
Properly washing a black car is really about one thing: preventing damage before it even starts. The whole game is about using techniques that lift dirt off the paint instead of grinding it in. That's why a pre-wash foam bath and a gentle hand wash aren't just fancy extras—they're the only way to get that flawless, deep shine.
Why Your Black Car Demands a Different Approach
Let's be honest, owning a black car is a choice. You sign up for that incredible, liquid-mirror finish, but you also sign up for a paint job that highlights every single imperfection. While a silver or white car can camouflage minor flaws, black paint puts every swirl mark, water spot, and tiny scratch right under the spotlight.

This isn't just about looks; there's some science to it. Dark surfaces absorb more heat and light, which can speed up oxidation and make the clear coat more vulnerable to damage. A micro-scratch that would be invisible on a lighter car turns into a glaring flaw the second the sun hits your black paint.
The Mindset Shift: From Cleaning to Preserving
To keep a black car looking its best, you have to change how you think about washing it. You're not trying to scrub the dirt off. Your real goal is to lift it away with the absolute minimum amount of physical contact.
This is where the right tools and techniques become so important:
- Lubrication is Everything: Every single step needs to be focused on creating a slick, slippery surface. This helps dirt particles glide right off instead of getting dragged across the paint.
- Touchless First: The more grime you can get off the car before a wash mitt ever touches it, the safer the whole wash will be.
- Gentle Contact Only: When you do have to touch the paint, it has to be with the right materials and absolutely zero pressure.
The biggest mistake people make is washing their black car like it's any other color. Black paint doesn't forgive shortcuts. A single trip through an automatic car wash with its harsh brushes can do more damage in five minutes than you could fix in five hours.
The Science of a Good Foam Bath
This "preservation first" mindset is exactly why a foam gun or cannon is a must-have, not just a cool gadget. When you blanket the car in a thick layer of suds, you're kicking off a crucial process. The foam clings to the surface, where it starts to soften and encapsulate all the abrasive stuff like dust and road grit.
Letting that foam dwell for a few minutes allows the shampoo to do the hard work for you. It breaks down the dirt so it can be rinsed away safely, which dramatically reduces the risk of creating new swirl marks when you finally start the hand wash.
It’s no surprise that maintaining a black car takes serious dedication. In fact, owners report a 44% higher maintenance focus compared to the average for other car colors. You can see this reflected in the booming car care industry, a trend detailed in a consumer report from Mintel.
Building Your Scratch-Free Detailing Kit
Before a single drop of water ever touches your car, the battle against swirl marks is either won or lost right there in your garage. Getting the right tools together is, without a doubt, the most important part of washing a black car. Using the wrong stuff is like trying to do surgery with a butter knife—you're just going to make things worse.
So, let's get one thing straight: old t-shirts, dish soap, and that crusty old sponge have no place here. They are the sworn enemies of your car’s delicate clear coat.
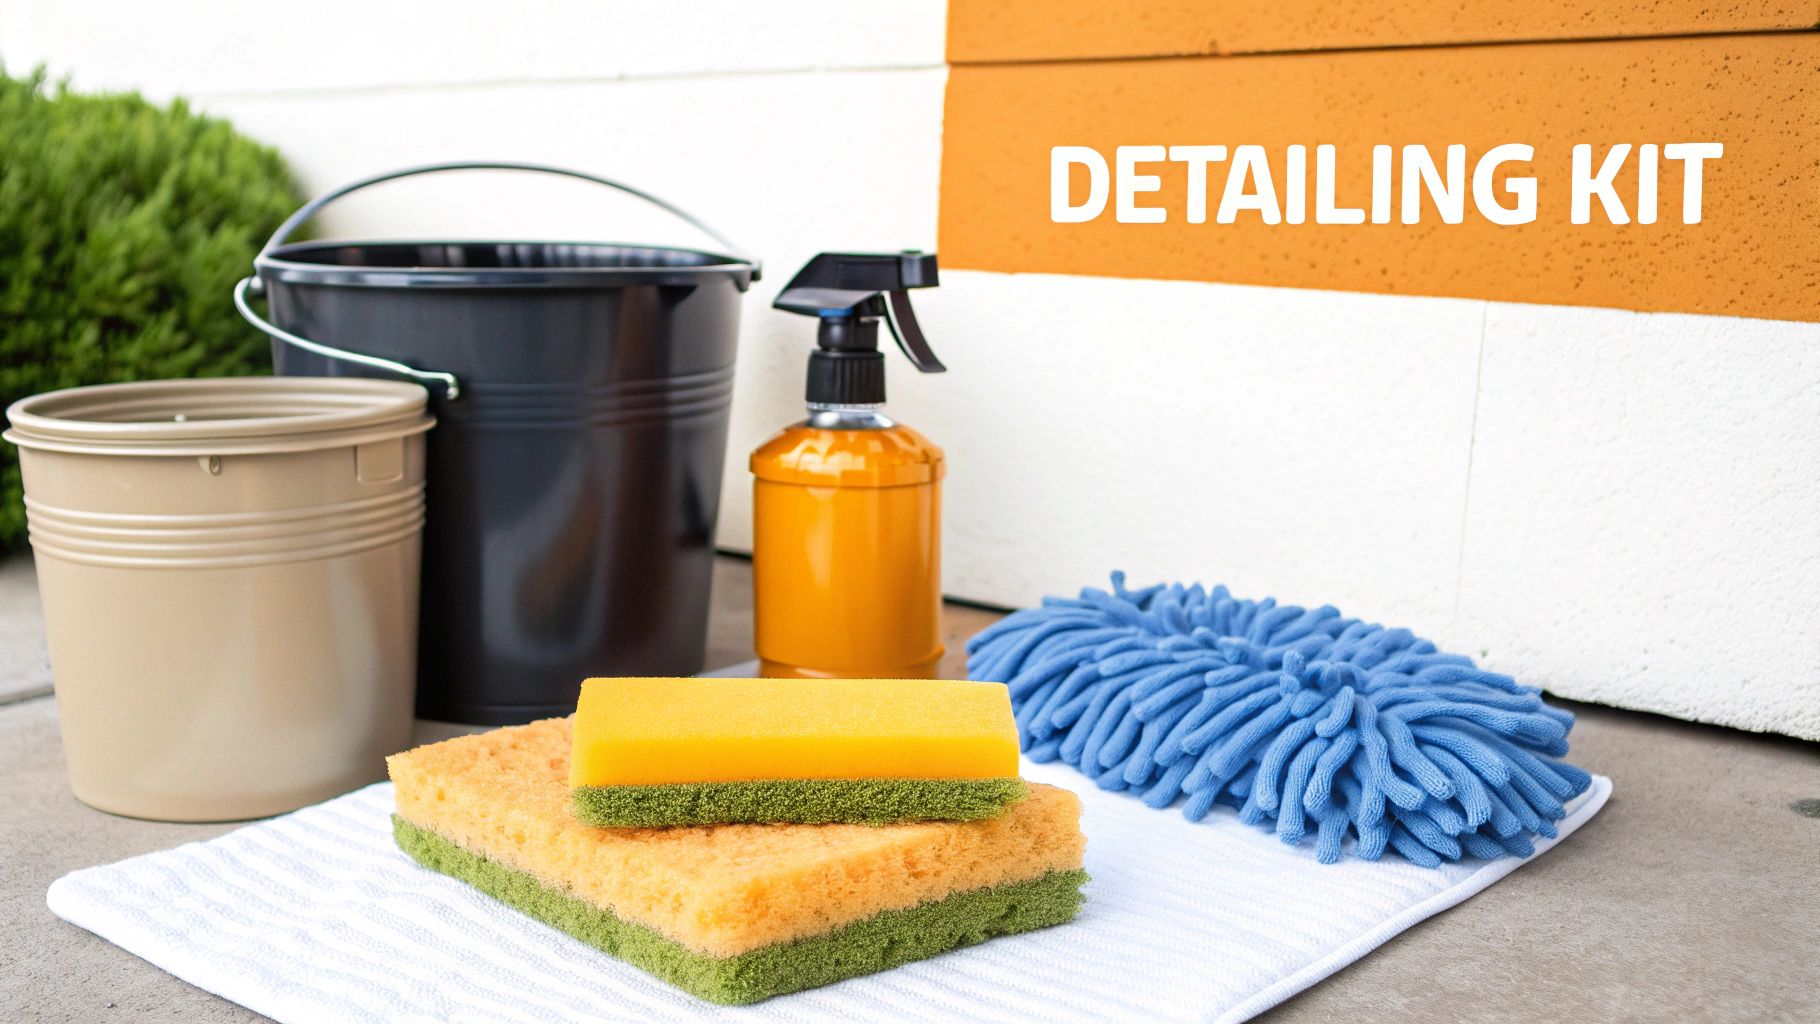
The entire foundation of a proper, safe wash is the two-bucket method. It's simple: one bucket for your soapy water, and a second one with plain, clean water for rinsing your mitt. This genius system stops you from dragging the grit and grime you just removed right back across your paint.
To make this method work, each bucket needs a Grit Guard. It's a simple plastic insert that sits at the bottom, trapping all the nasty stuff and keeping it away from your wash mitt.
Core Components for a Safe Wash
What you wash your car with is just as critical as how you wash it. A quality wash mitt is non-negotiable. Its long, soft microfiber fingers are designed to gently lift dirt and pull it deep into the fibers, keeping those abrasive particles safely away from your paint. This is where so many well-meaning car owners go wrong.
Then there's your soap. Please, never, ever use dish soap. It’s designed to strip grease and oil, which means it will strip every last bit of wax or sealant right off your paint, leaving it naked and vulnerable. You need a dedicated, pH-neutral car shampoo that's engineered for lubrication, letting your mitt glide smoothly across the surface.
Honestly, if there's one tool I'd recommend for any black car owner, it's a good foam gun. It turns your regular garden hose into a foam-generating machine, blanketing the car in thick suds. This pre-wash step is crucial because it softens and lifts the worst of the dirt before your mitt even touches the paint. It's a game-changer for a flawless finish.
Your Black Car's Best Friends and Worst Enemies
I've seen it all, and the wrong tools can permanently ruin a beautiful black finish in a single wash. To make it crystal clear, here's a quick reference guide to what you should be using—and what you should throw in the trash immediately.
| Tool Category | Recommended (Safe for Black Paint) | Avoid (Causes Scratches & Swirls) |
|---|---|---|
| Buckets | Two 5-gallon buckets with Grit Guards | A single bucket without a grit trap |
| Shampoo | pH-neutral, high-lubricity car shampoo | Dish soap or all-purpose cleaners |
| Wash Media | Plush microfiber or chenille wash mitts | Sponges, old rags, or bristle brushes |
| Foam Application | Garden hose foam gun or pressure washer foam cannon | Applying soap directly with a sponge |
Think of this as your essential shopping list. These items aren't just gadgets; they are a fundamental investment in protecting that deep, mirror-like shine. For a deeper dive into how a foam gun can elevate your wash routine, check out our guide on the benefits of a car foaming gun. Stick with the recommended gear, and you'll be well on your way to a swirl-free finish every time.
Executing the Perfect Pre-Wash Foam Bath
This is where a good car wash becomes a great one. The pre-wash foam bath is your single best defense against swirl marks, transforming a potentially risky job into a safe and incredibly satisfying process. It's all about letting the suds do the heavy lifting before your wash mitt ever has to touch the paint.
First things first: your location is more critical than you might think, especially with a black car. You absolutely have to work in a shaded spot, out of direct sunlight. Sun beating down on black paint creates a hot surface that will evaporate your water and foam way too fast, leaving behind stubborn mineral deposits and soap residue that are a nightmare to get off.
Before you even think about foam, grab your hose and give the entire car a thorough rinse. The goal here isn't to get it clean—it's to knock off the loosest layer of dust, pollen, and road debris. Think of it as clearing the way for the foam to get to the really tough, bonded-on grime.
Crafting the Perfect Foam Blanket
Alright, now for the fun part. Your foam cannon or foam gun is the star of the show, but its performance is all about the setup. The soap-to-water ratio is everything. Too little soap gives you a watery, useless foam. Too much, and you're just wasting product and will spend forever rinsing it off.
I always start by checking the dilution ratio recommended on the car shampoo bottle. A solid starting point for most soaps is 1-2 ounces of soap for every 16 ounces of water in your foam cannon's reservoir. From there, you can dial it in.
- Adjusting Thickness: Nearly every foam cannon has an adjustable dial. Crank it towards the "+" for that thick, shaving-cream-like foam, or turn it towards the "-" for a wetter, runnier consistency. Thicker foam clings longer, which means the soap has more time to break down the dirt.
- Application Technique: Always, and I mean always, apply the foam from the bottom of the car and work your way up. This simple trick prevents the foam from running down over dirty panels, which can cause streaking. Overlap your passes to lay down a thick, uniform blanket over every square inch.
Don't neglect the wheel wells and undercarriage. These spots are caked with the worst, most abrasive road grit, and foaming them thoroughly makes the rest of your wash so much safer. You'll quickly notice that the right soap creates a stable foam that really clings. To get a better handle on this, you can learn more about the best foam soap for cars in our detailed guide.
The All-Important Dwell Time
Once the car looks like it's covered in snow, the most crucial—and for many, the most difficult—part begins: waiting. This is called dwell time. You have to let that foam sit and work its magic for a good 3-5 minutes.
During this window, the cleaning agents (surfactants) in the shampoo are actively breaking down and encapsulating dirt particles, lifting them right off the paint's surface. On a really dirty car, you can literally watch the foam turn brown as it pulls the grime away.
Resisting the urge to rinse is key. If you rinse too soon, the soap hasn't had enough time to work. But letting the foam dry on the surface is even worse—it will leave behind streaks and spots that are incredibly difficult to remove.
After your 3-5 minutes are up, it’s time for the final pre-wash rinse. This time, start from the top of the car and work your way down. Use a steady stream of water to gently sheet the foam and all that captured dirt off the panels.
When you're done, the vast majority of harmful abrasives will be gone, perfectly setting the stage for a safe and scratch-free contact wash.
The Secret to a Swirl-Free Finish: The Two-Bucket Wash
Your foam pre-wash did the heavy lifting, getting rid of all that nasty, scratchy grit. Now we move on to the contact wash. But forget everything you know about scrubbing. This next step is all about gently lifting off the remaining road film using a technique that’s non-negotiable for professional detailers: the two-bucket method.
This simple discipline is the absolute key to washing a black car without adding a fresh set of swirl marks.
The concept is beautifully simple. You'll have one bucket with your pH-neutral car shampoo (the "Wash" bucket) and a second bucket with nothing but clean water (the "Rinse" bucket). The crucial part? Each bucket needs a Grit Guard at the bottom. This little plastic grate traps dirt and keeps it from getting stirred back up into your wash mitt.
This quick visual shows the pre-wash steps that set the stage for a successful two-bucket wash.
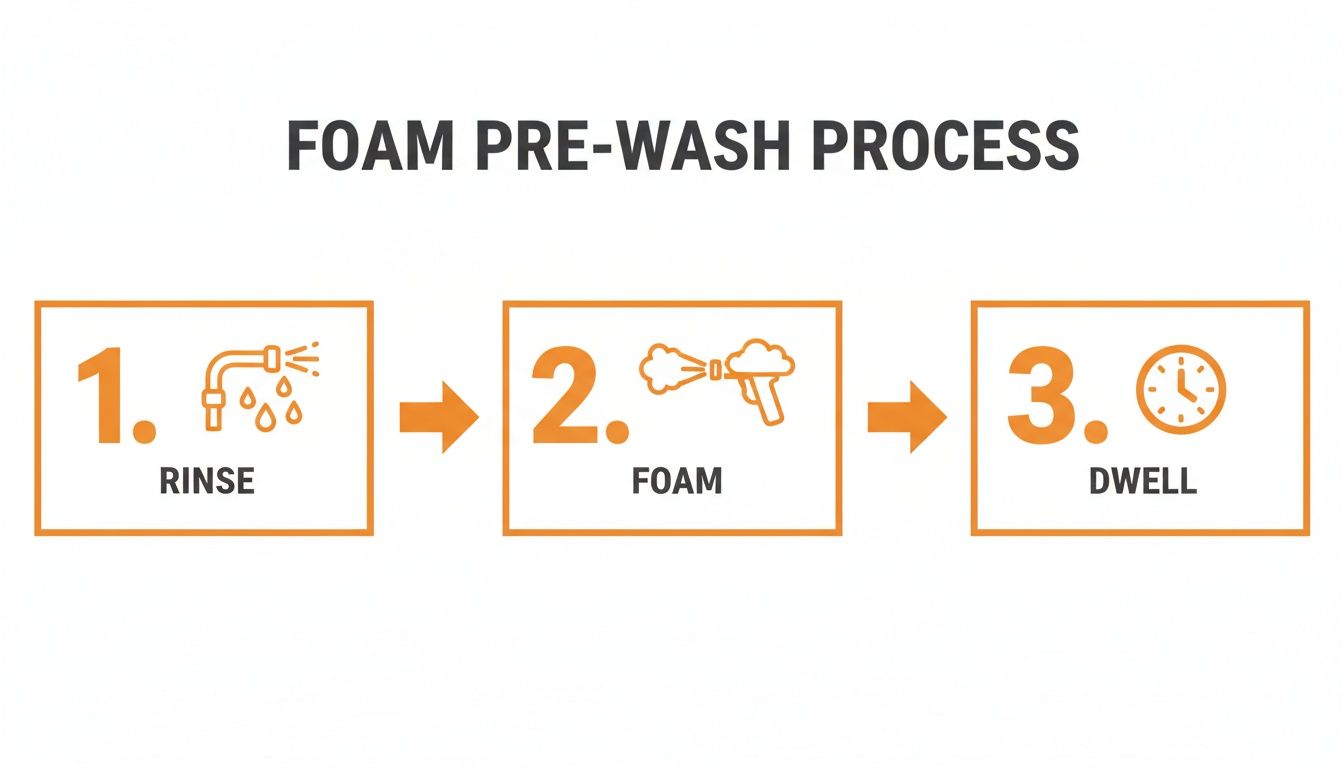
By rinsing first, then foaming, and letting the soap dwell, you’re making sure the surface is as safe as possible before your mitt ever has to touch the paint.
The Top-Down Strategy
The golden rule here is to always work from top to bottom. Gravity pulls dirty suds down, so you’re not dragging grime from the bumpers and rocker panels all over the clean roof and hood. It just makes sense.
Get into a calm, methodical rhythm. It’s not a race.
- Charge the Mitt: Dunk your plush microfiber mitt into the soapy "Wash" bucket. Let it get completely saturated.
- Glide, Don't Scrub: Gently glide the mitt across a small section of the car—think half the roof or a single door panel. Use straight-line motions, not circles. The most important part? Zero downward pressure. Seriously. Let the weight of the sudsy mitt and the lubrication from the soap do all the work.
- Rinse the Mitt: Before you even think about getting more soap, plunge the dirty mitt into your "Rinse" bucket. Vigorously rub it against the Grit Guard at the bottom to release all the dirt it just picked up. You'll see the particles sink to the bottom.
- Reload with Clean Soap: Squeeze out the excess water from your now-clean mitt and go back to the "Wash" bucket to load up with fresh, uncontaminated suds.
This four-step cycle—Charge, Glide, Rinse, Reload—is your new mantra. You repeat it for every single section of the car. It sounds a bit tedious, I know, but this process is what separates a flawless, mirror-like finish from a spiderweb of new scratches.
Key Takeaway: Every single time your mitt touches the paint, it picks up dirt. Rinsing it in a dedicated bucket before reloading with soap ensures you're only ever touching your black paint with a clean mitt and clean suds. This is the single most effective habit you can build to prevent swirl marks.
Panel-by-Panel and Saving the Worst for Last
Having a logical flow is just as important. Start with the roof, then move down to the "greenhouse"—all the windows and pillars. From there, you can tackle the hood, trunk, and the upper parts of the doors and fenders.
You always, always save the dirtiest parts of the car for the absolute end of the wash.
These are the high-impact zones that get blasted with road grime. If you have an extra mitt, now's the time to use it.
- Lower rocker panels (the area right below the doors)
- The front bumper, which is a graveyard for bugs and tar
- The rear bumper and exhaust tips
- Wheel wells
By washing these heavy-hitting areas last, you guarantee that the concentrated, abrasive gunk they hold never gets a chance to contaminate your wash water, giving your car’s sensitive black finish the protection it deserves.
Rinsing and Drying Without Leaving a Trace
You've done the hard part—the careful pre-wash and the meticulous two-bucket wash. Now comes the moment of truth: the final rinse and dry. This is where a perfect, glossy black finish is made or broken. One wrong move here can leave you with a mess of water spots or, even worse, a fresh set of fine scratches that undo all your hard work.
Think of your rinsing strategy as a continuation of your washing method. Start at the roof and work your way down. Use a gentle, steady stream of water to "sheet" the remaining suds off the car. You're not trying to blast it clean; you're letting the water’s own surface tension do the work, pulling everything off the panels and leaving as little moisture behind as possible.
The Touchless Drying Method
Honestly, the safest way to dry a black car is to not touch it at all. This is where a good leaf blower or a dedicated car dryer is worth its weight in gold. By using a powerful stream of filtered air, you can push water out of every nook and cranny—think panel gaps, around the mirrors, and inside the grille where water loves to hide and cause frustrating drips later.
This approach completely removes the risk of scratching the paint because nothing physically touches the surface. It's the purest form of the "touch as little as possible" mantra that's so crucial for dark paint. Just like with rinsing, work from the top down, clearing the large panels first before moving to the details.
The Gentle Touch Drying Method
If you don't have an air dryer, the next best thing is a high-quality, ultra-plush microfiber drying towel. And I mean a real drying towel, not an old bath towel or a synthetic chamois. Those are far too aggressive for a delicate black finish. A premium microfiber towel is engineered to soak up an incredible amount of water without marring the paint.
Technique is everything here. Never scrub or wipe the towel in circles across the paint. Instead, use the “blotting” method. Lay the towel flat across a panel, gently pat it to absorb the water, and lift it straight off. For larger areas like the hood or roof, you can also gently drag the towel in one straight line, letting its weight do all the work.
Black cars are a classic for a reason, and keeping them looking perfect is a top priority for their owners. In fact, 62% of car owners globally say their vehicle's appearance is highly important. This is what fuels the need for specialized care methods that protect that deep, flawless shine. You can see more on these trends in this market research on car care products.
No matter which drying method you go with, time is of the essence. You need to get all the water off before it evaporates and leaves behind mineral deposits—those stubborn water spots that stand out so starkly on black paint. For a deeper dive into towel selection, check out our guide on using microfiber towels for cleaning. Nail these final steps, and your black car will have that jaw-dropping, spot-free shine you’ve been working for.
Your Black Car Washing Questions, Answered
Even when you have a solid routine, questions always come up. Black paint can be intimidating, but knowing how to handle these common situations will give you the confidence to keep your car looking its best.
How Often Should I Wash My Black Car?
If it’s your daily driver, you’ll want to give it a proper wash every one to two weeks. That’s the sweet spot for preventing nasty stuff like industrial fallout, bird droppings, and caked-on dust from bonding to the clear coat.
Of course, life happens. If you get caught in a big rainstorm or drive on salted winter roads, wash it as soon as you get a chance. The goal is to get the grime off before it builds up, which makes your job easier and, more importantly, safer for the paint.
Can I Use a Pressure Washer Safely?
A pressure washer can be your best friend or your worst enemy. It’s fantastic for the initial rinse to gently knock off the loose dirt, but you have to use it correctly.
Here’s how to do it without causing damage:
- Use a wide-angle tip. Stick with a 40-degree (white) nozzle. It spreads the water out, reducing the force on any single spot.
- Keep your distance. Never get closer than a foot or two from the paint. Let the water do the work, not brute force.
- Never use a narrow stream. A zero-degree, high-pressure jet can and will chip paint or destroy fragile trim pieces. Don't risk it.
Honestly, for applying foam, a dedicated foam gun that hooks up to your garden hose is a much safer bet. It gives you all the pre-soak benefits without the risk.
The real danger to your black paint isn't always the weekly wash; it's what happens in between. Things like bird droppings and bug splatter are incredibly acidic and can start to etch into your clear coat within hours, especially on a hot day.
What Should I Do About Bird Droppings?
Act fast. I mean, right now. This is a true paint emergency. The best thing you can do is keep a bottle of quick detailer spray and a clean, plush microfiber towel in your car.
When you see a spot, douse it with the spray and let it sit for 30-60 seconds. This will soften the mess and provide lubrication. Then, gently lift it away with the towel in a single, careful wipe. Never, ever scrub it dry. That’s a guaranteed way to grind sharp grit into your finish, leaving behind deep scratches that are a pain to fix.
To really maintain that flawless, swirl-free shine, post-wash treatments are a game-changer. Using high-quality Car Polishing and Waxing Kits can help you tackle any minor imperfections that pop up.
At SwiftJet, we know that having the right tools makes all the difference. The SwiftJet Car Wash Foam Gun helps turn a nerve-wracking chore into a deeply satisfying, scratch-free process. Get your SwiftJet today and give your black car the flawless finish it truly deserves.