
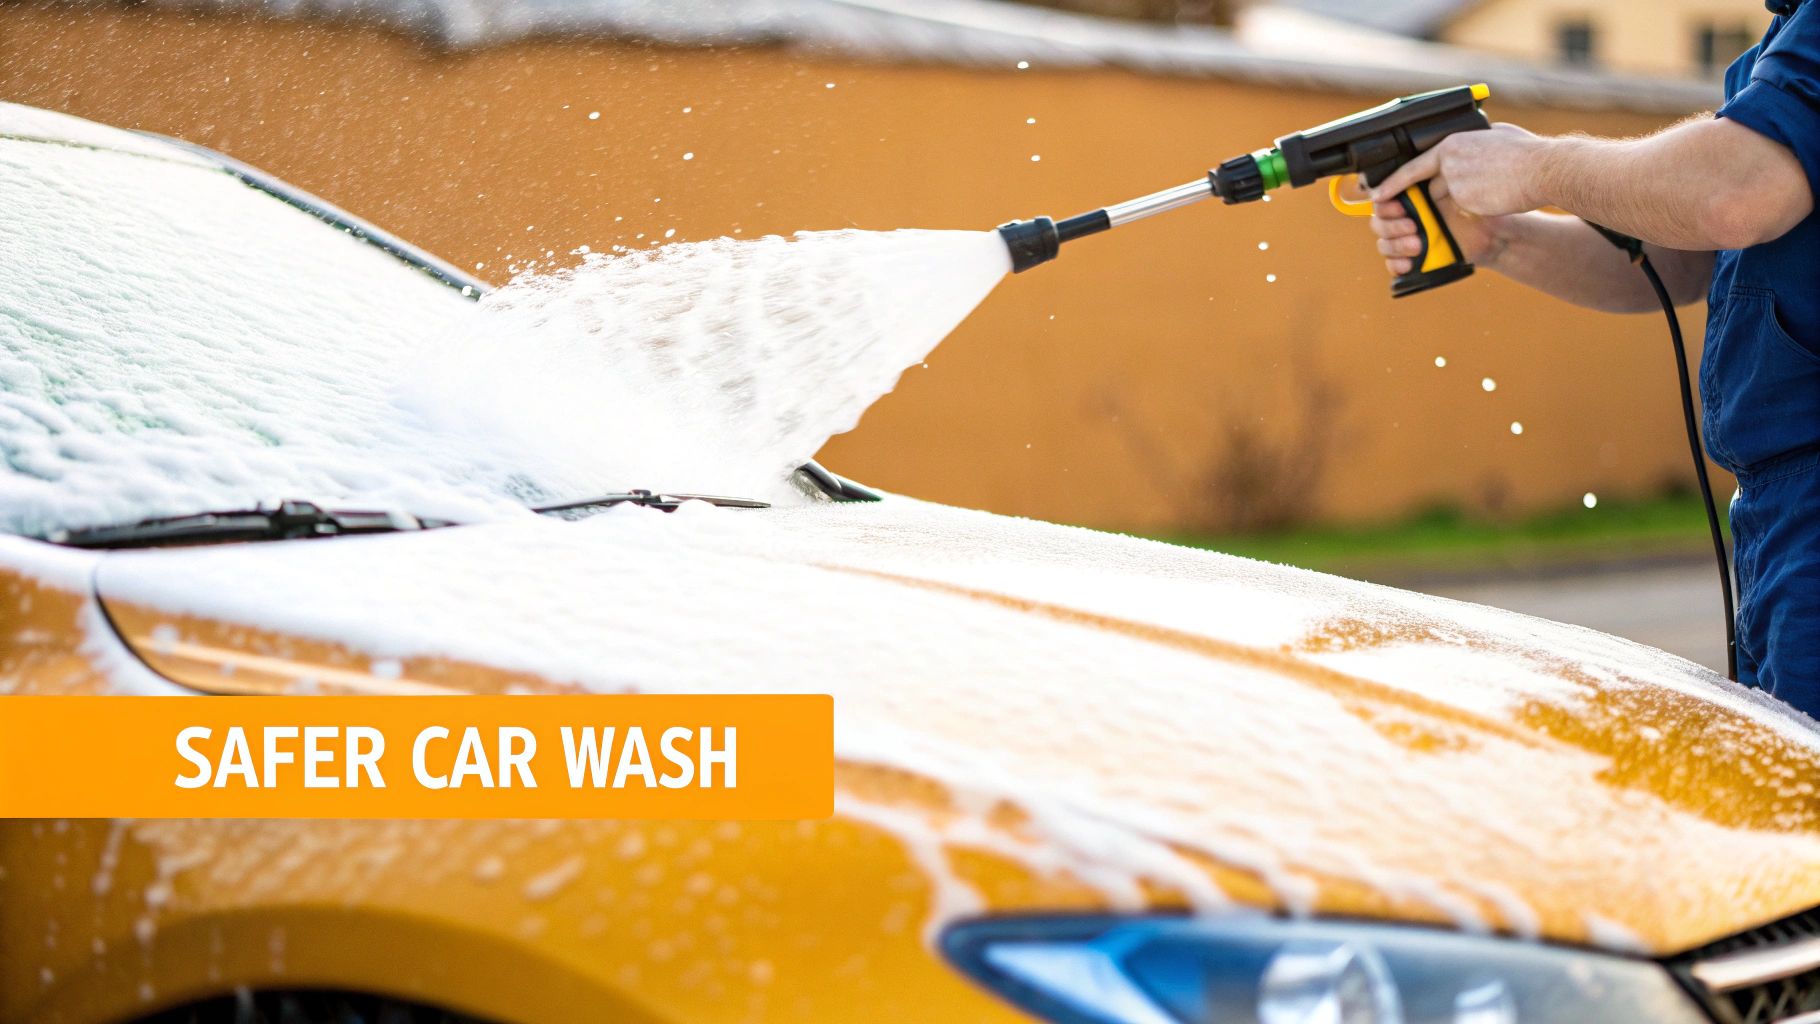
Ever wonder how detailers get that thick, shaving-cream-like foam that just seems to melt dirt off a car? The secret is a car foaming gun. It's a simple but brilliant tool that hooks right up to your garden hose, mixing soap and water to create a rich, sudsy foam.
This isn't the same thing as a foam cannon, which needs a powerful pressure washer to work. The beauty of a foaming gun is its simplicity—it gives you that pro-level, deep-cleaning foam without the extra equipment, making it perfect for washing your car at home. The foam's real job is to lift grime away from your paint, which is the key to preventing those dreaded swirl marks.
Why a Foaming Gun Is a Game Changer for Your Car Wash
If you’re still dragging a gritty sponge out of a bucket, it’s time to rethink your process. Moving up to a tool like the SwiftJet car foaming gun isn't just about getting a new toy; it's about fundamentally improving how you wash your car. You’ll get better results, faster, right in your own driveway.
The real magic is in those thick, clinging suds. Unlike watery soap from a bucket, this foam hangs around. It sticks to the surface, giving the soap the time it needs to break down road grime, bug splatters, and other gunk. This "dwell time" is what separates a quick rinse from a real clean.
The Science of a Safer Wash
Here’s a hard truth: the old bucket-and-sponge method is a recipe for scratches. When you scrub a dirty car with a sponge, you're grinding tiny particles of dirt and grit directly into your clear coat. That’s what causes the fine scratches and swirl marks that make your paint look dull.
A foaming gun completely changes the game.
The foam creates a slick, lubricated barrier between the dirt and your paint. It encapsulates all those abrasive particles, lifting them off the surface. When you follow up with a wash mitt, you're gliding over the foam, not grinding in the dirt.
It's like pre-soaking a pan with baked-on food. The foam does the hard work for you, loosening everything up so it rinses away easily. This leaves a much cleaner, safer surface for any final contact washing.
Efficiency Meets Professional Results
Beyond just being safer for your paint, a foaming gun is also incredibly efficient. You can blanket your entire vehicle in a thick layer of foam in just a minute or two. Good luck doing that with a bucket. This mix of speed and effectiveness is why these tools have blown up in popularity, not just with car enthusiasts but with professional detailers, too.
The numbers back it up. The global car wash foam gun market was valued at a massive US$ 1,211 million in 2024 and is expected to climb to US$ 1,853 million by 2031. It’s clear this is more than a passing trend.
Proper washing is one of the most essential car maintenance tips for keeping your vehicle looking its best, and a quality foaming gun has become a cornerstone of modern car care.
Getting Your SwiftJet Foam Gun Ready in Minutes
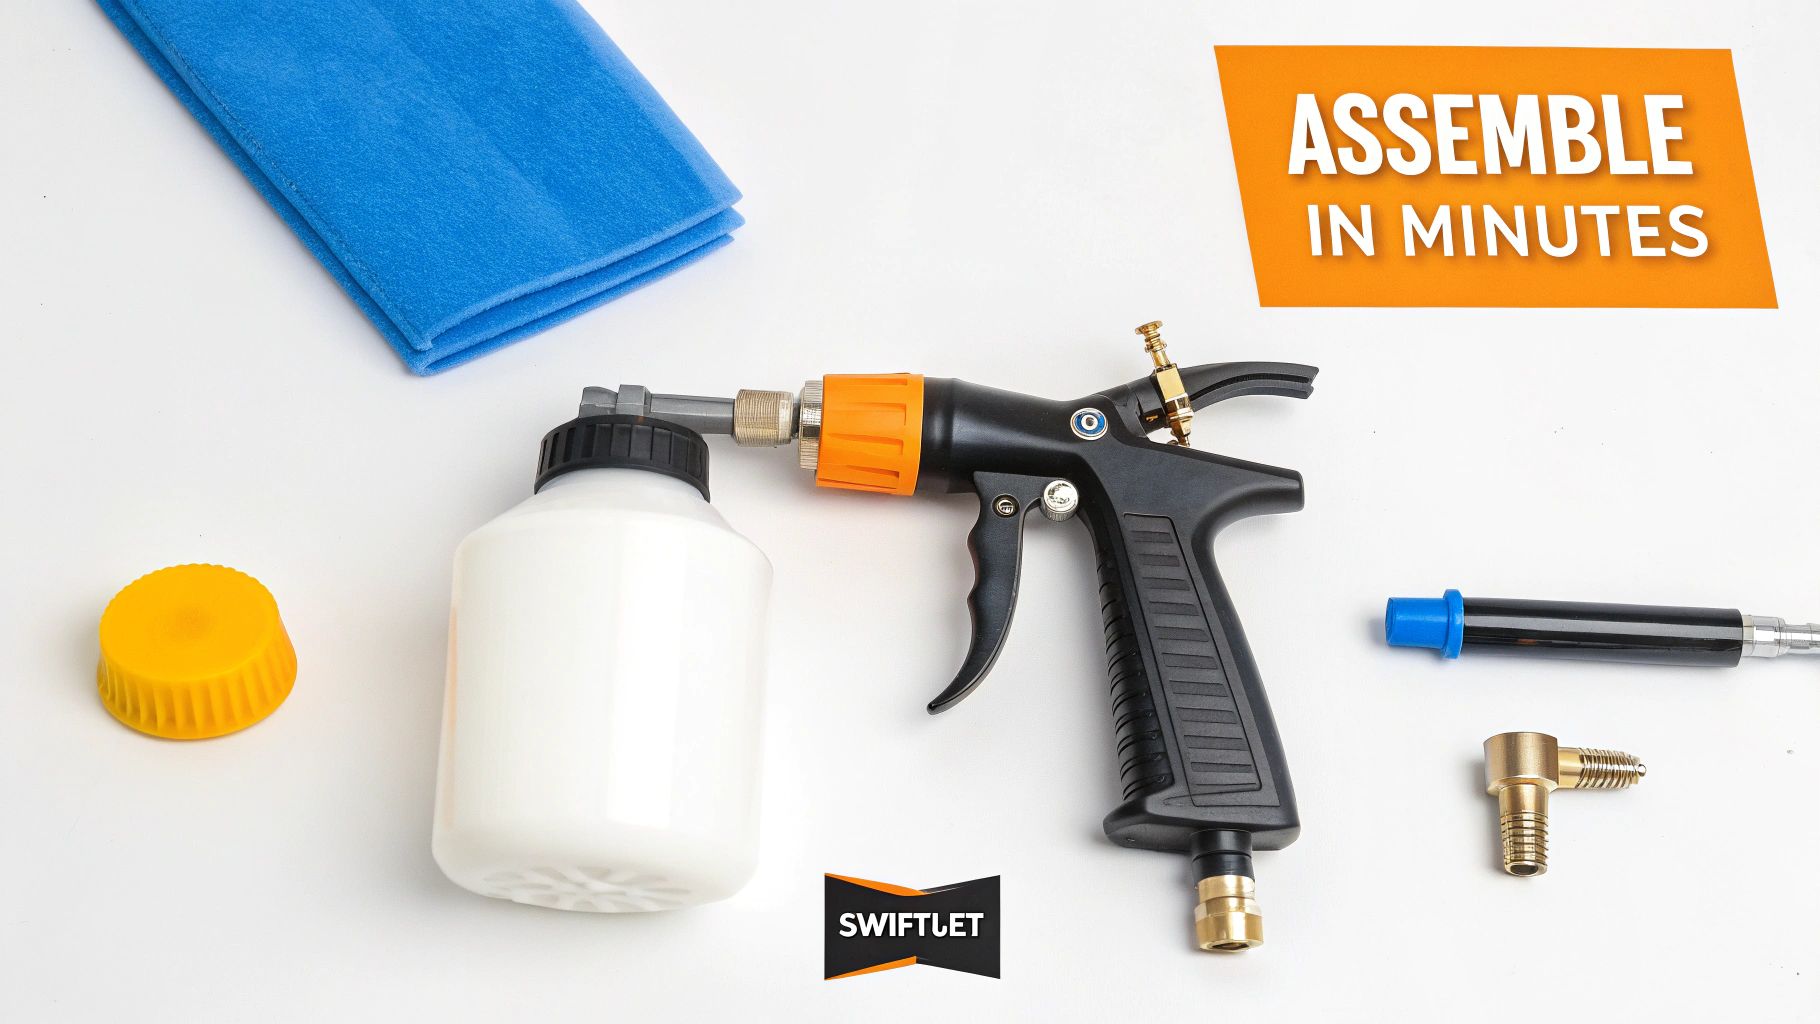
One of the best things about the SwiftJet foam gun is how fast you can go from unboxing it to blasting foam. There's no complicated manual or head-scratching involved; it's designed to be totally straightforward.
When you open the box, you'll see the main pieces: the trigger handle, the soap canister, the spray nozzle, and the black quick-connect adapter for your hose. You'll also find that awesome microfiber wash mitt—just put that to the side for a few minutes.
Hooking Up to Your Garden Hose
The first step is getting a solid, leak-free connection to your hose. I’ve seen people crank down on these connections with a wrench, but that’s a big mistake. You can strip the threads or ruin the rubber washer inside. All you need is a snug, hand-tight fit.
Start by screwing the black quick-connect adapter onto the end of your garden hose. Once that’s on, connecting the gun is a snap. Just pull back the spring-loaded collar on the adapter, slide the gun’s connector in, and let go. You'll hear a satisfying "click" as it locks in. Give it a little tug to make sure it's secure before you turn on the water.
My Go-To Tip: If you see a small drip, don’t just tighten it more. The culprit is almost always the small rubber washer inside the fitting. Unscrew the connection, make sure the washer is sitting flat, and try again. A crooked or missing washer is the cause of 99% of leaks.
Putting the Final Pieces Together
Now for the easy part. Take the soap canister—we'll get to the perfect soap-to-water ratio in a bit—and screw it onto the bottom of the gun body. It goes on just like the cap of a soda bottle.
Last, attach the spray nozzle to the front. This piece also just screws right on. You can twist the nozzle to change your spray pattern from a wide, gentle fan (perfect for covering the car in foam) to a more focused jet stream.
And that's it! In less than two minutes, you're holding a fully assembled car wash foam gun with a microfiber wash mitt. Now you've got the ideal setup for a scratch-free wash. Next, let’s talk about mixing up the soap.
Getting the Soap Mix Just Right for That Super Thick Foam

If you've ever wondered how detailers get that satisfying, shaving-cream-thick foam, here’s the secret: it's all in the mix. Your SwiftJet foam gun is a powerful tool, but mastering the soap-to-water ratio is what truly unlocks its potential. It’s how you turn a regular wash into a deep-cleaning foam bath that does the hard work for you.
First things first, let's talk soap. You absolutely have to use a dedicated, pH-neutral car wash soap. I can't stress this enough. Grabbing dish soap from the kitchen is a classic rookie mistake that can do real damage. Those detergents are designed to strip away everything, and they'll take your car's protective wax and sealant right along with the grime. That leaves your paint job exposed and vulnerable.
Working With the SwiftJet Canister
We designed the SwiftJet canister to be as straightforward as possible. You’ll see clear fill lines for both water and soap, taking all the guesswork out of the process.
Here’s a pro tip that makes a huge difference: always fill the canister with water first. If you pour the soap in and then blast it with a hose, you'll create a bubbly mess inside the bottle instead of a well-mixed solution. Adding water first lets the soap blend in smoothly, giving you a perfect, consistent mixture from top to bottom.
Dialing in Your Perfect Soap Ratio
There isn't one single "magic number" for the perfect ratio. The ideal mix really depends on a few things: how dirty your car is, the brand of soap you're using, and even the hardness of your water. For instance, if you have softer water, you'll find it creates rich suds with a bit less soap.
It's best to think of the recommended ratios as a starting point. From there, you can easily adjust the mix to get the exact foam consistency you're looking for.
SwiftJet Soap Mixing Ratio Guide
Below are some reliable starting points I use for different cleaning jobs. Remember to adjust based on your specific car wash soap and local water conditions to get that perfect cling.
| Cleaning Task | Suggested Soap Ratio (Soap:Water) | Foam Consistency Goal |
|---|---|---|
| Light Dusting | 1:10 (e.g., 3 oz soap to 30 oz water) | A light, wet foam that rinses away quickly. |
| Weekly Maintenance Wash | 1:8 (e.g., 4 oz soap to 32 oz water) | A thick, clinging foam that provides excellent lubrication. |
| Heavy Grime & Mud | 1:6 (e.g., 5 oz soap to 30 oz water) | A very dense, shaving-cream-like foam for maximum dwell time. |
Once you’ve made your first pass, take a look at the foam. Is it too thin and sliding off the paint immediately? You’ll want to add a bit more soap next time. Is it so thick that it’s a pain to rinse off? Just dial back the soap a little. If you're looking for soaps that are designed to work perfectly with a foam gun, you can check out our specially formulated pH-neutral car wash soaps.
Here's a great rule of thumb from my experience: you want a foam consistency that clings to vertical surfaces, like your car doors, for at least a couple of minutes without running right off. That "dwell time" is crucial because it gives the soap the time it needs to break down all the dirt and grime.
After a wash or two, you'll have found the perfect recipe for your setup. You'll be getting that thick, effective, and oh-so-satisfying foam every single time.
Giving Your Car a Flawless Foam Wash
Alright, your SwiftJet is assembled, the soap is mixed, and now it's time for the fun part. This is where you get to lay down a thick blanket of foam and see just how effective this method is for a professional, scratch-free wash.
The very first thing you need to do is a quick pre-rinse. Before you even think about foaming, just use your regular hose nozzle to spray down the entire car. You’re not trying to scrub anything off here; the goal is simply to dislodge all the loose dirt, dust, and grit. This is a crucial step because it prevents you from dragging that abrasive debris across your paint later on.
Laying Down the Perfect Layer of Foam
With the pre-rinse done, it’s time for the suds. Snap your SwiftJet onto the hose and start coating the vehicle. The trick is to always work from the top down. Start with the roof, then move to the windows, hood, and trunk, and finish with the lower sides and wheels.
Why top-down? Gravity. Starting high lets the foam slowly slide down the car, giving it extra time to soak into and loosen the grime on the lower panels. It’s a simple technique that makes a big difference.
A little pro-tip from my own experience: I use long, sweeping passes, slightly overlapping each one as I move across a panel. This ensures you get a nice, even coating without any dry spots. The SwiftJet’s on/off trigger is a lifesaver here, letting you pause the spray instantly while you move to the next section, so you don't waste any soap.
Breaking Up Grime with Your Microfiber Mitt
Once the car is covered, just let the foam sit for a few minutes. You’ll actually see it working, dripping down and carrying dirt with it. If your car was just a little dusty, you might be able to rinse right after this step. But for vehicles with that stubborn layer of road film, you’ll want to give it a gentle hand wash.
Grab the microfiber mitt that came with your kit and dunk it in a separate bucket of clean water. Following that same top-to-bottom pattern, lightly wipe the mitt over the foam in straight lines. You don't need to apply heavy pressure at all—the foam is providing all the lubrication you need to lift the dirt safely without scratching the paint.
- Go Easy: Let the weight of the mitt and the slickness of the foam do the heavy lifting.
- Keep it Clean: After every panel or two, give the mitt a good rinse in your water bucket to release any trapped grit before touching the paint again.
The Final Rinse for a Spotless Finish
After you’ve worked your way around the car, it’s time to rinse everything off. Disconnect the SwiftJet from the hose so you just have a clean stream of water. And you guessed it—rinse from the top down. This ensures you’re chasing all the soap down and off the car, preventing soapy water from the roof from running over the panels you just cleaned.
Be thorough here. Pay extra attention to all the little hiding spots like behind the mirrors, around door handles, and inside the grille. Any soap residue left behind is what causes those annoying streaks and water spots.
The whole DIY detailing scene has exploded, largely thanks to social media showing just how satisfying and effective this process is. In fact, the general foam gun market was valued at USD 0.5 billion in 2024 and is expected to more than double to USD 1.2 billion by 2034. It's clear that more and more people are catching on to this safer way to wash. You can dig into the numbers and market growth insights on reportsanddata.com. Following these steps will give you a gleaming, spotless finish that proves why this method is so popular.
Keeping Your SwiftJet Gun in Top Condition
Like any good piece of equipment, your SwiftJet foam gun will last for years if you give it just a little bit of attention. Taking care of it means you'll get that satisfying, thick foam every single wash. The best part? The whole cleanup process takes less than a minute.
This quick routine is all about preventing soap from drying up inside the gun's plumbing, which is hands-down the main reason people see a drop in performance.
The Simple Post-Wash Routine
Once your car is sparkling clean and you're ready to pack up, run through these quick steps.
-
Rinse the Canister: First, unscrew the soap canister and dump out any leftover soap solution. A quick swirl of fresh water is all it takes to get it clean.
-
Flush the Gun: Fill that clean canister with a bit of plain water and screw it back on. Hook up your hose and give it a good spray for about 30 seconds. This is the most important part—it clears out any soap residue from the internal filter and mixing chamber, keeping things flowing freely.
-
Store It Smart: After disconnecting the hose, give the gun a final shake to get rid of any lingering water. Then, just stash it somewhere dry, like a garage shelf or a shed, away from direct sun or freezing weather.
Quick Fixes for Common Issues
Even with the best care, you might hit a snag. Don't worry, the fixes are almost always incredibly simple.
-
Foam Seems Weak or Watery? Nine times out of ten, this is just an off soap-to-water ratio. If you've double-checked your mix, take a look at the small internal filter screen. A quick rinse under the tap is usually enough to clear a minor clog and get you back to thick foam.
-
Dripping at the Hose Connection? Before you crank down on the fitting, check the little rubber washer inside the connector. If it's missing, twisted, or just worn out, it won't create a good seal. A quick adjustment or replacement usually solves the leak instantly.
Taking care of your tools is just as important as the wash itself. It’s this kind of attention to detail that’s driving a huge shift in how people approach car care, moving towards high-quality products that deliver professional results at home.
The numbers back this up. The car care market, valued at USD 13.40 billion in 2025, is expected to jump to USD 18.38 billion by 2034. Foam-based washing is a massive part of that growth because it's so effective. You can see more car care market trend analysis on fortunebusinessinsights.com. Keeping your SwiftJet in prime condition ensures you're getting the best out of this awesome technology.
This diagram breaks down the whole foam washing process into its three core stages.
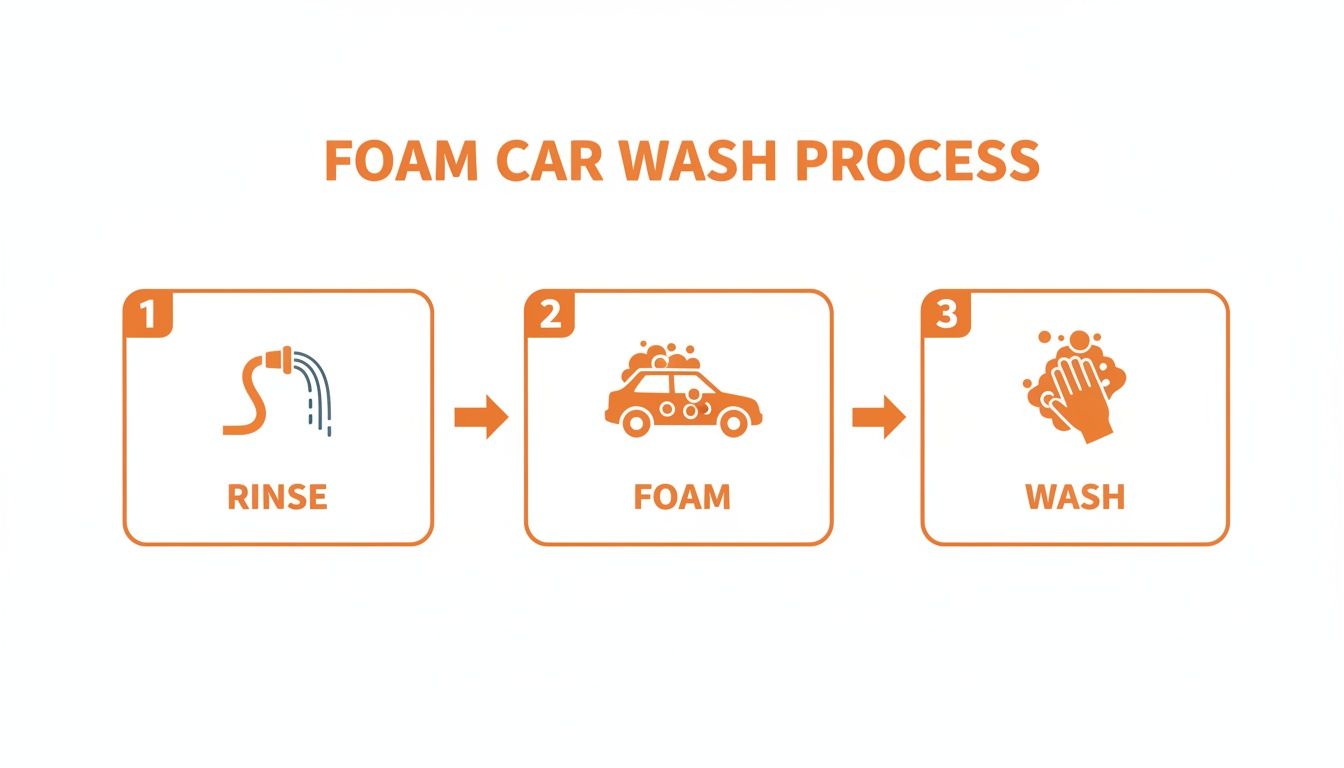
This simple Rinse-Foam-Wash method is the secret to a great, scratch-free finish. If you notice your spray patterns aren't as crisp as they used to be after tons of washes, you can grab a foam spray tips replacement set to get it spraying like new again.
Got Questions About Your Foam Gun? We’ve Got Answers.
Once you start using your SwiftJet, you'll probably have a few questions as you get the hang of it. That's totally normal. We've put together some of the most common questions we hear so you can get clear answers fast and feel confident you're doing things right.
Can I Just Use Dish Soap in My Foam Gun?
This is probably the number one question we get, and it’s a tempting shortcut. But the answer is a firm no.
Dish soap is an amazing degreaser, which is great for last night's dinner plates but terrible for your car's paint. It’s formulated to strip away everything it touches. That includes any wax, sealant, or ceramic coating you’ve applied, leaving your car's delicate clear coat totally exposed to the elements.
Always, always use a dedicated, pH-neutral car wash soap. These soaps are engineered to lift dirt and grime without stripping away the protective layers you've worked so hard to apply. It’s the cornerstone of a safe, scratch-free wash.
What if I Have Low Water Pressure at Home?
This is a really common worry, but here's the good news: the SwiftJet was designed for exactly this situation. It’s built to work perfectly with the typical water pressure from a standard home garden hose, which is usually somewhere between 40 to 60 PSI.
The magic happens inside the gun, where it mixes soap, water, and air to create the foam. It doesn't need high pressure to make thick suds. As long as you have a decent, steady flow from your hose, you’ll be blanketing your car in foam in no time.
Quick Tip: People often confuse a car foaming gun (like the SwiftJet) with a foam cannon. A foam gun is a low-pressure tool for a garden hose. A foam cannon, on the other hand, is a high-pressure accessory that absolutely requires a pressure washer to work. They might look alike, but they're completely different tools.
What Else Can I Clean with My SwiftJet?
Your SwiftJet is fantastic for washing your car, but its usefulness doesn't stop at the edge of your driveway. The ability to lay down a thick, clinging layer of soap makes it a surprisingly versatile tool for all sorts of jobs around your property.
Think about all the things that are a pain to clean with just a bucket and sponge. You can use it for:
- Boats, RVs, and Campers: Makes washing those huge surfaces so much faster.
- Toys and Equipment: Perfect for muddy dirt bikes, ATVs, and lawnmowers.
- Around the House: Tackle dirty siding, grimy outdoor furniture, and even windows.
Just make sure you’re using the right cleaning solution for the job at hand. You’ll be surprised how often you find yourself reaching for your foam gun for cleaning tasks you used to dread.
Ready to see what a real foam wash can do for your car? The SwiftJet car foaming gun makes it easy to get that pro-level clean right at home. Shop now and transform your car wash at swiftjetusa.com.