
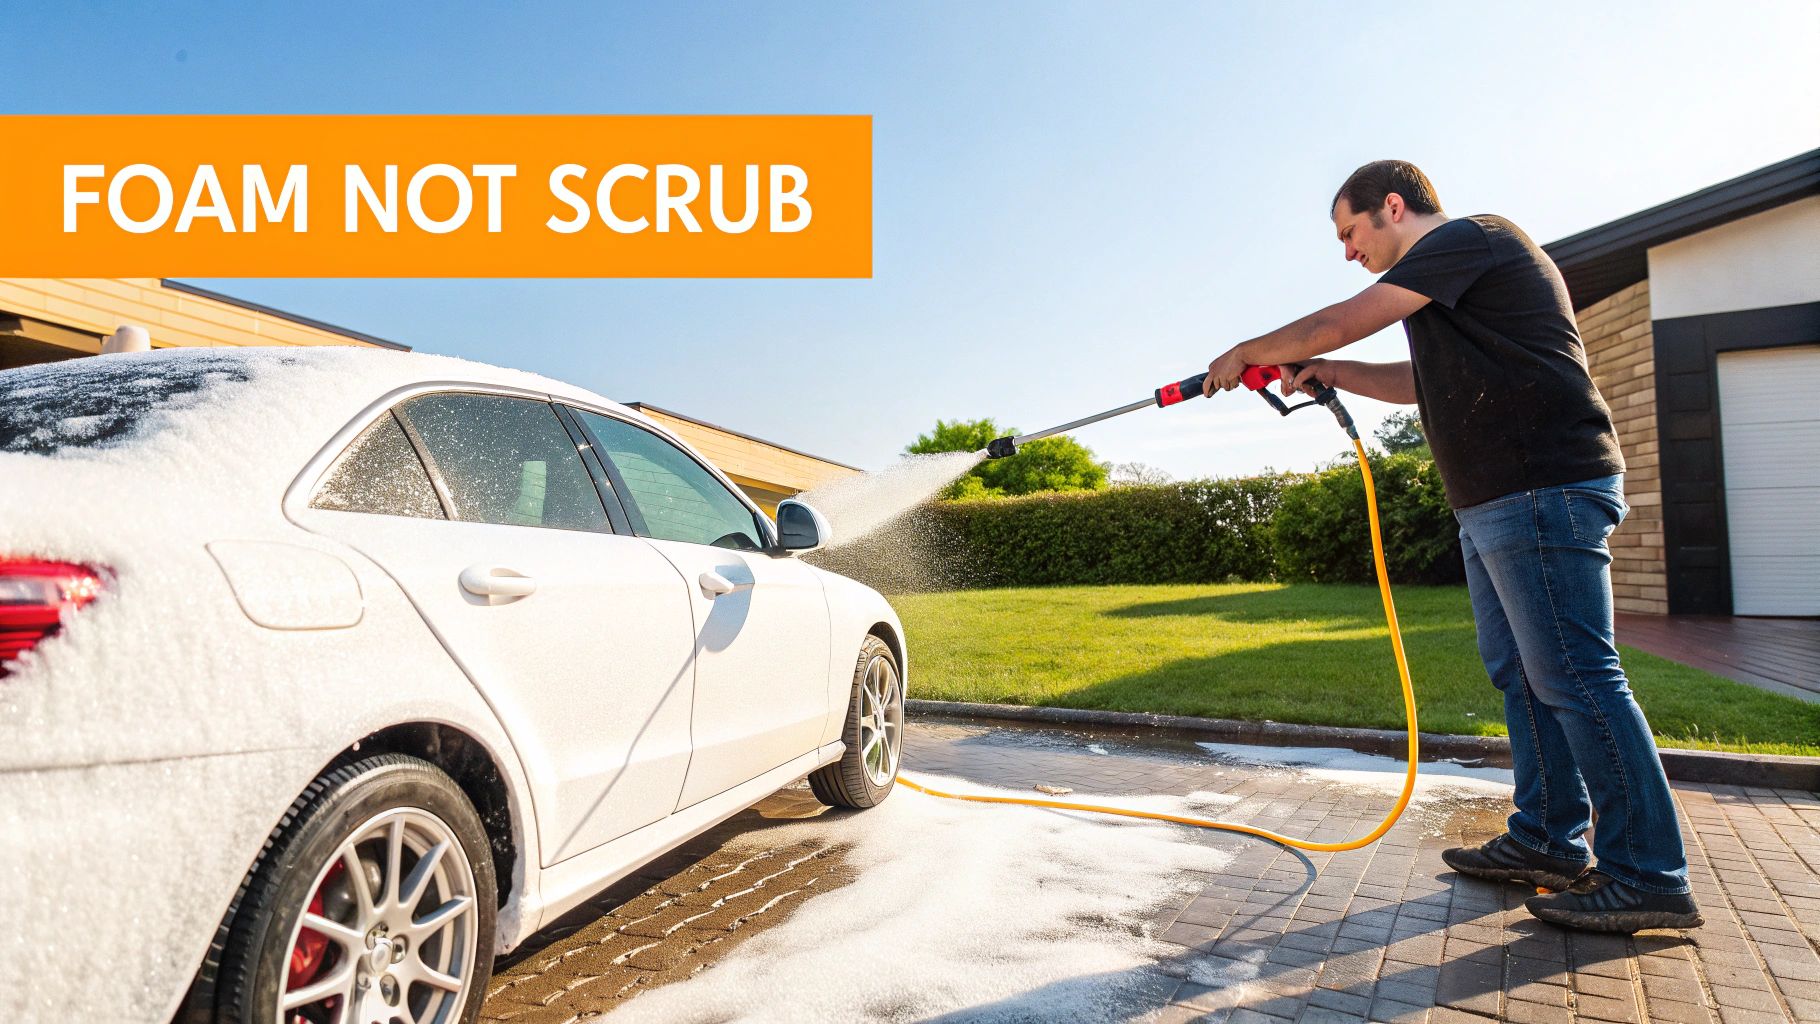
Yes, you absolutely can pressure wash your car at home, and it's one of the best ways to get that showroom shine without damaging your paint. The secret isn't about blasting your car with high pressure. It's about using the right technique—starting with a thick layer of foam that lifts the grime off the paint before you ever lay a hand on it. This pre-wash step is what prevents those frustrating swirl marks and tiny scratches you get from a typical bucket wash.
Beyond the Bucket and Sponge
Let's get one thing straight: the idea of aiming a pressure washer at your car can feel a bit nerve-wracking. We've all seen videos of paint getting stripped off, and that's a legitimate worry if you're using heavy-duty industrial equipment. But modern car washing is all about finesse, not force. The real goal is to safely remove all that abrasive dirt, not just power-wash it into oblivion.
This whole process hinges more on lubrication than raw pressure. When you cover your car in a thick blanket of foam, you're creating a slippery cushion between the dirt particles and your car's delicate clear coat. The foam gets in there, loosens up the grit, and lets you rinse it all away without dragging it across the surface.
A Smarter Way to Wash Your Car
Think about the old-school bucket-and-sponge method. It often causes more harm than good. Each time you dunk that sponge back into your soapy water, you’re just reintroducing tiny bits of sand and dirt. Then you scrub that gritty concoction all over your paint, creating a fine web of scratches that we call "swirl marks." Over time, that's what dulls your car's finish.
A foam-first approach flips the script entirely. It just makes more sense.
- Less Physical Contact: The foam does the dirty work, so you don't have to scrub aggressively and risk scratching the paint.
- It's Way Faster: You can soap your entire car in a matter of seconds. No more going panel by panel.
- A Deeper Clean: The foam lifts and encapsulates contaminants from the surface, giving you a much more thorough and even clean.
This shift towards safer, more effective car care is a big reason why the global car wash services market is exploding, with projections to hit USD 42,488.87 million by 2033. A huge part of that growth is coming from DIYers like us who want professional results at home.
The Right Gear for a Flawless Finish
Here’s the good news: you don't need some beastly, gas-powered pressure washer to do this right. Tools like the SwiftJet Car Wash Foam Gun are designed to connect right to a standard garden hose, bringing this professional technique to any driveway. This kind of setup can cut your cleaning time by up to 40% and uses a lot less water than the endless rinsing that comes with bucket washing.
When you consider that improper washing is blamed for swirl marks on up to 70% of cars, switching to a foam-first strategy is probably the single best thing you can do to protect your paint. You can learn more about these trends in automotive care by checking out the latest analysis on MarketResearch.com.
Building Your Car Wash Toolkit
Getting the right gear together is the most critical part of pressure washing your car safely. Seriously, the difference between a gleaming, scratch-free finish and an expensive trip to the body shop boils down to the tools you choose. This isn't about finding the most powerful machine on the shelf; it's about building the smartest setup for the job.
The heart of any good car wash system is how you apply foam and rinse it off. Most people jump straight to thinking about a big, powerful pressure washer, either gas or electric. And while those can be effective, they also carry a real risk of damaging your paint if you don't know exactly what you're doing.
Luckily, there's a much safer and more user-friendly alternative: a simple foam gun that just hooks up to your garden hose.
Pressure Washer or Foam Gun? The Big Decision
A traditional pressure washer setup is definitely powerful and can make quick work of a dirty car, but it requires a careful hand and a bit of know-how. You have to wrestle with the machine, manage the high-pressure hose, and, most importantly, choose the right nozzle to avoid literally blasting the clear coat off your paint. For most of us washing our cars in the driveway, it’s often overkill.
On the other hand, a tool like the SwiftJet Foam Gun is designed to connect right to the garden hose you already own. It operates using your home's standard water pressure, which is usually somewhere between 40 and 70 PSI. That’s worlds away from the danger zone, making it practically impossible to damage your paint. You still get that thick, satisfying foam that lifts dirt, but you completely eliminate the risk.
Let's break down how these two approaches really stack up against each other.
Pressure Washer vs SwiftJet Foam Gun Setup
Here’s a quick look at the major differences you’ll find when deciding between a full-blown pressure washer and a simpler foam gun system.
| Feature | Pressure Washer Setup | SwiftJet Foam Gun Setup |
|---|---|---|
| Pressure Level | 1200-2200+ PSI (Requires careful control) | 40-70 PSI (Completely paint safe) |
| Complexity | High (Requires specific nozzles, hoses, and power source) | Low (Screws onto any standard garden hose) |
| Risk of Damage | Moderate to High (Incorrect use can strip paint) | Extremely Low (No risk of paint damage) |
| Cost | Higher initial investment for the machine | Lower initial investment |
The choice really comes down to balancing power with safety and simplicity. For the vast majority of car owners, the foam gun route provides all the cleaning power you need without any of the associated risks.
The Essentials For Any Setup
No matter which path you take, a few core items are absolutely non-negotiable for a great wash. These tools are all about cleaning effectively while protecting your car's finish every step of the way.
-
pH-Neutral Car Soap: Whatever you do, don't use dish soap. It’s formulated to strip grease and will do the same to your car’s protective wax and sealant layers. A quality, pH-neutral car soap cleans away grime without damaging that crucial protection.
-
The Right Nozzle: If you do go with a pressure washer, the 40-degree (white) nozzle is your best and only friend for washing paint. It creates a wide, gentle fan of water that's much safer for your car's finish than a more focused stream.
-
Two Wash Buckets: Yes, even with a fancy foam gun, you need two buckets. One is for your soapy wash mitt, and the other is filled with plain water to rinse the mitt. This simple step keeps the dirt you pull off the car from going right back on.
-
Microfiber Wash Mitts and Towels: Forget old rags or sponges. Microfiber is specifically designed with tiny loops that trap and lift dirt particles, pulling them away from the paint. This prevents you from just dragging grit across the surface and creating swirl marks.
The most important thing to remember is that a safe, effective car wash is less about raw power and more about smart, deliberate choices. The best PSI for the job is always the lowest pressure that works.
If you really want to get into the weeds on this, we've got a whole guide that explores the ideal car wash pressure washer PSI and explains in detail why more isn't always better. By getting your toolkit right from the start, you're setting yourself up for a perfect, damage-free wash every single time.
The Art of the Pre-Rinse and Foam Bath
This is where the magic really happens, long before a wash mitt ever touches your paint. Think of the pre-rinse and the foam bath as the foundation for a truly scratch-free shine. If you rush this part, you're basically just grinding dirt and grit into your clear coat. It's a recipe for swirl marks.
First up is the pre-rinse. Its only job is to knock off all the loose, heavy-hitter contaminants. We're talking about that layer of dust, sand, and road grime that acts like sandpaper under pressure. Grab a wide-angle nozzle and work your way from the top of the car down. Let gravity be your friend here, pulling all that nasty stuff off the paint and onto the ground.
Mastering Your Foam Application
With the loose debris gone, it’s time for the main event: the foam bath. This is the single most important step for minimizing physical contact with your car's paint. A thick, clinging foam doesn't just look cool; it's actively working for you, encapsulating the more stubborn dirt and lifting it away from the surface.
This is what we in the detailing world call a "touchless" wash phase. The foam does the heavy lifting, so when you finally do your contact wash, you're dealing with a much cleaner—and safer—surface. For anyone new to this, we’ve got a great article that explains exactly why a quality car foaming gun is such a game-changer.
Getting that perfect, shaving-cream-like consistency comes down to nailing the soap-to-water ratio. This isn't an exact science, as it can change depending on your water hardness and the specific soap you're using.
- Start with the manufacturer's suggestion. Most soaps work well with about a 1:10 soap-to-water ratio.
- Don't be afraid to adjust. If the foam is thin and slides right off, you need more soap. If it’s so thick it’s clumping, add a little more water.
- Tools like the SwiftJet Foam Gun make this a breeze. The adjustable dial lets you fine-tune the mix right on the spot until you get it just right.
The goal is a foam that clings to the side of your car for a few minutes without running off. That "dwell time" is what gives the soap's surfactants a chance to break the bond between the dirt and your paint.
The infographic below really brings it all together, showing how pressure, nozzles, and soap work in harmony.
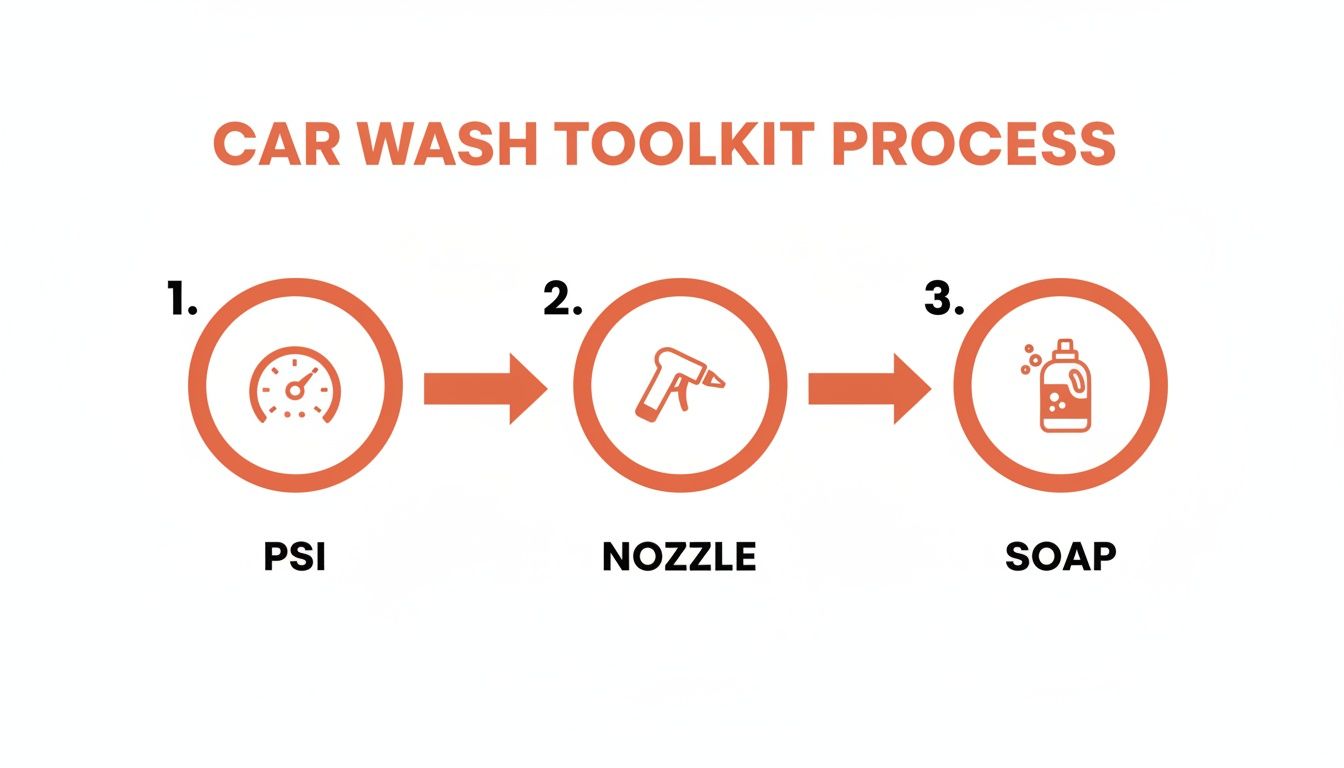
This whole process is a system. When you get your PSI, nozzle choice, and soap concentration dialed in, you create a washing method that's both incredibly effective and safe for your paint.
Adjusting Your Technique for Different Scenarios
Your foaming strategy shouldn't be a one-size-fits-all deal. A car with a light layer of pollen needs a different approach than one caked in mud after an off-road trip.
For the really heavy grime—think dried mud on your rocker panels—you'll want a richer foam mixture and a longer dwell time. Let that foam sit and do its thing for a good five to seven minutes before you even think about rinsing. On the other hand, for a regular weekly wash, your standard mix and a shorter dwell time will do the trick just fine.
And of course, none of this works without the right cleaning agent. Using a pH-neutral soap designed specifically for cars is non-negotiable. The wrong soap can strip off your wax or sealant, leaving your paint unprotected. There are tons of great products on the market, and this guide on the best soaps for cars is an excellent place to start your search.
Getting Hands-On: The Contact Wash
So, you've let the foam work its magic, pulling away all that loose grime. Now it's time for the contact wash, the step where good technique really separates the pros from the amateurs. All that pre-soaking with foam has made this part infinitely safer, clearing the way so you’re not just grinding dirt into your clear coat.
Grab your wash mitt. Now, fight every instinct you have to wash in big circles like they do in the movies. That's a one-way ticket to swirl mark city. Those fine, web-like scratches that you only see in the bright sun? They come from circular washing.
The secret is to always wash in straight, overlapping lines. Think of it like mowing a lawn or painting a fence—back and forth, top to bottom. This simple change in motion ensures that if any microscopic scratches happen, they're uniform and virtually invisible, not a chaotic mess.
Why the Two-Bucket Method is Still King
Even with a top-tier foam cannon, the two-bucket method is your single best insurance policy against scratches. It's an old-school detailing trick that’s stuck around for one simple reason: it works flawlessly. Don't skip it.
Here’s the simple setup:
- Wash Bucket: This one’s for your car soap and water mixture.
- Rinse Bucket: Just plain, clean water. A Grit Guard at the bottom is a game-changer here.
The process is straightforward. After washing a small section of your car, dunk your dirty mitt into the rinse bucket first. Swirl it around against the Grit Guard. You’ll see the dirt fall out and get trapped at the bottom. Only then do you dip it back into your clean, soapy water. This tiny habit prevents you from dragging the grit you just removed right back across your paint.
The two-bucket system is a cornerstone of professional car care. It's a low-cost, high-impact habit that will do more to protect your car's finish over the long haul than almost any other technique.
The Final Rinse: Don't Rush the Finish Line
With every panel now gently washed, you're ready for the final rinse. This isn't just about getting the suds off; it's about setting yourself up for a perfect, spot-free dry. If you rush this, you'll be left with a dull film and frustrating streaks.
Always work from the top down. Let gravity be your friend, pulling the soap residue down and away from the clean panels. You need to be methodical here, flushing out all the little nooks and crannies where soap loves to hide.
Pay extra attention to these problem spots:
- Around emblems and trim pieces
- Inside the grille
- Behind the side mirrors
- Along window seals and panel gaps
Giving these areas a proper flush prevents those annoying soapy drips that always seem to appear just after you've finished drying. A thorough final rinse is what makes the difference between a pretty good wash and a head-turning, professional-level detail.
Getting That Spotless, Streak-Free Dry
You’ve done all the hard work—the pre-rinse, the foam bath, the careful contact wash. Now comes the final, crucial step that separates a good wash from a great one: the dry.
Don't let all that effort go to waste by letting your car air-dry. That's a surefire recipe for stubborn water spots, which are just mineral deposits left behind as water evaporates. Over time, these can actually etch into your clear coat.
Properly drying your car is about more than just getting the water off. It’s about protecting the paint and locking in that flawless, mirror-like finish you've been working toward.
The Right Tools for a Flawless Finish
Leave the old bath towels in the linen closet. To dry a car without introducing new scratches, you need tools designed specifically for the job—ones that are incredibly gentle on your paint yet super absorbent.
Two methods are the go-to for professional detailers and serious enthusiasts:
- Touchless Drying: My personal favorite for getting into all the nooks and crannies. Using a leaf blower or a dedicated car dryer is brilliant for blasting water out of mirror housings, grilles, and panel gaps. Since nothing touches the paint, it’s the safest method out there.
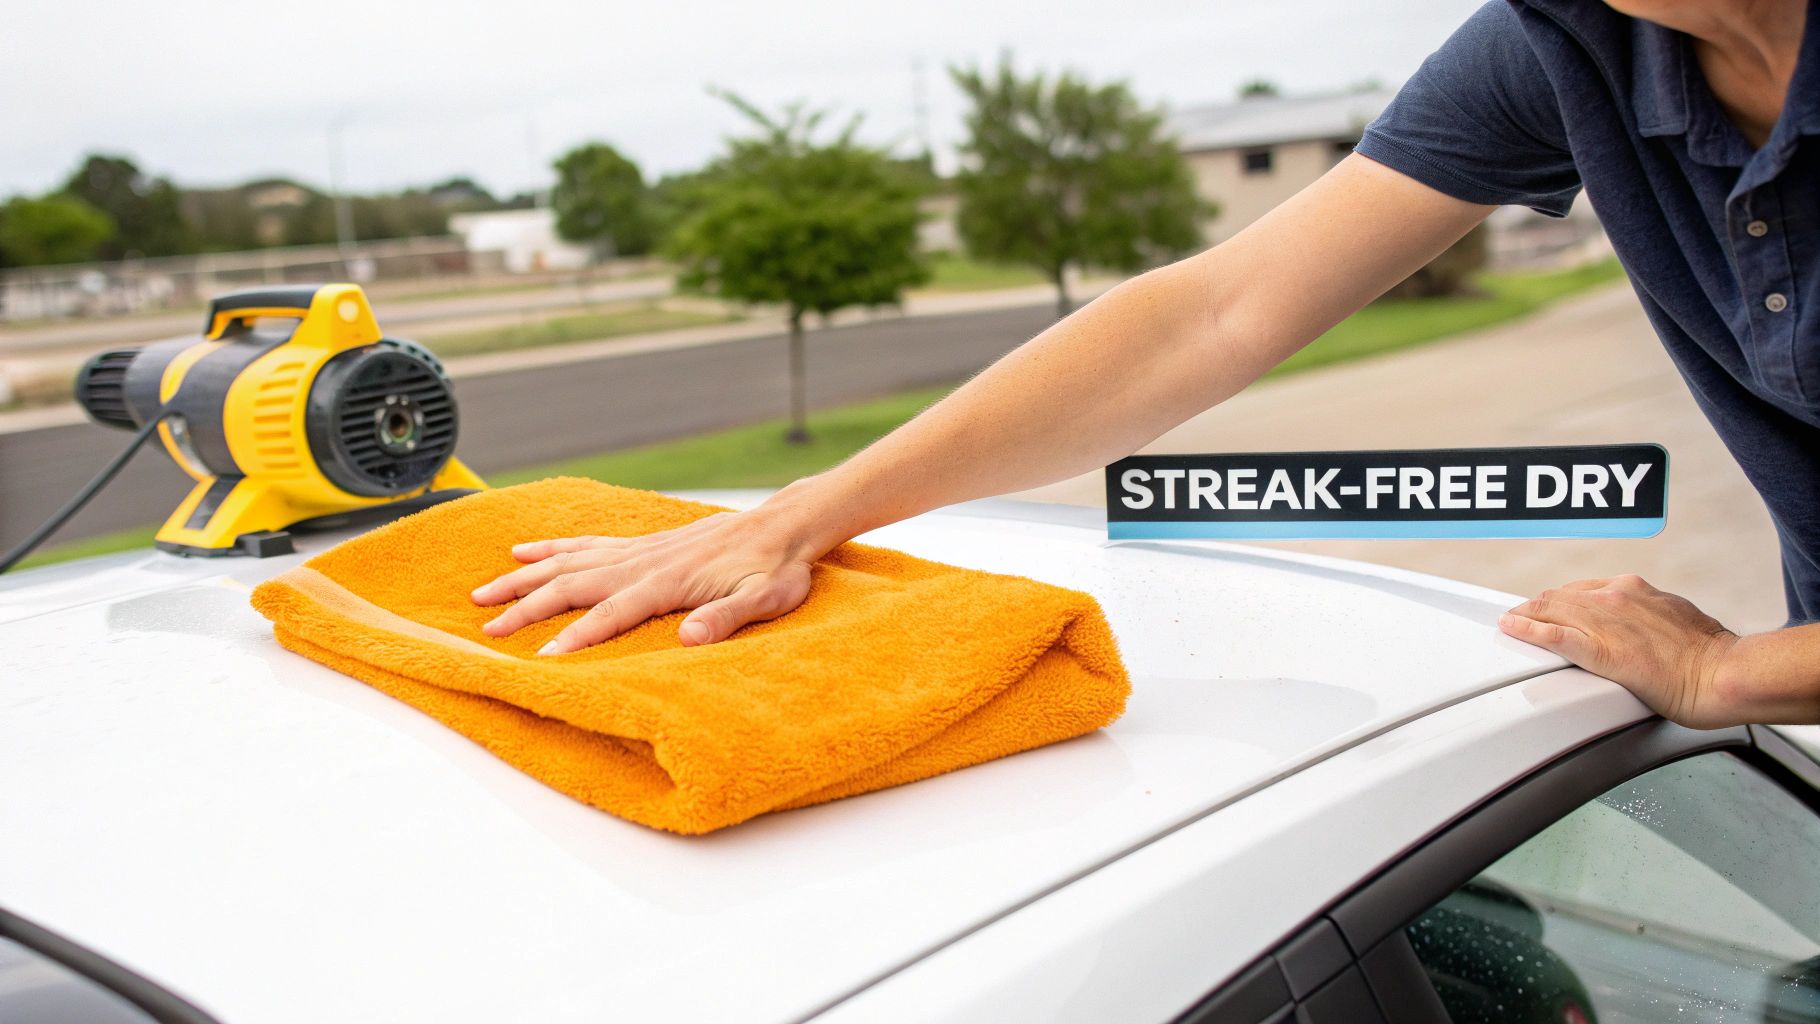
- High-Quality Microfiber Towels: Not all microfiber is the same. For drying, you need an ultra-plush, high-GSM (grams per square meter) towel. Think thick, soft, and thirsty. These towels can soak up an incredible amount of water, often enough to dry an entire panel with one pass.
Pro Tip: Keep your drying towels completely separate from your washing towels. I can't stress this enough. Using the same towels risks dragging trapped grit across your pristine paint. Designate a set of plush towels for drying only and keep them clean.
Perfecting Your Drying Technique
How you dry is just as important as what you use. Vigorously rubbing a towel across the paint, even a clean one, creates friction and can lead to fine scratches and swirl marks. A gentle touch is key.
The best approach is the "blotting" or "draping" method. Take a large, clean microfiber drying towel and lay it flat across a panel, like the roof or hood. Gently pat the towel or let its own weight do the work of absorbing the water. Then, carefully lift it and move on to the next section.
For an even better result, I highly recommend using a drying aid. This is a quick detailer or a dedicated spray that you lightly mist over the wet car right before you dry it. It provides a bit of lubrication, letting your towel glide effortlessly and reducing friction to almost zero. As a bonus, most drying aids add a layer of gloss, leaving behind a slick, just-waxed feel.
Finally, open the doors and wipe down the jambs with a separate, smaller towel. It's a small detail that makes a huge difference in the final result. If you want to dive deeper, check out our guide on choosing the best microfiber towels for cleaning.
Common Questions on Pressure Washing a Car
Even with the best guide, a few questions always pop up before you pull the trigger on a pressure washer. It's smart to ask—getting the right answers can save you from a costly mistake. Let's walk through some of the things I get asked most often.
The number one worry? Damaging the paint. It's a totally valid fear if you go in with the wrong setup, but thankfully, it's easy to avoid.
What Is the Safest PSI for a Car Wash?
If you're using a pressure washer, stick to a range between 1200 and 1900 PSI. Anything over 2000 PSI is asking for trouble. You risk chipping the paint, peeling off trim, or forcing water into seals where it doesn't belong.
Just as important as the PSI is your technique. Always use a wide-angle nozzle (the 40-degree tip is your best friend here) and keep it at least a foot away from the surface.
For a completely stress-free wash, a foam gun like the SwiftJet is a fantastic alternative. It hooks up to a regular garden hose and uses your home's standard 40-70 PSI water pressure. At that level, there's zero chance of damaging your car's finish.
Should I Use Dish Soap in My Foam Cannon?
No, never. Please don't do this. Dish soap is a powerful degreaser designed to strip everything off your plates, and it will do the exact same thing to your car. That means it will strip away any protective wax or sealant you have.
Using dish soap leaves your car’s paint completely exposed to the elements. UV rays, road salt, and dirt will have a field day. Always stick with a pH-neutral car soap that’s made to clean away grime while leaving your protective layers intact.
How Often Should I Wash My Car?
As a general guideline, washing your car every two weeks is a great routine. This keeps grime like bird droppings, road salt, and tree sap from baking into the paint and causing permanent damage.
Of course, this depends on where you live and what you drive through. If you're dealing with salted roads in the winter or a ton of pollen in the spring, you’ll want to wash it more often. Regular washing isn't just about looks; it's a key part of how to make your car last longer by protecting its finish and resale value.
Ready to get that perfect, swirl-free shine at home? The SwiftJet Car Wash Foam Gun connects to any standard garden hose, making it easy to get a professional-level clean without the risk. Shop now at swiftjetusa.com and see the difference for yourself.