
Getting hard water stains off your car windows is all about using the right tool for the job. For fresh spots, a simple acidic solution like vinegar can dissolve the minerals. But for stubborn, etched-in damage, you'll need to step up your game with mechanical methods like a clay bar or even a glass polish.
The trick is to match your removal technique to how bad the stain is. This way, you get crystal-clear glass without accidentally scratching it.
Why Hard Water Stains Form on Car Glass
Before you reach for any old cleaner, it helps to know what you're actually fighting. Those annoying white spots aren't just dirt—they're mineral deposits, mostly calcium and magnesium, left behind when water evaporates. This isn't just an eyesore; if you ignore them, they can permanently damage your windows.
Believe it or not, hard water stains are a headache for over 90% of car owners worldwide. They turn clean windows into a hazy mess that can mess with your visibility. As detailing pro Brian from Apex Detail explains, these spots come from sprinkler water or even rain. When the water dries, the sun bakes those mineral deposits right onto the glass. In places with really hard water, these spots can etch into the glass for good if left for years.
Differentiating Topical Stains from Etched Damage
Not all hard water spots are the same, and figuring out what you’re dealing with is the most critical first step. It determines your entire plan of attack.
-
Topical Stains: These are the new guys. They're fresh mineral deposits just sitting on top of the glass. If you run a fingernail across the window, it'll feel rough or gritty. The good news? These are the easiest to remove with chemical cleaners.
-
Etched Stains: This is where things get serious. When minerals sit on the glass for a long time, especially under a hot sun, they can chemically bond with it and literally eat into the surface. The window will feel smooth, but you'll still see a faint, cloudy stain. Etching requires more muscle, meaning you'll need to physically polish the damage out.
This simple flowchart breaks down how to quickly tell what kind of stain you have.
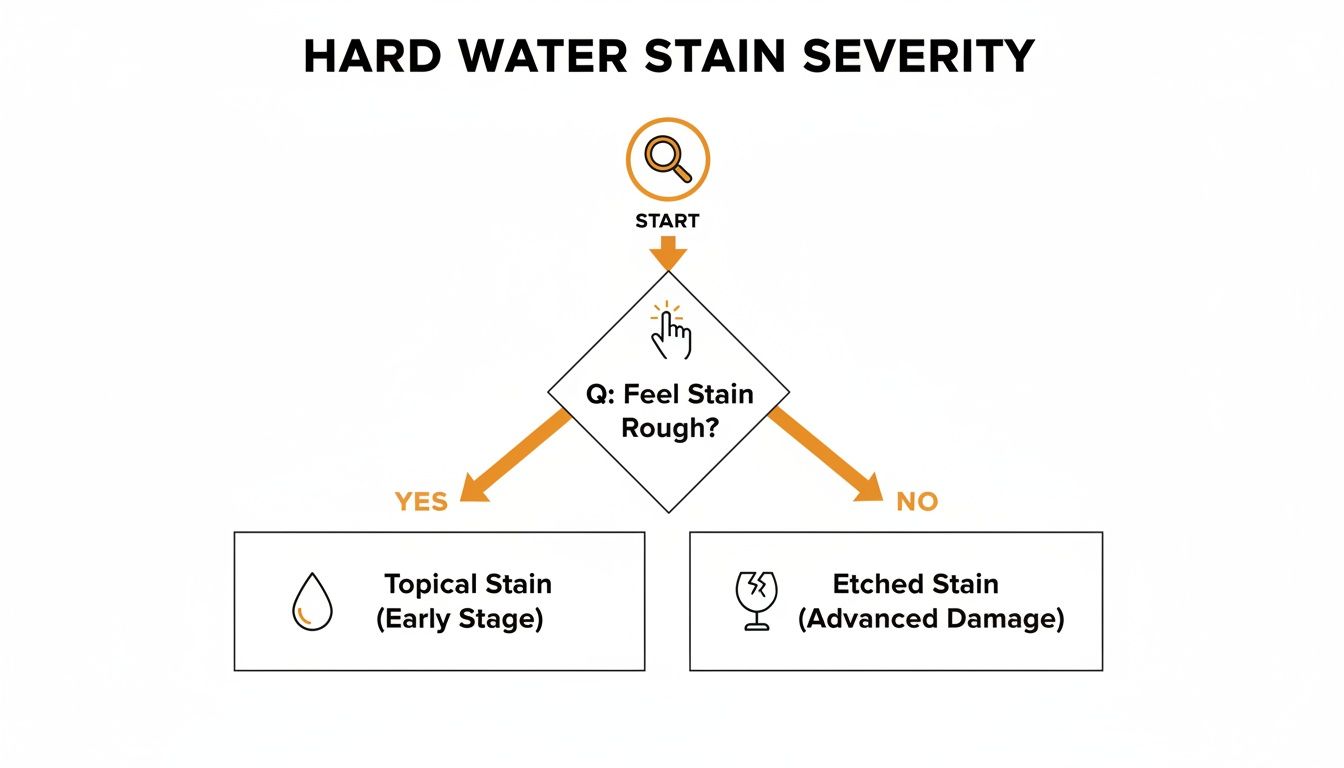
A quick touch test is genuinely the best way to diagnose the problem right from the start.
To make it even clearer, here's a quick guide to help you diagnose the spots on your windows and pick the best removal method.
Identifying Hard Water Stain Severity
| Severity Level | Appearance | Common Cause | Recommended Approach |
|---|---|---|---|
| Topical (Mild) | White, chalky spots; feels rough to the touch. | Fresh sprinkler water, recent rain that dried quickly. | Start with a vinegar/water solution or a dedicated hard water spot remover. |
| Etched (Severe) | Faint, cloudy outlines of spots; feels smooth. | Long-term exposure, minerals baked on by the sun for weeks or months. | Requires mechanical removal: clay bar, fine steel wool, or glass polish with cerium oxide. |
Knowing the difference saves you from wasting time on a cleaner that won't work or, worse, using a method that's too aggressive for a simple stain.
Pro Tip: Always check for stains on a clean, dry window. Dirt and grime can feel gritty just like topical stains, which might fool you into using the wrong approach. Give the glass a quick wash and dry first to get a true read on the mineral deposits themselves.
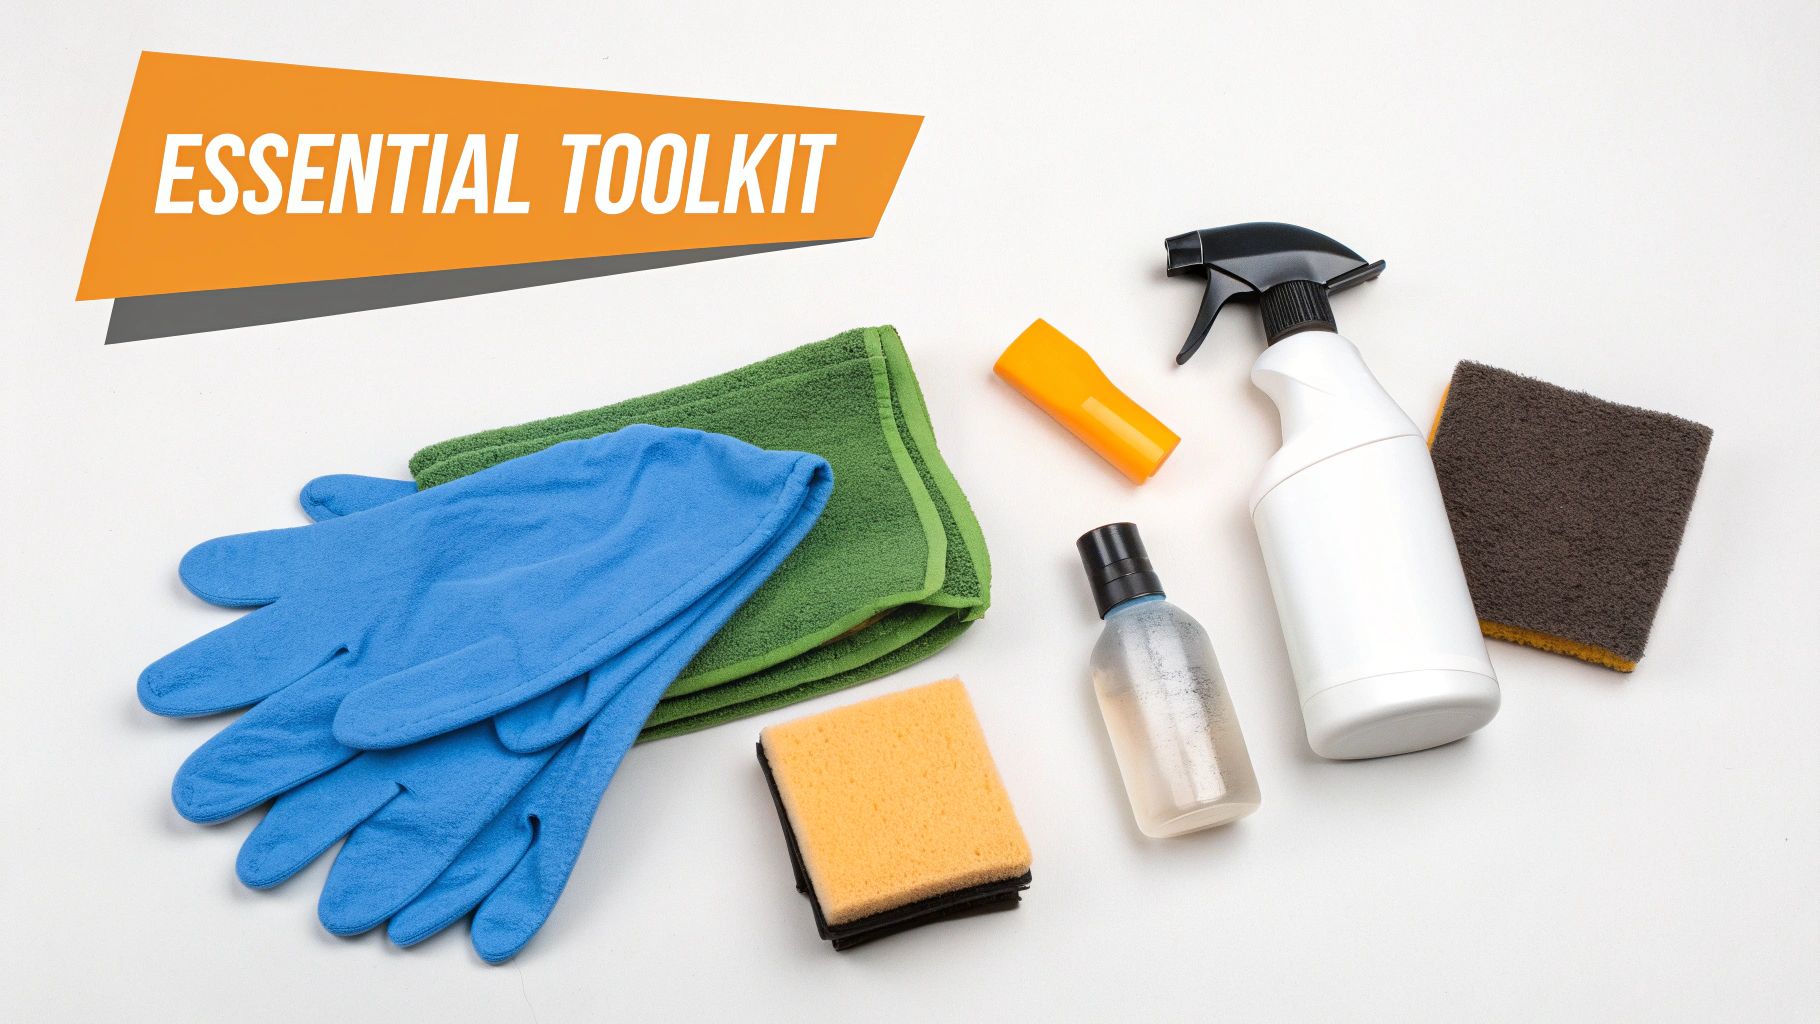
Your Essential Toolkit for Spotless Windows
Before you even think about tackling those stubborn water spots, let’s get your gear in order. Trust me, showing up to the fight unprepared is the quickest way to get frustrated and potentially even damage your car. A few minutes of prep saves a world of headache later.
First up, grab a stack of clean, high-quality microfiber towels. Don't skimp here. You'll want separate towels for applying cleaners, another for scrubbing, and a final, perfectly clean one for that final buff and dry. This prevents you from just moving minerals around. If you're unsure what to look for, our guide on choosing the right microfiber towels for cleaning can help you pick the perfect ones.
Core Cleaning and Safety Supplies
The specific cleaner you use will depend on how bad the staining is, but the rest of this list is non-negotiable for almost any method you try.
- Spray Bottles: Have at least two on hand. One for your cleaning solution and another filled with distilled water for rinsing.
- Painter's Tape and Plastic Sheeting: This is your best friend. Meticulously mask off any paint, rubber seals, or plastic trim touching the glass.
- Nitrile Gloves: Keep your hands safe from acidic cleaners and other chemicals.
- Safety Glasses: Seriously, don't skip these. A splash of cleaner in the eye is a trip to the emergency room you don't want to take.
Pro Tip: Don't get lazy with the prep work. The whole point is to fix the glass, not create a bigger problem on your paint. That extra 5 minutes of taping off the area can save you from the permanent etching that acidic overspray can cause to your car's clear coat.
Choosing Your Weapon: The Cleaning Agent
Now for the main event—the cleaning agent. What you choose is directly tied to the severity of the stains you’re dealing with.
For those light, fresh spots, you can often start with stuff from your kitchen pantry. A simple 50/50 mix of distilled white vinegar and distilled water can work wonders. If the stains are a bit more caked on, a paste made from baking soda and water gives you a bit of gentle scrubbing power.
But if the household remedies aren't cutting it, it's time to bring in the bigger guns.
- Dedicated Hard Water Spot Remover: These are purpose-built acidic cleaners, often in a gel or liquid form, that are made to dissolve mineral deposits quickly.
- Detailing Clay Bar: A fantastic tool for physically pulling out embedded minerals that are stuck to the glass surface.
- #0000 Steel Wool: Use this as a last resort and with extreme caution. It’s for the most severely crusted-on stains that nothing else will touch.
- Cerium Oxide Compound: This is what the pros use. It’s a fine powder you mix into a slurry to actually polish away light etching, restoring perfect clarity to the glass.
DIY Fixes for Lighter Water Spotting
If you've caught those annoying water spots early on, you might not need to look any further than your own kitchen. For light to moderate mineral buildup, some simple household remedies can work wonders, saving you a trip to the auto parts store. The secret is using the right stuff and having a little patience.
Before you jump into any treatment, though, you have to start with a clean surface. It’s a non-negotiable. You definitely don't want to be grinding hidden dirt and grit into your glass while trying to scrub away the stains. A quick pre-wash, maybe with a tool like the SwiftJet foam gun, is perfect for lifting away all that loose grime. This simple step sets you up for a much safer and more effective cleaning process.
The Classic Vinegar and Distilled Water Solution
The old-school go-to for dissolving mineral deposits is a straightforward acidic solution. The acetic acid in white vinegar is fantastic at breaking down the calcium and magnesium that leave behind those chalky-looking spots on your car's glass.
Here’s how I usually approach it:
- Mix up a 50/50 solution of distilled white vinegar and distilled water in a spray bottle. It's crucial to use distilled water here—tap water is full of minerals and will just make the problem worse.
- Spray the solution generously over the stained area. Don't be shy with it; you want to let that acid get to work.
- Let it sit for about 1 to 3 minutes. This dwell time gives the vinegar a chance to react with and loosen up the mineral deposits. Just be sure it doesn't dry on the glass, especially if you're working in the sun.
- Gently rub the area with a clean microfiber towel using light pressure.
- Finally, rinse it all off thoroughly with more distilled water and dry the window completely with a fresh, clean microfiber.
This approach is gentle on your glass and is often all you need for fresh spots. For a deeper dive into this and other techniques, there’s great info on how to remove hard water stains from windows that covers these lighter cases well.
Stepping It Up With a Gentle Baking Soda Paste
What if the vinegar solution doesn't quite get the job done? You can bring in a mild abrasive. A simple baking soda paste gives you a bit more scrubbing power without being aggressive enough to scratch your glass.
Just mix baking soda with a tiny bit of distilled water until you have a thick paste, something like the consistency of toothpaste. Apply this paste directly onto the hard water spots using a microfiber applicator pad or even just the soft side of a sponge.
Work the paste into the stains using small, circular motions and very light pressure. The fine particles in the baking soda help mechanically lift the stubborn mineral bits that the vinegar couldn't dissolve on its own. After a little scrubbing, rinse the window completely and dry it off to see how you did.
A quick reality check on DIY methods: they’re great for minor issues, but vinegar often fails in 95% of cases beyond the most minimal staining. That's because minerals like silica can actually etch into the glass. Plus, hard water is notorious for reducing a detergent's effectiveness by 20-25%, which is why those white spots pop up so easily once the water evaporates.
Once you're all done, a final, thorough rinse is key to getting rid of any leftover cleaner. To really nail that perfect finish, take a look at our guide filled with professional vehicle detailing tips.
Advanced Techniques for Stubborn Etched Stains
Sometimes, vinegar and off-the-shelf cleaners just won't cut it. You're left with cloudy spots that seem to be a permanent part of the glass. This is where you have to step up your game from a chemical approach to a physical one.
When mineral deposits sit on your windows for too long, especially under the hot sun, they can actually etch into the surface. At this point, you're not just cleaning a stain on the glass; you're dealing with damage to the glass itself. These are the methods the pros use to tackle what looks like a lost cause.
A word of caution: these techniques are powerful, but they come with a higher risk of doing more harm than good if you're not careful. Always work on a cool, clean window out of direct sunlight. Patience is your best friend here.
Using a Clay Bar to Lift Embedded Minerals
If you’ve washed your windows but they still feel gritty or rough to the touch, that’s a sign that contaminants are bonded to the surface. A detailing clay bar, a go-to tool for decontaminating paint, works wonders on glass, too. It’s designed to gently grab and pull these bonded minerals right off the surface.
Think of it as a deep exfoliation for your car's glass. The process is pretty simple:
- Get it Slippery: Grab a good quality clay lubricant or a quick detailer spray. Mist the window generously—you want the surface wet enough for the clay to glide without any friction at all. Seriously, don't be shy with the lube.
- Glide, Don't Press: Flatten the clay bar into a small patty and gently slide it back and forth across the lubricated area. You'll actually feel and hear the grit as the clay picks up the contaminants.
- Keep it Clean: As the clay gets dirty, fold it over to expose a fresh, clean side. This is crucial to avoid dragging the gunk you just removed all over the glass.
- Wipe and Check: Once an area feels perfectly smooth and the clay glides silently, you're done there. Grab a clean microfiber towel and wipe away any leftover lubricant.
A clay bar is your best bet for those stubborn, above-surface deposits that chemical cleaners can't dissolve. However, it won't do anything for true etching that has eaten into the glass.
Key Takeaway: The secret to using a clay bar safely is abundant lubrication. If the bar ever feels like it's sticking or dragging, stop immediately and apply more lubricant to avoid scratching the glass.
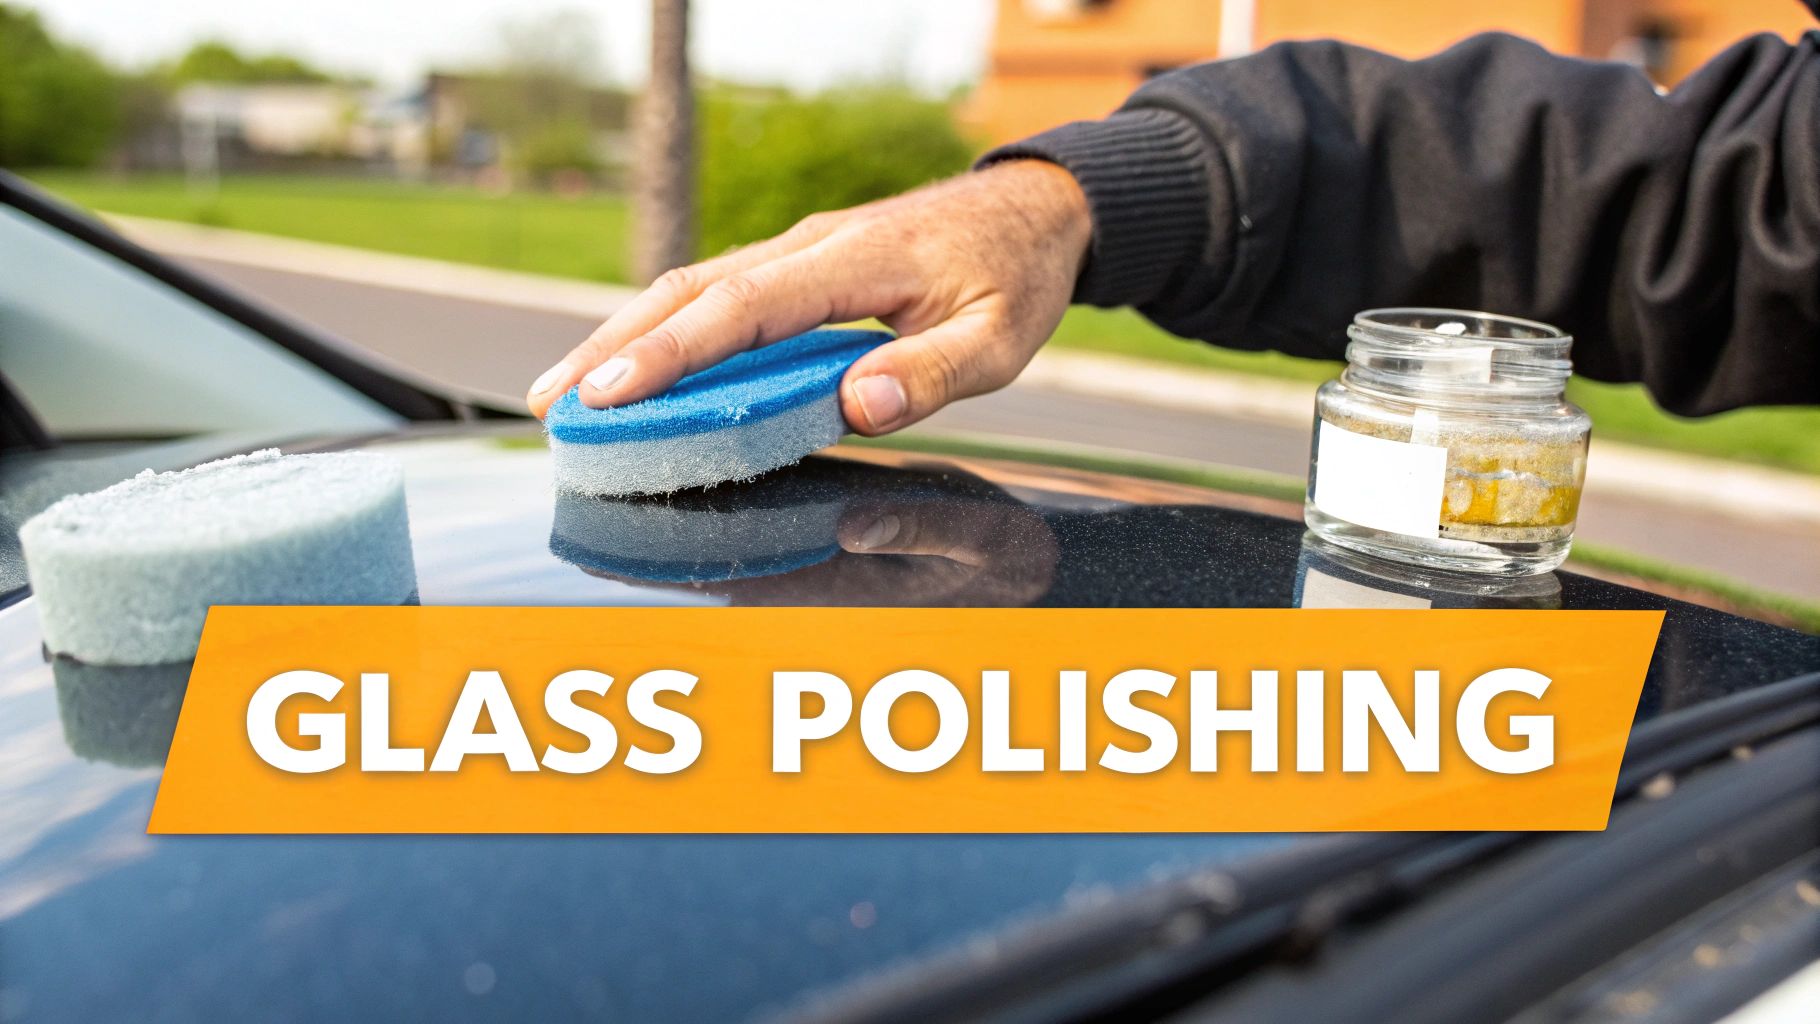
Polishing Your Glass with Cerium Oxide
So, what if the glass feels completely smooth, but you can still see a hazy, cloudy stain? That’s the tell-tale sign of etching. The minerals have physically damaged the surface, and no amount of cleaning will fix it. The only way to remove it is to remove an incredibly thin, microscopic layer of the glass itself to level the surface.
For this, you’ll need to break out the heavy machinery: a polisher and cerium oxide. This fine powder is the industry standard for polishing glass and can deliver incredible results.
You’ll need a dual-action (DA) polisher, a dedicated glass polishing pad (usually made of rayon or felt), and the cerium oxide powder.
First, mix the powder with a bit of water until you have a thin, milky slurry. Dab a few pea-sized drops onto your polishing pad. Working in a small 2x2 foot section, spread the polish with the machine on its lowest speed. Then, bump the speed up slightly and work the polish with slow, overlapping passes.
The key is to keep the polisher moving at all times. If you stay in one spot for too long, you can generate a dangerous amount of heat that could distort or even crack the window. Wipe the area frequently with a clean towel to check your progress. It takes time and patience, but this is the definitive way to restore optical clarity and permanently remove etched-in water spots.
Comparing Advanced Removal Methods
Deciding between a clay bar and polishing comes down to diagnosing the problem correctly. One lifts contaminants off the surface, while the other repairs the surface itself. This table breaks down the key differences to help you choose the right tool for the job.
| Method | Best For | Skill Level | Potential Risk |
|---|---|---|---|
| Clay Bar | Stubborn topical mineral deposits that feel gritty. | Beginner | Low; risk of light marring without proper lubrication. |
| Cerium Oxide Polish | Etched stains that are physically embedded in the glass. | Intermediate to Advanced | High; can distort or damage glass if too much heat is generated. |
Ultimately, start with the least aggressive method that could work—in this case, the clay bar. Only escalate to polishing with cerium oxide if you are confident the stain is truly etched and you're comfortable handling a power tool on your glass.
Keeping Your Car Windows Spot-Free for Good
You've just put in the hard work to get those stubborn mineral stains off your car's glass. Fantastic. But the last thing you want is for them to come right back after the next rainstorm. Winning the battle is one thing; winning the war means being proactive.
The real secret isn't just about cleaning. It’s about creating a surface that actively repels the mineral-laced water that causes the problem in the first place. This means shifting your mindset from just reacting to spots to preventing them from ever forming.
Perfect Your Rinse and Dry Technique
Your job isn't quite done once the stains are gone. The final moments of the cleaning process are what set you up for long-term success.
Always give the glass a final, thorough rinse after any cleaning treatment. If you can, use distilled water for this step. It’s completely free of minerals, so you're not accidentally re-applying the very thing you just removed. This quick rinse neutralizes any leftover cleaners and washes away any lingering mineral dust.
Then, dry the glass immediately and completely. Letting your car air-dry, especially in the sun, is basically an open invitation for new water spots. Grab a high-quality microfiber waffle-weave towel and buff the glass until it’s perfectly dry and streak-free. This single step is one of your most powerful defenses.
Expert Insight: The goal here is to leave absolutely nothing behind on the glass—no water droplets, no cleaner residue, nothing. A perfectly clean and dry surface gives a protective sealant the best possible chance to bond properly and do its job effectively.
Apply a Hydrophobic Glass Sealant
For the ultimate defense, you need to apply a hydrophobic coating or a dedicated glass sealant. Think of it as armor for your windows. These products create an invisible, super-slick barrier on the glass.
Instead of clinging to the surface, water beads up into tight little spheres and rolls right off, taking minerals and dirt along for the ride. It's often called the "lotus effect," and it’s incredibly effective.
Applying it is usually a simple wipe-on, wipe-off process:
- Put a small amount of sealant onto a clean applicator pad.
- Wipe it onto the glass using a crosshatch pattern (up-and-down, then side-to-side) to ensure you don’t miss any spots.
- Let it sit and haze over for a few minutes, according to the manufacturer's directions.
- Using a fresh, dry microfiber towel, buff away the hazy residue until the glass is crystal clear.
This protective layer doesn't just stop water spots. It also makes your glass much easier to clean in the future, as bugs and road grime will struggle to stick to the slick surface. A quality sealant can last for months, saving you a ton of time and effort down the road.
Build Simple Habits for Lasting Clarity
Finally, a few small tweaks to your daily routine can make a huge difference.
- Mind Your Parking: This is a big one. Try to avoid parking next to lawn sprinklers, as they are one of the most common culprits for hard water stains.
- Dry After Every Wash: Never skip drying your car after a wash. Even if you use filtered water, some minerals can be left behind. A few minutes with a towel prevents hours of work later.
- Carry a Quick Detailer: Keep a bottle of waterless wash spray and a microfiber towel in your car. If you see a water spot or a bird dropping, you can wipe it away immediately before it has a chance to bake in and etch the glass.
For more tips on quick, on-the-go cleaning, check out our guide on using a waterless car wash. By combining a solid after-care routine with these simple habits, you can keep your car's windows looking pristine.
Got Questions About Hard Water Stains?
Even with the best guide, it's natural to have a few questions before you start tackling those stubborn mineral spots. Getting these sorted out first can save you a ton of frustration and prevent any simple mistakes that could damage your glass or the surrounding paint.
Let's dig into some of the most common questions I hear from people dealing with this exact problem.
Can I Just Use Windex to Get Rid of Hard Water Stains?
I get this question all the time. While your go-to glass cleaner like Windex is great for everyday smudges and fingerprints, it’s completely powerless against mineral deposits. It just doesn't have the right stuff.
The ammonia in most household cleaners won’t touch the bonded calcium and magnesium that create those chalky spots. You could spray and wipe until your arm falls off and you wouldn't make a dent. You need a solution with some real chemical muscle—either an acid like vinegar or a specialized hard water remover built for cars. Trying to use Windex is like trying to wash a greasy pan with cold water; you need something that can actually break the bond.
Will These Cleaning Methods Damage My Window Tint?
This is a really important one, and thankfully, the answer is simple: it’s all about where the tint is. Aftermarket window tint is always applied to the inside of the glass.
Every single method we've covered, from using vinegar to polishing with cerium oxide, is done on the outside of the window. So, you can work away on the exterior without any risk to your tint film.
Crucial Tip: Never, ever use anything abrasive on the inside of a tinted window. That means no razor blades, no #0000 steel wool, and definitely no polishing compounds. You will instantly scratch and ruin the delicate film. When cleaning the interior, only use ammonia-free cleaners specifically designed for tinted windows.
How Can I Tell if a Stain Has Actually Etched the Glass?
Knowing the difference between a surface stain and true etching is the key to picking the right approach and not wasting your time. Once the window is clean and totally dry, here’s a quick test you can do.
Gently run your fingernail over one of the spots.
- Feel a rough, gritty texture? Great news. That means the mineral deposit is still sitting on top of the glass. A chemical cleaner or a clay bar should be able to lift it right off.
- Is the glass perfectly smooth, but you can still see the spot? This means the minerals have started to etch into the glass itself, creating a microscopic pit. This kind of below-the-surface damage requires polishing to physically level the glass and make the spot disappear.
Are Hard Water Removers Safe to Use on Car Paint?
A hard and fast no. The very thing that makes these products so effective on glass—their acidic formula—is exactly what makes them so dangerous for your car’s paint.
That acid will eat right through your clear coat, leaving behind permanent haze, dull spots, or worse if it's left to sit for even a short time. This is why prepping the area is something you absolutely cannot skip. Before you even open that bottle, use good-quality painter's tape and plastic sheeting to mask off all the paint, rubber seals, and plastic trim around the window.
If you do get an accidental drip, don't panic—just neutralize it immediately with a spray of water and wipe it away. A few extra minutes of careful prep work will save you from a massive headache and a costly trip to the body shop.
Now that you know how to restore your glass like a pro, make sure you have the right tools. Every cleaning job should start with a safe pre-rinse to lift away loose dirt and grit. The SwiftJet Foam Gun makes this step fast and effective. Grab yours today at https://swiftjetusa.com and get a safer, more professional clean every time.