
So, what does it really mean to "detail" a car? It’s a whole lot more than just running it through the local car wash. Detailing is a deep, methodical process of cleaning, restoring, and finishing a vehicle to bring it back to a showroom-quality condition, both inside and out. It’s less about a quick clean and more about meticulous restoration.
Why Detailing Is More Than Just a Car Wash
Think of it this way: a car wash is a quick shower, but detailing is a full-on spa day for your vehicle. While a wash gets rid of the surface-level dirt, when you detail a car, you're diving into a complete rejuvenation project. You're restoring its condition, protecting your investment, and seriously boosting its resale value. In fact, a professional detail can bump up a car’s resale price by 10-20%, which makes it a pretty smart move.
The whole process really boils down to three core stages: washing, correcting, and protecting.

This simple flow shows how each step logically builds on the last one. You can't get a flawless, protected finish without first creating a perfectly clean and smooth surface.
Car Detailing Stages at a Glance
To give you a clearer picture, here’s a quick breakdown of what each phase of the detailing process involves.
| Stage | Primary Goal | Key Tools and Products |
|---|---|---|
| Preparation | Safely remove loose dirt and prep surfaces for deep cleaning. | Pressure washer, foam gun (like SwiftJet), pre-wash foam, bug & tar remover. |
| Washing | Thoroughly clean the exterior without scratching the paint. | Two buckets with grit guards, microfiber wash mitt, pH-neutral car shampoo. |
| Decontamination | Remove embedded contaminants that washing can't. | Iron remover, clay bar or clay mitt, clay lubricant. |
| Paint Correction | Remove swirls, scratches, and oxidation to restore gloss. | Machine polisher (DA or rotary), polishing pads, compounds, polishes. |
| Protection | Apply a durable layer to shield paint from the elements. | Wax, paint sealant, or ceramic coating; microfiber applicator pads. |
| Finishing Touches | Detail wheels, tires, glass, and trim for a complete look. | Wheel cleaner, tire dressing, glass cleaner, trim restorer. |
This table maps out the journey from a dirty car to a brilliantly protected finish, showing how each stage has a specific purpose.
The Value of Meticulous Care
With an estimated 1.644 billion vehicles on the road worldwide by 2025, the need for proper care has never been more critical. The average car in the EU is now 12.3 years old, and detailing is the best defense against the daily grind. Using the right tools, like the SwiftJet Car Wash Foam Gun, makes that crucial first wash stage safer and more effective, blanketing the car in thick foam to lift dirt away without scrubbing.
A great detail isn't just about making a car look good for a weekend. It's about preserving its integrity against environmental factors like UV rays, road salt, and industrial fallout, which degrade paint and trim over time.
Benefits You Can See and Feel
Beyond just a shiny car, proper detailing has some very real advantages. It gets rid of contaminants that can permanently damage your paint, conditions interior surfaces to stop them from cracking, and even makes driving safer by giving you crystal-clear glass.
The perks are hard to ignore:
- Enhanced Appearance: You get that deep, wet-look gloss back in your paint.
- Increased Value: A well-kept car always fetches a better price.
- Long-Term Protection: Waxes, sealants, or ceramic coatings act as a shield against the elements.
- Personal Pride: There’s nothing quite like the satisfaction of driving a car that looks brand new.
If you're ready to learn more, we've got plenty of resources to help you out. Check out our expert vehicle detailing tips to get started on the right foot.
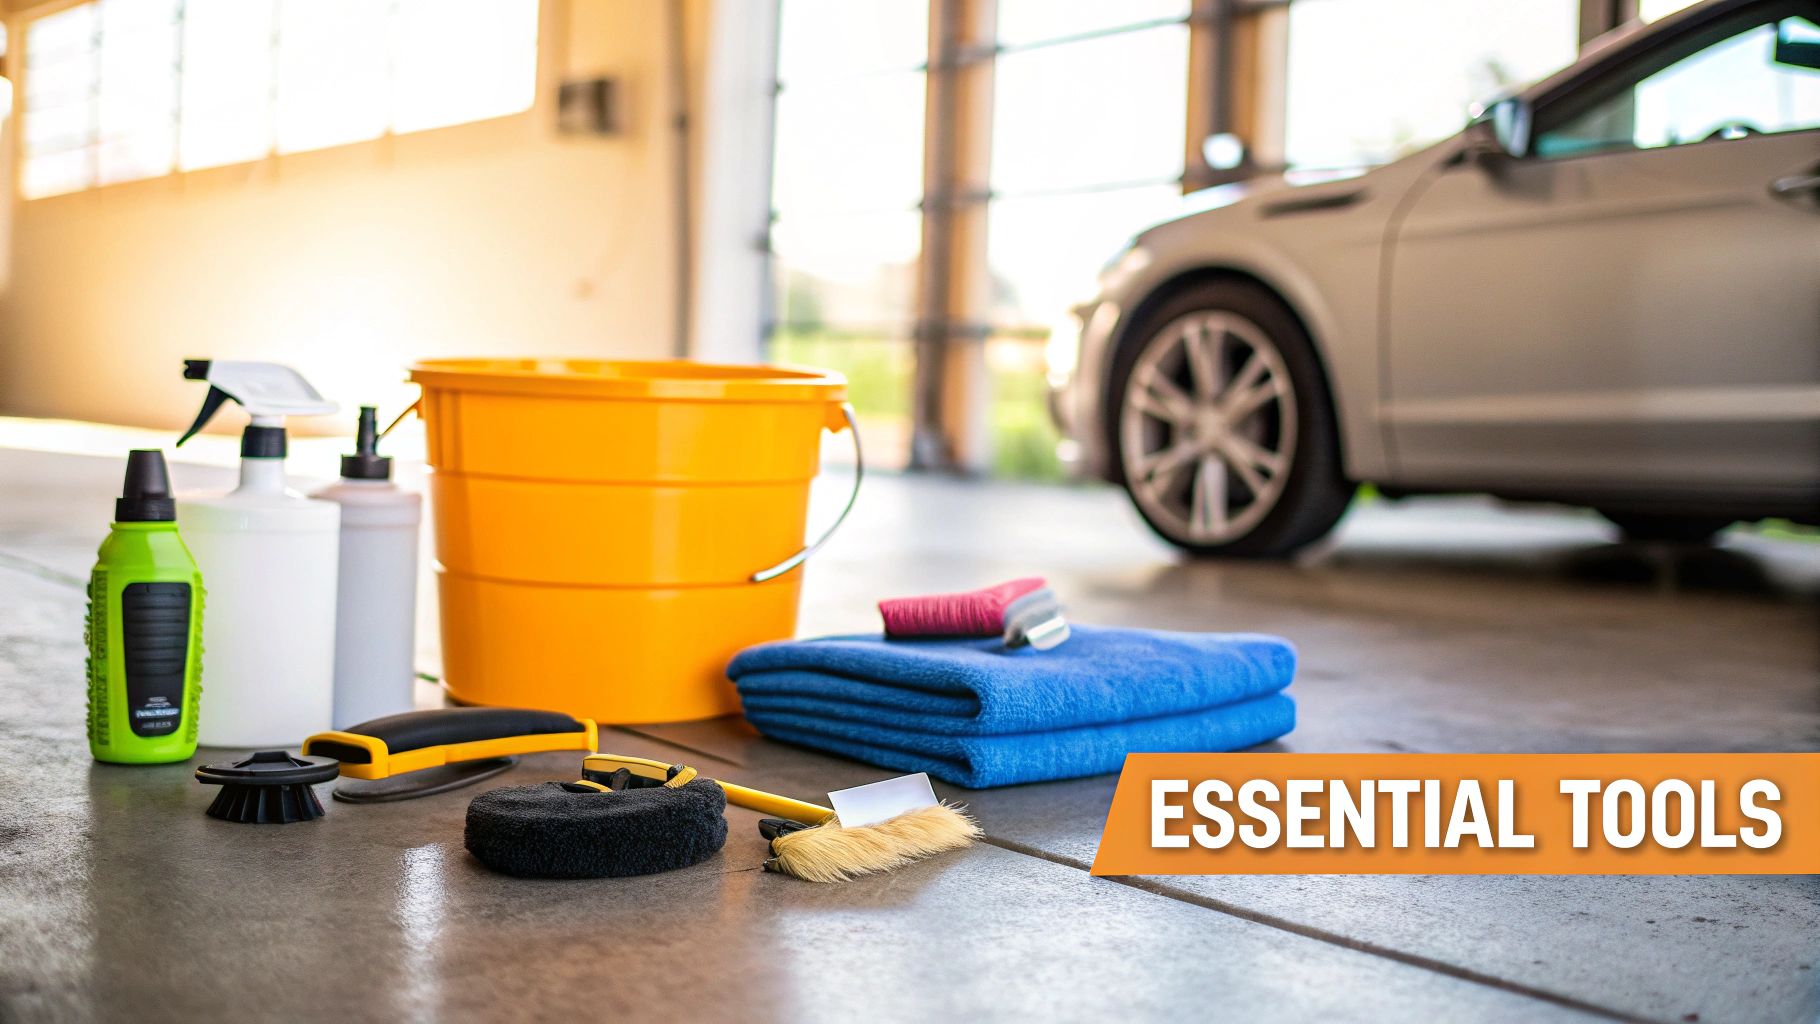
Gathering Your Detailing Gear
Let's be honest, the right tools are what separate a frustrating Saturday afternoon from a jaw-dropping finish. If you're still reaching for a bucket, a sponge, and some dish soap, you're not just making the job harder—you're actively damaging your car's paint. A proper detailing setup is an investment in protecting your vehicle and getting results you can be proud of.
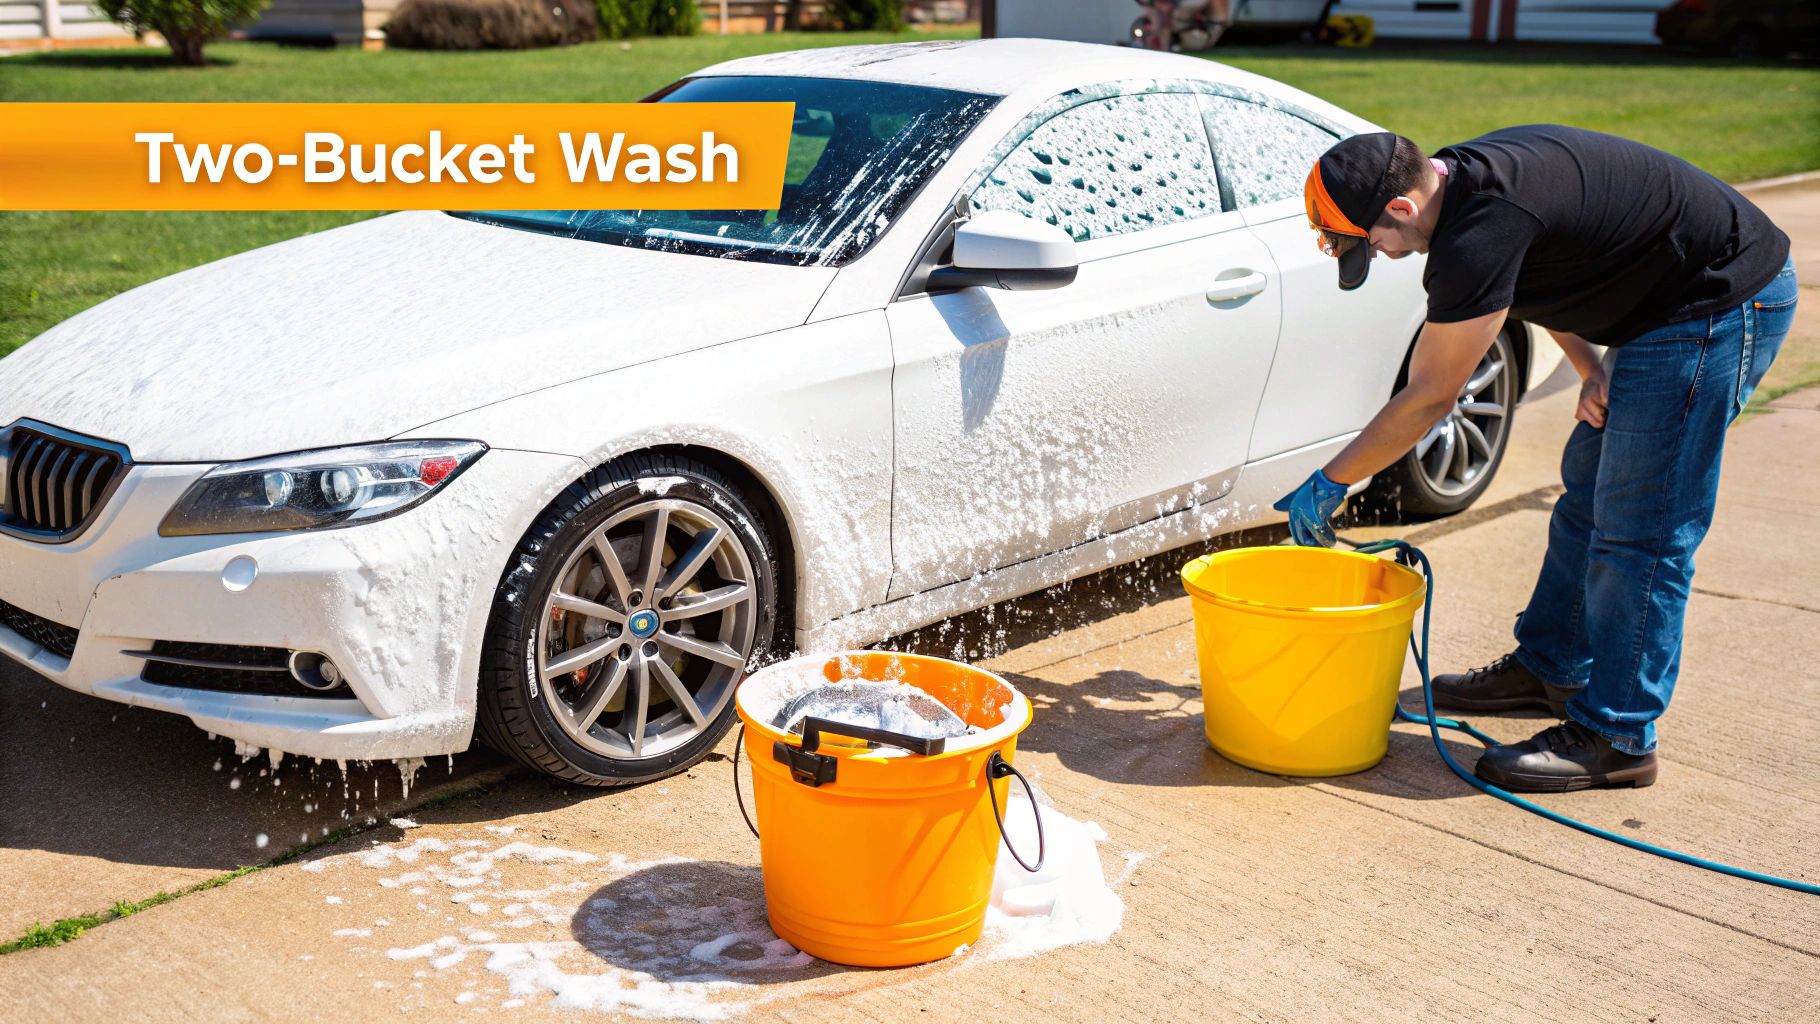
The absolute foundation of a safe wash is the two-bucket system. It’s not just a fancy trick for enthusiasts; it’s essential. One bucket is for your sudsy car shampoo, the other is just for clean rinse water. After washing a single panel, you rinse the dirty mitt in the clean water bucket before dipping it back into the soap. This simple habit stops you from dragging grit all over your car.
To make this system even safer, drop a Grit Guard into the bottom of both buckets. These plastic grates trap the dirt and debris at the bottom, so your wash mitt never picks it back up.
The Essentials for Washing and Drying
When it comes to what actually touches your paint, nothing beats high-quality microfiber. These towels are designed to lift and trap dirt within their fibers, not just push it around. You'll want a small collection for different jobs—some for washing, others for drying, and a separate set for buffing off waxes. If you want to dive deeper, check out this guide on picking the best microfiber towels for cleaning cars.
For the wash itself, grab a pH-neutral car shampoo. This stuff is formulated to cut through grime without stripping away any wax or sealant you've previously applied. Pair it with a plush microfiber wash mitt. Sponges are notorious for trapping grit on their flat surface and creating fine scratches.
Pro Tip: The biggest game-changer for wash safety is adding a pre-wash step. Using a foam gun, like the SwiftJet, covers the entire car in a thick layer of foam. This foam dwells on the surface, loosening up the heavy dirt and road film before you ever touch the paint with a mitt. It’s the single best way to minimize the risk of creating swirl marks.
Once you’re done washing, a large, super-absorbent microfiber drying towel will make quick work of getting a streak-free finish.
Tools for Decontamination and Paint Prep
Washing only removes the loose dirt. To get that perfectly smooth, glass-like feel, you have to deal with the stubborn contaminants bonded to the paint.
- Iron Remover: You'll spray this on the car (after washing) and watch as it turns bright purple. That color change is the chemical reaction dissolving tiny iron particles—mostly brake dust—that have embedded themselves in your clear coat.
- Clay Bar or Clay Mitt: This is your physical decontamination tool. After the iron remover, you'll glide the clay over the paint with a lubricant to pull off anything that’s left, like tree sap, road tar, and industrial fallout.
- Clay Lubricant: Never, ever use a clay bar on a dry surface. A dedicated clay lube creates a slick barrier that lets the clay glide effortlessly. Without it, you'll just create more scratches.
Must-Haves for the Interior
A truly detailed car looks just as good on the inside. Cleaning an interior properly requires a specific set of tools.
First up, a good vacuum cleaner with a few key attachments is non-negotiable. You'll need a crevice tool for those impossible-to-reach spots, an upholstery brush for seats and carpets, and a soft-bristled brush for gently dusting vents and electronics.
Next, you need a quality all-purpose cleaner (APC) designed for automotive interiors. Household cleaners are often too harsh and can cause plastics to fade or even crack over time. An automotive-safe APC can be used on plastics, vinyl, and even fabrics.
To finish the job, grab a couple of protectants. A good UV protectant for your dashboard and trim will keep them from looking chalky and faded. If you have leather, a dedicated leather cleaner and conditioner is crucial for keeping it soft and preventing cracks. A set of small, soft detailing brushes will also become your best friend for cleaning around buttons, shifter surrounds, and tight seams where dust loves to hide.
The Wash and Decontamination Method
This is where the real work—and the real magic—happens. A proper wash isn't just about knocking the dirt off; it's about getting the car surgically clean without inflicting new damage. Those frustrating swirl marks and fine scratches that dull your paint? Almost all of them come from bad washing habits.
We're going to dive into a process that lays the essential foundation for a truly show-stopping finish. Following these steps drastically cuts the risk of scratching your paint and gets the surface perfectly prepped for the deeper cleaning and polishing stages ahead.
Start With The Wheels and Tires
Rule number one: always tackle the dirtiest part of the car first. That means wheels and tires, no exceptions. If you wash the body first, you're guaranteed to splash grimy brake dust and potent wheel cleaner all over your nice, clean paint. It's a recipe for re-doing your work.
Grab a dedicated wheel cleaner and spray it onto the wheel faces and deep into the barrels. Let it sit for a minute to break down the grime (but never let it dry), then get in there with various brushes to agitate all that baked-on brake dust. A separate, stiffer brush is your best friend for scrubbing the tire sidewalls clean.
Once you're done scrubbing, give the wheels and tires a powerful rinse before you even think about touching the paint. This gets the nastiest, most abrasive grit out of the way from the very beginning.
The Pre-Wash Foam Bath
If there's one step that separates the pros from the amateurs, it's the pre-wash. The whole point is to lift away as much heavy dirt as possible before your wash mitt ever makes contact with the paint. This is where a foam gun like the SwiftJet really earns its keep.
Hook up your foam gun, fill it with a good pH-neutral car soap, and lay down a thick blanket of foam over the entire vehicle. Just let it dwell for a good 5-10 minutes. You'll literally watch the foam encapsulate and pull the road film and heavy crud right off the car.
After it's had time to work, give the car a thorough rinse from the top down. You’ll be washing away the vast majority of the grit that causes swirl marks.
The two-bucket wash method isn't just a suggestion; it's a non-negotiable technique for protecting your paint. It works by isolating the dirt you pull off the car from the clean, soapy water you use for washing, preventing you from dragging that same grit right back across your finish.
With the pre-wash done, it's time for the contact wash. You’ll need two buckets, each with a Grit Guard at the bottom. One gets filled with your car shampoo solution, the other with plain rinse water.
The process is simple but disciplined:
- Load: Dip your clean microfiber wash mitt into the soap bucket.
- Wash: Gently clean one panel at a time, moving from top to bottom. Use straight lines, not circles.
- Rinse: Before going back for more soap, dunk the now-dirty mitt into your rinse bucket and scrub it against the Grit Guard to release all the trapped dirt.
- Repeat: Wring out the mitt, dip it back into the clean soap bucket, and move to the next panel.
This cycle ensures you're only ever touching the paint with a clean, soap-loaded mitt. For a deeper dive, you can learn more about how to properly wash a car in our full guide.
Deep Cleaning With Chemical Decontamination
Even after a perfect wash, your paint still isn't truly clean. It’s covered in tiny, bonded particles that a wash mitt just glides right over. The first line of attack is chemical.
Spray an iron remover liberally across every painted surface and the wheels. You'll see it start to "bleed" a dramatic purple or red color as it comes into contact with and dissolves the microscopic iron particles from brake dust and industrial fallout.
This effect is your proof that the product is working. Let it dwell for a few minutes, then give the whole vehicle another thorough rinse to wash away the dissolved contaminants.
Achieving A Glass-Smooth Surface With Clay
The final step in decontamination is physical. Using a clay bar or a clay mitt allows you to safely shear off any stubborn contaminants left behind, like tree sap, road tar, or paint overspray. This is the secret to getting that perfectly smooth, glass-like feeling on your paint.
Flatten a piece of detailing clay in your palm and spray a generous amount of clay lubricant onto a small, 2'x2' section of paint. With very light pressure, just glide the clay back and forth over the lubricated area. You’ll feel it grabbing at first; once it moves freely and silently, you know the surface is clean.
Wipe the lubricant residue away with a clean microfiber towel and move on. Remember to fold and knead the clay often to expose a fresh, clean surface. Once you're done, the paint is finally, truly clean and ready for polishing.
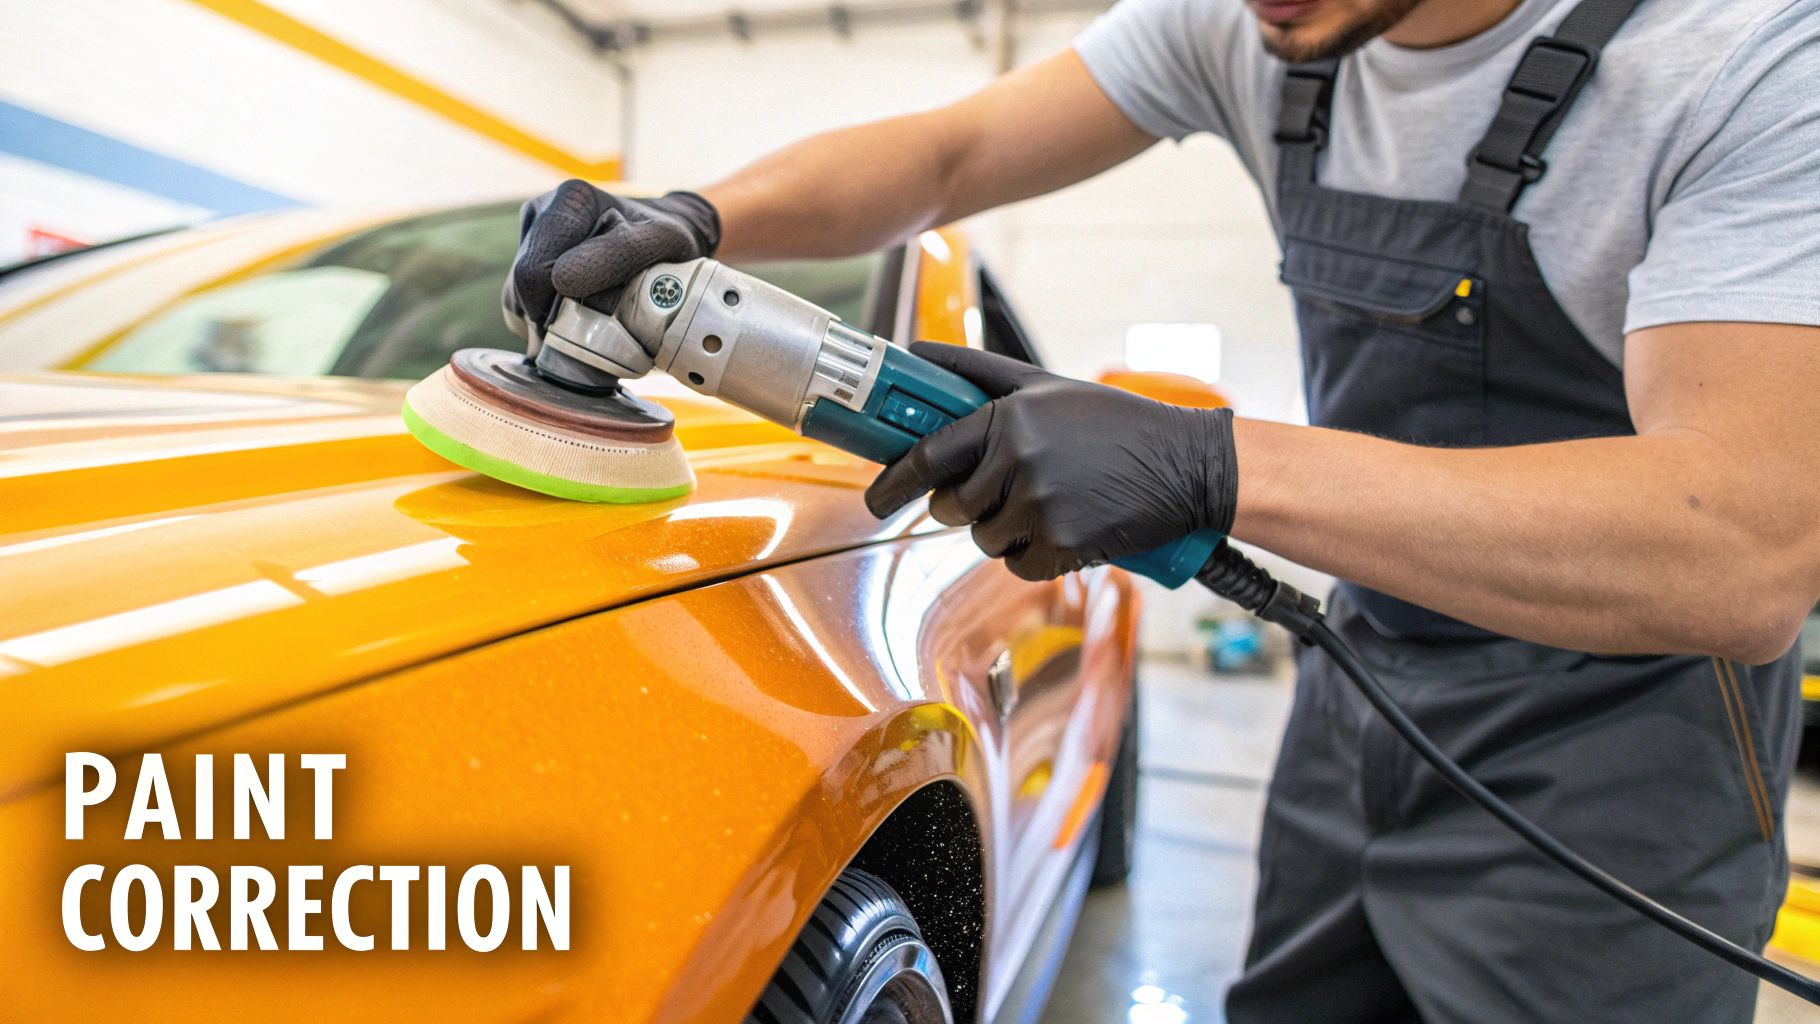
Bringing Back the Shine: Paint Correction and Protection
After you've washed and decontaminated your car, the paint is truly clean. But is it perfect? Probably not. Take a closer look under direct sunlight, and you’ll likely see a fine web of swirls, some light scratches, or maybe a hazy, oxidized look that's muting the color. This is where the magic of paint correction happens—it's the step that separates a clean car from a stunning one.
Paint correction is all about carefully leveling the paint surface by removing a microscopic layer of the clear coat. It’s not a filler; it’s a fix. By smoothing out those imperfections, you create a flawless canvas that reflects light perfectly, bringing back that deep, liquid gloss that turns heads.
Compounding vs. Polishing: What’s the Difference?
When you dive into paint correction, you'll hear two terms thrown around constantly: compounds and polishes. They sound similar, but they do very different jobs.
- Compounding: Think of this as the heavy-duty first step. Compounds have larger, more aggressive abrasives designed to tackle serious defects—noticeable scratches, heavy swirl marks from automatic car washes, and ugly oxidation. It's the go-to solution for paint that's seen better days.
- Polishing: This is the finesse stage. Polishes use much finer abrasives to remove light swirls, haziness, or the holograms sometimes left behind by an aggressive compounding step. It's all about refining the finish to a mirror-like shine and prepping it for protection.
For most cars that are in decent shape, a simple one-step polish is more than enough to make a massive difference. A good rule of thumb: if you can feel a scratch with your fingernail, it’s probably too deep to fix safely at home and might be a job for a professional.
Your Best Friend: The Dual-Action Polisher
If you're new to this, your first and best tool is a dual-action (DA) polisher. Unlike a professional rotary polisher that can burn through paint in seconds if you're not careful, a DA machine oscillates in a random orbit. This movement keeps heat from building up, making it incredibly safe and forgiving for beginners.
When you detail a car with a polisher, the pad you choose is just as crucial as the liquid you're using. They range from aggressive cutting pads (made of firm foam or microfiber) to ultra-soft finishing pads. A fantastic starting point for any novice is a medium polishing pad paired with a quality one-step polish. It has enough bite to remove minor flaws without being too aggressive.
Pro Tip for Beginners: Keep it simple. Work in a small 2'x2' area. Squeeze 3-4 pea-sized drops of polish onto your pad, spread it around the section with the machine on a low speed, then bump up the speed and work in overlapping passes. When the polish turns clear, you're done.
Don't Let Your Hard Work Go to Waste: Lock It In
You've spent hours perfecting your paint—now you have to protect it. A layer of protection acts as a shield against everything the world throws at your car: UV rays, acid rain, bird droppings, and road grime. You've got three main choices, and each offers a different mix of looks, longevity, and ease of use.
This final step is non-negotiable for preserving your work. With the global car market projected to hit an astonishing USD 4.8 trillion by 2035, it’s clear that vehicles are a major investment. Protecting the finish is key to maintaining that value. You can dig into the future of the car market at Future Market Insights to see just how big this industry is.
Comparing Paint Protection Options
Choosing between wax, sealant, and ceramic coating can feel overwhelming, but it really comes down to your goals and how much time you want to spend. Let's break them down.
This table gives a quick overview of what you can expect from each type of protection.
| Protection Type | Durability | Appearance | Application Difficulty |
|---|---|---|---|
| Carnauba Wax | 1-3 Months | Creates a deep, warm, wet-look glow. | Easy. Typically applied by hand and buffs off easily. |
| Paint Sealant | 4-6 Months | Produces a sharp, reflective, glass-like shine. | Easy to Moderate. Similar to wax but can be less forgiving if left on too long. |
| Ceramic Coating | 2+ Years | Delivers extreme gloss, intense water beading, and superior chemical resistance. | Difficult. Requires meticulous prep and a controlled environment for proper application. |
Here's a little more on each one:
Carnauba wax is the old-school favorite, beloved by enthusiasts for the rich, warm glow it gives, especially on dark cars. It's incredibly satisfying to apply and gives a beautiful look, but it won't last long.
Paint sealants are the modern workhorse. These are synthetic polymers engineered for durability. They form a slick, hard shell over the paint that outlasts any wax, offering a sharp, glassy shine.
Ceramic coatings are the top-tier option available today. A coating is essentially a liquid that cures to form a semi-permanent, super-hard layer of protection that's much tougher than your car's clear coat. It provides incredible resistance to minor scratches and chemicals, and the water beading is insane, which helps keep the car cleaner for longer. The trade-off? The application is intense and leaves no room for error.
For most people detailing their own car, a quality paint sealant is the sweet spot. It offers an excellent blend of lasting protection, a brilliant shine, and a straightforward application process.
Bringing the Interior Back to Life
A truly spectacular detail goes far beyond a glossy exterior. Think about it—the inside of your car is where you actually spend your time. It deserves just as much attention. When I'm detailing a car, I approach the interior systematically to transform it from just a commuter space into a clean, fresh-smelling sanctuary. This isn't just about wiping things down; it's about restoring the materials and protecting them for the long haul.
The first and most impactful step is a serious declutter and deep vacuum. Start by pulling out everything that doesn't belong—floor mats, empty cups, and all the random stuff that accumulates. This gives you a clear canvas and reveals all the hidden spots where dirt and crumbs love to hide.
Vacuuming Like a Pro
A powerful vacuum with the right attachments is non-negotiable here. Before you even start suctioning, grab a soft-bristled detailing brush or even a can of compressed air. Use it to agitate and dislodge debris from all those tight spaces like air vents, seat seams, and that pesky gap between the center console and the seats.
Once you’ve loosened everything up, vacuum methodically. I always start from the top and work my way down, making sure to get way under the seats and deep into the carpet fibers. Your crevice tool is going to be your best friend for getting into tight corners and along trim pieces.
Tackling Upholstery and Carpets
With the loose dirt gone, it’s time to deal with stains and that deep-seated grime in the fabric. A quality automotive-grade all-purpose cleaner (APC) or a dedicated fabric cleaner is what you need. Please, avoid harsh household chemicals—they can easily damage or discolor your car’s interior materials.
For stubborn spots on your fabric seats or carpets, here’s my go-to method:
- Lightly spray the affected area with your cleaner. Don't soak it.
- Gently agitate the spot with a soft upholstery brush to work the cleaner into the fibers.
- Blot the area with a clean, dry microfiber towel. This lifts the stain and the cleaning solution right out.
- Repeat if you need to, but be careful not to oversaturate the fabric. Too much moisture can lead to mildew.
This targeted approach is so much more effective than just spraying and wiping.
Cleaning Hard Surfaces and Leather
Your dashboard, door panels, and center console collect a surprising amount of dust, fingerprints, and grime. A pro tip is to lightly mist your microfiber towel with an interior APC, not the surface itself. This prevents overspray from getting on your glass or electronics. Then, just gently wipe down all the plastic and vinyl.
A clean interior isn't just about looks; it's about creating a healthier driving environment. It's a bit gross, but studies have shown the average car interior can harbor more bacteria than a public toilet seat. That makes a deep clean an essential part of your regular maintenance.
Leather requires a completely different approach. If you want a truly immaculate interior, knowing how to clean leather the right way is a must. Use a dedicated pH-balanced leather cleaner applied to a soft brush, which lets you gently lift dirt from the grain without causing any damage.
After cleaning, always follow up with a high-quality leather conditioner. This is a crucial step. It replenishes the natural oils, keeping the leather soft and supple, which prevents it from drying out and cracking over time.
The Final Details That Make a Difference
The little finishing touches are what elevate a simple interior clean to a professional-level detail. Use a dedicated automotive glass cleaner and two separate microfiber towels—one for cleaning, one for buffing dry—to get those perfectly streak-free windows. And don't forget the door jambs! They collect a ton of dirt and grease and are often missed.
Finally, apply a quality UV protectant to your dashboard and other plastic trim. I recommend choosing a product that leaves a clean, satin, non-greasy finish. This not only makes the surfaces look brand new but also provides a vital barrier against the sun's damaging rays, preventing fading and cracking down the road.
Applying the Finishing Touches and Maintaining the Look
You’ve put in the hard work, and your car is looking fantastic. Now it’s time for those final, crucial details that truly make the difference between a simple wash and a professional-level detail. The first hurdle to clear? Drying your car without leaving behind those frustrating water spots.
Those spots are just mineral deposits left over after the water evaporates. The best way to beat them is with a large, high-quality microfiber drying towel. Instead of rubbing the paint, try laying the towel flat on a panel and gently dragging it across the surface. This "blot and drag" method soaks up the water with minimal friction, which is exactly what you want for your freshly polished finish.
For an even safer, touchless approach, an air blower is your best friend. A dedicated car dryer or even a clean electric leaf blower will blast water out of all the tricky spots—think panel gaps, mirror housings, and grilles—where towels just can't reach.
Achieving a Clean, Dressed Finish
With the paint perfectly dry, let's shift focus to the tires and glass. A good tire dressing does more than just restore that deep, black look; it also provides crucial UV protection.
My pro tip? Don't spray the dressing directly onto the tire. You'll just get messy overspray on your wheels and paint. Instead, apply it to a foam applicator pad first, then wipe it evenly onto the sidewall. This gives you a clean, satin finish that won't sling down the side of your car on your first drive.
Next up, the glass. Grab a dedicated automotive glass cleaner and use the two-towel method for a guaranteed streak-free shine. Use one microfiber towel to apply the cleaner and scrub away grime, then immediately follow with a second, completely dry towel to buff the glass to crystal clarity. It’s not just for looks—it’s a critical safety step.
A great detail isn’t just about the initial result; it's about making future maintenance easier. A protected car stays cleaner longer and is significantly faster to wash next time, turning a multi-hour project into a simple upkeep routine.
Creating a Sustainable Maintenance Plan
So, your car looks incredible. How do you keep it that way? A simple maintenance plan is your ticket to avoiding another full-blown paint correction marathon anytime soon. The whole point is to protect the sealant or wax you just applied and stop new contaminants from bonding to the paint.
Here’s a simple routine to follow:
- Routine Washes: Try to give your car a proper maintenance wash every one to two weeks. Using a pH-neutral soap and safe wash techniques will prevent heavy dirt from building up and causing damage.
- Protection Top-Up: Keep an eye on your protection. Depending on what you used (wax, sealant, or coating), you'll need to reapply it based on the manufacturer's guidelines. This could be every few months for a quality sealant or once a year for certain ceramic coatings.
Consistent upkeep is the secret to keeping any vehicle in prime condition for years. It's about more than just aesthetics; it's about preserving your investment. The principles of regular care aren't just for cars, either—you can find similar pro tips for lasting durability for all sorts of gear. At the end of the day, a well-maintained car is a protected asset.
Your Top Car Detailing Questions, Answered
Even with a solid guide, you're bound to have questions once you get your hands dirty. That's totally normal. Let's tackle some of the most common things people ask, so you can move forward with confidence.
How Often Should I Really Detail My Car?
This is probably the number one question I get. For a full, deep-clean detail—we’re talking clay bar, polish, and a fresh layer of protection—you should aim for once or twice a year. Think of it as a seasonal reset for your vehicle, clearing away all the gunk that builds up over the months and bringing back that showroom shine.
But here’s the real secret to a car that always looks incredible: don't wait for that big detail day. A regular wash every week or two is what truly keeps the heavy grime from taking hold. Staying on top of it makes the big job a whole lot easier.
Can I Just Detail My Car in the Sun?
Please don't. Working in direct sunlight is one of the quickest ways to ruin a perfectly good detail. The heat from the sun bakes products onto your paint before you have a chance to work with them properly.
Soaps, sprays, and other chemicals evaporate almost instantly, leaving behind nasty water spots and streaks. Hot panels also make polishes and waxes a nightmare—they become grabby and are incredibly difficult to buff off cleanly.
My Pro Tip: Always find some shade. A garage or carport is ideal. If that’s not an option, plan your detail for the early morning or later in the evening. You want the panels to be cool to the touch. This one change will save you a world of frustration.
What's the Difference Between a Car Wash and a Detail?
It’s easy to mix these up, but they're worlds apart. A car wash is just a quick surface clean. Its job is to knock off the loose dirt and dust from your daily drives. Think of it as basic upkeep.
Detailing, on the other hand, is a top-to-bottom restoration. It’s a far more intensive process that tackles things a simple wash could never touch. A real detail involves:
- Deep Decontamination: Pulling embedded contaminants out of the paint with iron removers and clay bars until it's perfectly smooth.
- Paint Correction: Actually fixing imperfections by polishing away swirl marks, light scratches, and that dull, hazy look from oxidation.
- Serious Protection: Applying a durable sealant or ceramic coating that will protect the finish for months, not days.
Simply put, a wash maintains the look, but a detail restores and perfects it.
Ready to make every wash safer and more effective? The SwiftJet Car Wash Foam Gun lays down a thick blanket of grime-lifting foam, drastically reducing the risk of swirls and scratches before you ever touch the paint. Get professional-grade results at home by visiting https://swiftjetusa.com to grab yours today.