
The secret to a flawless, scratch-free car wash isn't in the elbow grease—it's all in the setup. I’ve seen it a hundred times: a well-intentioned wash that ends in a web of new swirl marks simply because of a few crucial missteps at the beginning.
Before you even think about touching your car with a wash mitt, take a few minutes to get your environment and equipment right. This is where the real pros separate themselves from the amateurs.
Setting the Stage for a Perfect Wash
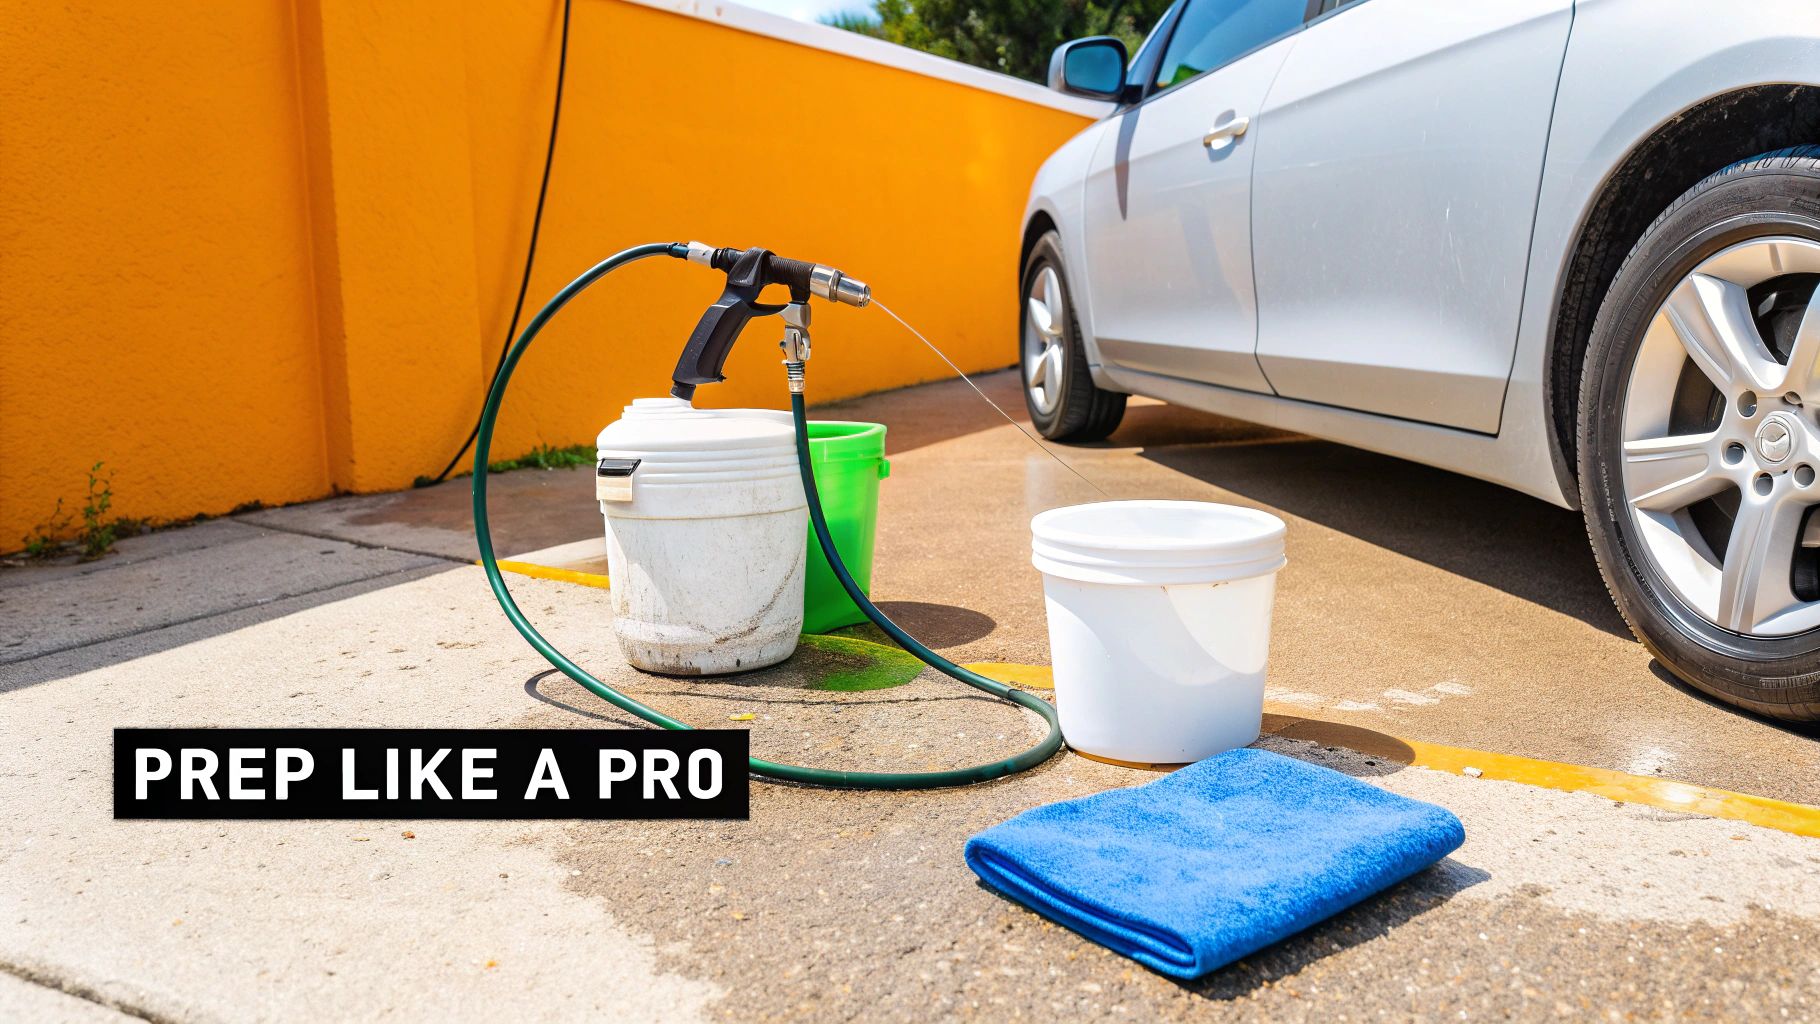
The difference between a stunning finish and a disappointing result is decided long before soap hits the paint. That first ten minutes of prep work directly determines whether you'll end up with a sparkling, swirl-free shine or a finish marred by fine scratches and water spots.
It all starts with picking the right time and place. Washing your car under the hot, direct sun is one of the worst mistakes you can make. The intense heat causes water and soap to evaporate almost instantly, baking residue onto your paint. This not only leaves stubborn water spots but can actually etch into your clear coat, causing permanent damage.
My advice? Always wash in the shade. If that’s not an option, do it early in the morning or later in the evening when the sun is low and your car's panels are cool to the touch.
Assembling Your Scratch-Free Toolkit
Once you've got your shady spot, it’s time to gather your gear. This isn't about buying the most expensive products, but about using the right tools to protect your paint. So many common mistakes come from using things that seem harmless, like old t-shirts or a kitchen sponge. These materials are notorious for trapping grit and dragging it across your paint like sandpaper.
Your must-have list is actually pretty simple:
- Two Buckets with Grit Guards: This is the cornerstone of safe washing and is absolutely non-negotiable. One bucket is for your soapy water, the other for clean rinse water. The grit guards sit at the bottom, trapping the dirt you rinse off your mitt so it doesn't get smeared back onto your car.
- A Quality Microfiber Wash Mitt: Forget sponges. A plush microfiber mitt has a deep pile that lifts dirt particles up and away from the surface, holding them safely within its fibers until you rinse it in the clean water bucket.
- pH-Neutral Car Shampoo: Never, ever use dish soap. It’s designed to strip grease, and it will just as easily strip away any wax or sealant protecting your paint, leaving it vulnerable to the elements.
Here's a quick checklist to make sure you have everything ready to go. Running back and forth for supplies mid-wash is how mistakes happen.
Essential Car Wash Preparation Checklist
This table is your quick reference for the tools and conditions you need before starting your car wash for optimal, scratch-free results.
| Item or Condition | Why It Matters | Expert Tip |
|---|---|---|
| Shaded Location | Prevents soap from drying on the paint, which causes water spots and etching. | If you can't find shade, wash one panel at a time and rinse it immediately. |
| Two Buckets | One for soap, one for rinsing. This keeps dirt from going back onto the car. | Use different colored buckets (e.g., red for rinse, blue for soap) to avoid mix-ups. |
| Grit Guards | Traps dirt at the bottom of the buckets, away from your wash mitt. | After dunking your mitt, rub it gently against the grit guard to release particles. |
| pH-Neutral Soap | Cleans effectively without stripping protective wax or sealant layers. | Look for shampoos that say "wax safe" or "pH balanced" on the label. |
| Microfiber Mitt | Pulls dirt deep into its fibers, away from the paint surface. | Have a separate, dedicated mitt or sponge just for the wheels and tires. |
| Foam Gun/Cannon | A pre-wash foam layer loosens and lifts heavy dirt without any physical contact. | Let the foam dwell for 5-10 minutes but don't let it dry on the surface. |
Getting these few things right sets you up for a wash that actually improves your car's appearance, rather than degrading it.
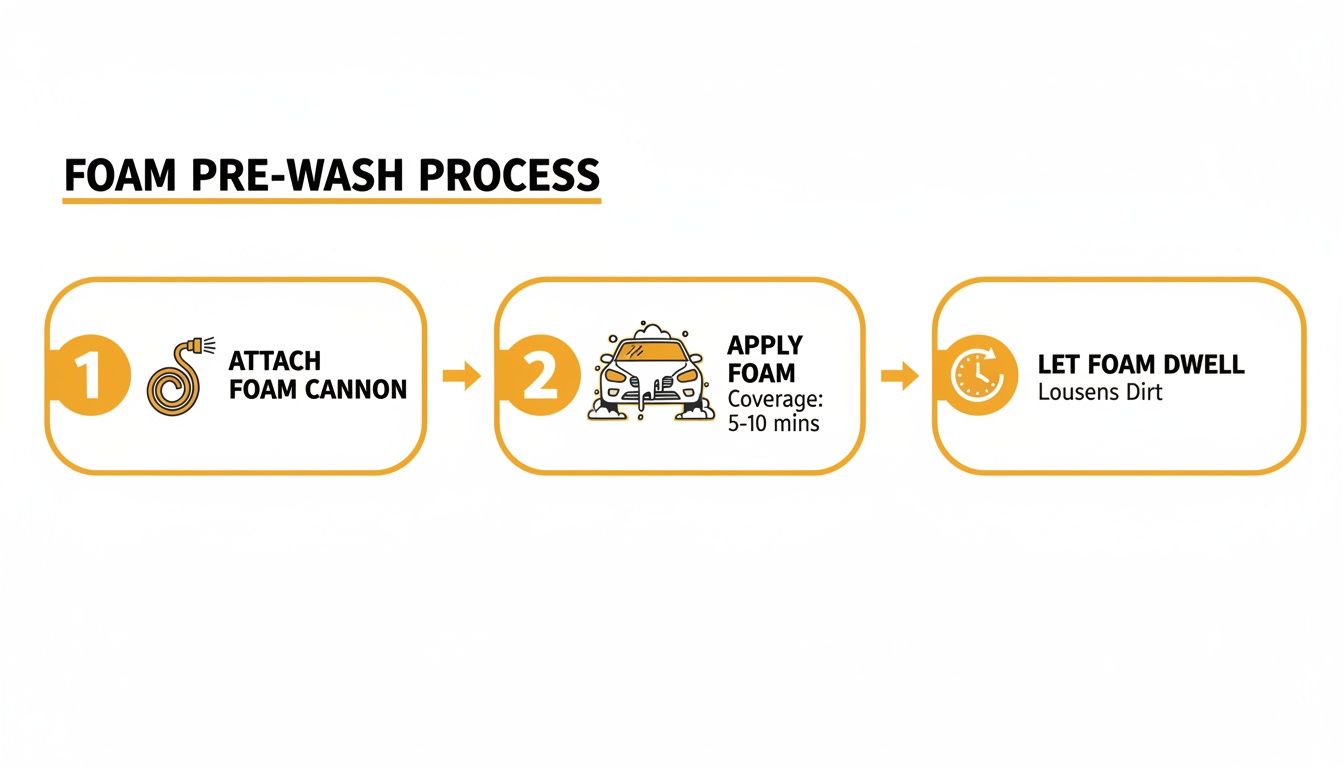
The Power of a Pre-Wash Foam Bath
The final, game-changing step in a pro-level setup is the pre-wash. Your goal here is to get as much of the heavy grime, dust, and grit off the car as possible before you ever touch it. This is where a foam gun, like the SwiftJet, is incredibly effective for anyone using a standard garden hose.
By covering your car in a thick blanket of foam and letting it sit for 5-10 minutes, you're allowing the cleaning agents to break down and encapsulate those abrasive dirt particles. As the foam slowly drips off, it safely pulls that dangerous grit away with it.
This single action dramatically cuts down on the amount of dirt left for the contact wash, making it one of the most powerful car wash tips for preventing swirl marks. It lubricates the entire surface and does the heavy lifting for you, ensuring that when your mitt finally does touch the paint, it’s gliding over a much cleaner, safer surface.
Using a Pre-Wash Foam Bath to Lift Grime Safely
This is where the real detailing magic begins. If there's one single technique I'd recommend to prevent swirl marks, a pre-wash foam bath is it. The whole point is to lift off the heaviest, grittiest contaminants before you ever touch the paint, which dramatically cuts down your risk of scratching it.
The science behind it is pretty straightforward. A quality foam gun, like the SwiftJet, simply hooks up to your garden hose and uses the water pressure to mix car shampoo with air. The result? A thick, shaving-cream-like foam that clings to every single panel.
And this isn't just for a cool "snow foam" effect on Instagram. The foam has a crucial job to do. As it sits there, the cleaning agents—known as surfactants—go to work, surrounding individual particles of dirt and road grime. They essentially break the bond between the gunk and your car's clear coat.
How to Master the Foam Application
Applying the foam correctly is just as important as the foam itself. You’re aiming for full, even coverage so the soap can do its job uniformly across the entire car. It’s a simple process, but getting it right yields professional-level results.
First, add your favorite car wash soap to the foam gun's canister. You don’t need to go crazy here; a couple of ounces is usually enough. For more specific ratios, you can check out our guide on choosing the best foam soap for cars. Top it off with water, give it a gentle swirl to mix, and screw the canister back onto the foam gun.
Connect the foam gun to your garden hose, and you're good to go. Here’s a pro tip that a lot of beginners miss:
- Start From the Bottom Up: Always begin foaming the lower panels of your car and work your way to the roof. This simple trick ensures the dirtiest parts of the car (the rockers, lower doors) get the longest dwell time.
- Prevent Annoying Streaks: Foaming bottom-to-top also stops the suds from running down dry paint, which can cause streaks. Instead, the foam will cascade over already-foamed areas, keeping the coverage consistent.
- Dial in the Mixture: Play with the adjustment dial on your foam gun. You're looking for a consistency that’s thick enough to cling for several minutes but not so heavy that it just slides right off.
Once your car is wearing a nice white blanket of foam, the most important part begins: just wait.
Let the foam dwell for 5 to 10 minutes. This is the sweet spot for the soap to encapsulate all that dirt. Just be careful not to let it dry on the surface, especially if you're working in the sun or on a warm day. You'll actually see the foam start to sag as it pulls the grime down with it.
Why At-Home Foaming Is Gaining Traction
The rise of easy-to-use tools like hose-end foam guns is really changing how people detail their cars at home. While the subscription car wash industry is set to explode—projected to grow from $6.39 billion in 2025 to $16.43 billion by 2035—more and more enthusiasts are bringing pro techniques to their own driveways.
This trend is all about getting better results and providing the specialized care modern cars, especially EVs, demand. A quality tool like the SwiftJet foam gun can produce thicker, more effective foam than many competitors, which not only speeds up the wash but can cut down on micro-scratches by up to 75%, according to some studies.
This simple pre-wash is the perfect example of working smarter, not harder.
The Final Rinse Before the Contact Wash
After the foam has had a few minutes to work, it’s time for the rinse. Using a gentle spray from your hose, start rinsing from the top down. This lets gravity do half the work for you, efficiently pulling all the dirty suds off the vehicle.
Don't rush this part. Make sure you get into all the little nooks and crannies—around the emblems, inside the grille, and between the panel gaps.
Once you’re done, you'll be looking at a car that is worlds cleaner and, more importantly, far safer for the two-bucket contact wash that comes next. You’ve successfully removed the most dangerous, scratch-inducing grit without ever laying a mitt on the paint.
The Two-Bucket Method: Your Best Defense Against Swirl Marks
Now that the pre-wash foam has done the heavy lifting, it's time to actually touch the car. This is the moment of truth—the contact wash is where most swirls and fine scratches are born. But with the right technique, you can keep your paint looking flawless.
The gold standard here is the two-bucket method. It's a simple, almost ridiculously effective strategy that professional detailers live by, and it’s all about keeping your wash mitt clean.
The logic is sound. You'll have one bucket with your pH-neutral car shampoo solution (the "Wash" bucket) and a second one filled with plain, clean water (the "Rinse" bucket). For best results, drop a grit guard into the bottom of both. This little plastic insert is crucial; it traps the dirt you rinse off your mitt at the bottom, preventing you from picking it right back up.
This setup creates a clear separation: your soapy water stays clean, and the rinse bucket becomes a dumping ground for all the nasty road grime you lift off the paint.
The foam pre-wash you just did sets the stage perfectly for this step.
By following that simple "Attach, Foam, Dwell" process, you’ve already removed the vast majority of loose grit before your mitt even touches the paint.
Perfecting the Top-Down Approach
How you wash is just as important as what you wash with. The single most important rule? Always work from the top down. This is one of those foundational car wash tips for a very good reason.
Think about it: the roof, hood, and windows are usually the cleanest parts of your car. The real filth—the heavy, abrasive gunk—lives on the lower rocker panels, bumpers, and behind the wheels.
Starting at the top lets gravity work for you. Dirty water naturally runs down over areas you haven't washed yet. This simple habit prevents you from dragging the worst of the road grime from the bottom of your car all over the delicate paint on the top surfaces.
Here's how the rhythm of the wash should go:
- Load up: Dip your clean microfiber wash mitt into the soapy water bucket.
- Wash a section: Gently wash a single panel, like the roof or half the hood. Always use straight, overlapping lines—never scrub in circles. This dramatically reduces the risk of creating swirl marks.
- Rinse the mitt: Before going back for more soap, dunk your now-dirty mitt into the clean water rinse bucket. Really agitate it against the grit guard to release all the trapped dirt.
- Reload and repeat: With a clean mitt, go back to the soap bucket and load up for the next panel. Continue this process, working your way down the car, panel by panel.
Why Wheels and Tires Get Their Own Tools
Your car's wheels and tires are a completely different animal. They're caked in brake dust (which is essentially tiny, sharp, hot metal shavings), road tar, and all sorts of other nasty stuff. You want none of that touching your paint. Ever.
For this reason, you must use a separate, dedicated set of tools for your wheels. That means a dedicated wheel bucket (yes, a third bucket is ideal), specific brushes, and a wash mitt that you never, ever use on the body of the car.
This isn't just a suggestion; it's a non-negotiable rule for a safe wash. Mixing your wheel tools with your paint tools is the fastest way to put deep, ugly scratches into your clear coat.
Always wash the wheels and tires last, after you've finished the rest of the car. This prevents any of the powerful (and often aggressive) wheel cleaners from splashing onto your freshly cleaned paint. Follow this process, and you'll get a truly professional, scratch-free finish every single time.
Getting Your Car Dry Without Causing Scratches
You’ve done the hard work. The car is clean, the soap is gone, and you’re on the home stretch. But this is where so many people mess up. A bad drying job can instantly cover your beautifully clean paint with fine scratches and swirl marks, undoing everything you just accomplished.
Honestly, the final rinse and drying process is just as crucial as the wash itself. Think about it: any tiny bit of leftover grit or even minerals in your tap water can act like sandpaper when you drag a towel across the paint. Nailing this final step is the secret to getting that truly flawless, streak-free shine.
Start with a “Sheeting” Rinse
Before you even think about grabbing a towel, you can get rid of up to 80% of the water on your car with a simple trick called a sheeting rinse. It sounds fancy, but it couldn't be easier.
Just unscrew the spray nozzle from your garden hose. Let a gentle, open stream of water flow over the car, starting from the roof and working your way down. You'll see the magic happen—the stream of water pulls the beads and droplets right off the panels with it. It’s a huge time-saver.
This one technique is a game-changer. It seriously cuts down on how much you have to dry by hand, which means less contact between a towel and your paint. Less contact means a much lower chance of scratching.
Choosing Your Drying Tools Wisely
Now that most of the water is gone, it's time to pick your weapon for the final dry. This is where a lot of common household items can cause some serious, irreversible damage.
Here’s a quick rundown of what to use and what to avoid:
| Tool | Why It Works (or Doesn't) | Verdict |
|---|---|---|
| Plush Microfiber Towel | The deep, soft fibers are designed to soak up water and pull any lingering dirt away from the paint's surface, trapping it safely. | Excellent & Safest Option |
| Air Blower / Leaf Blower | It's a completely touch-free way to dry. It pushes water out of all the tight spots and off panels without anything ever touching the paint. | Excellent & Safest Option |
| Old Bath Towels | Those coarse cotton fibers are way too abrasive for car paint. They’ll leave behind a trail of fine scratches and a ton of lint. | Avoid at All Costs |
| Silicone Water Blade | They seem efficient, but if a single piece of grit gets trapped under that blade, you'll drag it across the entire panel, creating a nasty scratch. | Avoid at All Costs |
Your absolute best bet is a big, high-quality microfiber drying towel. If you're curious about what makes them so much better than the rest, you can learn more about selecting the right microfiber towels for cleaning.
The “Blot and Pat” Drying Method
Even with the perfect towel, your technique is everything. Please, never drag a dry or even a semi-damp towel across the paint in a wiping motion. That’s a one-way ticket to creating what detailers call "towel-induced marring."
Instead, use the blot and pat method. It's simple:
- Lay the Towel Flat: Gently spread your large microfiber towel across a panel, like the hood or roof.
- Pat Gently: Lightly pat the top of the towel. Don't press hard. Let its absorbency do all the work.
- Lift and Repeat: Carefully lift the towel straight up—don't drag it—and move to the next wet section. For sides and doors, you can fold the towel and gently blot the surface.
This method ensures you're just lifting water away from the surface without creating friction. For an extra layer of protection, I highly recommend a drying aid. It’s a slick lubricant you mist onto the wet panel right before you blot it. This adds slickness, makes the process even safer, and usually leaves behind a nice bit of gloss or a fresh layer of sealant.
The car care world is changing. While professional car washes are more popular than ever—projected to be used by nearly 80% of U.S. drivers in 2025, a huge jump from 48% in 1994—a growing number of enthusiasts are bringing professional techniques home. This shift is all about getting better results and being smarter with water, especially in places like Europe with strict regulations. For instance, foam pre-soaks are proven to lift 90% more grime while using 30-50% less water, a trend helping to fuel a massive $84.77 billion market. You can read more on these industry trends from the International Carwash Association.
Applying the Finishing Touches for a Showroom Look
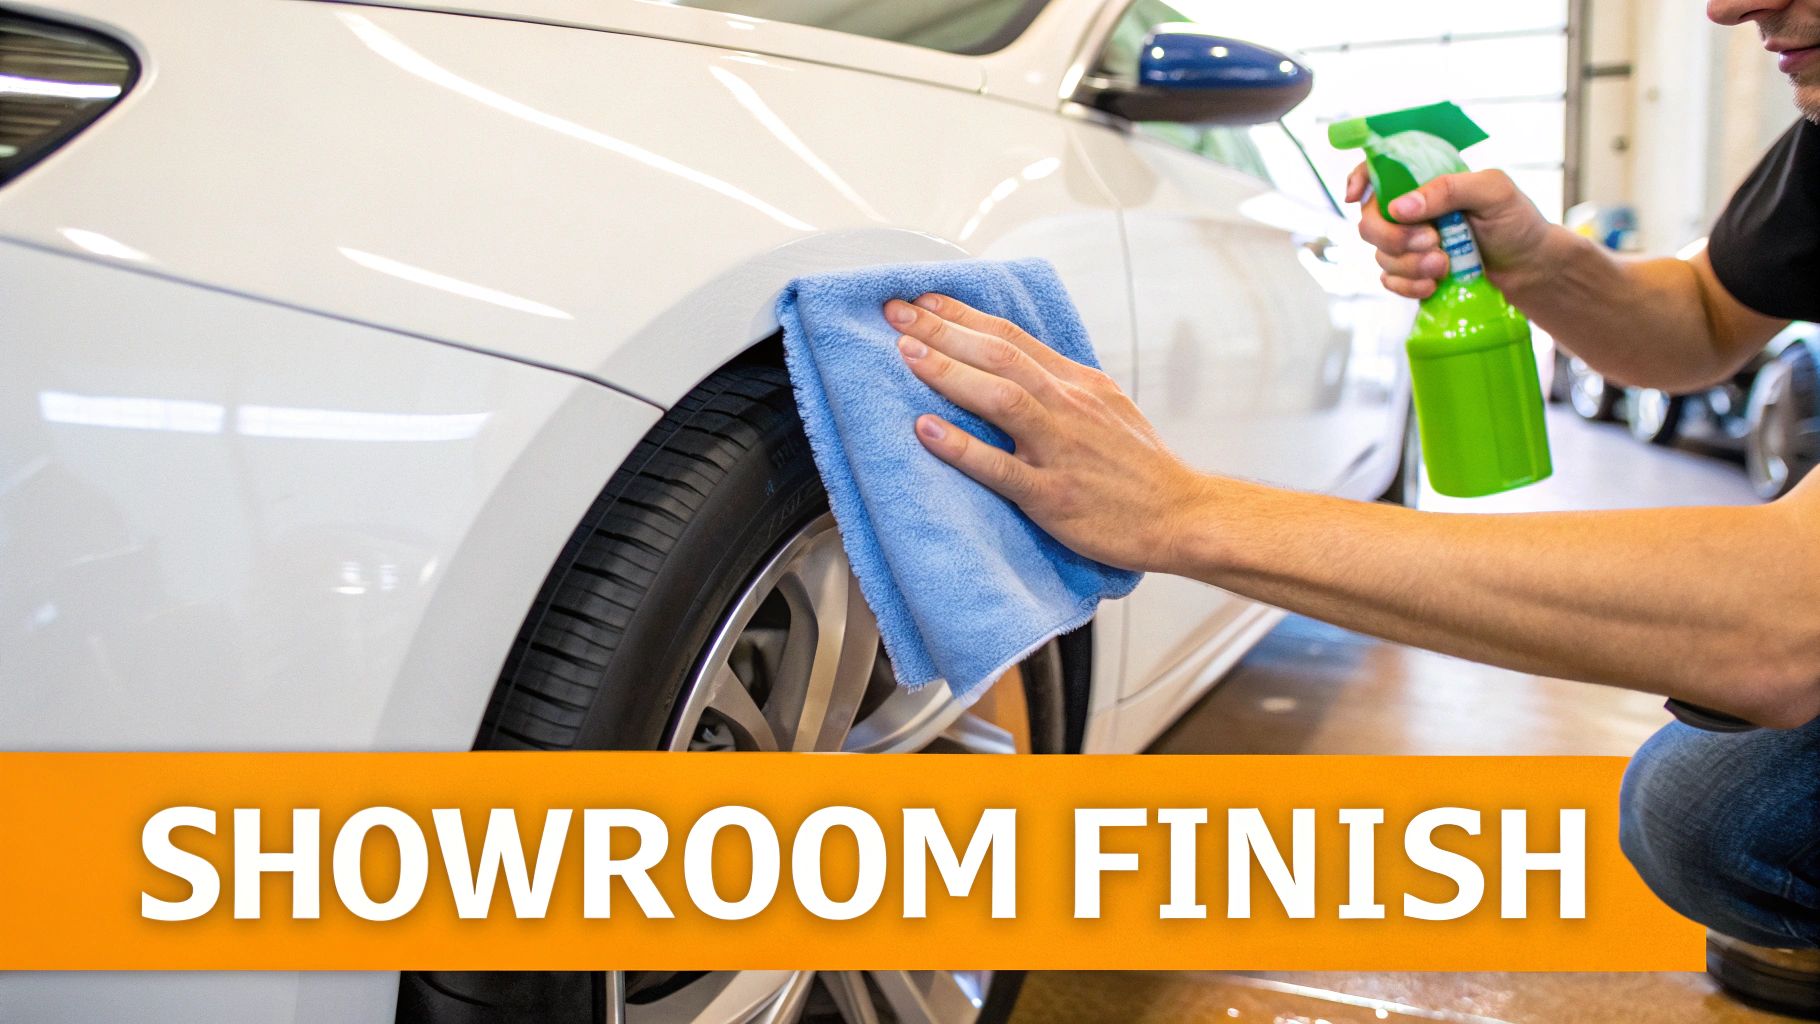
You’ve washed and dried the car, but don't pack up your gear just yet. The next few steps are what really separate a clean car from a professionally detailed one. This is where you create that sharp, head-turning look that makes all the effort feel worthwhile.
Think of it like this: skipping these final touches is like wearing a brand-new suit with muddy shoes. It just undermines all the great work you've already put in.
Getting Crystal-Clear Glass
Nothing ruins a great wash like hazy, streaky windows. The secret to an invisible, streak-free finish isn't complicated—it just requires the right product and technique. First, ditch the household glass cleaners. Many contain ammonia, which is terrible for automotive window tint and can dry out the rubber seals around your windows.
Always grab an automotive-specific, ammonia-free glass cleaner. From there, the two-towel method is your best friend for getting perfect results every time.
- The Cleaning Towel: Take a low-pile microfiber towel, spritz it with cleaner, and do the initial wipe-down. Fold it into quarters so you always have a fresh, clean side to work with.
- The Buffing Towel: Grab a second, completely dry microfiber towel (a waffle-weave one is fantastic for this) and buff away any leftover residue. This final buff is what truly eliminates the streaks.
Here’s a pro tip: roll your windows down about an inch to clean that top edge of the glass that usually hides inside the seal. It’s a small detail that makes a huge difference. While you're focused on the glass, it's also a good time to think about long-term protection; understanding the many car window tinting benefits shows how it can protect your interior from UV damage while adding a sleek look.
Dressing the Tires for a Rich, Black Finish
Clean wheels paired with faded, brownish tires just look incomplete. A good tire dressing is the finishing touch that frames your clean paint and wheels, giving the whole car a sharper, more finished appearance. The goal here isn't a greasy, high-gloss shine that slings product down the side of your car, but a deep, satin black finish that looks brand-new.
The secret to a perfect application is using a dedicated foam applicator pad. Never spray the dressing directly onto the tire—the overspray will get all over your freshly cleaned wheels and can even hit your brake components.
Just apply a small amount of dressing to your applicator and work it into the rubber evenly. Let it sit for a few minutes, then take a clean, old microfiber cloth and give the tire a quick wipe. This removes any excess product and leaves you with that crisp, non-greasy satin look.
Adding That Final Layer of Gloss and Protection
The last step is to apply a quality spray wax or quick detailer. This is the final reward for your paint after a thorough wash. This step doesn't just add a stunning gloss; it also lays down a slick, protective layer that helps shield your paint from dust, UV rays, and other light contaminants.
Working one panel at a time, lightly mist the surface with your chosen product. Use a clean, plush microfiber towel to gently spread it across the panel. Immediately flip the towel over to a dry side and buff the area to a brilliant shine.
This simple step does more than just make your car look fantastic today. It creates a hydrophobic surface that makes water bead up and roll right off, which will make your next wash significantly easier. For a deeper dive into these techniques, check out our guide on advanced vehicle detailing tips.
Taking these last few minutes to properly detail the glass, tires, and paint is one of the most impactful car wash tips you can follow to get that professional, showroom-quality finish right in your own driveway.
Answering Your Top Car Wash Questions
Even the most seasoned car enthusiast has questions. Getting the right answers is what separates a decent wash from a truly flawless finish. Let's tackle some of the most common questions I hear from people trying to perfect their at-home detailing game.
So, How Often Should I Really Wash My Car?
This is the big one, and the honest-to-goodness answer is: it depends entirely on your car's life. For the average daily driver in a pretty mild climate, giving it a good wash every two weeks is the sweet spot. That’s enough to keep everyday grime like dust, pollen, and road film from really getting a grip on your paint.
But life isn't always average. Your local environment is the real boss here.
- Living in the Rust Belt? If you see salt trucks in the winter, a weekly wash isn't optional—it's survival. Salt is paint's worst enemy, and it will aggressively start corroding your car's body and undercarriage.
- Near the Coast? That salty sea breeze is just as nasty as road salt. It speeds up oxidation like you wouldn't believe. A quick weekly rinse-down can make a huge difference.
- Parked Under "Nature"? If your car is a magnet for bird droppings, tree sap, or industrial dust, you'll need to wash it more frequently. Bird droppings, in particular, are incredibly acidic and can permanently etch your clear coat in just a couple of days.
The real goal here is consistency. Think of regular washing not as a chore, but as essential preventative maintenance for your paint.
Can I Just Use Dish Soap? It's All I've Got.
I know it's tempting, but please don't. This is a hard no. Grabbing the dish soap from your kitchen is one of the worst things you can do to your car's finish.
Dish soaps are incredible degreasers. They're designed to obliterate every trace of oil and grease, which is perfect for last night's lasagna pan but catastrophic for your car. It will strip away any protective wax, sealant, or ceramic coating you have, leaving your paint completely naked and vulnerable to the sun's UV rays and every other contaminant out there.
Do yourself a favor and stick to a dedicated, pH-neutral car wash shampoo. These are engineered to gently lift dirt without destroying the protective layers that keep your paint glossy and safe.
Wax vs. Sealant vs. Ceramic Coating: What's the Difference?
Trying to figure out paint protection can feel like a deep dive, but it really boils down to three levels of a "shield" for your paint, each with different ingredients and lifespans.
- Wax: This is the old-school classic, usually made from natural carnauba. Waxes give you that deep, warm glow that car show folks love. The trade-off? They don't last long, typically giving you a few weeks to a month of protection before needing to be reapplied.
- Sealant: Think of sealants as a modern, synthetic upgrade. They're lab-created polymers that chemically bond to the paint for a stronger hold. The look is more of a slick, glassy shine, and the protection is much more durable, usually lasting four to six months.
- Ceramic Coating: This is the top tier of paint protection available today. It’s a liquid polymer that forms a semi-permanent, hardened glass-like layer over your paint. It offers incredible resistance to chemicals, UV damage, and light scratches, and a single application can last for several years with the right care.
Help! My Paint is Covered in Swirl Marks. How Do I Fix Them?
There's nothing more frustrating than finishing a wash, pulling the car into the sun, and seeing a spiderweb of fine scratches. Those are swirl marks. They're microscopic scratches in the clear coat, and 99% of the time, they’re caused by bad washing and drying habits—think gritty sponges, dirty towels, or automated car washes with those giant, abrasive brushes.
First, the good news. Following the two-bucket method and safe drying techniques we've covered will stop you from creating any more swirls.
But to get rid of the ones you already have, you'll need something called paint correction. This involves using a machine polisher with specific compounds and pads to carefully level the clear coat, which essentially erases the scratches and brings back that deep, mirror-like shine. It’s a process that takes a lot of skill and patience, and for most people, it's a job best handed over to a professional detailer.
It’s no surprise that at-home car care has exploded. The global car wash services market rocketed to USD 36.07 billion in 2024 and is on track to hit USD 54.51 billion by 2032. While nearly 80% of North American drivers still use professional services, rising costs have more people taking matters into their own hands. And the results are impressive—statistics show that proper foam application alone can slash wash-induced scratches by a whopping 70%. You can dive into more of this research from Technavio's market analysis.
Ready to take your home car wash to the next level and leave swirl marks in the past? The SwiftJet Car Wash Foam Gun turns any standard garden hose into a pro-level foaming machine, blanketing your car in the thick suds needed for a truly safe wash.