
Washing your motorcycle the right way is about a lot more than just making it shine. Think of it as a fundamental part of your maintenance routine—a hands-on chance to protect your investment and make sure everything is running as it should. If you let dirt and grime build up, you’re inviting corrosive gunk to do some serious damage.
Road grime, splattered bugs, and brake dust aren’t just ugly; they’re a real threat. These contaminants are often acidic and can eat away at your bike's clear coat, dull the chrome, and cause rubber seals to degrade. A quick hose-down just won't cut it.
The best approach is a methodical and gentle one, centered around the classic two-bucket method, a good pH-neutral soap, and soft wash mitts. This technique is designed to lift dirt away without scratching the paint and protects all the sensitive bits and pieces from harm.
Turning a Chore into Essential Maintenance
When you wash your bike properly, you’re forced to get up close and personal with every single part. It’s during this process that you’ll spot potential problems you'd otherwise miss.
- Mechanical Checks: It's a lot easier to see a loose bolt, a small fluid leak, or a cable that's starting to fray when it isn't caked in mud.
- Tire Health: Cleaning your wheels is the perfect time to inspect your tires for nails, weird wear patterns, or signs of low pressure.
- Component Integrity: You can get a clear look at your brake pads, check the chain tension, and assess your suspension without a layer of dirt in the way.
This simple act of washing transforms a weekend chore into a critical diagnostic check. It becomes your first line of defense in preventative maintenance, potentially saving you a ton of money on future repairs.
This shift in thinking isn't just a local trend. Riders all over the world are realizing that specialized care preserves their bike's value and performance. The numbers back it up, too. The global motorcycle care kit market is on track to hit about $1 billion by 2030. This growth isn't just about shiny bikes; it's about a widespread understanding that proper cleaning is key to longevity. You can read more about this growing market and what it means for riders on htfmarketinsights.com.
Ultimately, learning the right way to wash a motorcycle is about showing your machine the respect it deserves. Our detailed vehicle detailing tips can give you even more pointers on getting that perfect, long-lasting finish.
Gearing Up: Your Motorcycle Cleaning Arsenal
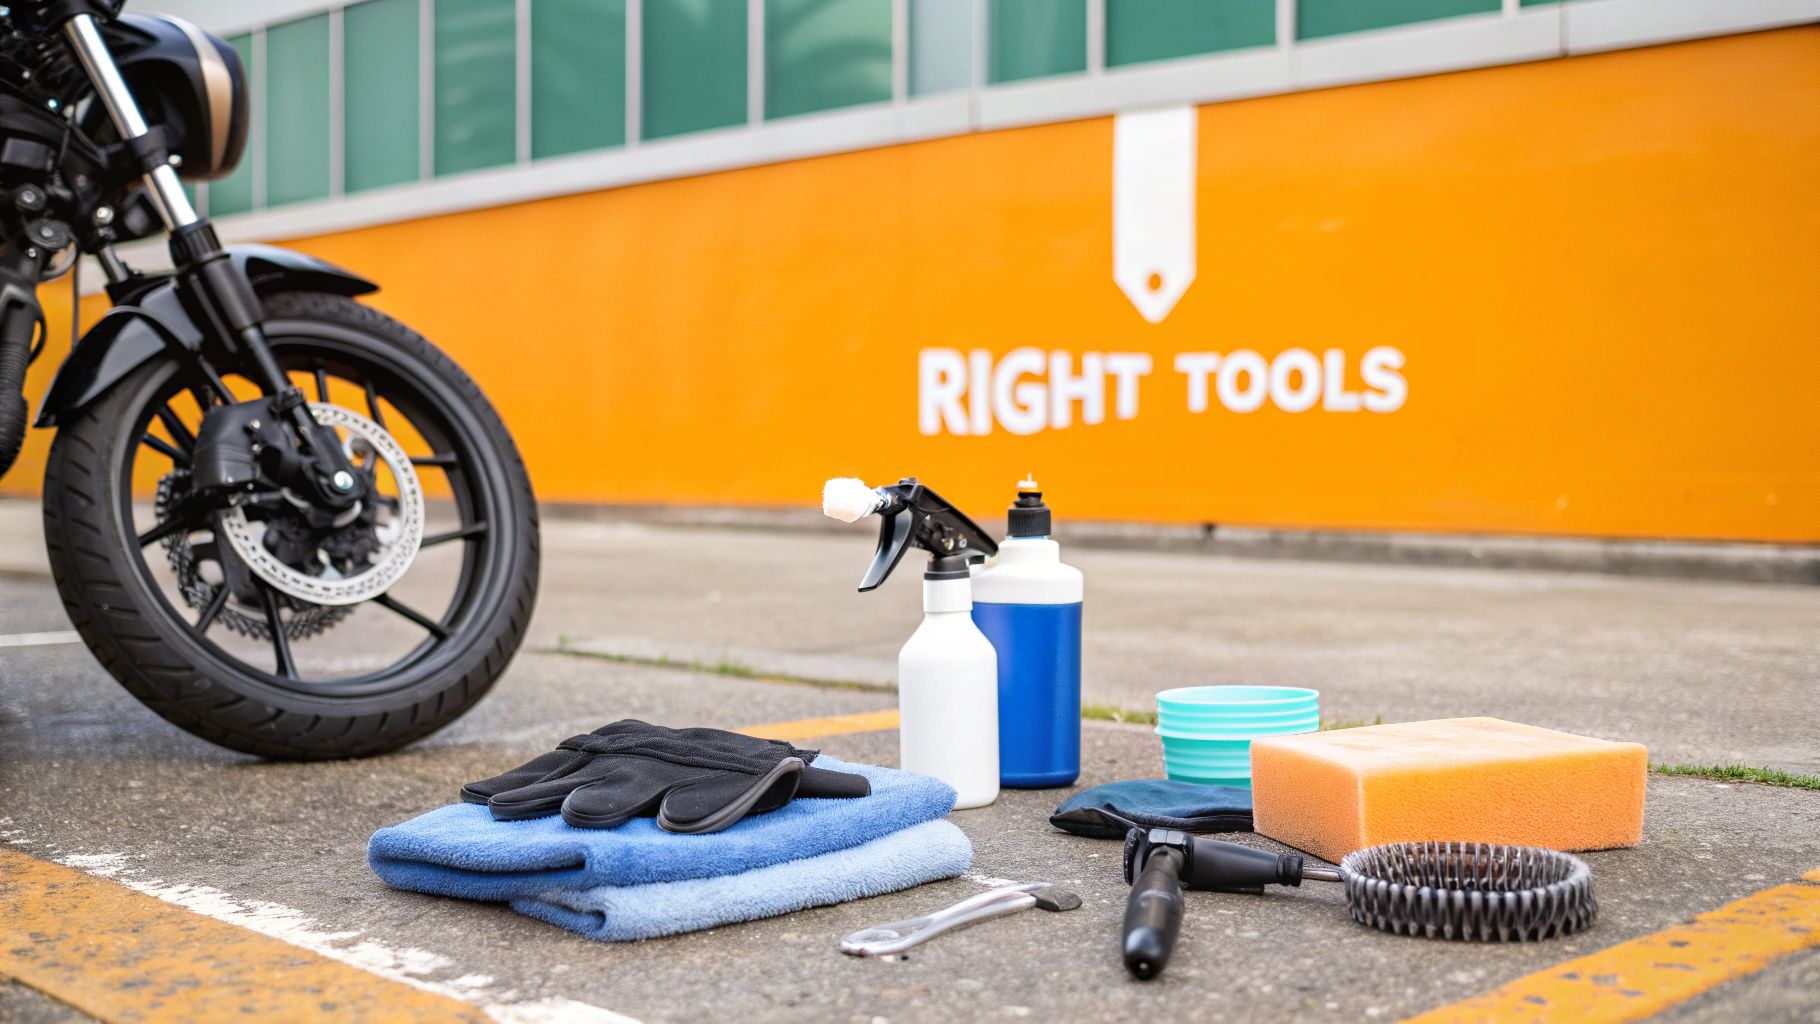
Let's be honest—using the wrong stuff to wash your bike can cause more damage than just leaving it dirty. I’ve seen it a hundred times: a well-meaning owner grabs a kitchen sponge and some dish soap, and they end up with a clean bike covered in new swirl marks and dull paint. A proper, safe wash starts with having the right tools for the job.
The absolute bedrock of a safe wash is the two-bucket method. It’s not fancy, but it’s crucial. You'll have one bucket with your sudsy motorcycle soap and a second one filled with plain water. Every time you wipe down a section, you rinse the dirt and grit from your wash mitt in the clean water bucket before dipping it back into the soap. This simple step keeps you from dragging a gritty mitt all over your bike's finish.
Core Cleaning Supplies You Can't Skip
What you wash your bike with is just as important as how you wash it. Stay away from household cleaners. That dish soap is designed to cut grease aggressively, which means it will strip off any wax or sealant you've applied and can dry out your rubber and plastic bits over time.
You need a pH-neutral, motorcycle-specific soap that’s tough on grime but gentle on your bike’s surfaces. If you want to dive deeper into why this matters, understanding the best foam soap for cars and bikes is a great place to start.
Here’s a quick rundown of the gear you'll want to have on hand before you even turn on the water.
Essential Motorcycle Washing Supplies
| Tool/Product | Purpose | Pro Tip |
|---|---|---|
| pH-Neutral Soap | Safely cleans without stripping wax or harming finishes. | Look for soaps designed to create thick foam to help lift dirt. |
| 2 Wash Buckets | Separates clean, soapy water from dirty rinse water. | Get "Grit Guards" for the bottom of each bucket to trap dirt. |
| Microfiber Wash Mitts | Traps dirt in deep fibers, preventing scratches. | Use at least two: one for paint and one for dirtier areas (wheels, engine). |
| Soft-Bristled Brushes | Cleans intricate, hard-to-reach spots. | An old, soft toothbrush is perfect for tight crevices around bolts. |
| Chain Cleaner | A degreaser that safely removes old lube and grime. | Make sure it's "O-ring safe" to avoid damaging your chain. |
| Microfiber Towels | For a scratch-free, spot-free dry. | A large, plush "waffle weave" towel is great for soaking up water quickly. |
Having these essentials ready makes the whole process smoother and, more importantly, safer for your motorcycle’s finish.
Game-Changing Tools for a Better, Safer Wash
If you're ready to take your cleaning game to the next level, a foam gun is your best friend. A tool like the SwiftJet Foam Gun is brilliant because it just hooks up to a regular garden hose. It completely blankets your bike in a thick, clinging foam that starts dissolving and lifting dirt before you even touch the surface.
The goal is to touch the paint as little as possible while it’s dirty. Every tool should be chosen with this principle in mind, from the initial rinse to the final drying towel.
This "foam-first" approach is the real secret to minimizing scratches. It lets the soap do most of the work, so you're not just grinding grit into the clear coat with your mitt. For those of us who don’t have a garage with a hose, a good portable water tank system can be a lifesaver, ensuring you have enough water for a thorough rinse and wash anywhere.
Finally, don’t skimp on your drying towels. A stack of high-quality microfiber towels is the only way to finish the job without leaving behind annoying water spots or fine scratches.
Getting Started: The Pre-Wash Is Key to a Flawless Finish
If you want to create a mess of swirl marks and fine scratches on your bike, just jump right in and start scrubbing. I see it all the time. But if you want that flawless, better-than-new shine, the real work starts long before a wash mitt ever touches your paint. This is the pre-wash phase, and it’s all about patience, proper setup, and letting your cleaning products do the hard work for you.
First thing's first: get your bike out of the sun. Washing in direct sunlight is a classic rookie mistake. The heat bakes soap and water onto your finish almost instantly, leaving behind ugly water spots and a film of residue that’s a real pain to get off. Pull it into the garage or wait for a cloudy day. Just as important, let the bike cool down completely, especially the engine and exhaust. Give it a solid 15-20 minutes; you don't want to spray cold water on hot metal.
Cover Up Your Bike’s Sensitive Bits
Before you even think about grabbing the hose, take a minute to protect the vulnerable parts of your motorcycle. Water is sneaky and will find its way into places it has no business being, leading to all sorts of electrical gremlins and corrosion down the road.
This is a simple but non-negotiable step.
- Exhaust Pipe: Shove a plastic bag or, even better, a dedicated exhaust plug into the muffler. You don't want water sitting in your exhaust system.
- Electronics & Switches: Got an aftermarket dash or some exposed wiring? Loosely cover it with a small plastic bag or some cling wrap. Don't seal it tight, just shield it.
- Air Intake: If your bike has an exposed air filter, make absolutely sure it's covered. A waterlogged filter is a recipe for a bad day.
This literally takes 60 seconds, but it can save you from hours of troubleshooting and expensive repairs. It's the difference between a safe wash and a risky one.
The point of the pre-wash isn't to get the bike spotless. The goal is to safely lift off all the loose, abrasive grit before you physically touch the paint. This one step is what separates a pro-level wash from a scratch-inducing amateur job.
Bring on the Foam and a Gentle Rinse
With everything protected, you can finally grab the hose. Start with a gentle rinse—I’m talking a shower setting, not a high-pressure jet—to knock off the top layer of dust, mud, and road grime. Always work from the top down and let gravity do the work of pulling all that gunk onto the ground.
Now for the fun part. This is where a foam gun, like the SwiftJet, completely changes the game. Hook it up to your hose and lay down a thick, satisfying blanket of foam over the entire bike. Seriously, don't be shy here. You want a heavy layer that clings to every surface, from the tank and fairings to the deep nooks and crannies of the engine.
Let that foam sit and do its thing for about 5-10 minutes. Just watch—you'll see it actively dissolving road grime and encapsulating the dirt, lifting it right off the surface. This chemical cleaning does the bulk of the initial work, which means far less scrubbing for you and a much, much safer wash for your paint.
Once the foam has worked its magic, give the bike another top-to-bottom gentle rinse. You'll be genuinely surprised by how much cleaner it looks already, and you haven't even touched it with a mitt yet.
The Two-Bucket Wash: Your Best Defense Against Scratches
Alright, your bike is pre-foamed and the worst of the grime is starting to loosen up. Now it's time for the "contact wash," and this is where the pros separate themselves from the amateurs. We’re going to use the two-bucket method, a simple technique that is hands-down the best way to prevent putting tiny scratches and swirl marks into your paint.
The logic is simple but genius. You’ll have one bucket with your motorcycle shampoo mix and another bucket filled with plain, clean water. The plain water bucket is your rinse station for the wash mitt. This simple separation is the key to ensuring you're not just grinding the dirt you just removed right back into your clear coat. It's a non-negotiable step for a truly safe wash.
Tackle the Grimiest Parts First
Before your pristine wash mitt even thinks about touching your fuel tank or fairings, you need to deal with the road warriors—the parts caked in the nastiest gunk. We do this first to avoid dragging brake dust and chain lube all over the bike.
- Wheels & Tires: Grab a dedicated, soft-bristled brush for the tires and a separate, often less-fluffy, wash mitt for the wheels. This is critical because brake dust is essentially tiny, sharp metal flakes. You want to keep that stuff isolated and far, far away from your paint.
- Chain & Undercarriage: If you didn't hit the chain hard during the pre-wash, now’s the time. A good degreaser and a proper chain brush will make quick work of it. A long-handled brush is also your best friend for getting into the nooks and crannies under the engine and around the swingarm.
By getting these dirty jobs out of the way first, you quarantine the worst of the abrasive grit. Now you can move on to the delicate parts with clean tools and clean water.
The Top-Down Strategy for Paint and Chrome
With the lower sections handled, it's time for the main event. Grab your fresh, plush microfiber wash mitt—the one reserved only for the pretty parts. Dunk it in your soap bucket, get it nicely saturated, and start at the top.
Gently glide the mitt across a panel, like the top of the tank or a fender. The key here is to use straight, overlapping lines, not frantic circles that can create swirls. After just that one section, it's time to clean your mitt. Plunge it into the rinse bucket and swish it around vigorously, maybe even rub it against a Grit Guard at the bottom if you have one.
You'll see the dirt cloud the water. Perfect. That's grime that won't be touching your bike again. Now, and only now, do you go back to the soap bucket for a fresh load of suds and move to the next section.
This constant "rinse-and-reload" cycle is the absolute heart of the two-bucket method. It might feel a little tedious, but trust me, this simple discipline is what saves your paint's finish from getting dulled by micro-scratches over time.
This diagram shows how a proper pre-wash sets you up for success before you even begin the contact wash.
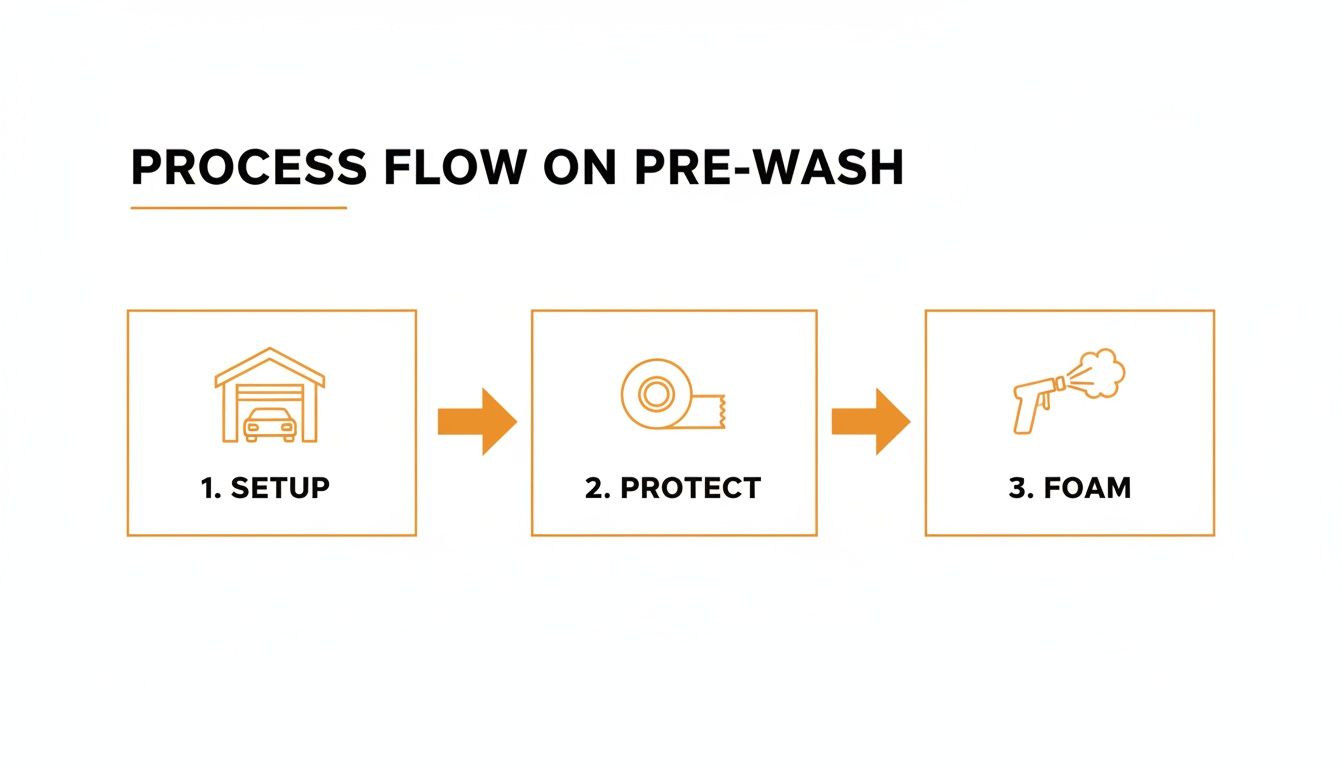
When you take the time to set up, protect sensitive components, and apply a good foam, the two-bucket wash that follows becomes infinitely safer and more effective.
Hitting the Details and Different Finishes
Remember, your bike isn't just one big piece of plastic. You've got different materials that need slightly different approaches. For glossy paint and shiny chrome, that plush mitt is your go-to. But for textured black plastics or a delicate matte finish, use a light touch and make sure your soap doesn't contain any waxes or glossing agents.
Don't forget the fiddly bits! This is where a good set of soft detailing brushes comes in handy. Dip a brush in your soapy water and gently work it around engine cooling fins, behind brake calipers, and into all the suspension linkages. This is the difference between a quick wash and a proper detail.
It's this demand for a better, safer clean that has fueled the rise of tools like foam cannons. Interestingly, tightening environmental regulations are also pushing the industry towards high-performance, eco-friendly products that work great without harming the planet. You can actually read more about these market trends over at Verified Market Research.
Drying and Finishing for Lasting Protection
Just like the first rinse, the final one is a make-or-break moment. After you’ve finished the contact wash, give your bike a complete, top-to-bottom rinse with low pressure. This is your chance to flush away every last bubble of soap residue.
Don't forget to aim the water into all those sneaky spots—behind the license plate, deep inside fairing vents, and around the engine cases. Any soap left behind will dry into dull patches that act like a magnet for fresh dirt.
Once the final soap sud is gone, the race against water spots begins. These pesky mineral deposits are left behind as water evaporates, and they can ruin an otherwise perfect wash.
Pick the Right Drying Method
When it comes to drying, you’ve got a couple of great, scratch-safe options. The first is the old-school blotting technique. Using a large, plush microfiber towel, gently lay it flat on a surface like the fuel tank or seat. Pat it down to soak up the water, then lift and repeat on the next section. The golden rule here is to avoid wiping aggressively; dragging even a tiny speck of missed grit across your clear coat is a recipe for disaster.
Your second option, and my personal favorite for its thoroughness, is using forced air. A dedicated motorcycle dryer or even a powerful electric leaf blower works wonders here. This is the only way to get water out of tight spaces like switchgear, engine fins, and around bolt heads where rust loves to start. It's a completely touchless method for the most delicate parts of your bike.
Pro Tip: I use a hybrid approach for a flawless finish. I start with the air dryer to blast water out of every nook and cranny. Then, I come back with a soft microfiber towel to gently blot any remaining water from the large, flat surfaces. It’s the best of both worlds.
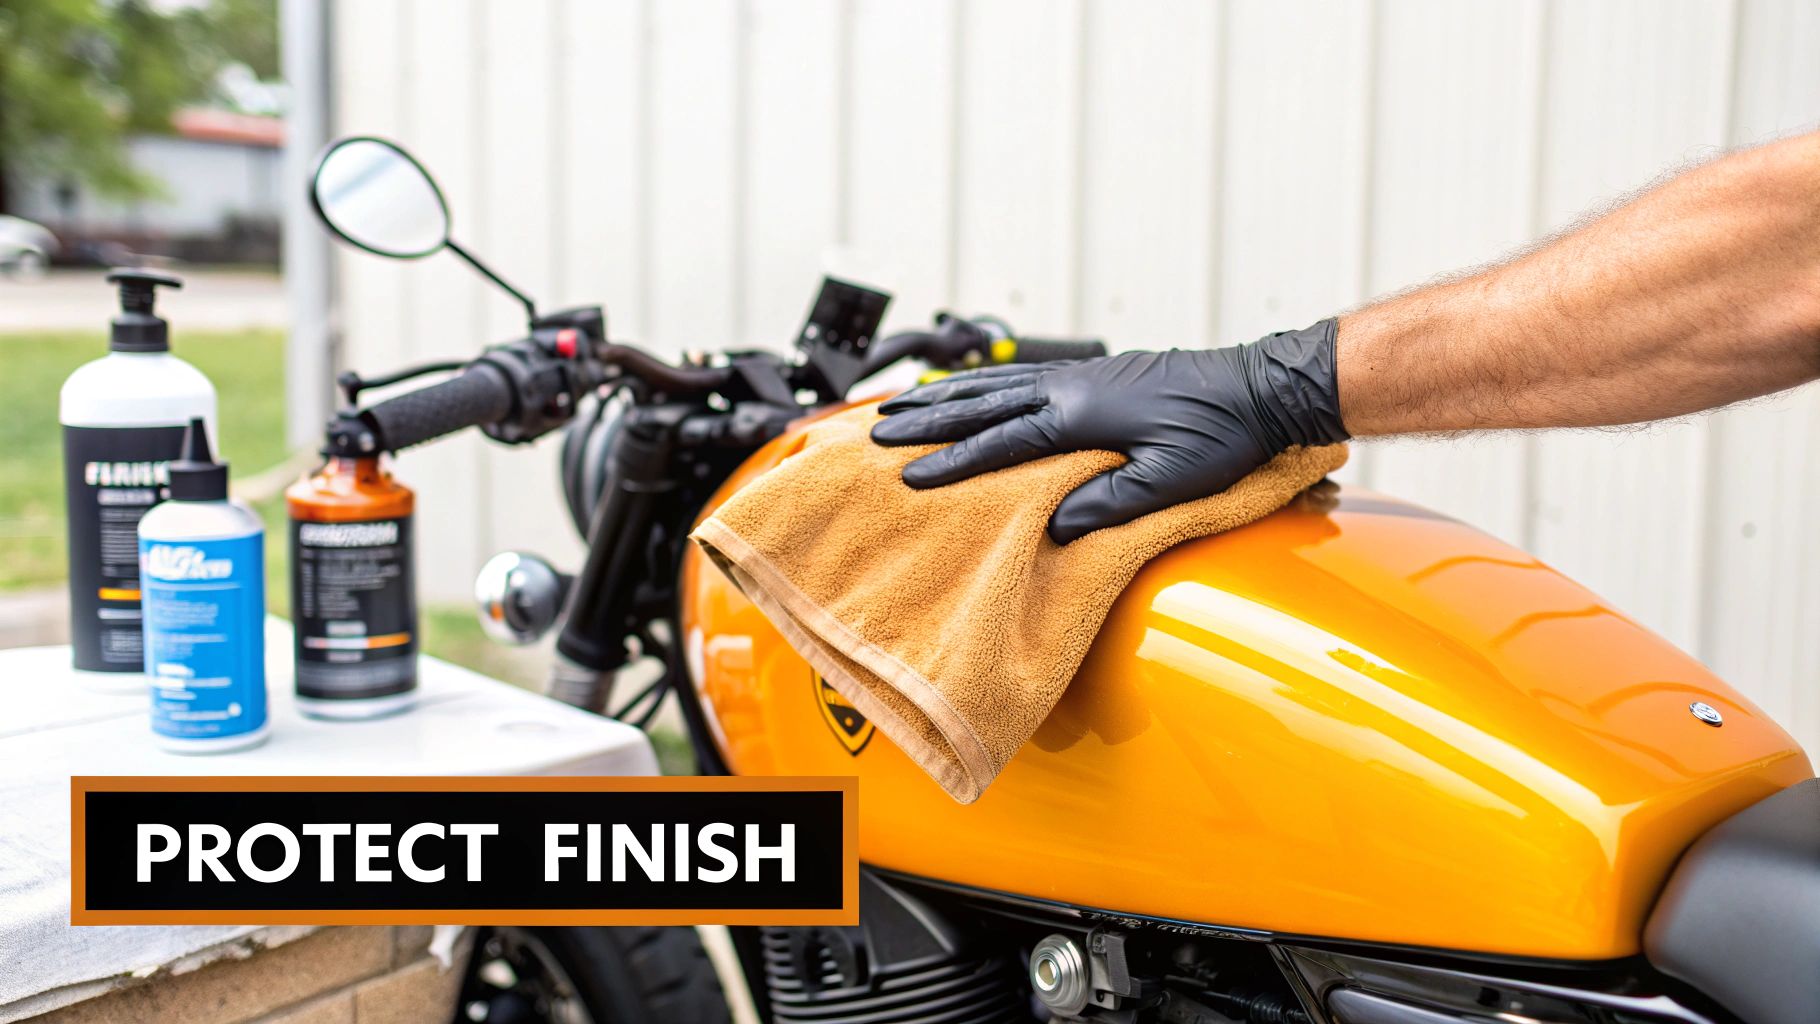
Lock in the Shine With a Protective Layer
Now that your motorcycle is sparkling clean and completely dry, it's time to protect all that hard work. This isn't just about shine; it's about armoring your bike against the elements.
For all your painted parts, a quality wax or paint sealant is non-negotiable. A classic carnauba wax delivers a deep, warm glow that many riders love. On the other hand, a modern synthetic sealant will usually give you longer-lasting protection from UV rays and road grime. Apply a thin, even coat with a foam applicator, let it haze up, then gently buff it to a shine with a fresh microfiber.
But your bike is more than just paint. Give the other materials some attention, too:
- Plastics and Vinyl: A dedicated UV protectant for your seat, dash, and unpainted black trim is a must to prevent fading and cracking over time.
- Chrome and Metal: A good metal polish will not only make your chrome pipes pop but also shield them from rust and pitting.
- Chain Lube: This is the last and most critical step. After a good wash, your chain is stripped of its lubricant. Apply a fresh coat to a clean, dry chain to keep it running smoothly and extend its life.
This kind of detailed care is becoming the new standard for riders everywhere. The demand for high-quality cleaning and protection products is booming, particularly in the Asia Pacific region. To give you an idea of the scale, Jakarta alone had over 26 million registered motorcycles in 2022.
Taking a few extra minutes for proper drying and protection is what separates a quick rinse from a professional-level detail. It’s how you get a durable, head-turning shine that truly safeguards your investment.
To get the right tools for the job, have a look at our guide on choosing the best microfiber towels for cleaning.
A Few Common Questions About Washing Your Bike
Even if you've been washing bikes for years, some questions always seem to come up. Let's tackle some of the most frequent ones I hear, so you can wash your motorcycle with complete confidence.
How Often Should I Be Washing My Motorcycle?
Honestly, this really boils down to how often and where you ride. If you're using your bike to commute every day, a good wash every one to two weeks is a great rhythm to get into. This stops that daily road grime from really setting in and becoming a chore to remove.
For those of us who are more "weekend warrior" types, giving it a solid clean once a month, or right after a particularly grimy ride (like that time you got caught in a surprise rainstorm), is plenty.
The real trick is to be responsive. Nasty stuff like bug guts, bird droppings, and especially road salt can start damaging your paint and clear coat in just a couple of days. It's always best to spot-clean that kind of thing as soon as you see it.
Is It Really That Bad to Use a Pressure Washer?
Yeah, I'd strongly advise against it. The sheer force of a pressure washer can blast water past seals on your wheel bearings, swingarm pivots, and, most critically, your electrical connections. That water gets trapped inside and causes rust and corrosion where you can't see it until it's too late. High pressure can also easily flake off paint or peel your favorite decal right off the tank.
If you find yourself in a situation where it's your only option, be extremely careful. Use the absolute lowest pressure setting and a wide fan tip (40-degree or wider). Stay back from the bike—I'm talking at least three or four feet. A much safer, and frankly more effective, alternative is a foam gun on a regular garden hose. You get that deep-cleaning foam without risking damage.
Can I Just Use My Car Wash Soap?
You bet. A good quality, pH-neutral car wash soap is perfect for your motorcycle. These soaps are formulated to cut through dirt and grime while being gentle on your bike’s paint, any wax or sealant you've applied, and all the plastic and rubber parts.
The one thing you should never, ever use is dish soap. It’s a powerful degreaser designed to strip away everything—and that includes your protective wax coat. It will also dry out your vinyl seat and plastic trim, causing them to fade and crack over time. Stick to products made for vehicles.
What's the Secret to Cleaning a Matte Finish?
Washing a matte finish is all about using the right stuff and the right technique. The "secret" is to avoid anything that creates shine. That means no soaps with glossing agents, no traditional waxes, and no silicone-based detail sprays. These products will fill in the unique, textured surface of the matte paint, creating shiny, patchy spots that you can't undo.
Always use a dedicated matte-finish soap. When it comes time to dry, don't wipe. Instead, gently blot the surface with a plush, clean microfiber towel. Your goal is just to lift the water off without polishing or rubbing the finish.
This concern about water getting into sensitive parts is a big one, especially with the rise of electric vehicles. For those who also own an electric bicycle, understanding water resistance ratings is key. You can find a fantastic breakdown on this topic here: Are Electric Bikes Waterproof?.
Ready to make every wash safer and more effective? The SwiftJet Foam Gun turns your garden hose into a professional-grade cleaning tool, blanketing your bike in thick foam to lift dirt without scratching. Experience a faster, better clean by visiting https://swiftjetusa.com.