
If you're wondering about the best way to clean an engine bay, it's all about a safety-first, low-pressure method. Combining a high-quality degreaser with a foam gun is the professional's secret. This technique cuts through tough grease and road grime while keeping sensitive electronics safe from the damaging force of a high-pressure jet wash.
Why Cleaning Your Engine Bay Actually Matters
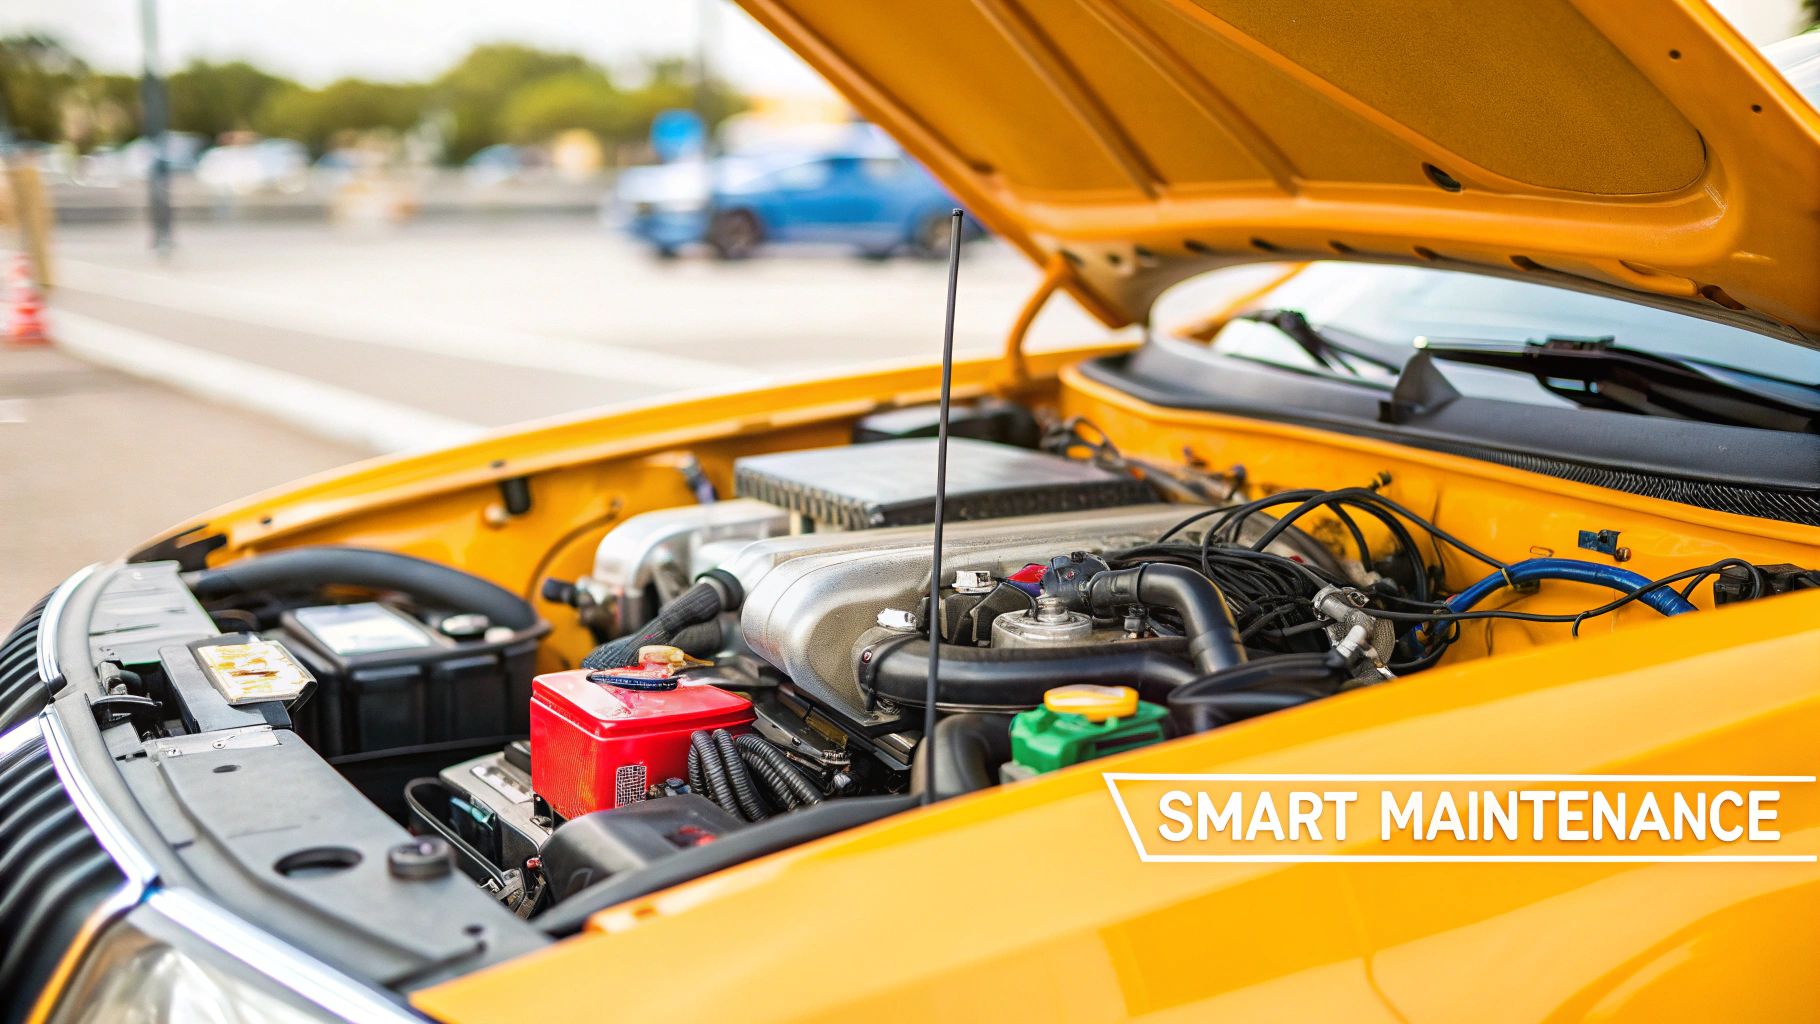
A lot of people think cleaning under the bonnet is just for die-hard enthusiasts getting their car ready for a show. That’s a common misconception. In reality, a clean engine bay is a key part of smart vehicle maintenance, and the benefits are far more than just cosmetic. It's not about vanity; it's about keeping your engine running well for the long haul.
Think about it this way: a thick layer of oily gunk acts like an insulator, trapping heat and making your engine work harder to cool down. When you wash that grime away, the engine can breathe and dissipate heat like it was designed to, which can help with both performance and longevity.
The Practical Benefits of a Clean Engine
Beyond just helping with heat, a clean engine bay gives you a clear view of what’s going on. It’s like a blank canvas. This makes it so much easier to catch small problems before they spiral into expensive, complicated repairs.
A slight oil weep from a valve cover gasket or a pinhole coolant leak from an aging hose? You’d never spot that on a dirty engine. On a clean one, those issues stick out like a sore thumb.
Here are a few of the biggest wins:
- Early Leak Detection: Spot oil, coolant, or power steering fluid leaks the moment they start. This simple check can save you from catastrophic engine damage or being stranded on the side of the road.
- Component Longevity: Road salt, dirt, and oil are corrosive. They slowly eat away at rubber hoses, plastic bits, and electrical wiring. Cleaning them off regularly stops the rot.
- Improved Resale Value: When you pop the bonnet for a potential buyer, a spotless engine bay screams "well-cared-for." It's a small detail that can make a big difference in perception and price.
- Easier Maintenance: Let's be honest, nobody enjoys working on a filthy engine. It's faster, easier, and just plain nicer for you or your mechanic.
A clean engine is a happy engine. It allows you to maintain a visual connection with your vehicle's health, turning a simple cleaning task into a powerful diagnostic tool.
To quickly recap the advantages, here’s a simple table outlining the core benefits of keeping your engine bay in top condition.
Key Benefits of a Clean Engine Bay
| Benefit | Why It Matters |
|---|---|
| Early Problem Spotting | Detects leaks and wear before they become major, costly repairs. |
| Better Heat Dissipation | Allows the engine to cool efficiently, reducing strain and wear. |
| Component Protection | Prevents corrosion and degradation of hoses, plastics, and wiring. |
| Increased Resale Value | Shows prospective buyers that the car has been meticulously maintained. |
| Simplified Servicing | Makes it easier and more pleasant to perform routine maintenance. |
This simple practice gives you a significant return by extending your vehicle's life and making it more reliable.
Smart Car Ownership in Practice
More and more drivers are catching on. The global Engine Bay Cleaning Market is actually projected to hit an incredible $5.6 billion by 2033. This growth is fueled by owners who understand how a clean engine boosts resale value and improves cooling.
Within the DIY community, foam sprays are quickly becoming the go-to choice. Why? The foam clings tenaciously to greasy surfaces, giving the cleaning agents time to work their magic without the risky overspray that could damage electronics. You can find more detail on this trend in recent industry reports.
At the end of the day, this isn't just about cleaning. It’s a core part of being a responsible car owner. For more great advice on overall vehicle health, check out these essential car maintenance tips to keep every part of your car in great shape.
Assembling Your Detailing Toolkit
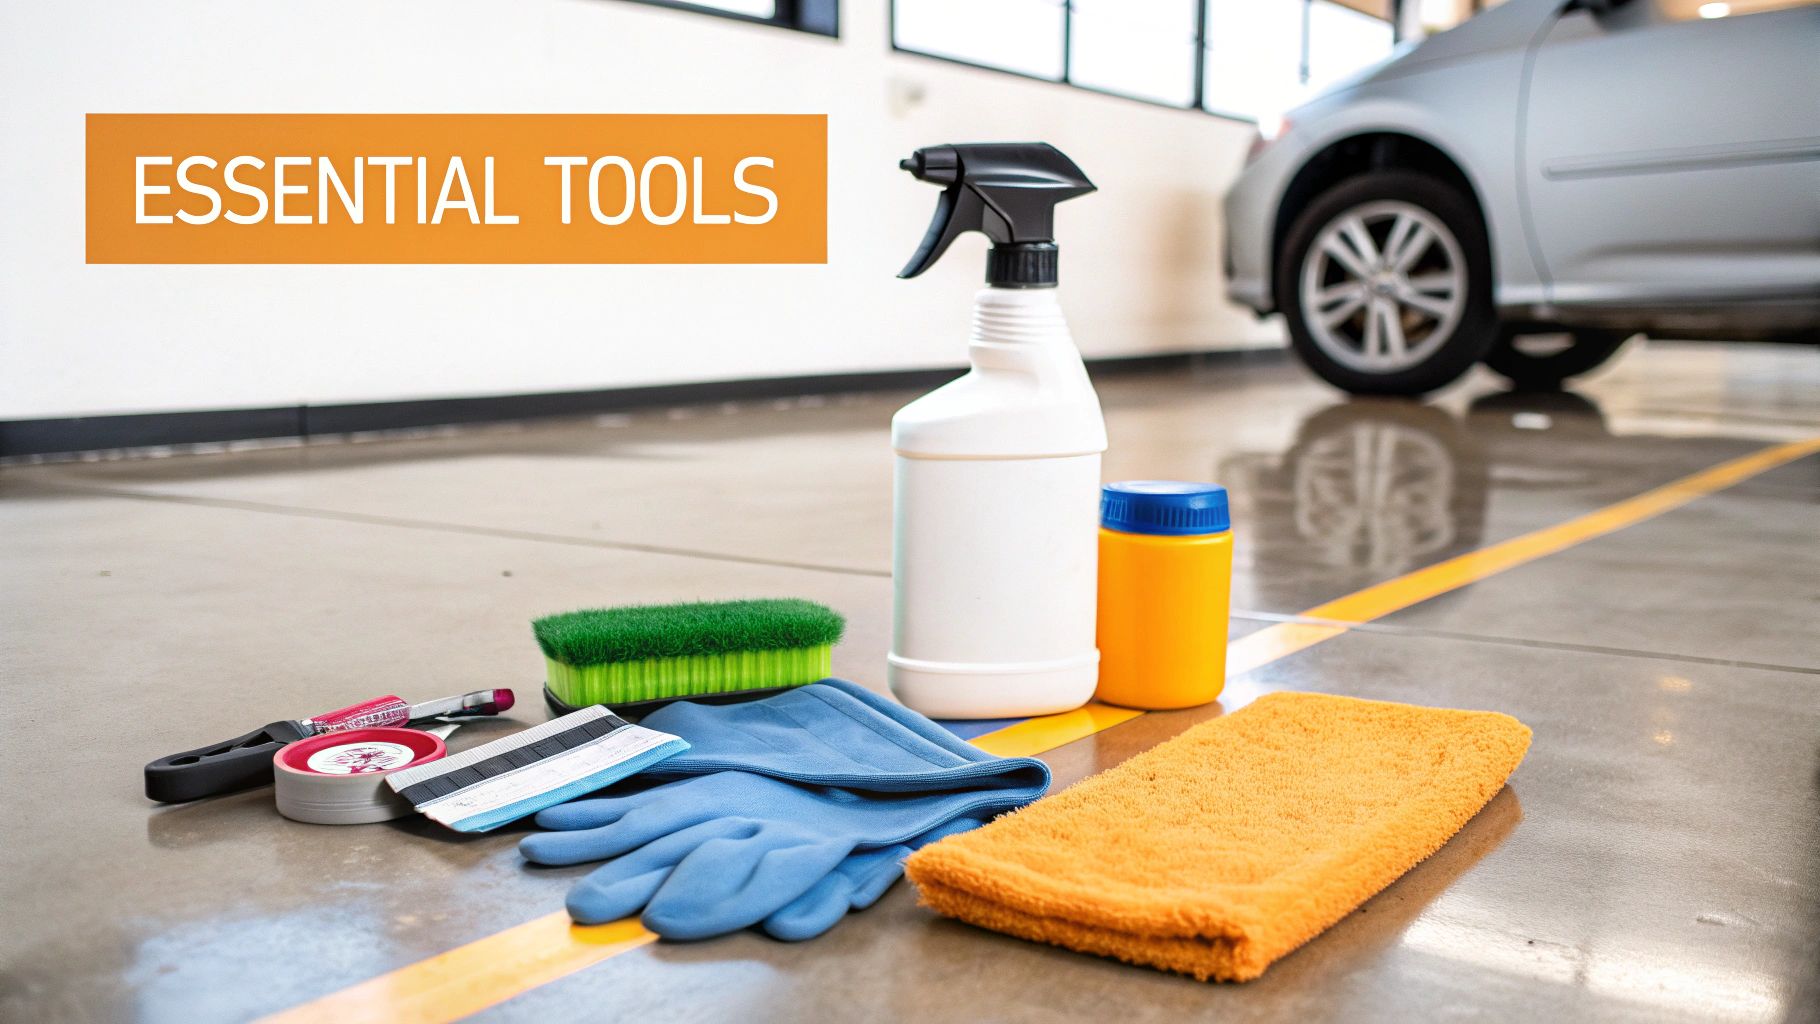
Before you even think about spraying a drop of water, let's talk gear. Having the right tools on hand is what separates a frustrating afternoon from a truly satisfying detail. The goal isn't just to make the engine bay look good, but to do it safely and efficiently, without causing any damage.
You don't need to buy out the entire auto parts store, either. A few well-chosen items will handle everything from a quick dusting to a full-on greasy cleanup. Think of this as your engine bay cleaning loadout.
Cleaners and Degreasers
First up, you need something to cut through the grime. Your choice here really depends on what you're up against.
- All-Purpose Cleaner (APC): If your engine bay is just dusty with a bit of light road film, a good APC is all you need. It’s the go-to for routine maintenance because it’s gentle enough for plastics, hoses, and painted surfaces without being overly aggressive.
- Engine Degreaser: Now, if you're looking at years of caked-on gunk or the aftermath of an oil leak, you need to bring in the heavy hitter. A dedicated engine degreaser is formulated specifically to break down and dissolve that stubborn, baked-on grease.
No matter which you choose, always read the label to make sure it's safe for aluminum, plastic, and rubber. When in doubt, test it on a small, hidden spot first. Better safe than sorry.
Application and Agitation Tools
Getting the cleaner on the surface and working it in is where the magic happens. The key isn't aggressive scrubbing; it's about letting the right tools do the work for you.
The secret to a great engine detail isn't brute force; it's letting the right chemicals and brushes do the heavy lifting. Gentle agitation is all that's needed to lift grime without scratching surfaces.
For applying your cleaner, a foam gun like the SwiftJet completely changes the game. It hooks up to a regular garden hose and blankets the engine in a thick foam. This clinging action gives the cleaner more time to work, breaking down dirt far more effectively than a standard spray bottle ever could.
Once the cleaner has had a minute to dwell, you'll need a few brushes to agitate the loosened grime:
- Soft-Bristled Detailing Brushes: Absolutely essential for working around delicate sensors, plastic covers, and any painted parts. A boar's hair brush is a perfect example—strong enough to clean but soft enough to prevent scratches.
- Long-Handled Brushes: These save your back. They're perfect for reaching the firewall and getting down into the lower, harder-to-reach areas of the bay.
- Wheel Brushes: The stiffer bristles on a good wheel brush are great for scrubbing the really tough spots on the engine block or subframe where grime is heaviest.
Safety and Protection Gear
Finally, let’s cover the stuff that protects you and the car. This is the non-negotiable part of the process. Seriously, don't skip this.
Here’s what you need to grab:
- Eye Protection: A simple pair of safety glasses can save you from a nasty chemical splash or a chunk of grit flying where it shouldn't.
- Chemical-Resistant Gloves: Degreasers can be harsh on your skin. A pair of nitrile gloves will keep your hands protected while still letting you feel what you're doing.
- Plastic Bags and Painter's Tape: Your best defense for waterproofing sensitive electronics. You’ll use these to carefully cover the alternator, air intake, fuse box, and any exposed electrical connections.
- Microfiber Towels: Have a good stack of clean, dry microfibers on standby. They’re super absorbent and won't leave lint all over your freshly cleaned components.
Don't Skip This: The Crucial Prep Work to Protect Your Engine
Before a single drop of water or cleaner hits your engine bay, you need to spend about ten to fifteen minutes on prep work. I can't stress this enough: this is the single most important part of the entire process. It’s what separates a professional, damage-free result from the horror stories you hear about check engine lights and expensive electrical problems.
The whole point here is to waterproof the sensitive parts. Modern cars are loaded with electronics and sensors that are water-resistant, sure, but they were never designed to handle a direct soaking from a hose or pressure washer. A little bit of prep turns a risky job into a totally safe one.
The First and Most Important Safety Check
First things first: make sure the engine is cool to the touch. Seriously, never, ever try to clean a warm or hot engine.
Hitting hot metal parts like an exhaust manifold or a turbocharger with cool water can cause thermal shock. That's a fancy way of saying you can create tiny fractures or even crack the metal wide open.
Besides that, any cleaner you spray on a hot surface will just flash-evaporate, leaving a splotchy, sticky mess that’s even harder to clean off. So, pop the hood, wait at least an hour after you've driven it, and then physically touch a large plastic cover or the engine block to be sure. If it's even a little warm, just wait longer. It's not worth the risk.
Next up, and just as important, is to disconnect the battery.
- Grab a wrench (usually a 10mm) and loosen the nut on the negative (-) terminal.
- Wiggle the clamp off the battery post.
- Tuck that cable securely to the side where it can't accidentally touch the terminal again.
This simple move completely removes the risk of short-circuiting anything while you're working. It’s a two-minute job that buys you total peace of mind.
Mapping and Protecting the Vulnerable Spots
With the engine cool and the battery disconnected, it's time to play defense. You'll need some plastic bags, plastic wrap, and painter's tape. Your mission is to create a watertight seal around anything that looks like it shouldn't get drenched.
Think of it like taping off the trim before you paint a room. A little bit of careful work here guarantees a clean, professional outcome.
Don't get overwhelmed, just be thorough. You're simply shielding the engine's brain and nervous system from the water. If you see a complex-looking electrical part, you're better off covering it just to be safe.
Here's a quick checklist of the usual suspects to cover up:
- Alternator: This is often the most exposed and vulnerable part. It has open vents for cooling, and water can get right in and wreck the bearings. Wrap it up tightly with a plastic bag or a few layers of plastic wrap.
- Air Intake: If you have an exposed, cone-style air filter, take it off for now. Stuff a wadded-up microfiber towel or a plastic bag into the opening of the intake tube to block it. If you just have the factory airbox, make sure the lid is clamped down tight.
- Fuse Box: These are usually pretty well sealed, but an extra layer of protection doesn't hurt. I like to wrap the lid with some plastic wrap and tape down the edges.
- Exposed Electrical Connectors: Scan the engine bay for any large wiring harnesses or sensor plugs that look exposed. A quick wrap with some painter's tape is all you need.
- ECU (Engine Control Unit): The "brain box" for your car is sometimes located in the engine bay. If you can see it, it's definitely a good idea to cover it.
This whole process should only take you about five minutes, but it's the critical step that prevents an expensive trip to the mechanic. While some of these precautions are similar to washing your car's exterior, the engine bay demands a much higher level of care. If you want to brush up on safe washing techniques for the rest of your vehicle, check out our guide on how to properly power wash a car.
Alright, with your engine prepped and protected, you're ready to get to the good part: the cleaning.
The Foam-Based Cleaning Method
With all your prep work done, we can get to the satisfying part—actually making that engine bay shine. We’re going to use a foam-based cleaning method, which is what the pros swear by and, frankly, the best way to clean your engine bay at home. This technique gives you a deep, penetrating clean that dissolves grime without the risks that come with high-pressure water.
The secret is the foam itself. Unlike a liquid spray that just runs off vertical surfaces, thick foam clings. It sticks to everything—the firewall, the underside of the hood, hoses, and plastic covers. This gives the cleaning agents critical "dwell time" to get to work breaking down grease, so you don't have to scrub aggressively and risk damaging delicate components.
Applying A Thick Blanket of Foam
Your main goal here is to get even, complete coverage. Using a tool like the SwiftJet foam gun, which hooks right up to a regular garden hose, makes this step incredibly straightforward.
Start spraying from the bottom of the engine bay and work your way up. This is a classic pro detailing trick. If you start from the top, the cleaner just runs down over the dirty lower sections, creating clean streaks. By working upwards, the foam is applied evenly over a consistently grimy surface, preventing those annoying streaks and giving you a uniform clean.
Don't hold back on the foam. You want a thick, rich lather covering every single component. Let that blanket of foam sit and work its magic for about 3-5 minutes. You’ll actually see it start to pull the dirt and oil away, turning from bright white to a dirty brownish color.
The Gentle Art of Agitation
Once the foam has had a few minutes to do its thing, it’s time to help it along with a little gentle agitation. Remember, the chemicals have already done most of the heavy lifting. You’re just helping to loosen the most stubborn, baked-on gunk with the right brushes.
This is where your detailing brush kit proves its worth.
- For large, flat plastic surfaces like the engine cover or airbox, a soft-bristled, wide brush is perfect.
- For ribbed hoses, tight crevices, and around sensitive connectors, a smaller, soft boar's hair brush provides the precision you need without causing scratches.
- For the really greasy, hard-to-reach spots deep in the bay, a long-handled brush will be your best friend.
Here’s a great pro-tip for those really tough spots: instead of scrubbing harder, just spray a bit of extra all-purpose cleaner directly onto your brush bristles. This concentrates the cleaning power exactly where you need it, letting you gently work away the grime without using excessive force. Finesse, not force, is the key.
This visual guide breaks down the essential preparation steps before you begin the foaming process.
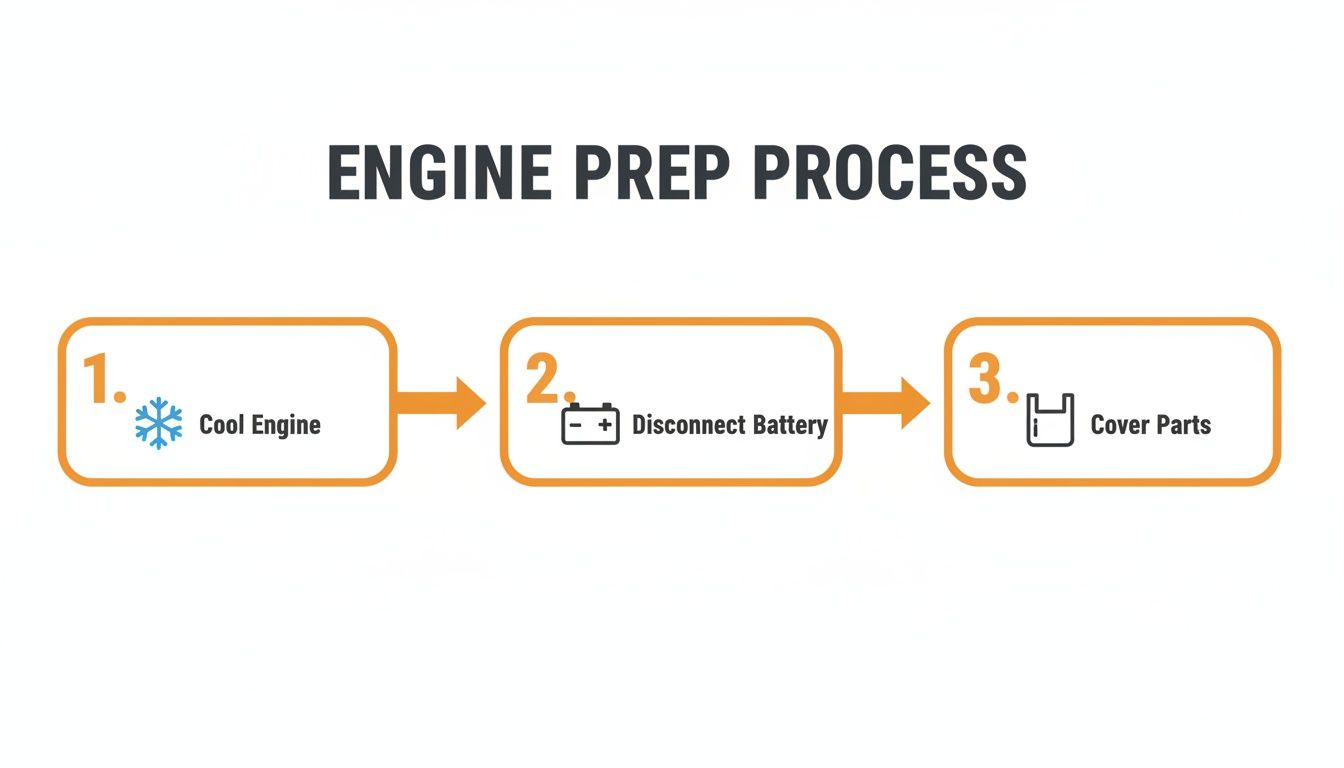
Following this simple three-step prep sequence is the foundation for a safe and effective clean, ensuring all sensitive components are protected before any water is introduced.
Why Foam Is The Superior Choice
When it comes to engine bays, not all cleaning methods are created equal. Many people instinctively reach for a pressure washer, thinking more power means a better clean. But in the tight, delicate environment of an engine bay, a high-quality foam gun is both safer and more effective.
Foam Gun vs Pressure Washer for Engine Bays
| Feature | Foam Gun | Pressure Washer |
|---|---|---|
| Water Pressure | Low, garden hose pressure. Gentle on wiring and seals. | High, potentially damaging pressure. Can force water into connectors. |
| Cleaning Action | Uses thick, clinging foam and chemical dwell time. | Relies on high-pressure water blasting grime away. |
| Safety | Very safe. Minimizes risk of damaging sensitive electronics. | High risk. Can easily damage sensors, gaskets, and wiring. |
| Control | Excellent control over where the foam and water go. | Can be difficult to control, leading to overspray. |
| Effectiveness | Highly effective at dissolving oil and grease. | Can miss embedded grime and push dirt into crevices. |
| Ease of Use | Simple to use; connects to a standard garden hose. | Requires a dedicated machine; can be cumbersome. |
The table makes it clear: a foam gun offers a smarter, safer approach that leverages chemical cleaning power over brute force, which is exactly what you want when working around an expensive engine.
The effectiveness of this method isn't just anecdotal. As the Car Engine Cleaning Service Market grows toward a projected $4.2 billion by 2032, industry benchmarks consistently show that foam application methods outperform traditional sprays by 35% in grease removal efficiency. That’s because thick foam can dwell on vertical surfaces, dissolving over 50% more oil residue than a liquid degreaser that just runs off. This efficiency is what allows professional detailers to slash their engine bay cleaning times from nearly two hours down to just 45 minutes.
The core principle is simple: let the product do the work. Thick, clinging foam maximizes chemical contact time, dramatically reducing the need for mechanical scrubbing and minimizing the risk of damage.
Ultimately, using a foam gun is about getting better results with less effort and more safety. You can learn more about how it works by exploring our detailed guide on the car foaming gun. This technique truly is the best way to clean an engine bay, whether you’re a beginner or a seasoned car enthusiast.
Rinsing, Drying, and Applying a Protectant
You’ve let the foam do its work and broken up all that grime. Now for the final phase—washing it all away and adding the finishing touches that make an engine bay look incredible and protect it from future abuse. A thorough rinse, a meticulous dry, and a quality dressing are what separate a decent job from a professional one.
The absolute key to rinsing is to avoid high pressure. You've already protected the sensitive parts, but blasting water in there with a pressure washer is just asking for an electrical headache. A regular garden hose with a spray nozzle set to a gentle shower or fan pattern is all you need.
Start rinsing from the top down. Hit the underside of the hood first, then move to the firewall, and finally rinse the engine block and lower components. This top-down method ensures you’re washing the dirt and foam downwards and out of the bay, not just moving it around.
Effective Drying Techniques
Once you're done rinsing, it's time to get everything bone dry. Letting water sit can leave ugly spots on your plastics and can cause real problems if it pools around electrical connectors. The best strategy is usually a combination of a couple of techniques.
A leaf blower or even a can of compressed air is your best friend here. These are perfect for blasting water out of all those tight crevices, connector housings, and intricate spots where a towel can never reach. This step is absolutely critical for making sure no moisture is left behind where it can do harm.
After you've blown out the bulk of the water, grab a stack of clean, high-quality microfiber towels for the final wipe-down. Gently pat and wipe all the surfaces you can reach—plastic covers, hoses, fluid reservoirs, you name it. This mops up any remaining droplets and leaves the surfaces perfectly prepped for a dressing. Using the right towel is important; you can learn more about picking the best microfiber towels for cleaning to avoid leaving behind lint or fine scratches.
Applying a Finishing Protectant
This is the step that delivers that "like new" factory finish. Applying a protectant, often called a dressing, restores a deep, rich color to plastics and rubber while adding a barrier against heat and damaging UV rays. You’re aiming for a clean, satin look, not a greasy, dust-attracting shine.
When you're picking a product, here’s what to look for:
- Water-Based Formula: These are much safer for the wide variety of materials in an engine bay compared to solvent-based dressings.
- Non-Greasy Finish: Steer clear of silicone-heavy products that leave an oily film. They become instant dust magnets.
- UV Protection: A good dressing will act like sunscreen for your engine’s plastic and rubber parts, helping to prevent them from fading and cracking.
The best way to apply it is to lightly mist the dressing onto a microfiber applicator pad or towel, not directly onto the engine. Wiping it on gives you way more control and stops overspray from getting on things like belts or pulleys. Gently work the product into all the plastic covers, hoses, and rubber trim for a uniform, conditioned finish.
The final dressing isn’t just for looks. It creates a dry, static-free surface that makes it harder for dust and grime to stick, meaning your engine bay stays cleaner for a whole lot longer.
The rise of effective, user-friendly products has been a game-changer for DIY car care. The Automotive Engine Cleaner Market is projected to hit $5,500 million by 2025, with wet-type cleaners leading the charge. There's a reason foam has become so popular: it penetrates 60% deeper into crevices than thin solvent sprays, which means less aggressive scrubbing that could harm delicate wiring. Tools like the SwiftJet Foam Gun exemplify this shift, outperforming basic nozzles with 4x the coverage. This makes it a perfect fit for the DIY car care segment, which now holds a substantial 30% market share. You can find more insights on this trend and market growth at DataInsightsMarket.com.
Tackling Your Top Engine Bay Cleaning Questions
Diving under the hood with a hose and cleaning supplies can feel a bit daunting the first time around. That's perfectly normal. Getting straight answers to your questions is the key to building confidence and making sure you get a great result without damaging anything.
We've gathered up the most common questions we hear, from total beginners to seasoned car enthusiasts. Consider this your go-to cheat sheet for turning that bit of uncertainty into a solid, successful cleaning plan.
How Often Should I Actually Clean My Engine?
This is the big one, and the honest answer is: it depends. There isn't a single magic number that fits every car and driver. A great starting point for most people is a good inspection and cleaning once or twice a year. If you’re mainly commuting on paved roads, that’s usually enough to keep heavy grime from building up and lets you spot potential leaks early.
That said, some situations definitely call for more frequent attention. You'll want to clean it more often if you:
- Live down a dusty road or in a rural area. All that dirt and pollen turns into a thick, gunky paste when it mixes with the slightest bit of oil.
- Battle salted roads in the winter. Road salt is a killer for metal, rubber, and plastic. A thorough rinse every 3-4 months during the winter can save you from a lot of corrosion-related headaches.
- Are an off-road enthusiast. Mud and trail gunk can cake onto everything, trapping moisture and heat where you don't want it. A quick rinse-down after each trip is a smart move.
Think of it less as a chore and more as preventative maintenance. A quick clean every few months makes the job way easier next time and helps you stay on top of your car's health.
Your best guide is a simple visual check. When you're checking your oil or washer fluid, just take a peek around. If you see a noticeable layer of grime forming, it’s probably time for a wash.
Is It Really Safe to Use Water in My Engine Bay?
Yes, absolutely—as long as you do it the right way. This is probably the number one fear people have, but modern cars are built to handle the elements. All those critical components are sealed to protect them from rain and road spray.
The real danger isn't the water itself; it's high-pressure water. Blasting your engine with a pressure washer can force water past those protective seals and right into sensitive electrical connectors, which is a recipe for disaster.
The safest way to clean your engine bay is with a low-pressure flow from a regular garden hose. Once you've done your prep work and covered the alternator, air intake, and fuse box, this method is incredibly safe. You're just gently rinsing away the dirt and cleaner, not attacking it with brute force.
What's the Best Cleaner to Use?
For most jobs, a good quality, pH-neutral all-purpose cleaner (APC) is your best friend. These are designed to cut through typical road grime and grease without being too harsh on the mix of plastic, rubber, and metal parts under the hood.
Now, if you're looking at an engine that's been leaking oil for years or is just caked in ancient gunk, you'll want to step up to a dedicated engine degreaser. These formulas are much stronger and have solvents specifically made to dissolve heavy, petroleum-based messes.
Here’s a simple breakdown:
| Cleaner Type | Best For | Key Feature |
|---|---|---|
| All-Purpose Cleaner | Routine cleaning, light dust, road film | Versatile and safe for all surfaces |
| Engine Degreaser | Heavy grease, old oil leaks, baked-on grime | Stronger formula for the really tough jobs |
No matter which one you pick, always read the directions on the bottle. If you're using a new product, it's always smart to test it on a small, hidden spot first to make sure it doesn't cause any discoloration. And please, stay away from harsh chemicals like brake cleaner—it can eat through plastics and ruin paint in a heartbeat.
Should I Clean the Engine When It's Warm?
Nope. You should only work on an engine that is completely cool to the touch. This is a non-negotiable safety rule for two very important reasons.
First, spraying cold water or cleaners onto hot metal parts can cause thermal shock. That rapid temperature change can create tiny cracks in components like your exhaust manifold or turbo housing, leading to some seriously expensive repairs.
Second, from a practical standpoint, hot surfaces make your cleaner evaporate almost instantly. It won't have the "dwell time" it needs to actually break down the grime. Instead, you'll be left with a splotchy, sticky residue that’s often harder to remove than the dirt you started with. Just pop the hood and give it at least an hour to cool down after you've been driving.
Ready to get that perfect, factory-fresh look with total peace of mind? The SwiftJet Car Wash Foam Gun lets you easily apply a thick, clinging layer of foam using nothing more than your garden hose. It’s the secret weapon for a safe, deep, and satisfying engine bay detail.
Upgrade Your Cleaning Arsenal with the SwiftJet Foam Gun Today!