
Power washing your car is straightforward, but doing it right is an art. It all boils down to a simple rhythm: prep in a cool, shady spot, pre-rinse with a wide-angle nozzle, lay down a thick blanket of foam, gently wash with a microfiber mitt, and finish with a thorough rinse and dry. The real secret to that flawless, damage-free shine? Using the right pressure (never go above 1900 PSI) and always keeping a safe distance from your paint.
Setting Up for a Perfect Power Wash
The path to a stunning, swirl-free finish starts long before you ever pull the trigger. Proper prep isn't just about grabbing your gear; it's about creating a safe, controlled environment for your car's delicate paint. If you rush this part, you're setting yourself up for mediocre results and maybe even some damage.
The first, and most critical, step is picking your spot. Always wash your car in the shade, and only when the panels are cool to the touch. Trying to wash a car in direct sunlight is a race against the clock you'll never win—the sun evaporates water and soap almost instantly, leaving behind ugly water spots and soap scum that can etch right into your clear coat.
Assembling Your Arsenal of Tools
With your car parked in the perfect spot, it’s time to get your equipment in order. Having everything you need within arm's reach makes the whole process smoother and more enjoyable. A methodical setup is what separates a weekend wash from a professional detail.
Obviously, your pressure washer is the star of the show. For washing cars, an electric model is usually your best bet, as they typically operate in that sweet spot of 1200-1900 PSI. If you’re working with a more powerful gas-powered unit, you'll need to be extra mindful of your nozzle choice and distance.
Beyond the washer itself, you’ll need a few key sidekicks:
- A Foam Cannon or Foam Gun: This is non-negotiable for a safe pre-wash. A foam cannon hooks up to your pressure washer, while a foam gun connects to a standard garden hose. If you don't have a pressure washer, you can learn more about how the SwiftJet Car Wash Foam Gun simplifies this process.
- pH-Neutral Car Soap: Step away from the dish soap. A quality car soap is engineered to break down road grime without stripping off the wax or sealant you've worked so hard to apply.
- The Right Nozzles: You'll spend most of your time with the white (40-degree) and green (25-degree) nozzles. These provide a wide enough spray to clean effectively without harming your paint.
- Two Buckets with Grit Guards: This is the classic two-bucket method. One bucket holds your soapy water, and the other is filled with plain water for rinsing your mitt. The grit guards trap the dirt at the bottom, keeping it from getting rubbed back onto your paint.
Essential Gear Checklist for a Professional-Level Wash
To make sure you don't miss a thing, here’s your quick-reference guide to all the equipment and supplies needed for a safe, damage-free car wash at home.
Pro Tip: Before you get started, lay out all your tools and connect your hoses. This little bit of organization prevents you from tripping over cords or fumbling for the right nozzle mid-wash, letting you stay in the zone.
| Item | Purpose | Pro Tip |
|---|---|---|
| Pressure Washer | Provides the controlled water flow for rinsing and cleaning. | Choose an electric model for safer, more consistent pressure. |
| Foam Cannon/Gun | Applies a thick layer of soap to lubricate and lift dirt. | Mix your soap and water solution according to the manufacturer's ratio for the thickest foam. |
| Two 5-Gallon Buckets | Separates clean, soapy water from dirty rinse water. | Label your buckets "Soap" and "Rinse" to avoid cross-contamination. |
| Grit Guards (x2) | Traps dirt at the bottom of the buckets to prevent scratches. | Always scrub your wash mitt against the guard each time you rinse it. |
| Microfiber Wash Mitt | Gently agitates and removes grime after the foam soak. | Use a separate mitt for wheels to avoid transferring brake dust to paint. |
| Microfiber Drying Towels | Absorb water without leaving streaks or lint. | Invest in a large, plush "waffle weave" towel for maximum absorbency. |
| Wheel & Tire Brush | Scrubs away stubborn brake dust and road grime. | Use a long-handled brush for wheel wells and a softer one for wheel faces. |
Having these items on hand will prepare you for every step of the process, ensuring you get that professional-level clean every single time.
Getting Pressure and Nozzles Right (and Avoiding a Trip to the Body Shop)
This is where things can go wrong—fast. The difference between a beautifully clean car and one with stripped wax, etched clear coat, or even peeled paint often boils down to pressure and the nozzle you choose. The "power" in "power washing" demands respect.
Let's break down the technical stuff so it makes sense. Your machine's force is measured in PSI (Pounds per Square Inch), and its water output is measured in GPM (Gallons Per Minute). When you're washing a car, the goal isn’t to sandblast the dirt off. It's to use just enough pressure to rinse effectively, letting the soap and foam do the real work.
Finding the Pressure Sweet Spot
For washing a car, you want to stay in the 1200 to 1900 PSI range. That's the sweet spot. Luckily, most consumer-grade electric pressure washers live in this zone, which makes them a great choice for at-home detailing. Gas-powered units, on the other hand, can easily push over 3000 PSI, which is way too aggressive for automotive paint.
If you happen to have a more powerful washer, you can still make it work. Just use a nozzle with a wider spray angle and back up a bit. Think of it like a flashlight beam: a tight, focused spot is intense, while a wide floodlight is much gentler. The same principle applies here.
Here's the most important rule to remember: Never use more pressure than you need. Always start low and test on a hidden spot—like the inside of a wheel well or a lower rocker panel—before you go hitting the main body panels.
This simple diagram highlights the very first thing you should do before you even turn the water on. Get your car into a cool, shaded spot to avoid soap drying on the paint and causing nasty water spots.
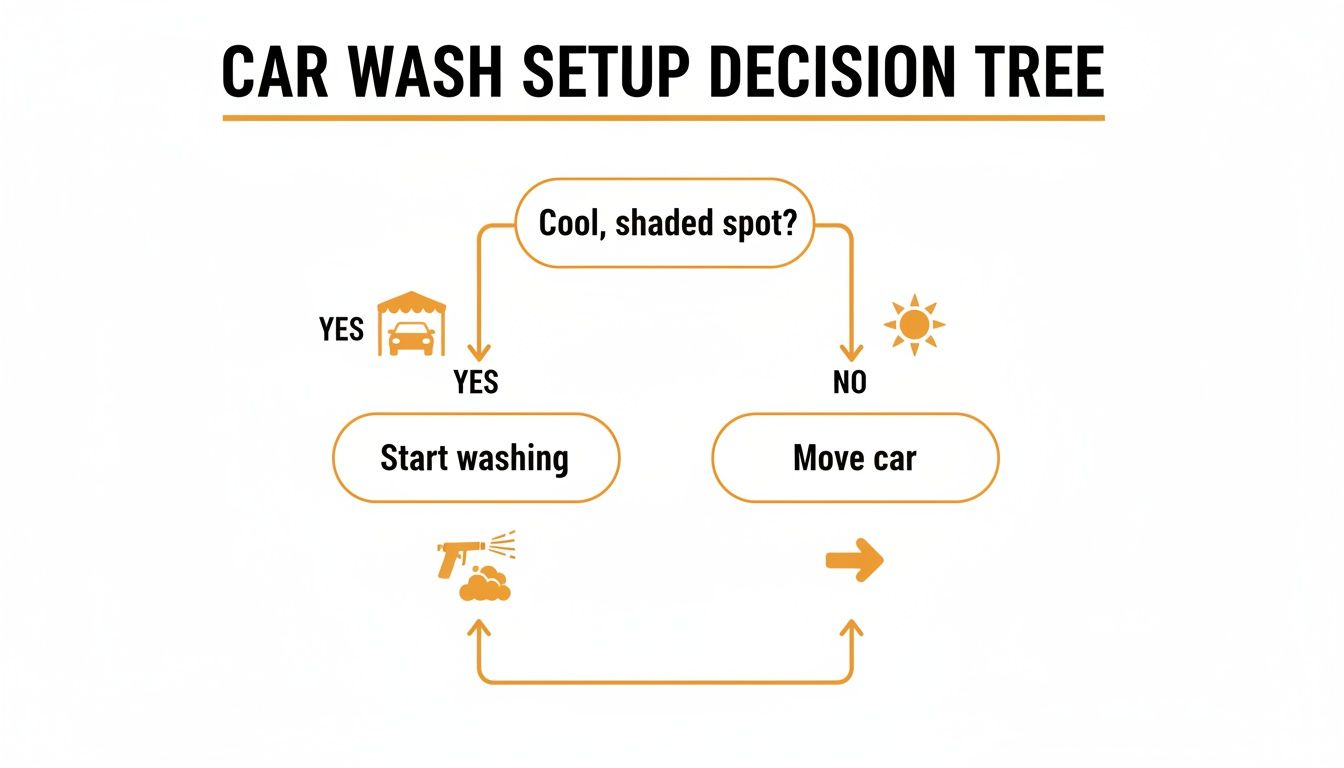
As you can see, a great wash starts with controlling your environment. Don't let the sun work against you.
What the Color-Coded Nozzles Mean for Your Car
Those little colored tips aren't just for show; they tell you the angle of the water spray. A smaller angle means a more concentrated, powerful stream. Knowing how to choose the right pressure washer nozzle is non-negotiable for doing this safely.
Here's a quick guide to what each one does:
- White Nozzle (40-Degree): This is your best friend. It gives you a wide, gentle spray that's perfect for the initial pre-rinse and for washing big, sensitive areas like your hood, roof, and doors. It's the safest bet for your paint.
- Green Nozzle (25-Degree): This one has a bit more bite. It's great for knocking off tougher grime on the lower parts of your car, inside the wheel wells, and on your tires. Just be careful with it on painted surfaces and keep a healthy distance.
- Yellow Nozzle (15-Degree): Honestly, this is usually too much for paint. Keep this one for blasting caked-on mud off the undercarriage or for cleaning your driveway, not your car's finish.
- Red Nozzle (0-Degree): Never, ever use the red nozzle on your car. I mean it. This thing shoots a single, powerful jet that can cut into paint, trim, and rubber seals like a knife. It has absolutely no place in auto detailing.
If you're using a foam cannon, having the right tips can make a huge difference in your foam quality. You can find foam spray tips and replacement sets designed to give you that thick, clinging foam we're all after.
A Note on Technique Around Sensitive Areas
Even with the right nozzle, how you use it matters. Keep the wand moving in smooth, sweeping motions. And always maintain a safe distance—at least 12 to 18 inches from the surface. Get too close, even with the "safe" white nozzle, and you can still cause damage.
Be extra cautious around these delicate parts:
- Headlights and Taillights: Modern headlights have a clear UV coating that high pressure can easily damage. Stick with the 40-degree nozzle and back up to at least 24 inches.
- Mirrors and Chrome: These surfaces scratch easily. All they need is a wide spray and gentle pressure.
- Plastic Trim and Emblems: Don't blast these head-on. The water can get behind them and pop them right off. Hit them from a 45-degree angle to rinse them safely without putting too much force on the adhesive.
Mastering the Foaming and Washing Technique
Okay, your car is prepped and the pressure washer is set. Now for the fun part. This is where you'll combine water pressure, thick foam, and a gentle touch to safely lift every bit of grime off your paint. Don't think of it as a chore; it's a careful process that protects your finish while getting that showroom shine.
Laying the Foundation With a Pre-Rinse
First things first: a solid pre-rinse. I can't stress this enough—it's a non-negotiable step. The goal here is to blast away all the loose, heavy gunk like dust, pollen, and light mud before a wash mitt ever touches the paint. If you skip this, you’re basically turning your wash mitt into a sheet of fine-grit sandpaper.
Grab your pressure washer, pop on the 40-degree (white) nozzle, and start rinsing. The golden rule is simple: work from top to bottom. Let gravity do the heavy lifting for you, pulling all that dirt down and away from the areas you just cleaned. Keep the nozzle a steady 18-24 inches from the surface and use smooth, overlapping sweeps to make sure you hit every panel.
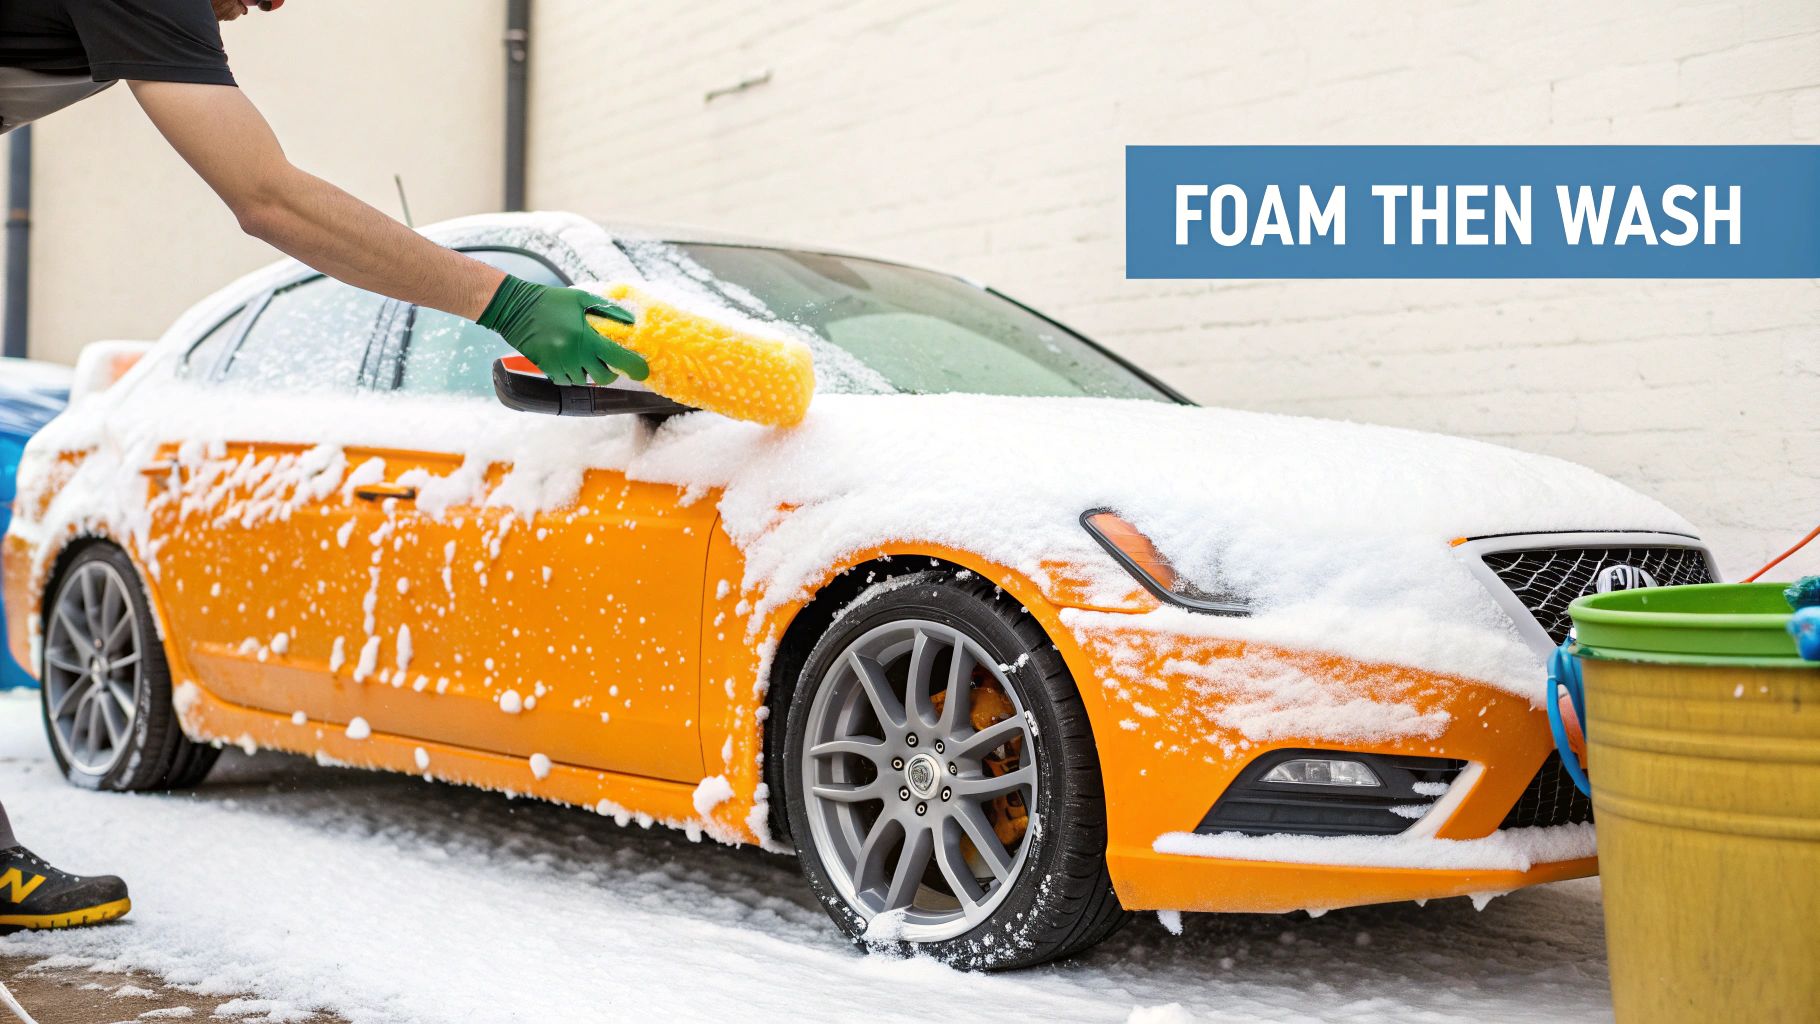
The Art of the Foam Blanket
Now it’s time to lay down a thick blanket of suds. This isn't just for a cool Instagram photo; it's a crucial part of a safe wash. The foam's main job is to lubricate the surface, surrounding every dirt particle and lifting it away from the paint. This dramatically reduces friction, which is your best defense against swirl marks and micro-scratches.
Fill your foam cannon or a car foaming gun like the SwiftJet with a quality, pH-neutral car soap, following the dilution ratio on the bottle. Just like rinsing, apply the foam from the top down. You want to cover the entire vehicle in a nice, thick layer—don't forget the nooks and crannies.
Pro Tip: Let that foam "dwell" on the surface for 3-5 minutes. This gives the soap’s cleaning agents time to break down the grime. But whatever you do, don't let it dry on the paint, especially if you're working in the sun. If you see it starting to dry, it’s time to move on.
The desire for this kind of professional result at home is a huge trend. The global car wash service market was valued at around USD 36.29 billion in 2025 and is expected to hit USD 54.48 billion by 2033. This shows a massive consumer shift toward using pro-level cleaning methods, even in their own driveways.
The Gentle Contact Wash
Once the foam has worked its magic, it's time for the contact wash. While the foam did a great job loosening the dirt, some stubborn contaminants will need a little gentle persuasion to come off. This is where your two-bucket method and microfiber wash mitt shine.
Here’s the proven, swirl-free process I've used for years:
- Load Up: Dunk your clean wash mitt into the bucket filled with fresh, soapy water.
- Wash a Section: Gently wash one panel at a time, like a door or half the hood. Use straight, back-and-forth motions—never circles, which can create noticeable swirl marks.
- Rinse the Mitt: Before getting more suds, rinse the now-dirty mitt in your second bucket (the one with plain water). Scrub it against the grit guard to dislodge all the trapped dirt.
- Reload with Soap: Now that the mitt is clean again, go back to your soap bucket and load it up with fresh suds.
- Repeat: Continue this panel-by-panel process, always working from top to bottom until the whole car is done.
This meticulous approach is key. It guarantees you’re only ever touching your car's paint with a clean, lubricated mitt, which is the secret to avoiding scratches. By working in small, manageable sections, you stay in complete control, keep the soap from drying, and ensure every inch of your car gets perfectly clean.
Mastering the Rinse and Dry for a Spotless Finish
You’ve done the hard work, and the grime is gone. But all that effort can go to waste if you mess up the rinse and dry. This is where you lock in that streak-free, showroom shine, so don't rush it. Get this part right, and your car will look incredible. Botch it, and you'll be staring at frustrating water spots for days.
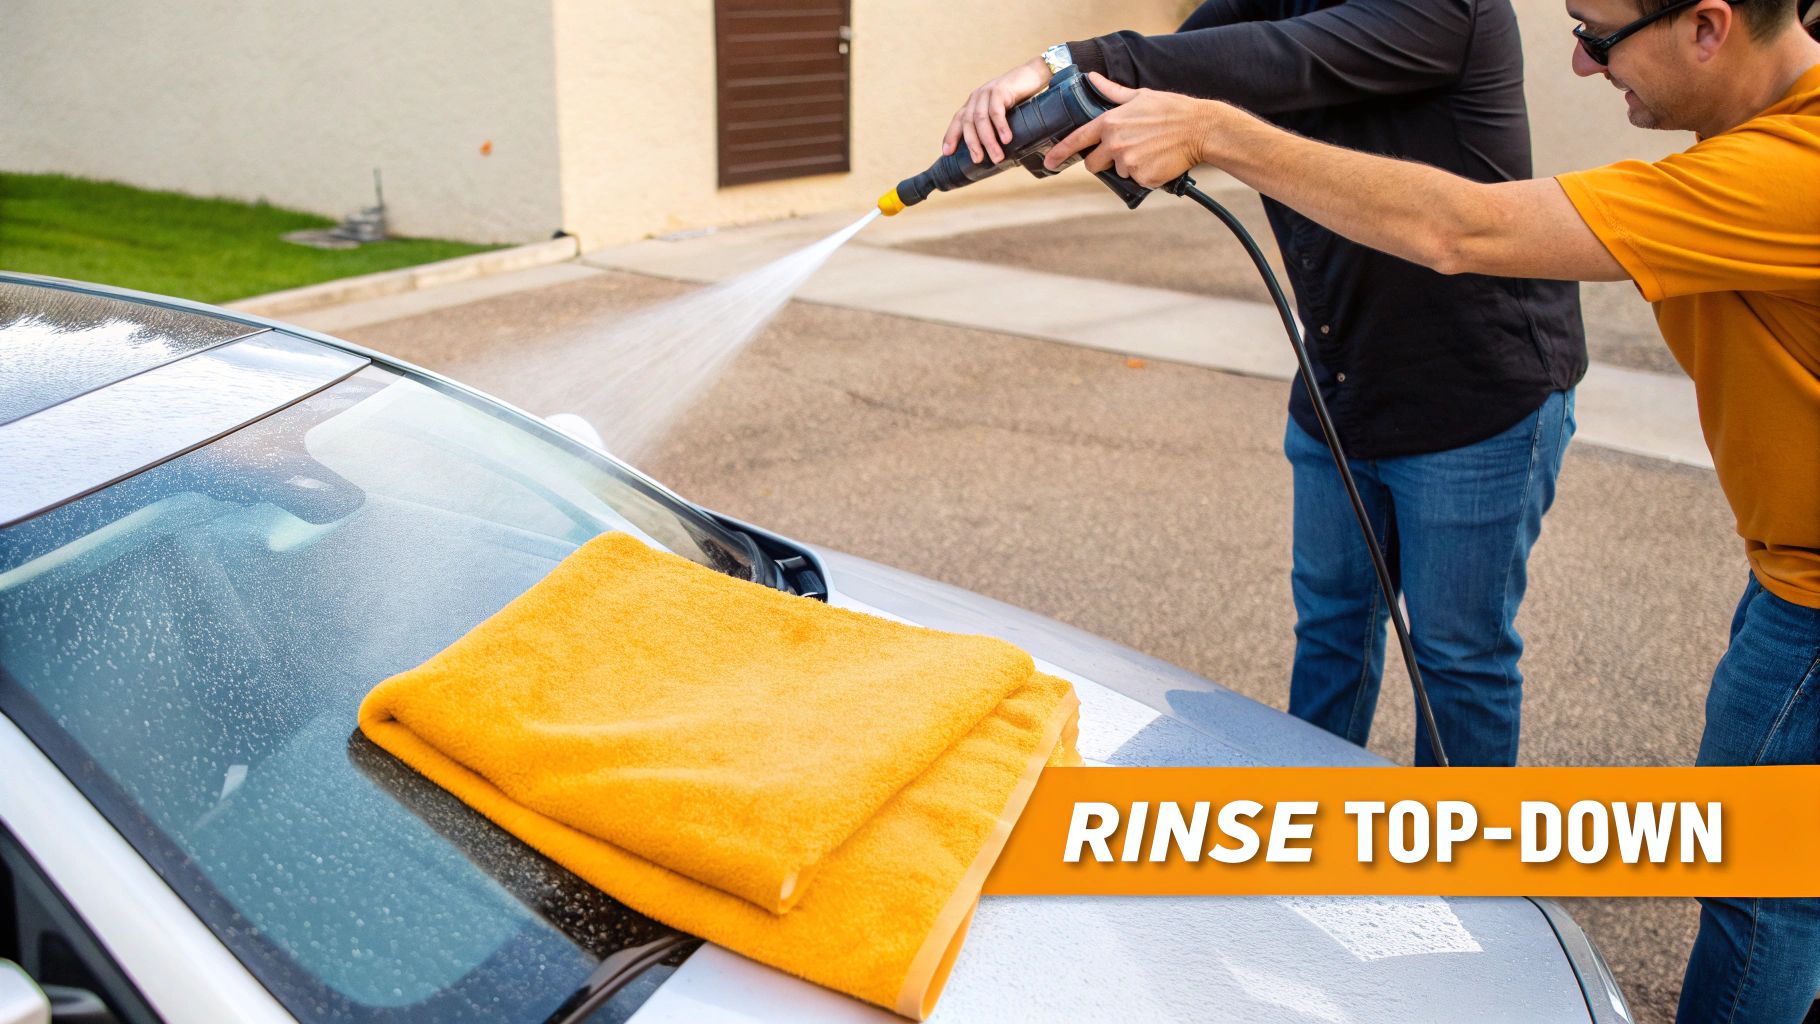
The final rinse is a lot like the first one. Grab your 40-degree (white) nozzle and start from the top, working your way down. Gravity is your best friend here, pulling all the leftover soap and dirt down and away from the panels you just cleaned.
Don't just give the car a quick spray. Be methodical. Soap loves to hide in tricky spots like panel gaps, behind mirrors, in the grille, and around emblems. A thorough rinse is your only defense against dried-on soap residue, which leaves behind ugly streaks that are a pain to remove later.
Choosing Your Drying Method
As soon as the last bubble of soap is rinsed away, the clock is ticking. You have to get the water off the paint before it evaporates and leaves behind mineral deposits—the dreaded water spots. You’ve basically got two choices here: the classic towel-dry or the more modern touchless approach.
A big, plush microfiber drying towel is the go-to for a reason. These towels are super absorbent and designed specifically to lift water off the paint without causing scratches. For best results, find a towel with a high GSM (grams per square meter) and a waffle-weave texture.
On the other hand, if you want a completely touch-free dry, a leaf blower or a dedicated car dryer is a fantastic tool. This method uses a powerful stream of filtered air to blast water off the surface and out of every nook and cranny. It's the absolute safest way to dry a car because nothing ever touches the paint, which means there's zero risk of scratching.
Comparing Drying Tools
| Drying Tool | Pros | Cons |
|---|---|---|
| Microfiber Towel | - Extremely effective at absorbing water. - Affordable and easy to find. |
- Can cause scratches if there's any dirt on it. - Takes longer on complex areas like grilles. |
| Leaf Blower/Car Dryer | - 100% touchless, which means zero scratch risk. - Blasts water out of tight spots and trim. - Fast, efficient, and honestly, pretty fun. |
- Can be noisy. - Needs a power source (outlet or battery). - Might blow dust around if your garage isn't clean. |
This final step in how to power wash a car is really where your attention to detail shines through. Rinsing and drying aren't afterthoughts; they're what separates a good wash from a great one.
Expert Insight: When you're using a microfiber towel, resist the urge to scrub. Instead, lay the towel flat on a panel and gently pat it or pull it slowly across the surface. This blotting motion minimizes friction and is much safer for your car's clear coat.
This focus on careful technique actually mirrors a bigger trend. Eco-friendly car washes are becoming more popular, making up 35% of new facilities opened in 2023, largely because people want to reduce water waste. Power washing at home, when done right, is similarly efficient and uses far less water than an old-school garden hose and bucket. You can find more industry statistics and trends that show how professional methods are shaping the way we care for our cars at home.
The Final Touch With a Drying Aid
Want to take your finish to the next level? Use a drying aid. This is usually a spray-on product, like a quick detailer or a spray wax, that you lightly mist onto the wet car panel by panel just before you dry it.
A good drying aid offers a few major benefits:
- Lubrication: It creates a super-slick surface between your towel and the paint, dramatically cutting down the risk of tiny scratches.
- Extra Gloss: Most drying aids leave behind a bit of shine and protection, giving your fresh wash an extra pop.
- No More Water Spots: They help the water "sheet" off the surface, which makes drying faster, easier, and more effective.
Just give a panel a light mist, then follow up with your microfiber towel. It's a quick, simple step that makes a world of difference, ensuring your car isn't just clean, but truly flawless.
Common Power Washing Mistakes and How to Avoid Them
When you’ve got a high-pressure stream of water in your hands, knowing what not to do is just as important as knowing what to do. A few simple slip-ups can easily turn a productive afternoon wash into a costly trip to the body shop.
There's a reason so many people are hesitant to wash their own cars—they’re worried about causing damage. That anxiety is real. In fact, some recent research shows that 80% of drivers now opt for professional car washes instead of doing it themselves at home. A big part of that trend is simply wanting to avoid the very mistakes we’re about to cover. You can dig into the full industry report on car wash market trends to see the data for yourself.
The good news is, once you learn to sidestep these common pitfalls, you can get those same professional-level results right in your own driveway.
Using the Wrong Nozzle or Pressure
This is, without a doubt, the number one way people accidentally damage their cars. The most notorious culprit is the red 0-degree nozzle. You should never, ever point this at your vehicle. It’s not for washing; it's for stripping paint or cutting through concrete. It will slice through your clear coat, shred rubber trim, and can even etch glass in an instant.
Even the yellow (15-degree) and green (25-degree) nozzles need to be handled with care. While they can be useful for blasting mud out of a wheel well or cleaning the undercarriage, they’re still too aggressive for your paint if you get too close.
Here's my simple rule of thumb:
- Stick with the 40-degree (white) nozzle for pretty much everything—paint, glass, and plastic trim.
- Keep a safe distance of at least 12-18 inches between the nozzle and the car’s surface.
- Always keep the wand moving. Don't just blast one spot; use smooth, sweeping motions to rinse the car evenly.
A Pro Tip to Remember: The pressure washer isn't meant to blast dirt off with brute force. Its job is to rinse away the dirt and grime that your foam and soap have already loosened up. Let your cleaning products do the real work.
Choosing the Wrong Cleaning Solution
I get it, it's tempting to just grab the dish soap from the kitchen sink. Please don't. That stuff is designed to cut through baked-on grease on your pots and pans, which means it's far too harsh for your car. It will strip away any wax or sealant you have, leaving your paint’s clear coat totally exposed to the elements.
Always, always use a dedicated pH-neutral car wash soap. These formulas are made to create thick suds that lift and encapsulate dirt particles, providing the lubrication you need to wash safely without scratching the finish.
Washing in Direct Sunlight
Trying to wash a car that’s hot to the touch or sitting under the midday sun is a recipe for frustration. The heat makes water and soap evaporate in seconds, creating a couple of big headaches for you.
First, you'll be left with water spots. These are nasty mineral deposits left behind as the water vanishes, and they can be a real pain to remove. Sometimes, they can even permanently etch into your clear coat. Second, soap that dries on the surface leaves behind a chalky film that looks awful and is surprisingly difficult to rinse away.
The fix is easy: wash in the shade, or wait for a cooler part of the day, like the early morning or just before sunset.
Spraying Sensitive and Forbidden Areas
A pressure washer is a powerful tool, and there are some spots on your car that are strictly off-limits. Pointing that high-pressure stream in the wrong place can lead to some serious mechanical or electrical trouble.
Be sure to avoid these areas completely:
- The Engine Bay: Never spray a pressure washer directly into your engine bay. You can force water into critical electrical connectors, the alternator, the fuse box, or your air intake. It's a gamble that can lead to some very expensive repairs.
- Panel Gaps and Seals: Hitting the gaps between body panels or the rubber seals around your doors and windows directly can push water past those barriers. This can lead to a damp interior, musty smells, and even rust in places you can't see.
- Chipped Paint or Rust Spots: If you see any paint that's already chipped, peeling, or has a rust bubble underneath, keep the pressure washer far away. A direct hit can easily get under the edge of that compromised paint and flake off a much bigger chunk, turning a tiny blemish into a major eyesore.
Got Questions About Power Washing Your Car? We've Got Answers.
Even after you've got the basics down, a few questions always pop up. It's totally normal. Here, I'll walk you through some of the most common things people wonder about when they're getting started with power washing their car. Think of this as the final once-over to make sure you're feeling 100% ready to go.
Let's clear up any lingering doubts so you can grab that pressure washer with confidence.
Can I Just Use Any Old Soap in My Foam Cannon?
This is probably the most important question, and the answer is a hard no. You absolutely need a pH-neutral car wash soap that’s made for cars. It's tempting to grab the dish soap from the kitchen, but that stuff is designed to cut through heavy grease, and it'll do the same to your car’s wax and sealant. That leaves your paint job exposed and vulnerable.
Proper car soaps are different. They're engineered to create a thick, slick foam that lifts dirt away from the surface without stripping off those essential protective layers. Always follow the soap's instructions for the right dilution ratio—that's the secret to getting that satisfying, shaving-cream-like foam.
What's the Right PSI for Washing a Car?
You're looking for the sweet spot, which is somewhere between 1200 and 1900 PSI. This range has enough oomph to rinse away grime effectively but isn't so aggressive that it'll damage your paint. Most electric pressure washers are perfect for this, as they typically operate right in that safe zone.
If you have a more powerful gas model, you just need to be more careful. Those can easily push past 2000 PSI. The trick is to use a wider-angle nozzle, like the 40-degree (white) tip, and simply stand a little further back from the car. This softens the spray's impact considerably.
Pro Tip: Never hit your car's paint with more than 2000 PSI. It's a surefire way to risk chipping the paint or, even worse, damaging the clear coat. Always start with the lowest pressure setting and test it on a less visible spot first, like a lower door panel.
How Often Should I Be Power Washing My Car?
Honestly, it really depends on where you live and how you drive. For the average person, giving your car a good wash every two weeks is a solid routine. It keeps the usual suspects—dust, bird droppings, and road film—from building up and causing problems.
Of course, if you're dealing with tougher conditions, you'll need to wash it more often. Live somewhere with snowy winters? That road salt is a killer for your undercarriage and paint, so a weekly wash is a smart move. Same goes for spring when pollen and tree sap are everywhere; getting that stuff off quickly will save your finish.
Is It Okay to Power Wash the Wheels and Tires?
Yes, absolutely! Power washing is fantastic for wheels and tires, which are often the dirtiest parts of the car. This is one spot where you can get a little more aggressive with a 25-degree (green) nozzle to blast away that stubborn, baked-on brake dust.
Just remember to keep a safe distance—at least 12 inches away from the wheel itself. Be especially careful if you have delicate custom wheels, like chrome or powder-coated finishes. And whatever you do, avoid spraying the tire's valve stem directly or aiming the high-pressure stream into any cracks you might see in the tire's sidewall.
Ready to achieve that perfect, thick foam you've seen the pros use? The SwiftJet Car Wash Foam Gun connects to any standard garden hose, turning your regular wash into a deep-cleaning foam bath. Upgrade your car care routine today at SwiftJetUSA.com.