

Popular advice is simple: rinse a car wash mitt, toss it in the laundry, and use it again. That routine misses the underlying risk. A neglected mitt can put more scratches into paint than the grime it was meant to remove, because old grit, dried product, and damaged fibers stay in the pile and return to the next panel.
Learning how to clean a car wash mitt properly means treating it as a paint-contact tool, not as a disposable rag you can wash with household laundry. Microfiber depends on fine split synthetic filaments to capture grit, and care guidance warns that heat, twisting, and leftover contaminants shorten the mitt's useful life. Addict Auto's microfiber mitt care guidance even recommends washing the mitt after every use, including when it doesn't look dirty.
Why Your Wash Mitt Deserves More Attention Than You Think
A wash mitt can look clean and still be unsafe for paint. Once sand, road film, dried wax, or polish residue stays in the pile, the next pass may drag those particles across the clear coat instead of releasing them into rinse water.
The risk often begins after the wash. Leaving a used mitt in a bucket of suds lets trapped grit shift as the mitt is squeezed and moved. When it dries, residue hardens between the fibers. It may still feel soft in your hand, but softness does not show whether the pile is free of abrasive contamination.
What damages the pile
Microfiber cleans through fine split filaments that capture and hold dirt. Fabric softener and dryer sheets can coat those filaments, while excessive heat can deform them. Care guidance recommends cold or warm water, no bleach or softener, and low-heat or air drying. 3D Products' microfiber care instructions also advises keeping microfiber away from lint-producing fabrics.
Twisting adds concentrated stress to the mitt. Its construction is meant to flex and hold water, not withstand being wrung like a towel. Harsh detergent, high heat, and forceful handling can flatten the pile or reduce absorbency. A mitt can look clean while lifting dirt poorly.
Sanitizing also matters when a mitt has held organic grime, stagnant wash water, or strong product residue. Rinse out the contamination first, then wash it separately with a microfiber-safe detergent. Do not rely on fragrance or a hot dryer to mask odor. If the smell remains after washing and complete drying, treat that as a contamination warning rather than a cosmetic problem.
Practical rule: If a mitt has touched paint, give it a full rinse, wash, dry, and inspection before storage.
The working routine is simple. Rinse promptly, wash with a specialized microfiber detergent, use a gentle cycle at 30°C to 40°C maximum according to Addict Auto's care recommendations, and dry indoors away from dust and direct heat. Replace the mitt when washing no longer restores a clean, flexible pile, when fibers mat, or when grit and odor persist. A wash mitt is a consumable. Extending its service too far can cost more in paint correction than replacing it.
Right After the Wash Caring for a Freshly Used Mitt
A wash mitt can be damaged before it ever reaches the laundry. The risk is highest while wet grit remains trapped in the fingers, cuff seam, and pile. Handle it as soon as it leaves the final panel, especially when the fibers feel gritty or unusually heavy.
Tap the mitt gently against the inside rim of the rinse bucket to release loose debris. Keep it away from concrete, walls, and the vehicle's bodywork. A hard slap can crush the pile, while dropping it on the ground can load the fibers with fresh sand.
A clean rinse before detergent
Use the clean-water bucket from the two-bucket wash setup, rather than the bucket holding the dirtiest solution. Submerge the mitt and move it through the water with light pressure. Squeeze from the cuff toward the fingertips so dirty water and grit leave through the open end instead of moving farther into the material.
Repeat the motion until the mitt feels lighter and less gritty between your fingers. A separate rinse bucket also reduces the chance of carrying contaminated water back onto the vehicle, a principle included in SwiftJet's bucket car wash guidance.
Rinse the cuff seam, thumb area, and finger pockets with a low-pressure hose. Hold the mitt open and flush water through the pile. Avoid blasting one small section at close range, which can force debris deeper into the fibers. Turn it inside out only when the design permits this without pulling the stitching.
What not to do on the driveway
Leave detergent out of this first flush. Soap makes a gritty mitt slippery, but it does not remove embedded particles by itself. Rinse first, shake off standing water, then move the mitt indoors or to the laundry area for its proper wash.
Avoid these shortcuts:
- Don't wring it: Twisting distorts the pile and strains the cuff.
- Don't leave it in suds: Dirty solution keeps contamination against the fibers.
- Don't drop it on the ground: Buy Oil Direct's wash-mitt care advice warns that embedded sand can scratch paint.
- Don't store it damp: Moisture encourages odor and leaves residue sitting in the pile.
A quick rinse is only the first step. The mitt still needs a full wash, complete drying, and a visual and tactile inspection before storage. If the pile remains matted, gritty, or foul-smelling after that process, treat the mitt as worn out rather than putting it back into service.
Hand Washing vs Machine Washing a Microfiber Mitt
A machine cannot rescue a neglected mitt. Hand washing gives you more control over grit and residue, while machine washing saves time when the mitt has already been rinsed and inspected. Both methods fail if you add fabric softener, use aggressive heat, or wash the mitt with lint-shedding clothing.
Hand washing for maximum control
Fill a clean basin with lukewarm water and add a measured dose of microfiber-specific detergent. Let the mitt soak briefly, then work it gently with your fingertips from cuff to fingertips. Do not scrub the pile aggressively. The aim is to release contamination, not drive it deeper into the backing.
Press the mitt under the water, release it, and repeat. Rinse in fresh water until the water runs clear. Press it between clean hands to remove excess water, never twisting the cuff or pile. Hand washing works well after use on a delicate finish, when product residue is visible, or when the mitt needs a close inspection.
It also gives you useful feedback. Run your fingers through the finger pockets and seams. If you can still feel grit after rinsing, keep washing or retire the mitt. A clean-looking surface is not enough if abrasive particles remain lodged in the fibers.
Machine washing for consistency
Place the mitt inside a mesh laundry bag before putting it in the washer. Use a gentle cycle at 30°C to 40°C maximum, with specialized microfiber detergent. Keep the spin speed at 800 rpm or below, as advised in Addict Auto's washing guidance.
Do not use bleach, fabric softener, dryer sheets, or detergent pods. Wash the mitt separately from towels or garments that shed lint. High heat can deform the filaments, and excessive spinning can flatten the pile or press remaining grit into the weave. The damage may not be obvious until the next wash, when the mitt drags contamination across the paint.
A washing machine suits routine cleaning after thorough pre-rinsing, especially when several mitts need the same treatment. It is a poor choice for a heavily stained mitt that still needs targeted inspection. For that job, hand wash first, then decide whether machine laundering is worthwhile.
| Factor | Hand Washing | Machine Washing |
|---|---|---|
| Control | Highest control over pressure, rinsing, and inspection | Consistent when the cycle is set correctly |
| Best use | Stained, delicate, or heavily contaminated mitts | Routine cleaning after thorough pre-rinsing |
| Water temperature | Cold to lukewarm water | 30°C to 40°C maximum |
| Detergent | Specialized microfiber detergent | Specialized microfiber detergent |
| Spin or pressure | Press out water, never twist | Keep spin at 800 rpm or below |
| Main advantage | You can locate and work on problem areas | Faster and easier for multiple mitts |
| Main risk | Incomplete rinsing if the basin stays dirty | Heat, lint, or harsh products can damage fibers |
If the mitt is heavily soiled, pre-soak it for about 10 to 20 minutes before laundering, following ROC Goods' mitt-cleaning guidance. That loosens grit before agitation begins. After washing, use the same contamination standard applied during a careful bucket car wash: if residue remains, do not put the mitt back on paint.
Removing Stains Odors and Stubborn Grime
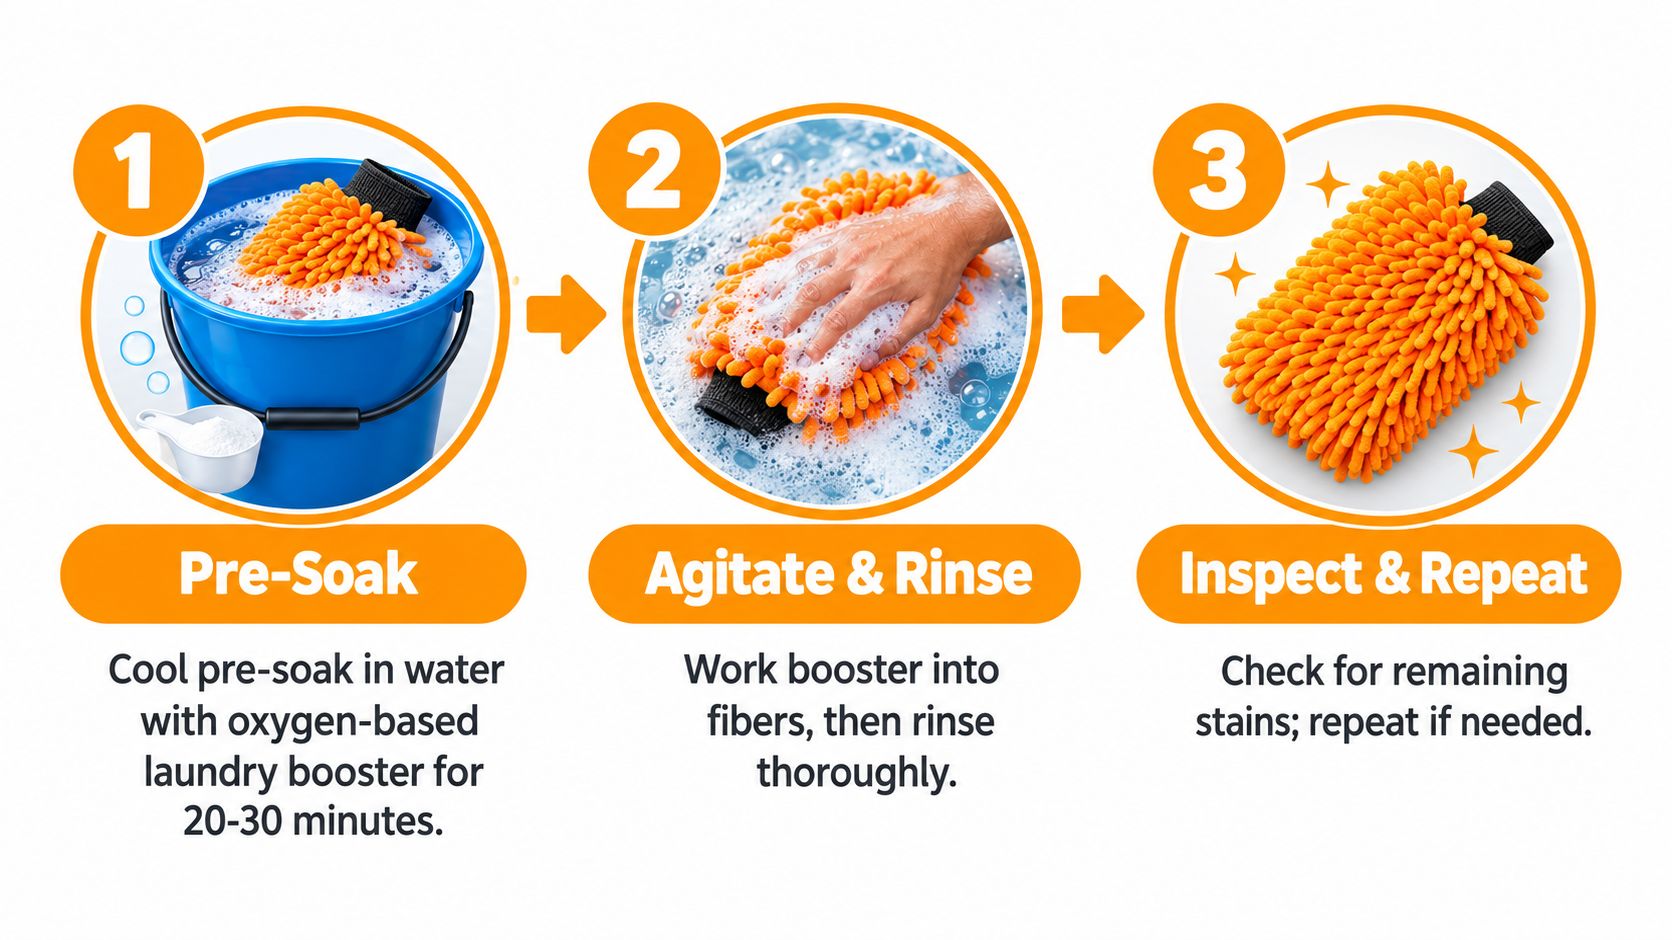
A mitt with a musty smell, dark stains, or grit lodged in the fingertips has reached a decision point. Clean it separately first, then judge whether the fibers are still safe for paint. A routine rinse rarely removes contamination buried in the pile.
Soak the mitt in cool or warm water for about 10 to 20 minutes. Use clean water and a microfiber-safe cleaner. Work the solution through the pile from cuff to fingertips, drain it, and repeat with fresh water if the runoff stays dirty.
Treating stains without coating the fibers
After soaking, knead the mitt gently in plain warm water with microfiber detergent. Work around the cuff, seams, and fingertips, where product residue and grit often collect. Rinse thoroughly before treating any remaining mark.
For a set-in stain, test a diluted, microfiber-safe cleaner on a hidden area. Apply only enough to reach the spot, agitate lightly with a soft brush, and rinse until no cleaner remains. Chlorine bleach, fabric softener, and harsh degreasers can clog or deform synthetic filaments. Residue left behind may streak paint during the next wash.
Odor usually means moisture or organic contamination remained in the pile. A fresh rinse and complete indoor drying resolve many cases. If the smell persists, a mild vinegar-and-water treatment is an option, followed by a thorough rinse. Never combine vinegar with bleach or other cleaners.
The SwiftJet charcoal smell remover article applies to odor around the vehicle, not to contamination inside the mitt. Deodorizing the surrounding area will not remove grit, wax residue, or embedded grime.
Inspect the mitt under bright light before drying. Run clean fingers through the pile and check whether particles still fall out. If the fibers remain supple, repeat the cleaning once. If the pile feels waxy, stiff, or gritty afterward, replace the mitt. A visible stain can be acceptable when the material is clean and soft, but texture that can drag contamination across paint is not.
Drying and Storing Mitts Without Damaging the Fibers
Drying decides whether a clean mitt stays safe for paint. A mitt that leaves the washer clean can still lose its useful pile if it is left against a radiator or exposed to excessive heat.
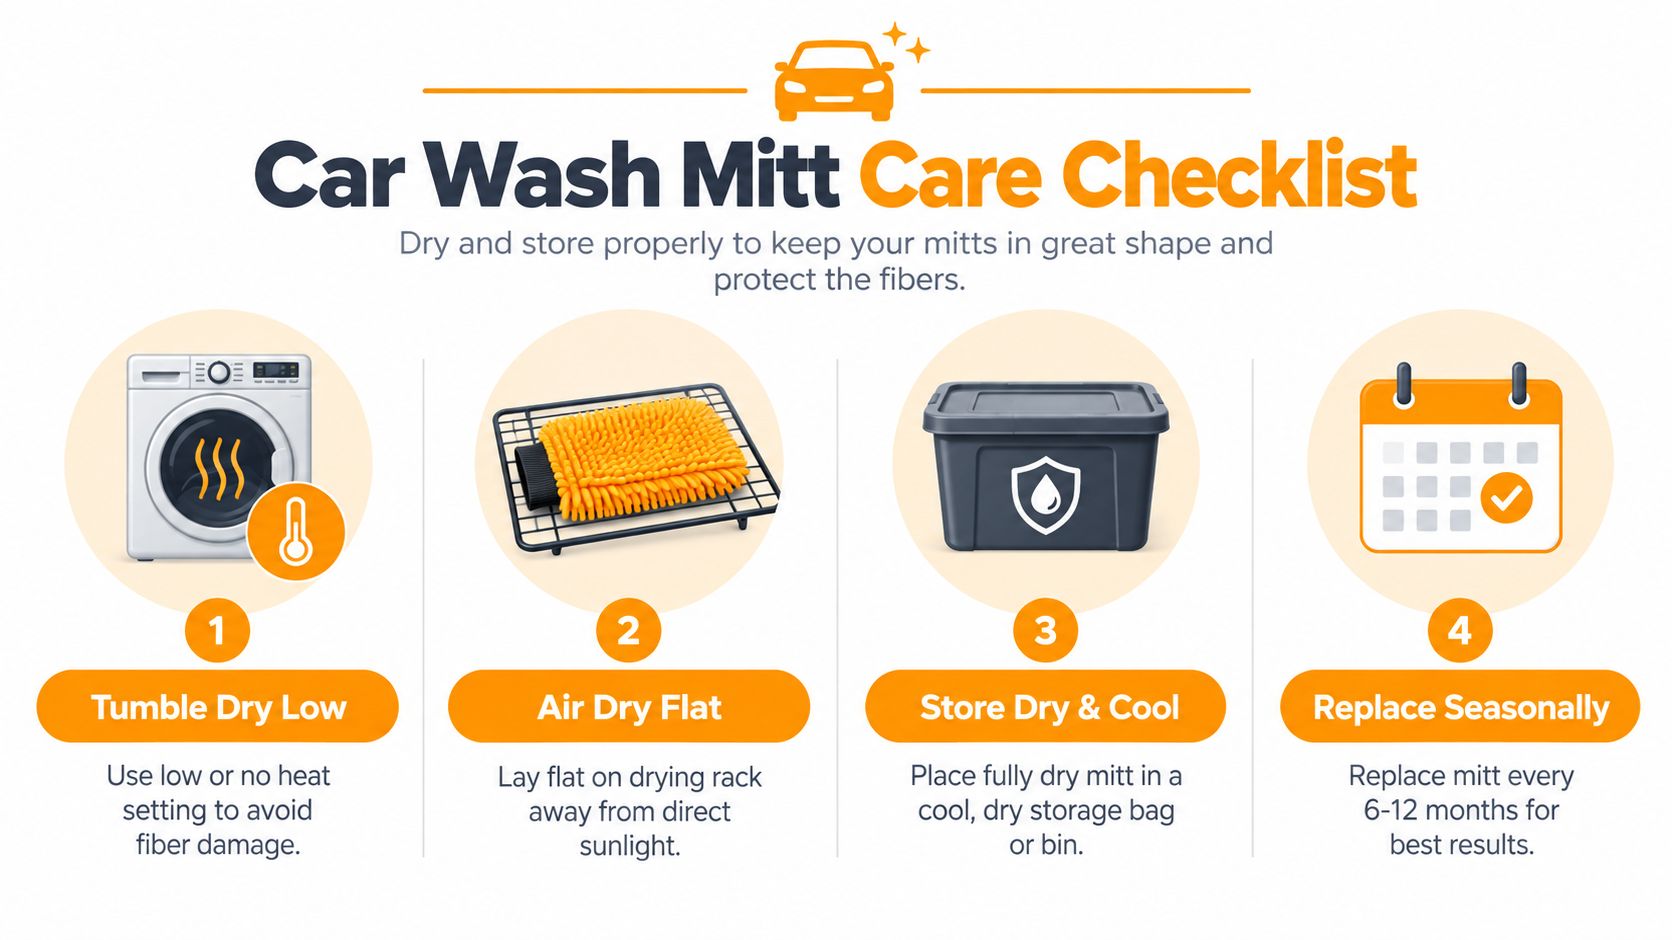
A tumble dryer is acceptable on a low or no-heat setting. The movement may fluff the pile, while high heat can deform synthetic filaments. Stop the cycle before the mitt becomes hot, and skip dryer sheets because their softening agents coat microfiber and can leave residue.
Air-drying works when the surface is clean
Indoor air-drying gives you the most control. Hang the mitt cuff-down from a clean clip, or place it on a clean mesh rack so air reaches both sides. Keep it away from dust, workshop oils, pets, and direct heat. Low-heat or air-drying guidance, along with warnings about bleach, softeners, and dryer sheets, is also covered in SwiftJet's guide to microfiber towels for cleaning.
Do not twist the mitt to force water out. Press excess water away with your hands, shake the mitt open, and let gravity finish the job. Radiators, hot vents, and high-temperature dryer cycles can crush or distort the loop structure, especially after contamination or incorrect laundering has weakened the material.
Storage starts only after full drying
Do not seal a damp mitt in a plastic bin. Dry it completely first, then place it in a clean sealed container or breathable cotton bag in a cool, dry closet. The storage choice should block dust, pollen, and workshop debris without compressing the pile.
Store clean mitts separately from tools used on wheels, engine bays, or heavily soiled lower panels. If several mitt types share the same cabinet, label each bin or bag by use. Clean storage matters because a freshly washed mitt can pick up grit again before its next wash. Use the same separation principle for other microfiber tools, as the cleaning guidance from SwiftJet's guide to microfiber towels for cleaning also indicates.
When to Clean and When to Replace the Mitt
A wash mitt is not automatically safe because it looks clean. Keep it in service only when the pile recovers, the fibers stay intact, and rinsing removes the grit. Replace it when the material has physically changed or contamination remains lodged inside. Repeated washing cannot make a damaged mitt safe for paint.
Check the mitt only after it is completely clean and dry. Water can hide trapped debris, while damp fibers can look fuller than they really are.
The three physical tests
Flatten test: Pinch the pile and lift it between your fingers. Fibers that spring back and feel clean can usually be reused. If they remain matted, flat, or waxy after washing, the split fibers may be too damaged to recover. That surface can smear residue instead of lifting it from the panel.
Shed test: Dunk the dry mitt in clean water and agitate it gently. One loose thread does not automatically end its service life. A steady stream of fibers means the yarn is breaking down, creating loose debris that can sit between the mitt and the paint.
Trapped-grit test: Pass a clean white cotton glove or lint roller across the dry pile. Grit that still comes free after a full wash and rinse is lodged too firmly for ordinary detergent to remove reliably.
| Signal | What to Check | Clean and Reuse If | Replace If |
|---|---|---|---|
| Flattened pile | Pinch and lift the fibers | Pile springs back and feels clean | Fibers remain matted or waxy |
| Fiber shedding | Agitate in clean water | Only an occasional stray thread appears | Fibers stream or shed steadily |
| Trapped grit | Use a white cotton glove or lint roller | No meaningful grit comes free | Grit remains after a full wash |
| Ground contact | Review where the mitt was dropped | It stayed off the ground | Sand or debris may be embedded |
| Chemical damage | Recall the wash products used | Only microfiber-safe detergent was used | Bleach, softener, or harsh products coated the pile |
A mitt that passes all three physical tests can return to paint work. Retire one that fails two of the three signals. Replace it immediately if it touched the ground or handled a heavily gritty surface without proper rinsing. Sand wedged into the pile may remain even after laundering.
A failed mitt does not need to go in the trash. Reassign it to wheels, door jambs, exhaust areas, or other tasks where paint safety is less demanding. Do not return it to painted panels after chemical damage, persistent grit, or heavy shedding.
Replacing a questionable mitt costs less than correcting scratches caused by contamination. Treat the tool as a consumable, and use its condition, not its age, to decide when it leaves paint duty. The wash-mitt guidance from Buy Oil Direct also supports retiring a mitt when its fibers no longer protect the surface.
For a cleaner wash routine, SwiftJet offers a hose-connected foam gun that applies clinging foam and includes a microfiber wash mitt for vehicle cleaning. Visit SwiftJet to review the foam gun options and build a setup that makes rinsing contamination out of your mitt easier from the first wash.
