

You've just finished a wash, the paint is clean, and the tires look ready to set it off. Then you drive half a mile, glance down the doors, and see black specks where the sidewall dressing flung onto the paint. That's usually not a bad tire shine formula. It's the result of the wrong tire shine applicator, too much product in the pad, or a tire shape that didn't get the right kind of contact.
The good news is that the fix is usually in your hand, not in another bottle. A better applicator geometry, cleaner prep, and a lighter touch change the outcome fast, especially on low-profile tires, aggressive tread blocks, and raised white-letter sidewalls. Professional detailing lives or dies on controlling how product meets rubber, and that starts with matching the tool to the tire.
Why Your Tire Shine Keeps Slinging and Streaking
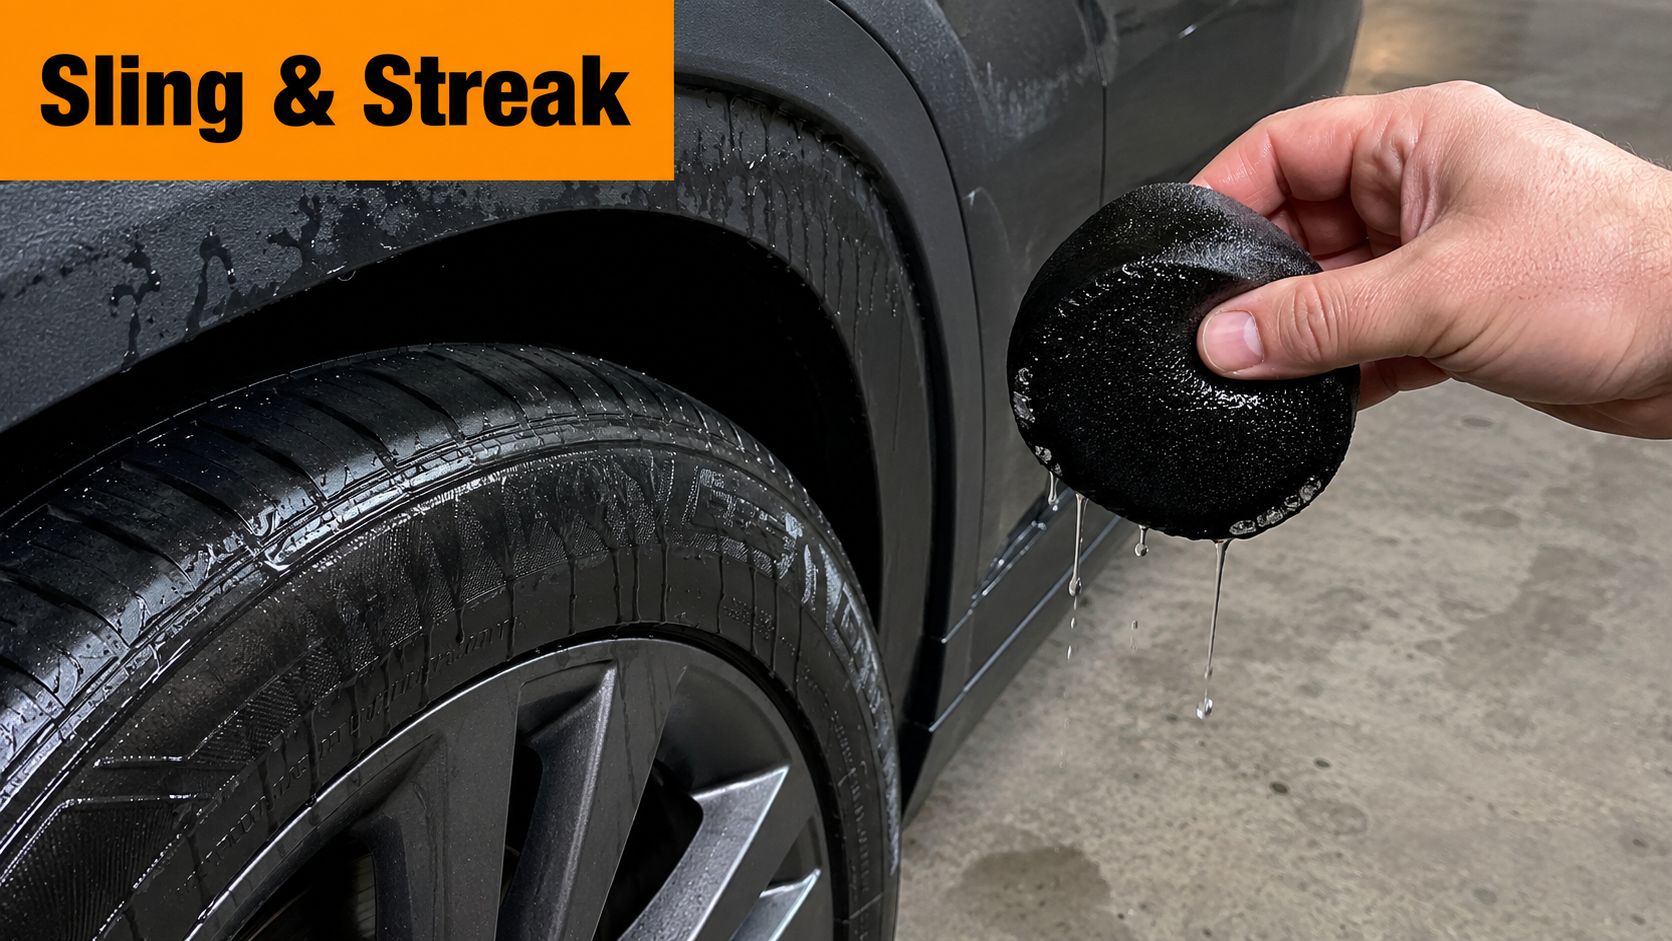
The classic failure looks the same in every driveway. You wash the car carefully, wipe the wheels down, dress the tires, and by the time you reach the gas station, the lower doors are dotted with oily spots. That usually means the dressing sat on top of the tire instead of being worked into the sidewall, and the applicator carried more product than the rubber could hold.
The chain reaction that causes sling
A saturated pad is the first weak link. If the foam or microfiber is dripping, the sidewall gets a wet film instead of a controlled layer, and that film gets thrown outward as soon as the tire flexes at speed. The effect gets worse on tires with deeper grooves because excess product settles into the recesses and then works its way back out.
Practical rule: if the applicator leaves streaks on the first pass, it's already holding too much dressing for that tire.
Tire shape matters just as much. A low-profile tire doesn't have much tall sidewall to forgive sloppy strokes, while a chunky tread pattern creates edges, voids, and a bigger chance of missed spots. The same pad that looks clean on a sedan can flood the shoulder of an off-road tire or skip the lower curve of a performance tire.
The older machine approach in washes shows why control matters. Professional Carwashing & Detailing notes that the early flat-pad systems were faster and cheaper than hand application, but the trade-off was quality, while newer independent roller systems used 15 dense foam applicator rollers per side and could use half the dressing of older flat-pad systems, with usage as low as 1 ounce per vehicle Professional Carwashing & Detailing. That same logic applies in the driveway. Less uncontrolled product usually means less sling.
The simplest correction is to slow down, load less, and press the dressing into the rubber instead of laying it on top. A tire shine applicator should meter product, not flood the sidewall.
Choosing the Right Tire Shine Applicator for Your Tires
The right tool depends on what the tire looks like. A smooth touring tire, a low-profile performance tire, a raised white-letter sidewall, and an all-terrain tread all need different contact geometry. If you use one generic pad for everything, some tires will look great while others will streak, miss the bottom edge, or trap too much dressing in the grooves.
Here's the quick rule: flat surfaces like flat pads, curved sidewalls like contoured foam, grooves and letters like precision edges, and heavy tread patterns like firmer brushes or a hybrid approach. That isn't marketing fluff. It's just contact shape meeting rubber shape.
| Tire Shine Applicator Types and Best Use Cases | |||
|---|---|---|---|
| Applicator Type | Best For | Key Advantage | Limitation |
| Flat foam pads | Simple sidewalls, quick maintenance jobs | Easy to control on broad, smooth rubber | Misses curves and grooves more easily |
| Contoured foam heads | Low-profile tires, rounded sidewalls | Matches tire curvature better and keeps product where you want it | Can be awkward on tight lettering or deep tread |
| Microfiber towels | Light dressing on delicate trim-adjacent areas | Good touch sensitivity and easy edge work | Can absorb more product than it releases |
| Stiff-bristle brushes | Aggressive treads, deep channels, utility tires | Reaches texture and raised patterns better | Can be too aggressive if the dressing is thin or the tire is already clean |
A contoured foam applicator usually gives the cleanest result on modern passenger cars because its shape follows the sidewall instead of fighting it. A flat pad is still useful for quick work, but it can ride high on the shoulder and leave the lower edge underdressed. Microfiber helps when you need finesse around logos or narrow bands, and a brush earns its keep on chunky tread or intricate patterns.
For a closer look at a microfiber-style option, this microfiber applicator pad overview is useful context if you're comparing texture and handling.
The best backup tool is the one that fixes your misses, not the one that looks fancy in the package.
Raised white-letter tires deserve special attention. Flat foam often skims the letters without getting product into the recesses, while a contoured head or a small brush can trace the edges more precisely. On heavily treaded tires, don't expect one tool to hit every cavity in one pass. Use the primary applicator for the visible sidewall, then switch to a smaller tool for the inner shapes and the bottom zone that sits against the ground.
Preparing Tires Before Applying Any Dressing
Dirty rubber will fool you every time. If the tire still carries road film, old dressing, and brown oxidation, the applicator is just spreading contamination around. That's why the finish looks uneven even when the product itself is decent.
Tire browning, often called blooming, shows up as that ugly brown cast that keeps bleeding back through the surface. The fix starts with a proper clean, not with a heavier coat of shine. A dedicated tire cleaner and a stiff, purpose-built brush remove the residue that keeps new dressing from bonding evenly.
Start with the tire only after the wheel face is safe to clean. If brake dust is still on the wheel, use the right cleaner first, then rinse thoroughly. This brake dust cleaner reference is a useful companion if you're building a full wheel-and-tire prep routine.
The prep sequence that keeps dressing predictable
- Rinse loose debris. Knock off grit and sand before you scrub, because dragging dry debris across rubber only creates more mess.
- Scrub with cleaner. Work the sidewall with an appropriate tire cleaner and a brush that can reach the texture without shredding the surface.
- Rinse until the runoff is clean. Old dressing and brown residue should leave the tire, not stay behind in the pores.
- Dry completely. Dressing performs more evenly on a dry sidewall, and the applicator glides better without slipping on leftover water.
The bottom section of the tire is the most commonly missed area. Roll the vehicle forward or backward just enough to expose the section that was sitting on the ground, because that spot usually holds the ugliest residue and the most brake dust. If you don't move the car, you're dressing around a blind zone.
Clean rubber accepts product evenly. Wet, dirty rubber makes even good dressing look cheap.
The old wash-industry lesson is the same one hobby detailers keep relearning. Control and prep come before shine. Once the tire is clean and dry, the applicator can do its job instead of fighting grime.
Applying Tire Dressing for Even Coverage and Zero Sling
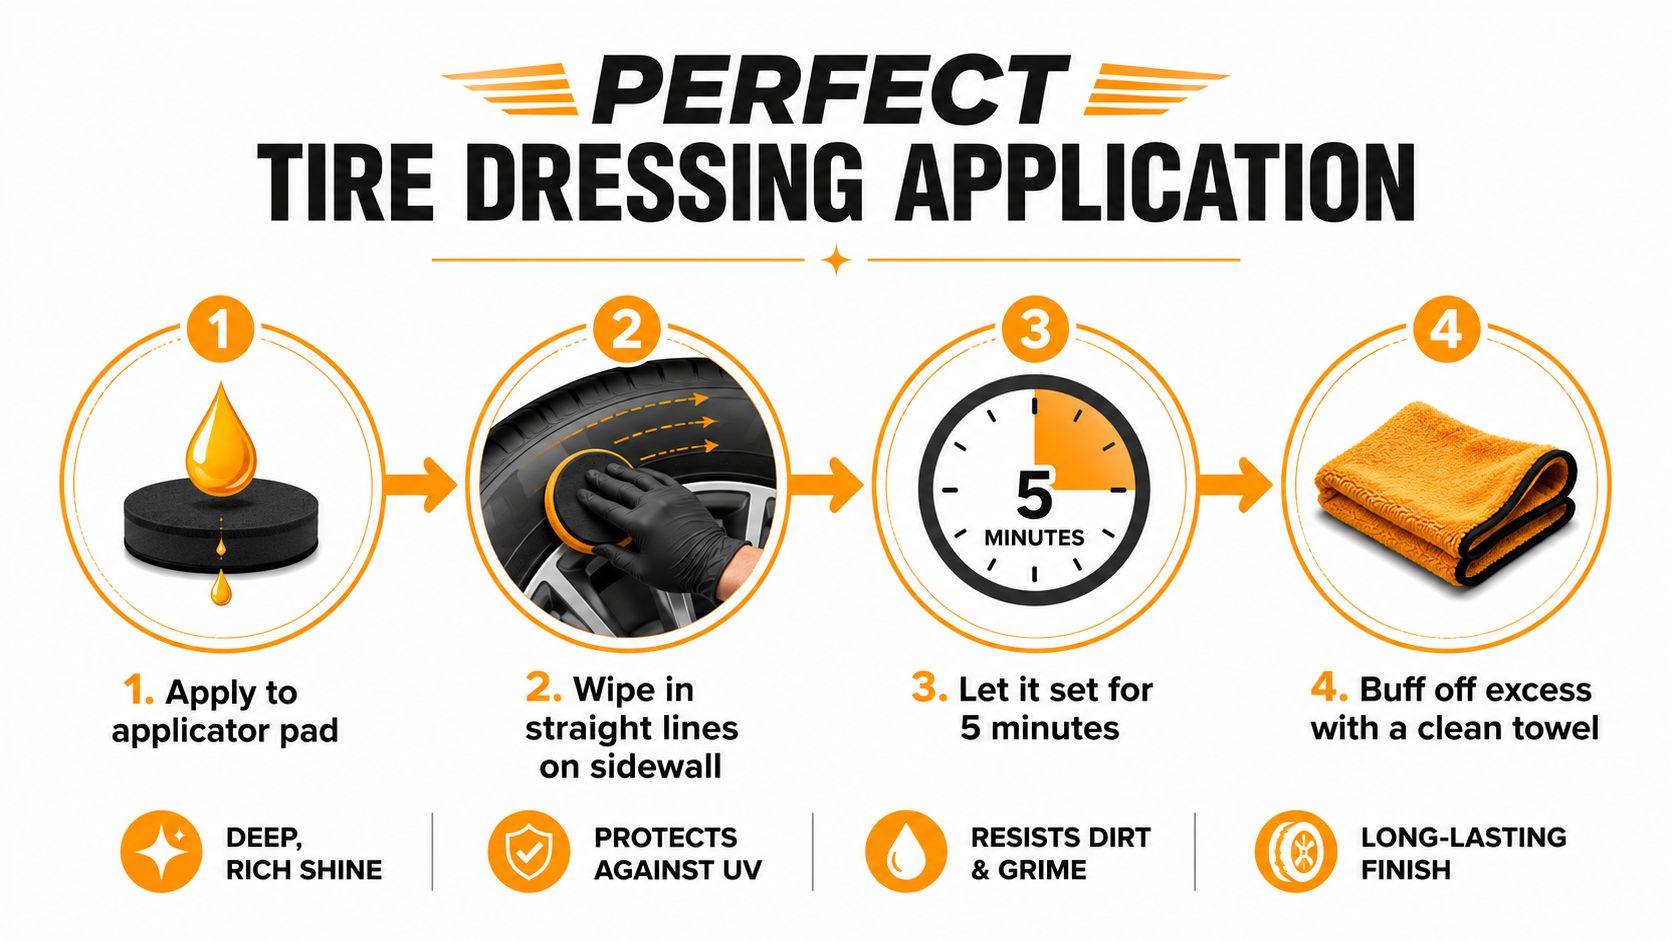
The cleanest tire finishes come from thin, deliberate passes. Load the applicator lightly, then work the product into the rubber instead of painting it on like a wall. If the pad feels heavy, it's already carrying too much dressing for a controlled result.
Stroke direction matters
Use straight, overlapping passes that follow the tire's curvature. On a rounded sidewall, short strokes keep the applicator from skidding and pushing product into the shoulder seam. On raised lettering, angle the edge of the pad so the dressing reaches into the recess without pooling on top of the letters.
Keep your pressure light. The goal is contact, not compression. Too much force squeezes product out of the pad and creates the wet edge that later lands on the paint.
A small amount goes farther than a wet pad
A good tire shine applicator should leave a uniform film, not visible puddles. If you see product collecting at the wheel lip, you've gone past the useful amount. Wipe the edge where the sidewall meets the rim with a clean towel if any dressing creeps toward the finish.
Let the first layer settle before you decide whether the tire needs more. People often overcorrect at this point. They assume the first pass looks too dull, then add another heavy coat, and the sling problem starts all over again.
For a visual guide, this process pairs well with the short video below.
If you're also cleaning the cabin after a full detail, deep interior cleaning steps from The Mobile Buff are a useful reference because they follow the same principle, controlled process beats rushed product use.
Practical rule: if you can see the dressing from six feet away before the tire even rolls, there's probably too much on the surface.
A final buff with a clean towel helps remove the last wet edge near the wheel lip. That tiny step often separates a decent finish from one that stays off the paint for days.
Common Tire Shine Mistakes and How to Fix Them
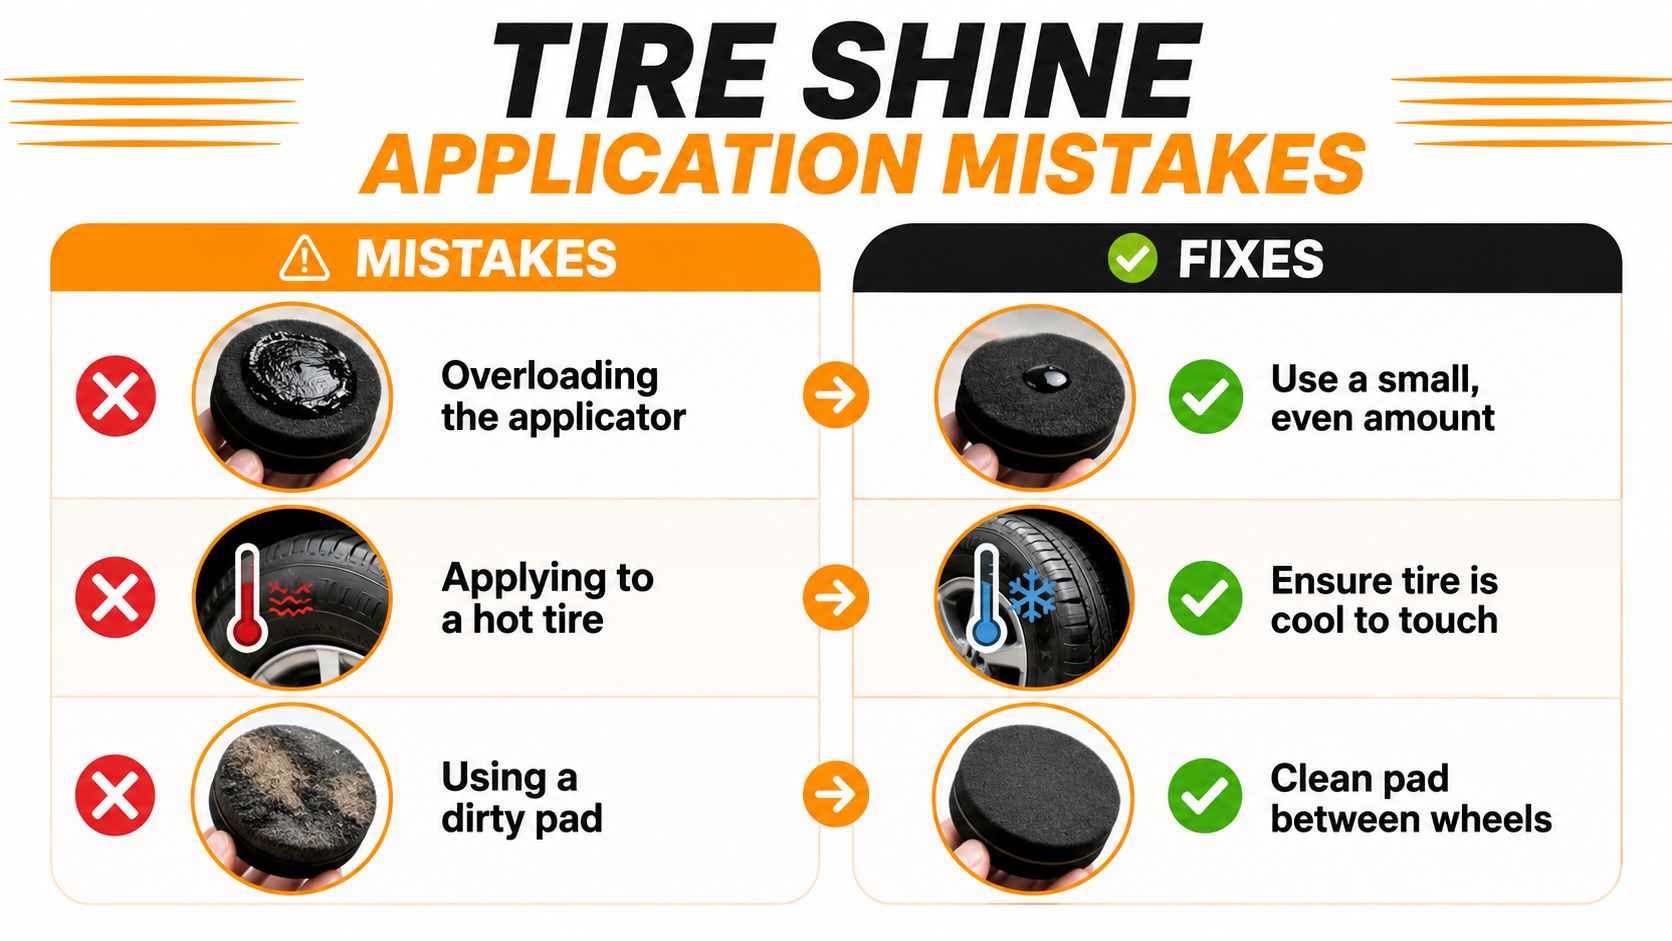
Most tire shine problems show up as the same four mistakes. The first is overloading the applicator, which creates a greasy finish that looks rich for a few minutes and then slings onto the bodywork. The second is applying dressing to a dirty or wet tire, which keeps the product from settling evenly.
What the mistake looks like in real life
A dirty pad often leaves dark streaks or patchy shine because old product and loose grit are being reintroduced to the tire. A wet tire tends to repel controlled coverage, so the dressing slides instead of gripping. On a hot day, a warm sidewall can make both problems worse because the product moves before it settles.
The third mistake is skipping the bottom zone. That lower strip wears the most grime and usually gets ignored because it's hard to see without rolling the car. If you don't expose it, you don't dress it, and the finish reads uneven from the first glance.
The fourth mistake is using a worn-out applicator that has lost its shape. Once a foam pad collapses, it stops matching the tire and starts skipping edges, especially on low-profile sidewalls or white-letter tires. A pad that sheds particles is even worse because it leaves debris in the fresh dressing.
The correction that actually works
- Use a small, even amount. The pad should be damp with product, not saturated enough to drip.
- Keep the tire cool and dry. Dressing behaves better on a surface that isn't hot to the touch or wet from rinsing.
- Clean the pad between wheels. A dirty applicator transfers old residue and ruins consistency.
- Roll the car slightly. That exposes the hidden bottom edge and keeps the finish uniform around the full circumference.
The common thread is simple. Streaks and sling usually come from technique, not from some mysterious incompatibility with the tire dressing. Once the applicator is matched to the tire and the surface is prepared properly, the finish becomes far more predictable.
Cleaning and Maintaining Your Tire Shine Applicator
A dirty applicator becomes part of the problem. Old dressing hardens in the foam or microfiber, then gets pushed back onto the next tire as streaks, clumps, or gray residue. If the tool feels stiff, smells sour, or has lost its original shape, it's already underperforming.
The cleanup routine is quick. Rinse the applicator while the dressing is still fresh, work a small amount of mild cleaner through the fibers or foam, then rinse again until the water runs clear. Don't soak it in harsh solvent unless the product maker specifically allows it, because damaged foam stops holding product evenly.
Drying matters more than you might think. A damp pad stored in a closed bucket can grow mildew and pick up odor, and that makes the next detail messier than the last one. Lay the applicator out where air can move around it, and keep it out of direct dirt and shop dust.
A good pad should feel consistent in your hand every time you pick it up. If it's flattened, crumbly, or shedding, retire it.
Storage is simple too. Keep clean applicators in a sealed bin or bag so they don't collect garage grit between uses. Separate tire tools from wash mitts and interior cloths, because cross-contamination is what turns a good-looking tool into a streak machine.
If you want a companion reference on towel care, microfiber towels for cleaning is a useful read when you're organizing the rest of your detailing kit. The same logic applies across the board, clean tools deliver cleaner results.
A tire shine applicator isn't disposable if you treat it like a precision tool. Keep it clean, keep it shaped, and replace it before it starts sabotaging the finish.
If you want better tire shine without the sling, start with a cleaner pad, the right applicator shape, and a lighter hand. Visit SwiftJet to see the foam gun and detailing gear that fit into a faster, cleaner wash routine, and use the same disciplined approach on tires that you already use on paint.
