
Picture this: you’re all set to wash your car, but you spend the first five minutes wrestling with a leaky, stubborn hose connection. We’ve all been there. Now, imagine swapping that frustrating twist-on, twist-off routine for a simple, satisfying click. That’s exactly what quick disconnect fittings bring to the table.
This small upgrade is a game-changer for your detailing workflow, especially when you're using tools like the SwiftJet foam gun with your garden hose.
The Secret to a Faster, Leak-Free Car Wash
This guide is all about getting straight to the point. We'll show you how these simple fittings can stop those annoying leaks at both the spigot and your foam gun, saving you a ton of time and hassle. This isn't just about convenience; it's about adding a layer of professional polish to your home setup.
You'll quickly see why making this small change is one of the most satisfying upgrades any car enthusiast can make. The whole process just becomes smoother and a lot more enjoyable.

Why Make the Switch?
At its core, the biggest benefit is pure efficiency. Instead of fighting with stiff, muddy hose ends, you get a secure, watertight connection with a single push-and-click motion. That one simple action creates a ripple effect that improves your entire cleaning routine.
- Saves You Time: Instantly swap between your SwiftJet foam gun, a high-pressure nozzle, or even a sprinkler without having to walk back to the spigot every time.
- Kills the Frustration: Say goodbye to cross-threading, surprise sprays to the face, and the general pain of old-school hose connections.
- Protects Your Gear: A solid, proper seal means no more water dripping into the internal parts of your tools, which helps reduce wear and corrosion over the long haul.
And it’s not just us car washing folks who see the value. This demand for convenience has created a massive global market for these fittings. One segment alone was valued at roughly USD 1.2 billion and is expected to climb to USD 1.9 billion by 2033. That kind of growth just proves how much people everywhere crave efficiency.
A Foundation for Better Detailing
Think of quick disconnects as the starting point for a modular, custom cleaning system. They work best when you pair them with a quality hose that isn't going to kink or fight you at every turn. To find the right match, take a look at our guide on what to look for: https://www.swiftjetusa.com/blogs/news/best-hose-for-car-wash.
A seamless connection is the first step toward a professional-grade car wash at home. It removes the most common point of failure—the hose connection—allowing you to focus entirely on achieving a perfect finish on your vehicle.
For anyone really looking to level up their cleaning game, exploring topics like efficient techniques for using a pressure washer can open up a world of new ideas. When you combine the right tools with smart connectors, you transform a weekend chore into a genuinely satisfying experience.
How to Choose the Right Quick Disconnect Fittings
Walking into a hardware store or browsing online for quick disconnects can feel like a pop quiz you didn't study for. With so many options, how do you pick the right one? Let's cut through the noise and get you the perfect fittings for your SwiftJet foam gun, ensuring a leak-proof, durable connection right from the start.
The first big choice you'll make is the material. For garden hose fittings, the two main contenders are brass and stainless steel. Each has its own strengths, so think about your environment and how hard you'll be on your gear.
Material Matters: Brass vs. Stainless Steel
High-quality brass is the workhorse of the industry for a good reason. It’s incredibly durable, naturally resists corrosion, and creates a fantastic seal. For most home car washing setups, a solid brass set hits that sweet spot of performance and value. It's what I recommend for the majority of DIY enthusiasts.
Stainless steel, on the other hand, is the premium, heavy-duty option. It offers even better strength and corrosion resistance. This is a big deal if you live near the coast where salty air is a factor, or if you're a professional detailer using your equipment day in and day out. For that kind of intense use, stainless steel is built to last.
Here's the bottom line: both materials are excellent choices. Your decision really comes down to your specific needs. Go with brass for all-around reliability and value, or upgrade to stainless steel for maximum durability in tough conditions.
To make an informed decision on quick disconnects, it helps to understand the broader landscape of general hose fittings available for various applications. This context can clarify why certain features are important for specific tasks.
To help you decide, here’s a quick breakdown of the most common materials you'll encounter for quick disconnect fittings.
Quick Disconnect Material Comparison
| Material | Pros | Cons | Best For |
|---|---|---|---|
| Brass | Durable, corrosion-resistant, good value. | Heavier than plastic, can tarnish over time. | Most home and garden applications; great all-rounder. |
| Stainless Steel | Extremely durable, superior corrosion resistance. | More expensive, can be heavier than brass. | Professional detailers, coastal areas, heavy-duty use. |
| Aluminum | Lightweight, affordable. | Prone to corrosion and cross-threading, less durable. | Light-duty or temporary uses where weight is a concern. |
| Plastic | Very lightweight, cheapest option. | Can crack under pressure or with UV exposure. | Infrequent, low-pressure tasks; not ideal for detailing. |
For your SwiftJet setup, I strongly recommend sticking with high-quality brass or stainless steel. They provide the reliability and durability you need for a secure, leak-free experience wash after wash.
Getting the Size and Seal Right
Once you've picked a material, the next step is sizing. Thankfully, this part is simple.
Nearly all garden hoses and accessories in North America, including your SwiftJet foam gun, use the standard 3/4" GHT (Garden Hose Thread). Just make sure to double-check the product description to confirm it's GHT-compatible before you buy.
What truly makes these fittings work so well is the seal. Look for models with high-quality internal O-rings, usually made from rubber or nitrile. These little gaskets are the unsung heroes that prevent those annoying drips and sprays, creating a watertight seal that holds up against typical household water pressure.
A couple of other features can make your life a lot easier:
- Built-in Shut-off Valve: Some female couplers have an integrated valve that automatically stops the water when you disconnect. This is a game-changer, letting you swap from your foam gun to a spray nozzle without a mad dash back to the spigot.
- Ergonomic Grip: A rubberized or textured grip on the coupler sleeve makes it much easier to operate, especially when your hands are wet and soapy.
The demand for these handy connectors originally came from industrial sectors like automotive and manufacturing, where speed and reliability are critical. In fact, the market for pneumatic quick disconnect fittings alone was valued at USD 5.37 billion. This industrial heritage means the fittings we get for home use are often built to a surprisingly high standard.
A good set of quick disconnects can do more than just connect a foam gun. They can unlock a whole new level of efficiency for all your watering and cleaning tasks. Check out our guide on how they can even help turn your hose into a pressure washer for more serious cleaning power.
Installing Your Fittings for a Perfect Seal
Getting a flawless, leak-proof connection is really the whole point, right? Let's walk through how to install your new quick disconnects on both the SwiftJet foam gun and your garden hose. It's a straightforward process, and with a couple of pro tips, you'll nail that perfect seal from the very first go, leaving drips and frustration behind.
The foundation of any good seal is starting with a clean slate. Before you even think about attaching the new fittings, take a close look at the threads on your spigot, the end of your hose, and the inlet on your SwiftJet. Over time, old plumber’s tape, dirt, and mineral gunk can build up and completely sabotage your efforts to get a secure fit.
A small wire brush or even an old toothbrush works wonders here. Just give the threads a gentle scrub until they're free of any old tape or grime. Honestly, this simple prep step is often the one thing that separates a leaky mess from a perfect connection.
The Secret to a Watertight Seal
I've seen it a thousand times: a tiny, persistent drip that drives you crazy. The best defense is a little roll of plumber's tape, sometimes called thread seal tape. This thin, non-sticky tape is fantastic because it fills in the microscopic gaps between threads, creating a formidable barrier against leaks. It’s a cheap tool that delivers professional results every single time.
Applying it correctly is key. Just follow these simple rules:
- Wrap in the Right Direction: Always wrap the tape in the same direction you’ll be screwing the fitting on. For male threads, this is almost always clockwise. This keeps the tape from bunching up or unraveling as you tighten things down.
- Use the Right Amount: You don't need to mummify the threads. Just two to three wraps is usually plenty. You want to cover the threads completely without adding a ton of bulk.
- Keep it Taut: As you wrap, pull the tape slightly taut. This helps it settle down into the grooves of the threads, right where it needs to be.
Before we get to twisting wrenches, take a quick look at this visual guide. It's a great reminder to make sure you've got the right components in hand before you start.
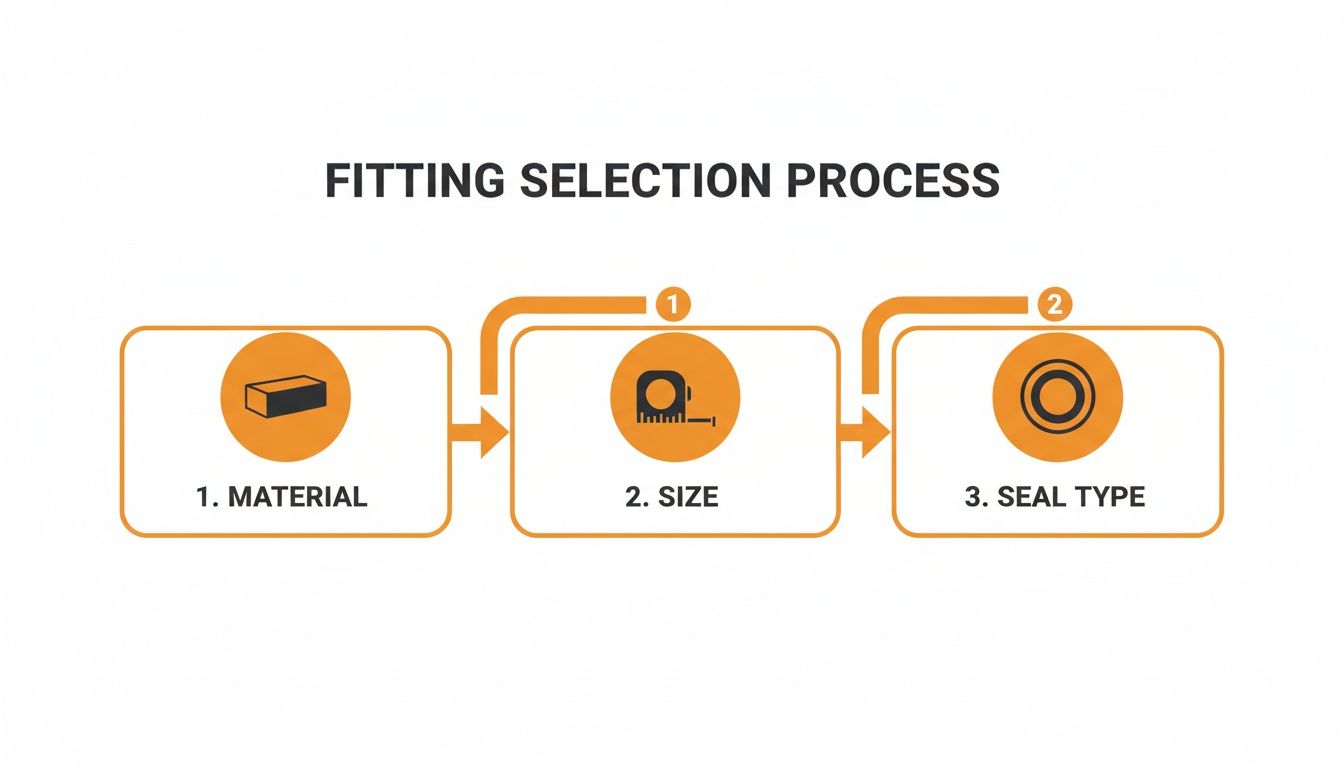
Getting the material, size, and seal type right from the start is half the battle won.
Attaching and Testing Your New Fittings
With your threads prepped and taped, you're ready to go. You'll have a male plug for your SwiftJet (and any other accessories) and a female coupler for the end of your hose. Go ahead and screw the appropriate piece onto each component.
The trick here is to get them snug but not overtightened. Use a wrench for a firm grip, but resist the urge to crank on it with all your might. Over-tightening is a classic mistake—it can easily crack a brass fitting or crush the internal rubber washer, which pretty much guarantees a leak. Remember, the plumber's tape is doing most of the sealing work for you.
I can't tell you how many people I've seen wrench down on fittings with maximum force, thinking "tighter is better." In reality, a firm, hand-tight connection followed by a gentle quarter-turn with a wrench is almost always perfect. It creates a lasting seal without damaging your gear.
Once everything is attached, it’s time for the moment of truth. Connect your hose to the spigot, then click your SwiftJet into the quick disconnect coupler. Turn the water on, but do it slowly at first, then open it up all the way.
Give each connection point a careful look: where the fittings meet the spigot, the hose, and the foam gun. If you spot any drips, turn off the water and disconnect. It’s usually a simple fix—an extra wrap of tape or a slight tightening is all it takes. Taking a minute to test now ensures your setup is solid and ready for action when you need it.
Making Your Quick Disconnect System Last
Alright, your new system is all set up. The hassle of constantly threading and unthreading your hose is officially a thing of the past. Now, let’s talk about keeping it that way. A little bit of care goes a long way, ensuring those quick disconnect fittings give you years of that satisfying click-and-go action. It's not just about making them last; it's about making your wash day even more seamless.
First things first, get used to the sound. That solid "click" when the male plug seats into the female coupler is your best friend. It’s the audible confirmation that you have a secure, leak-free connection. Always make sure you push the fittings together until you both hear and feel them lock into place.
When you're done, disconnect them the right way. Pull back the spring-loaded collar on the female coupler before you pull the male plug out. If you just yank them apart, you're putting a ton of stress on the locking balls and the internal O-rings, which is the fastest way to wear them out.
Simple Care for Smooth Performance
After a wash, dirt and grit can sneak into the coupler, which can make it feel stiff or hard to connect over time. The easiest fix? Just give it a quick rinse. After you're done, disconnect everything and run some clean water through the female coupler. This will flush out any gunk that’s built up inside.
Every few months—or anytime the connection starts to feel less than smooth—it's worth doing a quick inspection.
- Check the O-Rings: Take a peek inside the female coupler. You’ll see a small rubber O-ring. Look for any nicks, cracks, or signs of it drying out. This little gasket does all the work to prevent leaks.
- A Touch of Lube: Dab a tiny bit of silicone-based lubricant on the O-ring. This keeps the rubber pliable and makes connections buttery smooth, while also preventing it from cracking. Just be sure to avoid petroleum-based products like Vaseline, as they can cause rubber seals to swell and break down.
Pro Tip: A well-maintained quick disconnect should feel almost effortless. If you find yourself wrestling to get your tools connected or disconnected, that's your cue. It’s telling you it needs a quick clean and a bit of lube. This simple two-minute habit will save you a ton of frustration down the road.
A Gateway to Your Detailing Arsenal
The real beauty of a quick disconnect setup is the incredible versatility it brings to your garden hose. It’s no longer just a hose; it becomes a universal power-up station for all your car washing tools. You can now swap between your SwiftJet foam gun and any other attachment in a literal second.
Think about the workflow. You’ve just laid down a thick blanket of foam with the SwiftJet. Click. You pop it off and snap on a high-pressure jet nozzle to blast caked-on mud from the wheel wells. Click. Now you attach a wide, gentle shower nozzle for that final, sheeting rinse.
You're moving from one task to the next without ever walking back to the spigot to twist something off. It turns a chore into a smooth, efficient process.
This kind of flexibility is a game-changer, especially if you're thinking about stepping up your cleaning power. For those curious about the next level, you can see how this convenience pairs with more powerful systems in our guide on the foam cannon for a pressure washer and how it compares to a foam gun. It’s all about turning your driveway into a pro-level wash bay.
Dealing With Common Quick Disconnect Issues
Even the best equipment can act up now and then. When it comes to quick disconnects, the great news is that most problems are simple fixes you can handle right in your driveway. Instead of letting a small drip ruin your car wash, let's look at what usually goes wrong and how to solve it in minutes.
The most common complaint I hear is about a small, persistent leak. Don't worry—this almost never means the fitting is broken. More often than not, it's just something simple getting in the way of a good seal, usually right where the male plug and female coupler connect.
Before you start taking things apart, just disconnect the fitting and take a quick look inside. You'd be surprised how often a tiny piece of grit or a fleck of dirt gets lodged in there, preventing the internal O-ring from sealing completely. A quick blast of water from your hose is usually enough to flush it out.
Your Prime Suspect: The O-Ring
If a good rinse doesn't solve the drip, the next thing to check is the O-ring itself. This little rubber gasket sits inside the female coupler and does all the hard work of creating a watertight seal. Over time, it can dry out, get nicked, or just plain wear out from constant use.
Luckily, replacing an O-ring is a fix that costs next to nothing and saves a ton of frustration. You can usually pry the old one out with a small pick or a tiny flathead screwdriver—just be careful not to scratch the metal inside the fitting. Once it's out, pop the new one in. I like to add a small dab of silicone grease to the new O-ring to keep it from drying out and to help it seal better.
Think of the O-ring as the tires on your car. It's a critical wear-and-tear item that's designed to be replaced. Keeping a few extra on hand in your detailing kit is one of the smartest, cheapest investments you can make for uninterrupted cleaning.
When Connections Get Sticky
Ever had a fitting that gets stiff or feels tough to connect and release? That’s not a sign of failure; it’s just telling you it needs a little TLC. For the connection to work smoothly, the internal locking balls and spring mechanism have to move freely.
If you run into trouble, this quick guide should help you pinpoint the issue fast. I've found that 99% of problems fall into one of these three categories.
Quick Disconnect Troubleshooting Guide
| Problem | Likely Cause | Solution |
|---|---|---|
| Dripping at Connection | Debris inside the coupler or a worn-out O-ring. | Disconnect and flush the coupler with clean water. If that fails, replace the O-ring. |
| Stiff or Jammed Action | Lack of lubrication or grit caught in the locking collar. | Clean the mechanism and apply a bit of silicone lubricant to the O-ring and internal parts. |
| Won't "Click" Securely | The male plug isn't pushed in all the way, or debris is blocking the lock. | Give it a firm push until you hear and feel it click. Check for and remove any visible obstructions. |
A little bit of routine care goes a long way. By taking a moment to clean and lubricate your quick disconnects, you're making sure they snap together smoothly and give you a leak-free seal every time you wash your vehicle. It’s all about keeping your workflow efficient and headache-free.
Answering Your Top Quick Disconnect Questions
Let's dig into a few common questions I hear all the time about using quick disconnects with tools like the SwiftJet foam gun. Getting these details ironed out will help you feel confident that you're getting a truly leak-free, high-performance setup from your very first wash.
Will These Fittings Mess With My Water Pressure?
This is probably the number one concern, and it's a good question. The short answer? Nope. A quality quick disconnect won't noticeably reduce your water pressure or flow rate.
The standard 3/4" GHT fittings that match your garden hose are engineered specifically to allow for maximum water flow. The key is to stick with reputable brands and avoid the cheap, no-name stuff, which can sometimes have internal burrs or a restrictive design that chokes the water flow. Your SwiftJet needs good pressure to create that thick foam, and a well-made fitting won't get in the way of that.
The whole point of a quick disconnect system is to add convenience without taking away performance. You get the easy swap without sacrificing the power your tools need.
Should I Take the Fittings Off After Each Use?
Definitely not! In fact, you should do the opposite. The magic of this system is that it's a "set it and forget it" upgrade.
The best practice is to leave the male plug threaded into your SwiftJet (and any other spray nozzles or sprinklers you use), and keep the female coupler attached to the end of your hose. That's what gives you that satisfying, one-click connection. The only time you'd really want to remove them is for long-term winter storage, especially if you live where it freezes. Draining them fully will prevent ice from expanding and cracking the fittings.
Brass or Stainless Steel: Which One is Right for Me?
Both are fantastic options, but they serve slightly different needs.
-
High-quality brass is the workhorse of the industry. It's incredibly durable, fights off corrosion well, and is the perfect choice for most home detailing enthusiasts. It hits that sweet spot of performance and value.
-
Stainless steel is the premium upgrade. It offers superior durability and corrosion resistance, which is why it’s often the go-to for professional detailers or anyone who lives near the coast where salt in the air can be a problem.
For the average weekend warrior, a good brass set will provide years of dependable, leak-free service.
Ready to make your car wash faster, easier, and a whole lot more fun? The SwiftJet Car Wash Foam Gun is engineered for a perfect fit with high-quality quick disconnects. Upgrade your detailing game today at swiftjetusa.com.