

The popular advice is simple: a sponge is cheaper, quicker to rinse, and perfectly acceptable if you use plenty of shampoo. I don't buy it for painted panels. The question in a microfiber wash mitt vs sponge comparison isn't which tool feels softer in your hand. It's what happens to grit after the first dirty panel, and whether that grit stays separated from your clear coat.
A microfiber mitt gives contamination somewhere to go. Its deep pile lifts and holds particles away from the paint, while a flat sponge keeps more dirt close to the contact face. That distinction matters on a dusty commuter, and it matters even more on a pickup, SUV, RV, or off-road vehicle that carries abrasive debris across several large panels.
The verdict is clear. Use a quality microfiber wash mitt for painted surfaces, then make the result depend on your rinse discipline, panel order, and willingness to swap media when it becomes contaminated. Keep sponges for wheels, textured trim, engine-bay work, and small jobs where paint safety isn't the main concern.
Why the Mitt or Sponge Choice Matters More Than You Think
A household sponge looks harmless because it's soft, full of water, and easy to find. Softness alone doesn't make a wash tool safe. A sponge presents a broad, relatively flat contact face, so particles caught underneath can stay pressed against the clear coat while you move the tool across the panel.
That's the basic failure in the comfortable “a sponge is fine” assumption. The sponge may carry lubrication, but its surface doesn't create the same separation between trapped contamination and paint that a deep microfiber pile does. A technical comparison of microfiber mitts and sponges describes the mitt's deep fibers lifting and trapping dirt away from the finish, while a sponge keeps contamination closer to the clear coat and can drag abrasive grit across it.
Paint damage starts with contact
Every wash is a series of contact events. Dust sits on the panel, your tool picks it up, and your hand applies movement and pressure. If the tool holds the particle above the paint, the risk is lower. If the tool flattens that particle against the surface, you're turning a wash stroke into an abrasive stroke.
Micro-marring and swirl marks also build gradually. A single pass may leave damage too fine to notice, but repeated poor washing can haze a finish and make dark paint look dull under direct light. Soft single-stage finishes are especially unforgiving because polishing removes material, and there's a limit to how often you can correct the surface safely.
The paint-safe choice is the tool that gives grit an escape route, not merely the tool that holds the most water.
The material history helps explain why microfiber became useful beyond cloths. Ultra-fine fiber production dates to the late 1950s, continuous-filament advances were made in Japan in the 1960s by Miyoshi Okamoto at Toray Industries, and products such as Ultrasuede brought microfiber into commercial use by the 1970s. Microfiber later expanded into cleaning applications in the 1990s, as outlined in this microfiber history and car-cleaning overview.
There's also a wider abrasion concern around cleaning media. A 2024 ACS study found that worn melamine sponges can shed about 6.5 million microplastic fibers per gram, and estimated a global release potential of about 4.9 trillion fibers from sponge consumption, according to the ACS Environmental Science and Technology study. That research concerns melamine sponges rather than every automotive sponge, but it reinforces why sponge construction and wear deserve scrutiny.
What Each Tool Actually Is and How It Works
A microfiber wash mitt is a hand-sized wash tool made from very fine synthetic fibers, commonly arranged in a plush face or chenille-style noodle pile. The fibers are engineered to create spaces that can hold soapy water and collect loose contamination. When you glide the mitt over paint with light pressure, the pile can move around particles instead of presenting a single rigid face that pushes them along.
A car-washing sponge works differently. It may use open-cell or closed-cell foam, or a natural cellulose material, but the operating principle is similar: the sponge absorbs water and relies heavily on the lubricating film between its face and the paint. Its pores can hold contamination, but the contamination remains closer to the working surface and may be redeposited as you continue washing.
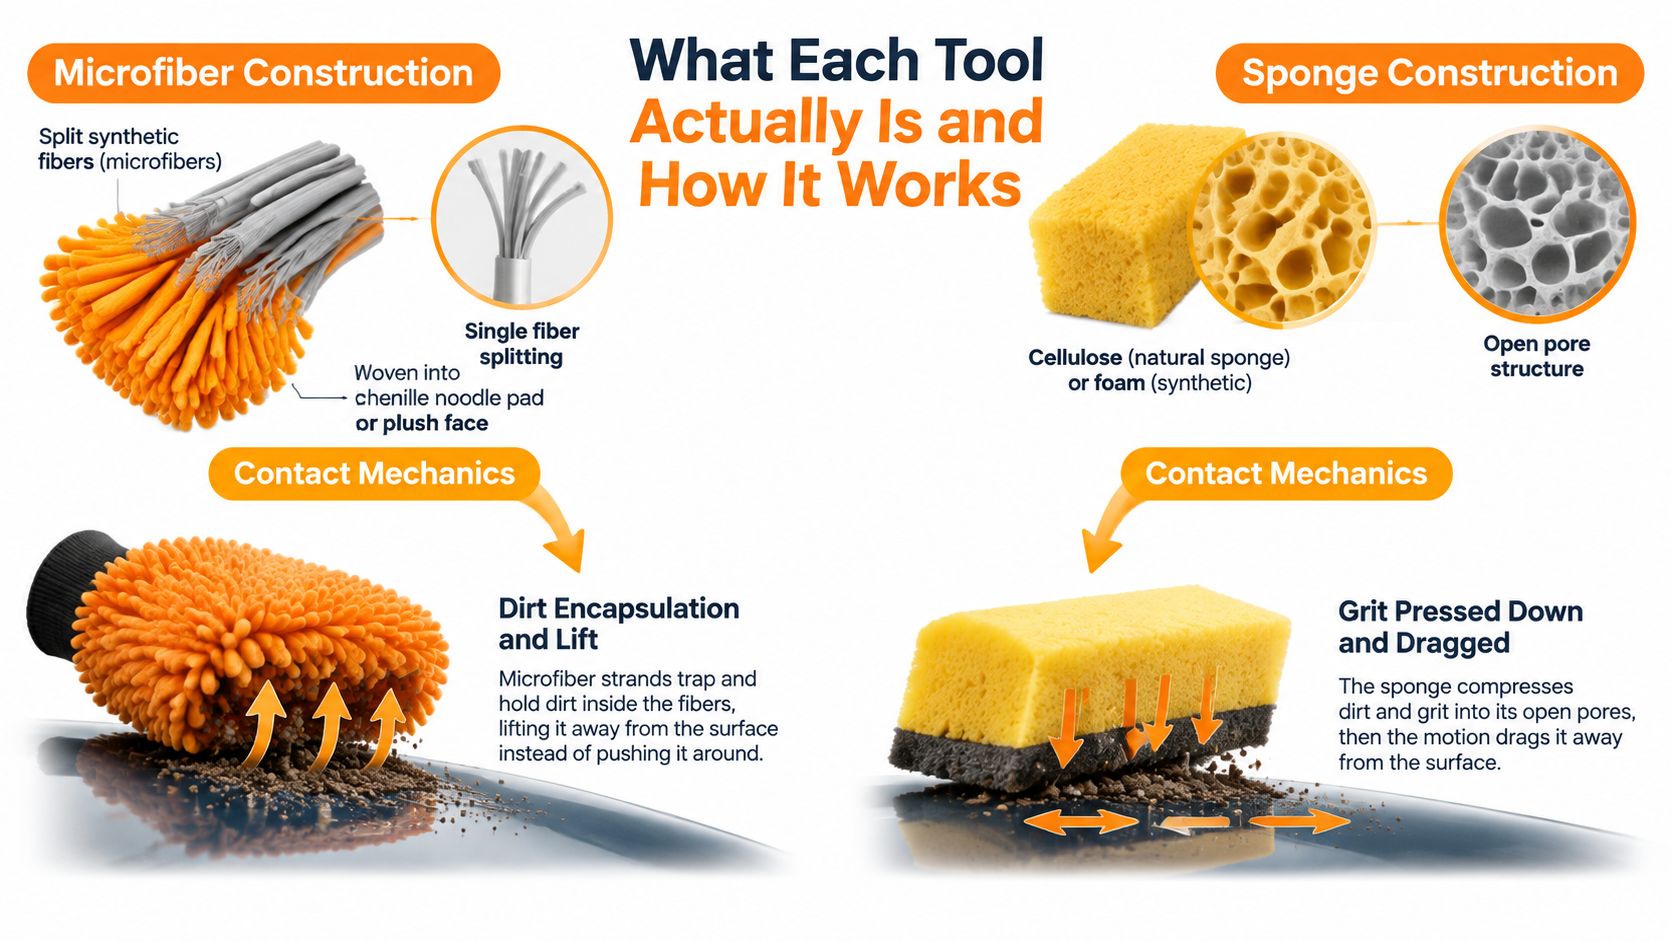
Fiber pile versus flat foam
Think of the mitt as a suspended collection system. Its pile creates depth between the paint and the contamination held inside the fibers. That doesn't make a mitt magically scratch-proof. A mitt overloaded with grit, dragged with force, or dropped on the ground can still mark paint. The geometry gives you a safer starting point.
A sponge depends more on lubrication and frequent rinsing. A softer sponge may feel gentler, but hand feel doesn't tell you how securely it releases grit or how much contamination remains near the contact face. Natural cellulose and synthetic foam also behave differently in absorption and release, so “sponge” isn't a single uniform material category.
For a more product-focused explanation of how a microfiber mitt fits into a car wash, see this microfiber wash mitt guide. The useful test isn't whether the tool feels soft when clean. It's whether it still presents a clean, lubricated working surface after a dirty panel.
The next distinction is practical. A mitt generally carries more wash solution and suds, which helps it stay lubricated over a longer section. A sponge may rinse faster, but that speed comes partly from releasing contamination quickly, not necessarily from removing it safely. A comparison from Star Car Wash makes that trade-off central to the sponge-versus-mitt decision.
Side-by-Side Comparison Across the Criteria That Count
The table below gives the garage-level answer. A quality microfiber mitt is the better general tool for painted panels. A sponge can be convenient, but convenience comes from its quick rinse and simple shape, not from superior contamination control.
Microfiber Mitt vs Sponge Criteria Comparison
| Criterion | Microfiber Wash Mitt | Car Washing Sponge |
|---|---|---|
| Scratch risk | Lower when clean, well lubricated, and used with light pressure | Higher because contamination stays closer to the flat contact face |
| Lubrication behavior | Retains substantial soapy water and suds | Holds wash liquid, but can release it and contamination quickly |
| Dirt-trapping capacity | Deep pile lifts and holds particles away from paint | Pores can hold dirt near the working surface |
| Rinsing between panels | Needs deliberate agitation and inspection | Rinses quickly, but quick release can redeposit contamination |
| Water retention | Generally high, supporting broader panel coverage | High at first, with faster loss during use |
| Durability | Reusable when washed and stored correctly | Reusable for some jobs, but contamination and wear reduce confidence |
| Maintenance | Requires microfiber-safe laundering and separation by task | Simple to rinse, but difficult to judge whether grit remains embedded |
| Best painted-panel use | Full exterior contact washing | Limited emergency or small-area work |
| Best non-paint use | Dedicated mitts can serve wheels or trim when separated from paint tools | Wheels, tires, textured plastics, and utility cleaning |
Where the mitt wins decisively
The first sharp difference is paint safety on dark or soft finishes.
On black paint, soft single-stage paint, or a vehicle you plan to keep glossy, use the microfiber mitt. The sponge's lower purchase price doesn't compensate for added correction work.
The second is contamination management across multiple panels. A mitt's pile creates more distance between the paint and the grit it has collected, but only while you rinse and reload it correctly. That condition matters. A dirty mitt is not safer merely because it started as microfiber.
Where the sponge has a narrow advantage
A sponge can be faster to rinse, especially on a lower panel that's heavily soiled and due for separate treatment. It can also work well around textured plastic, wheel faces, tires, and engine-bay surfaces where paint refinement isn't the priority. For a one-panel roadside cleanup, a small sponge may be easier to carry and control.
That's not enough to make it the default for bodywork. The sponge's efficiency is a short-term handling advantage. The mitt's advantage is contamination separation, lubrication retention, and broader coverage. On a full vehicle, I'll take the tool that reduces the chance of dragging grit, then control its hygiene rather than pretend a fast rinse solves everything.
Best-Use Scenarios for Large and Gritty Vehicles
Large vehicles expose the weakness in any simplistic “mitts are safer” answer. A truck, RV, camping trailer, or off-road SUV has more paint, more lower-body contamination, and more opportunities to carry grit from one panel to the next. A mitt helps because its larger working surface holds more wash solution and suspends contamination in a deeper pile, but it also becomes unsafe if you keep using it after it's visibly loaded.
I won't invent a square-feet-per-minute figure for this process because coverage changes with vehicle shape, soil level, mitt size, foam dwell, water pressure, and the washer's technique. The useful measurement is operational: how many clean, lubricated passes you can make before the tool needs rinsing, and how much time you spend stopping to remove contamination.
Match the tool to the vehicle
- Dusty daily driver: Pre-rinse first, then wash upper panels with a mitt. After the hood and front fenders, inspect the pile. If it feels gritty or leaves a visible smear, rinse more aggressively or change media.
- Pickup or SUV: Use one mitt for glass and upper paint, then a fresh mitt for lower doors, rocker panels, bumpers, and tailgate. Don't carry front-end road film across the rest of the truck.
- Off-road rig: Treat the first contact wash as a contamination-control job. Foam, rinse, and use separate media for the dirtiest sections. A sponge's fast rinsing doesn't make it suitable for dragging trail grit across paint.
- RV or camping trailer: The mitt's water retention and broad pile help cover large panels with fewer reloads. Keep a separate utility tool for awnings, tires, hardware, and visibly rough surfaces.
- Emergency spot cleaning: A sponge can be acceptable for a small, isolated area when you rinse after every pass and don't use it as a substitute for a full wash.
The grit threshold is visible, not mathematical. Stop or swap when the mitt shows a dirt smear, feels loaded, touches the ground, or enters an area with unknown contamination. For tight emblems and intricate recesses, use a dedicated small tool. A USB lithium scrubber with battery is better suited to controlled utility cleaning than repurposing your paint mitt for aggressive recessed grime.
Running a Safer Wash Using a Foam Gun and Mitt
Start with the vehicle in the shade and let the surface cool. Set up a wash bucket with shampoo, a separate rinse bucket, and a clean microfiber mitt. A foam gun such as the SwiftJet model applies clinging foam through a garden hose connection and includes a microfiber wash mitt, so the pre-wash and contact tool can be used as one straightforward setup.
The wash sequence
- Rinse without touching the paint. Work from the roof downward and flush loose dust from mirrors, glass, hood, doors, and lower panels. Spend extra time on wheel arches and rocker panels, but keep wheel media separate from paint media.
- Apply foam and let it dwell for about 3 to 5 minutes. Use that time to let the foam loosen surface contamination. Don't allow it to dry on the vehicle.
- Rinse again before contact. The foam has done its job by softening and carrying away loose material. The mitt should now glide over a cleaner, wetter surface rather than grind through a dry layer of dust.
- Wash top down. Start with the roof, glass, upper doors, hood, and upper fenders. Leave the lower doors, bumpers, rear panel, and rocker areas until later.
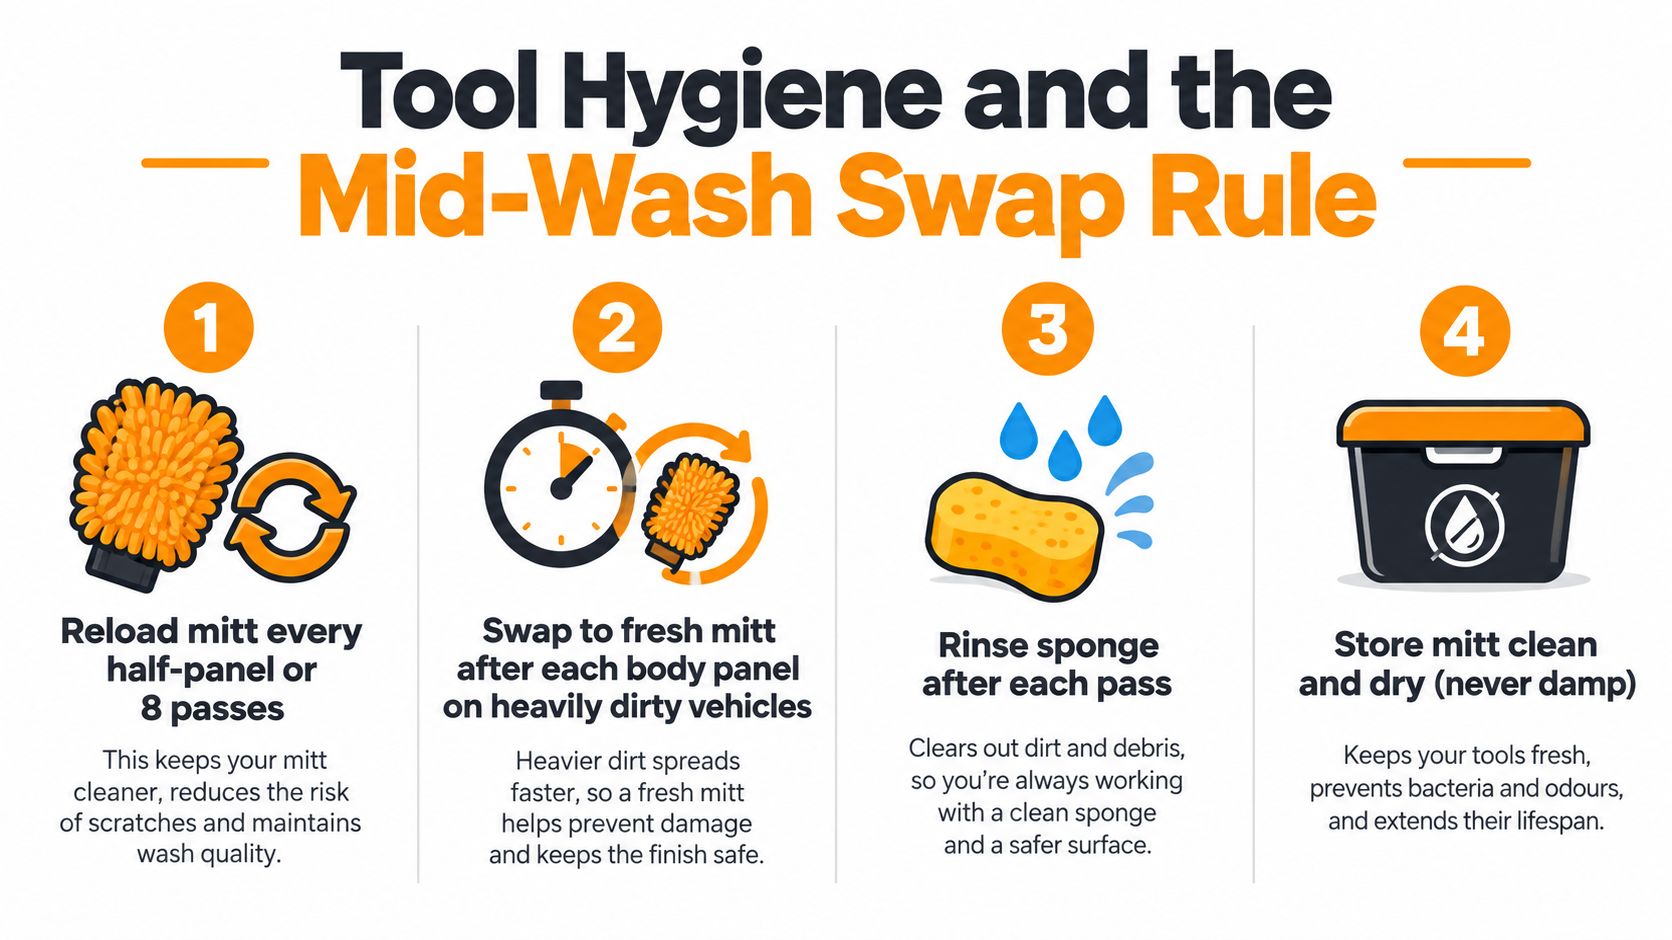
- Make eight to ten light passes on a panel, then reload. Keep the mitt wet and avoid pressing down to force a result. If a mark needs pressure, stop and treat it separately instead of scrubbing harder.
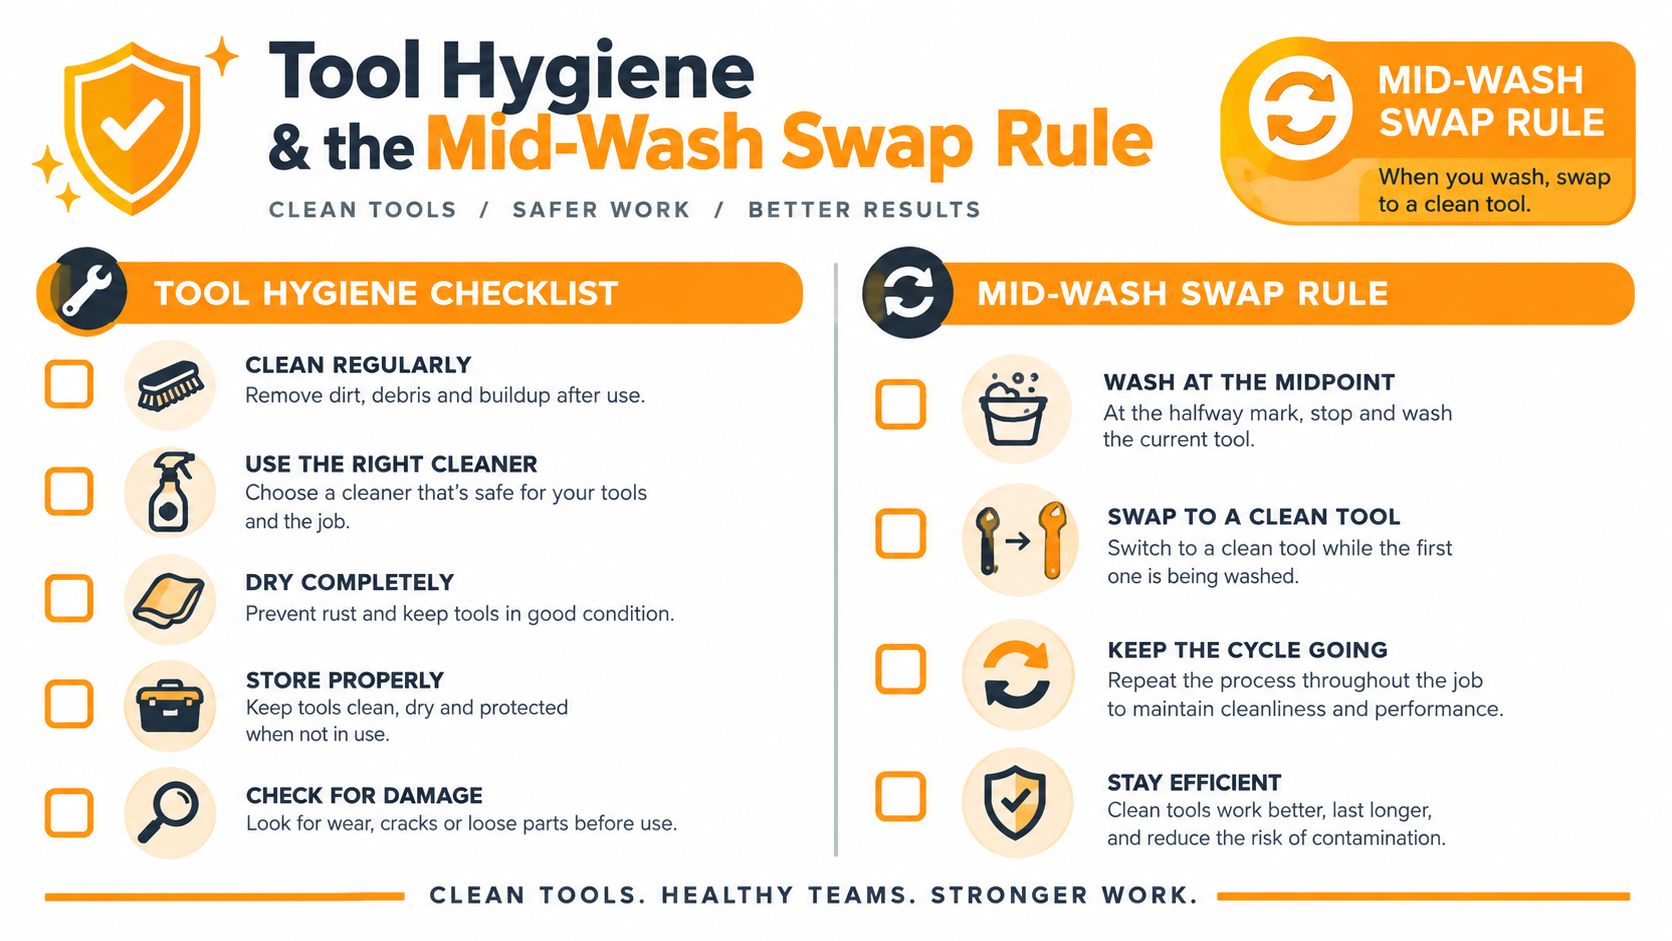
- Rinse and flick the mitt between panels. Dunk it in the rinse bucket, agitate it against the grit guard, give it a light squeeze, and flick excess water away. Then reload it in the wash bucket.
The exact swap point is straightforward. Change to a fresh mitt after the front clip on a heavily dirty vehicle, or sooner if you see grit, a dark smear, or a matted section of pile. Use a separate mitt for wheels and never return it to painted panels.
Microfiber also matters during the final contact-dry stage. A clean, damp mitt can help pick up isolated water residue with minimal pressure, while a sponge offers less pile depth for separating any remaining particle from the paint. For broader process guidance, use this foam gun washing guide.
Cleaning tools need their own handling routine, particularly when they've touched contaminated surfaces. If you're building a wider cleaning protocol, this resource on a resilient threat explained for facilities provides useful context for why laundering and drying shouldn't be treated as afterthoughts.
Tool Hygiene and the Mid-Wash Swap Rule
Microfiber's advantage ends when the mitt becomes a grit bag. Community discussions repeatedly raise the concern that microfiber can lock in dirt and feel difficult to rinse completely, while sponges may appear cleaner because they release debris more visibly. The practical answer is not to trust appearance. Rinse deliberately, inspect the pile, and swap media before contamination becomes a paint problem, as reflected in this detailing community discussion about wash mitt maintenance.
Use a simple control routine
- Reload at the half-panel point or after eight passes. Return the mitt to the rinse bucket before it becomes saturated with dirt, then reload it with fresh shampoo.
- Swap after the front clip on a dirty vehicle. Keep a second mitt ready for the sides and rear. On a muddy or off-road vehicle, swap even earlier.
- Stop after a drop. A mitt that hits the ground is contaminated until thoroughly washed. Don't give it a quick splash and put it back on black paint.
- Stop at a visible smear. If the mitt leaves a dirty trail, feels gritty, or has matted fibers, remove it from the wash immediately.
- Keep tools task-specific. Wheel, tire, engine-bay, and body-panel media shouldn't share jobs.
Agitate the mitt lightly against a grit guard in the rinse bucket and give it a gentle squeeze. Don't wring it aggressively, because twisting can distort the fibers and seams. After washing, use microfiber-specific detergent, skip fabric softener, and dry with low heat or air dry. Store it clean and completely dry, never folded away while damp.
If the mitt still causes marring
Check the pre-rinse first. Then check whether you're using enough lubrication, whether the mitt is overloaded, whether the paint is unusually soft, and whether your drying towel is the culprit. A fresh mitt can't compensate for heavy hand pressure, circular scrubbing, a dropped tool, or a drying towel contaminated by wheels.
Which to Buy and What to Do First
Buy the microfiber mitt. Pair it with a two-bucket wash, a grit guard, and a foam pre-wash if your vehicle carries regular road dust. That combination attacks the actual problem, which is contact with contaminated paint, rather than adding more shampoo to the bucket.
A sponge still has a job. Use one for wheels, tires, textured plastic trim, engine-bay surfaces, and small utility cleanups where a deep paint-safe pile isn't essential. Don't move that sponge from a wheel to a painted door, and don't keep a kitchen sponge in your car-wash kit just because it's convenient.
Choose by your working conditions
- Most DIY owners: Choose a plush or chenille microfiber mitt, a rinse bucket, and a separate wheel tool.
- Large vehicles: Buy a second mitt before the first wash. The swap is cheaper than trying to rescue an overloaded mitt halfway through a truck or RV.
- Mobile detailers: Carry clean, dry media in sealed storage and separate used mitts immediately. Hygiene is part of your service quality.
- Tight-detail work: Keep a smaller dedicated tool for grilles, emblems, and narrow recesses. A broad mitt is safer for flat paint, but it isn't a precision instrument.
- SwiftJet owners: If you already have the SwiftJet foam gun, start with its included microfiber mitt so you can build the wash around the supplied foam application and contact tool. The car-cleaning sponge guide can help you understand where a sponge remains useful, but it shouldn't change the painted-panel verdict.
Don't buy a sponge for body paint because it costs less or rinses faster. Build a small, separated kit instead. If you're expanding beyond wash media into brushes, storage, and general garage equipment, this guide can help you set up a shop tool kit without mixing paint-safe and abrasive tools.
Start this week with one quality microfiber mitt and one grit guard. On your next wash, pre-rinse, foam, work from clean upper panels to dirty lower panels, rinse at the half-panel point, and swap as soon as the mitt shows contamination. Retire the kitchen sponge from painted surfaces.
SwiftJet offers a garden-hose foam gun that applies clinging foam and includes a microfiber wash mitt, making it a practical starting point for a safer contact wash. Visit SwiftJet to review the foam gun and build your wash routine around better pre-rinsing, lubrication, and tool hygiene.
