

You've got a Saturday morning, a dirty car, and a pressure washer that looks powerful enough to clean the driveway in seconds. Point it at the paint, though, and the wash can turn into a trail of grit across the clear coat, water behind a badge, or a finish that needs polishing before the afternoon is over. A low pressure car wash takes a different approach. It uses broad coverage, controlled rinsing, foam, dwell time, and careful contact rather than brute force.
The method works for home detailers because it makes the wash more repeatable. You'll loosen loose contamination before touching the paint, keep the dirtiest areas separate, and use only as much pressure as the surface needs. You'll also need to check whether local drought rules allow residential washing, because efficient equipment doesn't automatically make a prohibited wash legal.
Why Low Pressure Washing Is the Smart Choice for Home Detailing
High pressure isn't the same as effective cleaning. A narrow jet can move dirt, but it can also drive grit across paint, force water behind trim, and attack weak points around emblems, lights, seals, wraps, and decals. A low-pressure setup spreads water and soap across a wider area, giving chemistry and dwell time more opportunity to loosen traffic film, pollen, and light grime.
The EPA identifies self-service vehicle washing as the lowest-water mainstream car-wash format in its guidance, averaging 15.0 gallons per vehicle, or 57 liters, compared with 34 gallons per vehicle for conveyor washes in a 2002 study and 30 gallons per vehicle in a 2018 study. The same EPA vehicle-wash water-efficiency guidance notes manufacturer estimates of about 75.0 gallons per vehicle for conveyor systems and 55.0 gallons for in-bay automatic systems. Those figures don't make every home wash efficient, but they show why controlled, low-pressure application is a sensible foundation.
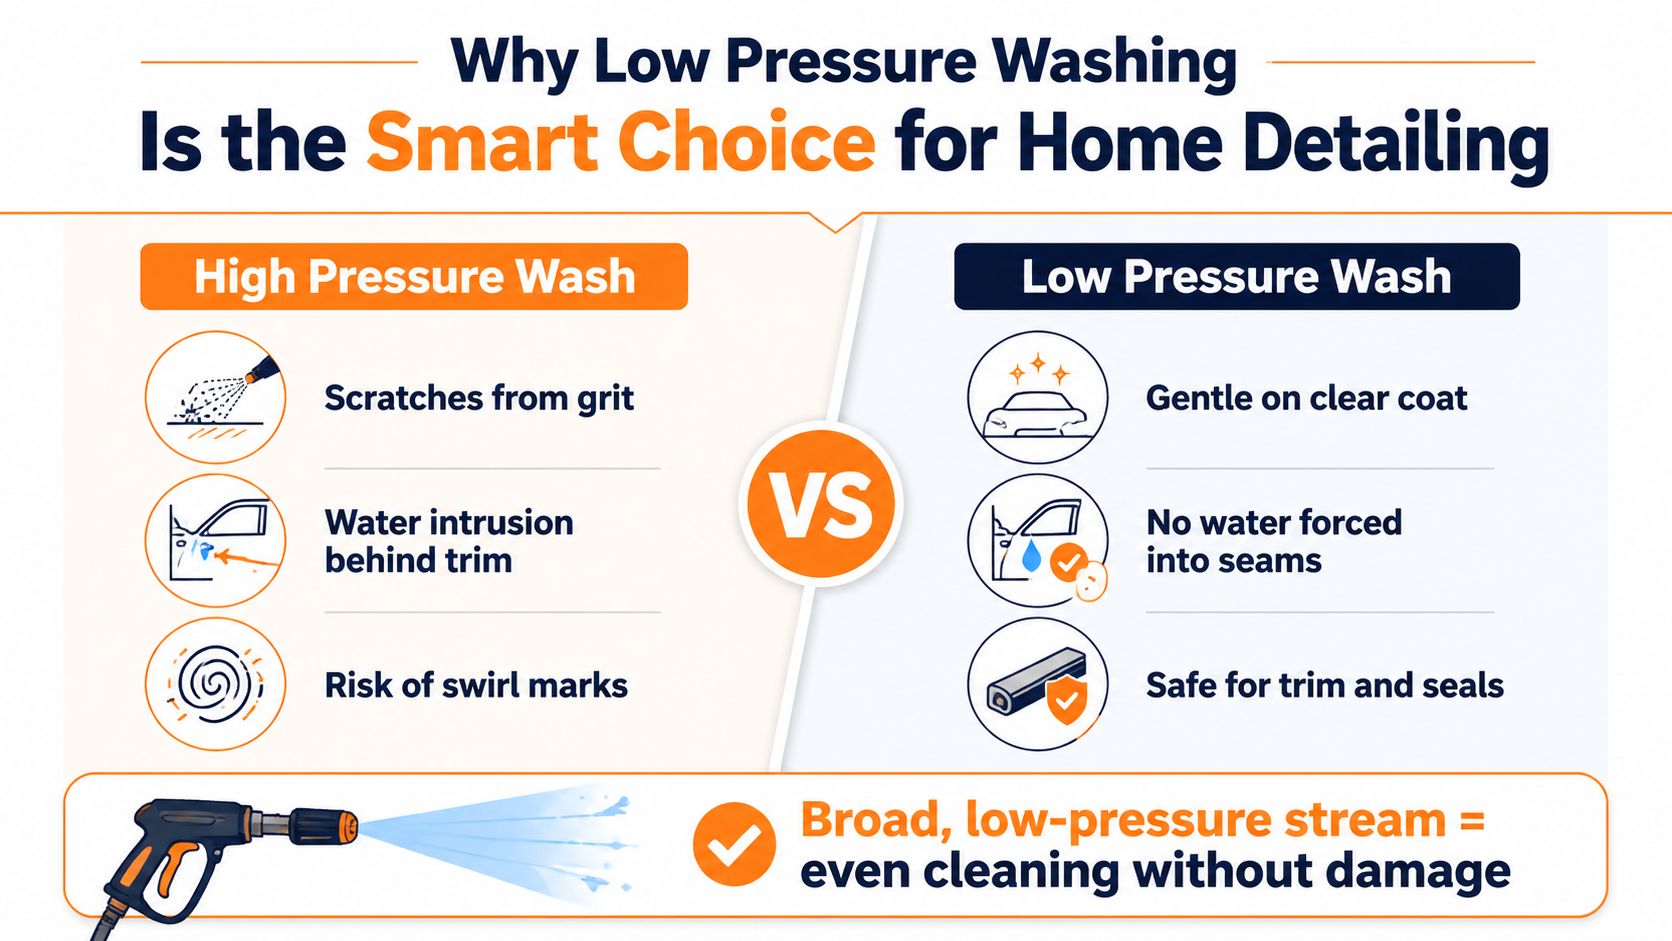
Pressure is only one part of cleaning
Start with a cool vehicle in shade. Warm panels and direct sunlight shorten the time available for foam and rinse water, which encourages soap film and mineral spotting. Rinse the wheels and lower panels separately, because they usually carry the heaviest contamination, then work from the roof downward.
A low-pressure wash still needs a pre-rinse, and heavily soiled paint still needs gentle agitation. Mud, salt, and bonded grime won't disappear because foam looks thick. Rinse, foam, rinse again, and use a clean mitt only after loose grit has been carried away.
Practical rule: Use pressure to flush contamination away, not to compensate for poor technique.
The low-pressure washing overview from SwiftJet is useful if you're comparing hose-based equipment with more aggressive pressure-washer routines. For professional operators, equipment selection is only part of the job. Local visibility and customer acquisition matter too, and a resource on home services direct mail for local pros can help mobile detailers think beyond the wash itself.
Tools and Products You Actually Need
You don't need a garage full of specialty chemicals to produce a clean finish. Build the process around a reliable water source, a controlled foam applicator, safe shampoo, clean microfiber, and a way to keep paint-contact tools away from wheel and rocker-panel grime.
A garden-hose foam gun suits a basic low-pressure car wash because it connects to household water and uses venturi action to draw and mix soap. A pressure-washer foam cannon is a different tool. It needs compatible fittings and the pressure range specified by its manufacturer. Before buying, check the hose connection, soap-dilution method, temperature limit, pickup tube, and replacement seals.
| Tool | Primary Role | Buying or Compatibility Check |
|---|---|---|
| Garden hose or low-flow supply | Delivers rinse water and feeds a hose foam gun | Confirm the connector fits your outdoor tap and hose |
| Foam gun or foam cannon | Applies lubricating pre-wash foam | Match the tool to garden-hose or pressure-washer use |
| pH-balanced car shampoo | Loosens soil without relying on harsh household detergent | Follow the label dilution and avoid mixing products |
| Two buckets | Separates wash solution from mitt-rinse water | Use grit guards if the buckets accept them |
| Microfiber wash mitt | Provides controlled contact on paint | Keep a dedicated mitt for body panels |
| Wheel mitt or brush | Handles brake dust and lower-area grime | Never return it to the paint-wash bucket |
| Microfiber drying towels | Removes water with low friction | Keep several clean towels available |
| Gentle-pattern hose nozzle | Provides a broad pre-rinse and final rinse | Avoid pinpoint settings on painted panels |
| Blower or wet vacuum | Clears water from mirrors, trim, and gaps | Use only where the device is safe for wet surfaces |
Household dish detergent is a poor shortcut. It can remove protective products and leave the finish feeling dry, while a car-specific shampoo is designed for vehicle surfaces and controlled rinsing. Keep iron remover, tar remover, wheel cleaner, and polish out of the basic routine unless the contamination requires them.
SwiftJet's guide to using a foam gun covers the hose-based application side of the process. Its Car Wash Foam Gun connects to a standard garden hose and is offered with a microfiber wash mitt, so it's one option for someone who wants foam application without adding a pressure washer.
Label every chemical, store products away from children and pets, and never combine cleaners. More product isn't a substitute for correct dilution, thorough rinsing, or a clean mitt.
The Low Pressure Wash Workflow From Pre-Rinse to Final Rinse
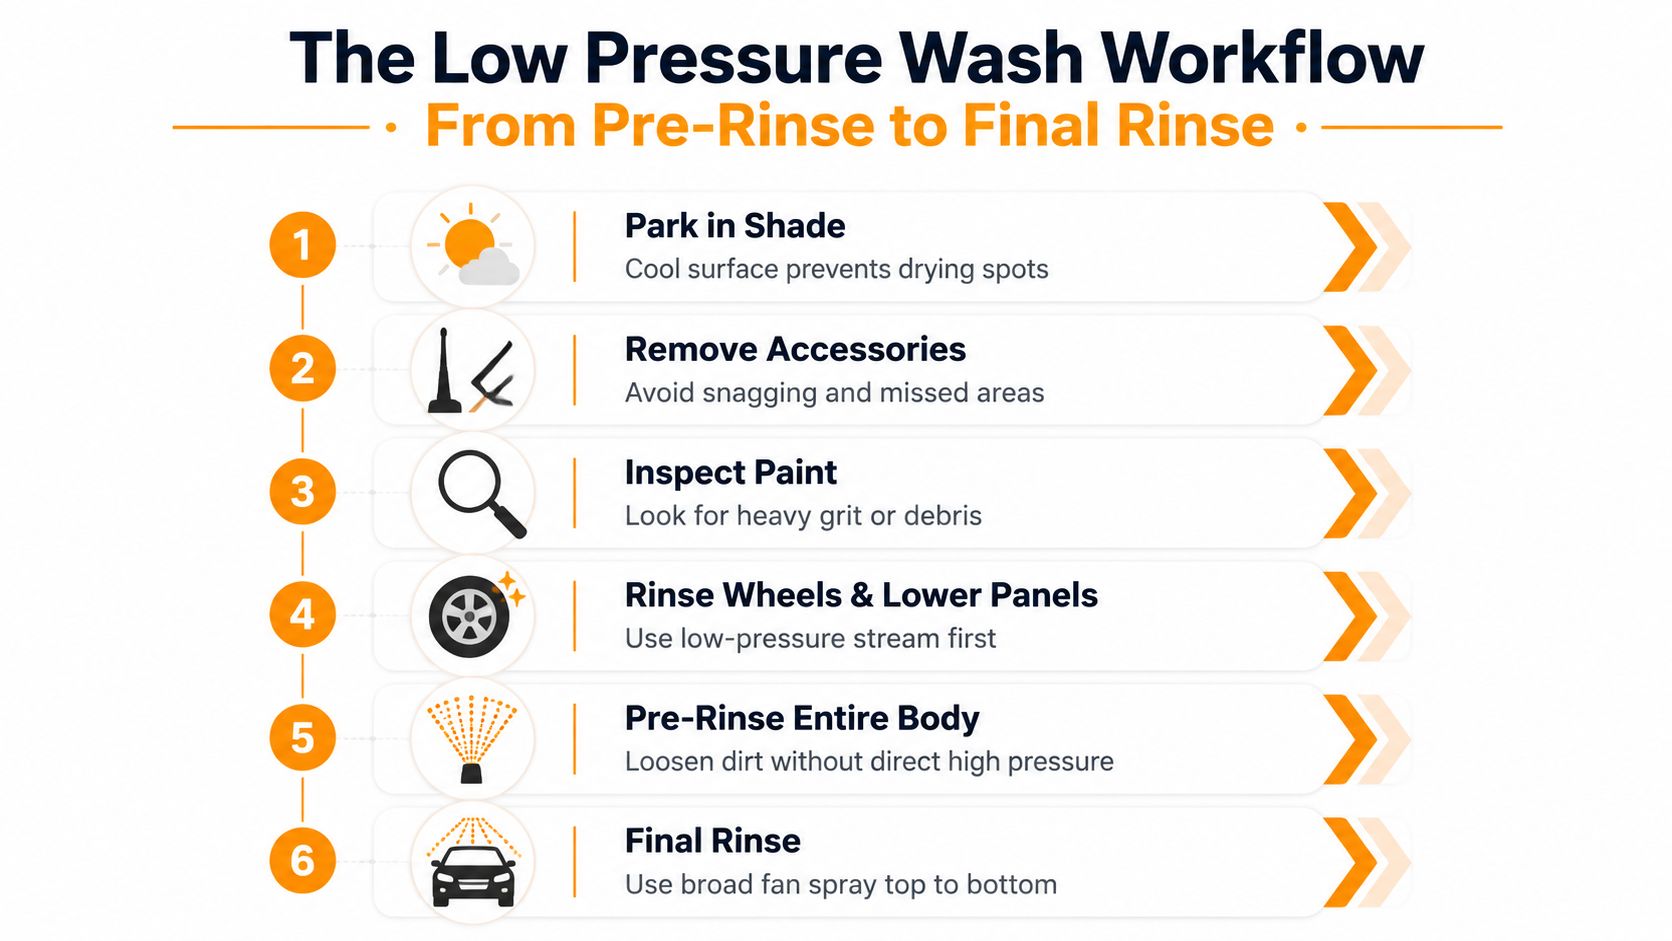
Park in shade and wait until the panels feel cool. Remove loose accessories that could snag a mitt, lower the antenna if applicable, and inspect the paint before water touches it. Look for dried mud, heavy sand, salt, and anything that could remain abrasive during contact washing.
- Rinse the wheels and lower panels first. Use a broad, low-pressure stream and keep it moving. Don't aim directly into mirrors, badges, seams, lights, or decal edges. These areas need coverage, not a concentrated blast.
- Pre-rinse the body from the top down. Begin at the roof and let water carry loosened material toward the ground. The lower panels can receive more attention later, after the worst contamination has been flushed away.
- Apply foam from the roof downward. Use a garden-hose foam gun or compatible foam cannon. Cover evenly, then allow the product to dwell according to its label. Independent detailing guidance commonly places a safe normal-condition dwell window at about 1 to 5 minutes, with shorter periods on hot panels and longer periods on cool or shaded surfaces, as described in this professional pre-wash foam guide.
- Rinse before the foam dries. If the vehicle is heavily soiled, rinse and repeat rather than increasing pressure. Foam softens and lubricates contamination, but it doesn't replace agitation on bonded grime.
- Contact-wash one panel at a time. Fill one bucket with diluted car shampoo and the other with clean rinse water. Load a clean microfiber mitt, wash the roof and glass first, then move to the hood, doors, and upper body. Use straight, overlapping passes instead of circular scrubbing. After each panel, rinse the mitt in the clean-water bucket, work it against the grit guard, and reload.
- Finish with a broad final rinse. Work from the top down and check around handles, trim, mirrors, and badges for trapped foam. Use a blower or wet vacuum on gaps where available, then pat the paint dry with clean microfiber towels. Open the doors and wipe the jambs, inspect the surface under good light, and apply protection only after the finish is fully dry.
A short visual demonstration can help you judge spray coverage and movement before trying the routine yourself.
Dialing In Dwell Time, PSI, and Nozzle Distance
A good low-pressure wash depends on three adjustments: how long the product sits, how hard the water hits, and how far the nozzle stays from the panel. The figures need to match the surface and the contamination, not a fixed setting copied from someone else's driveway.
Dwell time
Foam should remain wet while it works. The verified detailing guidance supports a normal dwell range of roughly 1 to 5 minutes, with 1 to 2 minutes on hot panels and 3 to 5 minutes on cool or shaded surfaces. Watch the foam rather than waiting for a timer alone. As it thins, collapses, or begins to haze, rinse the panel before residue dries.
Hot paint, direct sun, wind, hard water, and dark colors all reduce your usable window. Apply one section at a time if conditions are difficult. Adding more soap won't solve foam that dries before rinsing.
Pressure and distance
Technical guidance commonly places conventional vehicle-rinse pressure around 1,200 to 1,900 PSI, with the lower end for light soil and the upper end for stubborn road film, salt, or tar when used carefully. The foam dwell and pressure guidance from Jimbo's Detailing emphasizes a wide spray pattern, a 20 to 30 degree attack angle, and keeping the nozzle at least about 12 inches from painted panels.
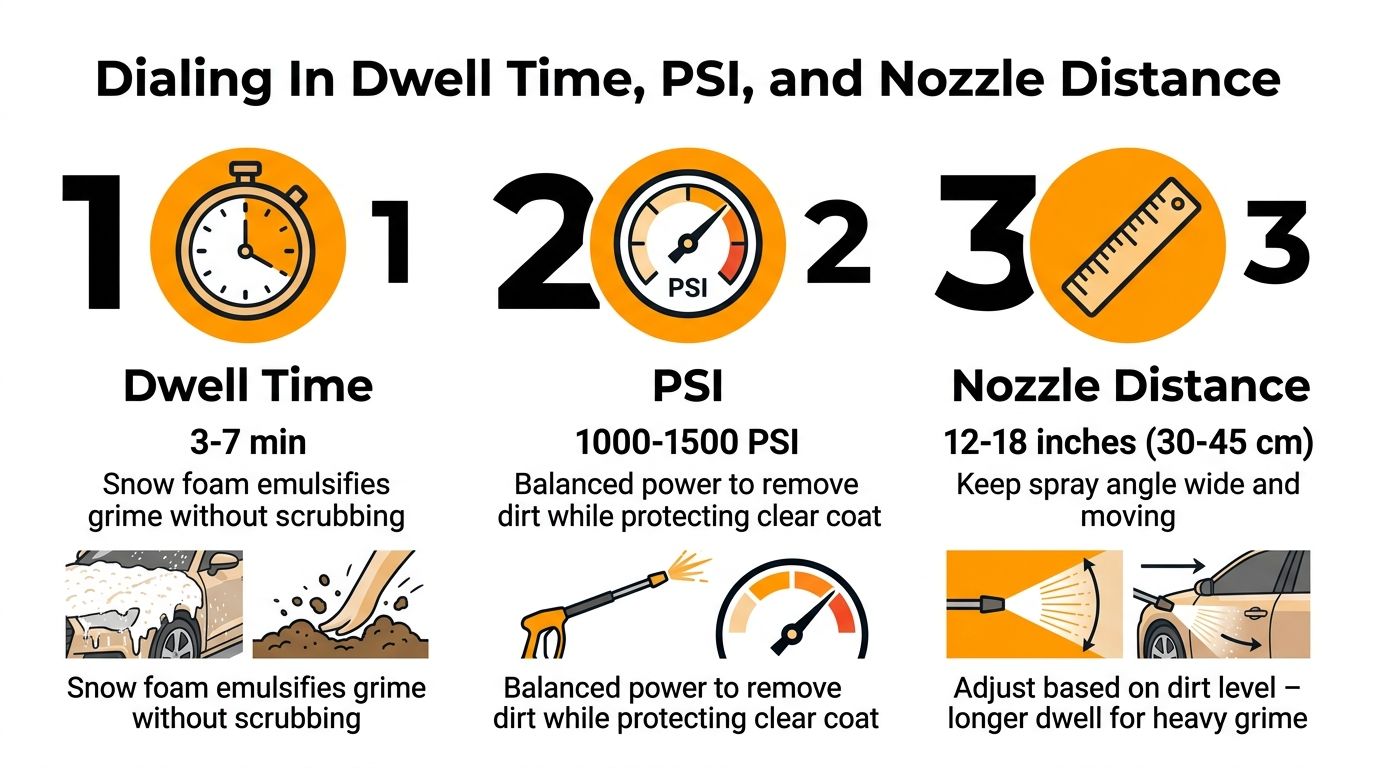
Don't use the same approach on a clear-coated door and a tarred rocker panel. Keep the spray moving, use a wide fan, and give seals, emblems, lights, and panel edges extra distance. The most common mistake is moving the nozzle too close instead of changing technique.
Adjustment order: Change distance first, shorten dwell time second, and only then consider changing the product or pressure.
The SwiftJet pressure-washer PSI guide can help you compare equipment categories. A hose foam gun generally delivers application foam through household hose pressure, so it belongs to a different operating setup than a high-pressure washer.
Water Restrictions and Drought Rules You Should Check First
A low-pressure car wash can reduce waste, but it doesn't override a local ban. Water rules change by state, city, conservation stage, property type, and whether the wash is residential, mobile, or commercial. Some jurisdictions permit washing on designated watering days with a shutoff nozzle. Others restrict pressure washing more broadly, allow only health or safety exceptions, encourage commercial facilities that reclaim water, or require specific recycled-water systems.
The current drought guidance for mobile detailers describes this patchwork, including locations where rules distinguish between high-pressure low-volume equipment and reclaimed-water systems. A foam gun may be gentler on consumption, but local wording can still classify the activity as outdoor vehicle washing or pressure washing.
Check before connecting the hose
Use a short checklist rather than relying on assumptions:
- Check the local conservation stage: Look at your city or county water utility's current drought notice.
- Read the outdoor-water ordinance: Search for residential car washing, hose shutoff requirements, runoff, and watering-day language.
- Call the utility: Ask whether a home wash is allowed and whether reclaimed water or a bucket method is required.
- Check neighborhood rules: An HOA, apartment complex, or property manager may impose stricter limits than the city.
- Control runoff: Keep dirty water away from storm drains and follow local disposal requirements.
Odd-even address schedules, time-of-day limits, and total bans aren't interchangeable. A permitted wash may still be limited to particular days or hours, while a declared shortage can remove that permission entirely. Commercial washes may receive different treatment because they can capture or recycle process water.
If washing is allowed but runoff is a concern, use a rinseless method, a wash mat, collection berm, or suitable graywater capture system where local rules permit it. Don't direct chemical-laden water into a storm drain, and don't assume a lower-pressure nozzle makes untreated runoff acceptable.
Troubleshooting Streaks, Spots, and Finish Problems
When the finish looks wrong halfway through the wash, stop adding product. Most defects in a low-pressure routine come from drying, contamination, dilution, or incomplete rinsing, and each has a practical correction.
Streaks and hazy residue
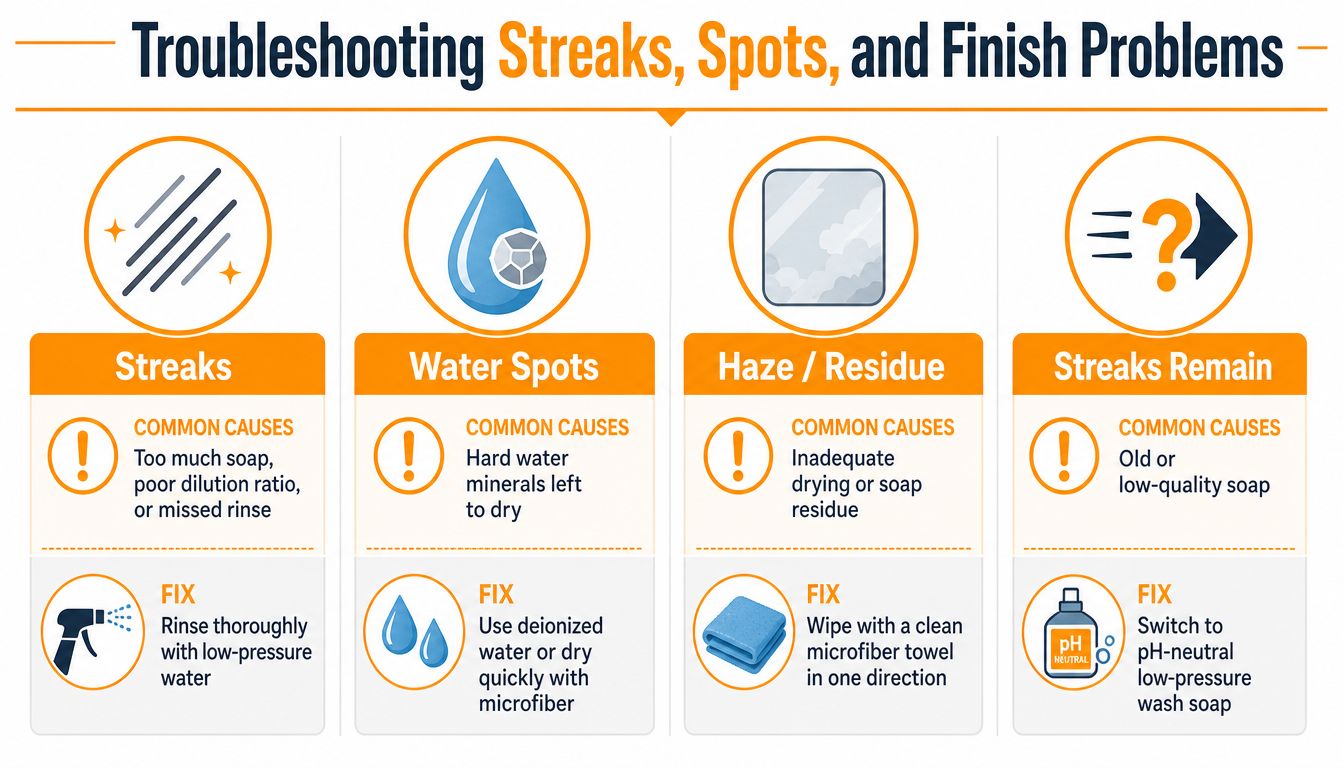
Streaks usually appear after too much shampoo, incorrect dilution, direct-sun rinsing, or a towel that has already collected dirt. Rinse the affected panel thoroughly with a broad stream, then use a clean, damp microfiber towel if residue remains. If the film comes from wax or sealant left in the sun, follow the product's removal directions rather than scrubbing harder.
A clean towel matters as much as a clean rinse. Fold it into fresh sides as you work, and retire any towel that drags, feels gritty, or leaves lint. Never wipe a drying panel with the same mitt used on wheels or rocker panels.
Water spots
Hard-water minerals can dry on the finish as temporary deposits. Dry the vehicle promptly, use clean microfiber, and consider a deionized final rinse where that equipment is available. A quick-detailer wipe can help remove fresh residue, but test it on a small area and use light pressure.
Older mineral spots may etch the surface. If a chemical spot remover doesn't correct them, machine polishing may be necessary. Don't keep rubbing the same mark with a dry towel. That adds friction without removing the underlying defect.
Swirls and micro-marring
Swirls usually come from dragging trapped grit across paint. Use separate tools for wheels and paint, rinse the mitt after every panel, and keep a second bucket of clean water available. If the rinse bucket becomes visibly dirty, replace the water instead of trusting the grit guard to do all the work.
Wash in straight, overlapping passes. Circular scrubbing spreads any remaining particle through a larger path and makes defects harder to track. For a neglected vehicle with embedded contamination, professional decontamination can be safer than trying to force the surface clean at home.
Drying without new marks
A waffle-weave drying towel absorbs water efficiently, but technique still matters. Pat panels instead of dragging a towel across them, then use a blower around emblems, mirrors, handles, trim, and panel gaps. Those trapped beads are the ones that run out later and leave rings.
Final inspection: Check the paint, glass, wheels, jambs, and trim from more than one angle before you put the chemicals away.
Keep the final rinse broad and complete, use fresh towels, and work in manageable sections when heat or sunlight compresses your drying time.
SwiftJet offers a garden-hose Car Wash Foam Gun that applies clinging soap foam without requiring a pressure washer, and it includes a microfiber wash mitt for the contact-wash stage. Visit SwiftJet to review the foam gun and choose a hose-based setup that fits your low-pressure wash routine.
