
That sticky spot on your car isn't just an annoyance; it's a direct assault on your paint job. The best way to tackle tree sap is to soften it first, either with a dedicated bug and tar remover or even just some warm, soapy water. From there, you can gently wipe it away with a clean microfiber towel.
The key is to act fast. If you let it sit, the sap will harden and can cause permanent damage to your vehicle's clear coat.
Understanding Why Tree Sap Wrecks Car Paint

Tree sap is far more than a sticky mess. It's a nasty cocktail of sugars and acidic compounds that chemically bonds with your car's clear coat. When the sun heats it up, this process goes into overdrive, causing the sap to harden while its acidic nature eats away at your paint's protective layers.
This chemical reaction is called etching. It’s not just sitting on top; the sap is literally melting into the clear coat. This creates a permanent bond that can lead to some ugly results:
- Dull Spots: The sap ruins the clear coat’s ability to reflect light, leaving behind a flat, lifeless patch on your otherwise shiny car.
- Discoloration: Over time, that spot can turn yellow or cloudy, permanently staining your paint.
- Pitting: In the worst-case scenarios, the acid can burn right through the clear coat and start damaging the color underneath, causing irreversible pitting.
The Urgency of Quick Removal
When it comes to tree sap, the clock is always ticking. Fresh sap is usually soft and gooey, which means it’s pretty easy to get off with a simple wash. But once it hardens into that tough, amber-like resin, getting it off becomes a much bigger—and riskier—job.
The longer sap sits, especially in direct sunlight, the more aggressive you'll have to be to remove it. What could have been a simple wipe-down can quickly turn into a delicate restoration project that requires polishing compounds just to fix the damage it left behind.
And this isn't a rare problem. Some reports show that up to 70% of vehicles parked under trees in cities end up with sap damage every year. When summer temperatures climb past 86°F (30°C), that sap can cause permanent discoloration in as little as a few hours on half of untreated cars.
This really drives home the need for a good cleaning routine. Learning the essential car wash steps to protect your paint is your first line of defense against contaminants like tree sap.
Getting Your Sap-Removal Toolkit Ready
Before you jump in and start scrubbing, let's talk about what you'll need. Grabbing an old kitchen sponge or some all-purpose cleaner from under the sink is a surefire way to damage your car's paint. You'll end up with a bigger problem than just a sticky spot. The real secret is matching your tools to how stubborn the sap is.
Always start with the gentlest approach first. For fresh, gooey sap that hasn't had time to bake in the sun, you might already have everything you need.
- Plush Microfiber Towels: You’ll want at least two of these. Microfiber is your paint's best friend—it lifts dirt and sap away from the surface instead of grinding it in like a cotton towel would.
- Good Car Wash Soap: Use a real, pH-neutral car wash soap. Dish soap is too harsh and will strip off any wax or sealant you have, leaving your paint unprotected.
- Warm Water: A bucket of warm water can make all the difference. It helps soften up fresh sap, making it much easier to lift off without a fight.
For Sap That's Put Up a Fight
What if the sap has been sitting for a few days and feels more like a tiny rock? A simple wash won't cut it. This is when you need to bring out the specialized gear.
A dedicated bug and tar remover is a fantastic tool to have in your detailing arsenal. These products are specifically designed to dissolve sticky, resinous gunk like tree sap without harming your car's clear coat. Another solid option is isopropyl alcohol (rubbing alcohol). Just a small amount on a microfiber towel can break down that hardened resin surprisingly well.
If you're dealing with sap that's completely fossilized onto your paint, it's time to reach for a detailing clay bar. This is what the pros use. Paired with a clay lubricant, the bar glides over the surface and literally shears off the bonded sap without scratching the paint. It’s the ultimate reset button for a contaminated surface.
A Practical Guide to Removing Tree Sap Safely
When you spot that sticky, unwelcome surprise on your car, don't panic. The trick is to match your attack to how stubborn the sap is. You don't always need to go in with heavy-duty chemicals; sometimes, a gentle touch is all it takes to get tree sap off car paint without a fight.
Start with the Basics: Fresh and Tacky Sap
If you’ve caught the sap while it's still fresh and sticky, your job is a lot easier. For this, your first and safest bet is simply warm, soapy water and a clean microfiber towel. Just soak the towel, lay it over the sap spot for a few minutes, and let the warmth soften the sugars. It should then lift away with a gentle wipe. Always start here before moving on to stronger methods.
When the Sap Starts to Harden
Okay, so the sap isn't fresh anymore. It's started to harden, but it's not a fossil yet. This is where a dedicated bug and tar remover becomes your best friend. These products are specifically formulated to dissolve sticky contaminants like sap without damaging your car’s clear coat.
The key is patience. Apply a small amount directly onto the sap and let it sit for the recommended time—usually about 30 to 60 seconds. Then, gently dab at it with a fresh microfiber cloth. Don’t scrub! Let the chemical do the heavy lifting. A gentle dabbing or blotting motion will break it down without spreading the mess or scratching your paint.
This quick decision tree can help you choose the right tool for the job.
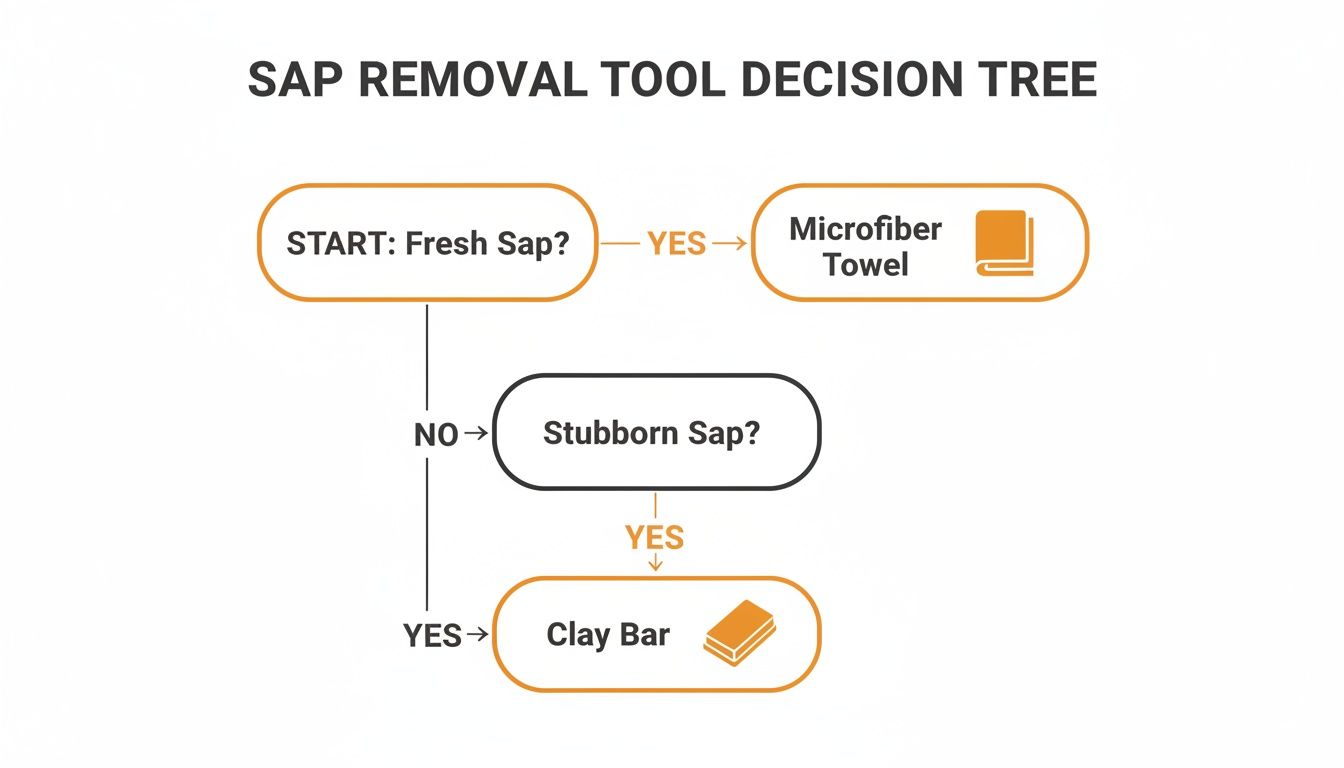
As you can see, the longer the sap sits, the more muscle you’ll need to get it off safely.
For Fossilized Sap: The Clay Bar Method
Now for the real challenge: those rock-hard, amber-colored blobs that seem permanently bonded to your paint. This is when professional detailers reach for a clay bar. A clay bar is designed to grab and shear off surface contaminants—like petrified sap—without digging into your clear coat.
You absolutely must use a clay lubricant with it. Never, ever use a clay bar on a dry surface. Spray the area generously and glide the clay over the sap with light pressure. You'll feel it grab at first, but keep at it until the surface is perfectly smooth. For a full walkthrough, check out our complete guide on how to clay bar your car.
Pro Tip: Whether you're using a chemical remover or just soap, always dab or blot, don't scrub. A circular scrubbing motion can spread the sticky residue and, even worse, create fine scratches and swirl marks in your paint.
Sap Removal Method Comparison
To make things even clearer, here's a quick-reference table that breaks down which method to use and when.
| Method | Best For | Effort Level | Paint Safety Risk |
|---|---|---|---|
| Warm, Soapy Water | Fresh, soft, sticky sap | Low | Very Low |
| Bug & Tar Remover | Semi-hardened or particularly stubborn sap | Low-Medium | Low |
| Detailing Clay Bar | Fully hardened, "fossilized" sap and resin | Medium | Low to Medium |
| Rubbing Alcohol | Very small, stubborn spots (use with care) | Low | Medium |
| Hand Sanitizer | Fresh sap, in a pinch | Low | Low |
This table helps illustrate the "start gentle, escalate as needed" approach that pros use to protect the vehicle's finish.
Unfortunately, sap removal doesn't always go according to plan. Data from UK auto forums revealed a shocking 25% increase in sap-related paint damage repairs between 2015 and 2022. In some real-world tests, clay bars failed on up to 80% of hardened pine sap, forcing detailers to resort to rubbing compounds, which significantly increases the risk of swirl marks.
On the other hand, those same forums found that a simple vinegar solution successfully dissolved 85% of fresh sap in under 15 minutes. It’s a powerful reminder that acting fast is your best defense. You can dive deeper into these community findings on PistonHeads to see what other drivers have experienced.
Restoring and Protecting Your Paint After Sap Removal
Getting that stubborn sap off is a great feeling, but hold off on the victory lap. The battle isn't quite over. Most sap removers, whether it's rubbing alcohol or a specialized product, are aggressive enough to take your car's wax or sealant right off with the sap. This leaves your clear coat naked and exposed.
So, first things first: neutralize the area. Grab a bucket of clean water and some pH-neutral car soap for a quick spot wash. This gets rid of any leftover chemical residue from the sap remover, making sure it doesn't linger and cause problems down the road.
Inspecting for Lingering Damage
After the spot is clean and dry, it's time to play detective. Get your car under good light—sunlight or a bright shop light works best—and look at the paint from a few different angles. What you're searching for is any faint dullness or cloudiness where the sap used to be.
This is what we call etching. It's basically a very subtle chemical burn left by the sap's acidity. If you catch it right away, it’s usually just a superficial mark on the clear coat. But if you ignore it, that ghost of a sap spot can become a permanent part of your paint job.
I always tell people to think of their car's clear coat like a screen protector. The sap remover might have weakened it, and the sap itself can leave behind a faint imprint. The next steps are all about buffing out that blemish and reinforcing the "screen protector" so it's strong and clear again.
Applying a Fresh Layer of Protection
Now for the most important part: putting that protective barrier back on. This isn’t just for a show-car shine; it's your frontline defense against the next round of sap, bird bombs, and sun damage. You've got a couple of solid choices:
- Traditional Carnauba Wax: The classic choice for a deep, warm glow. It's satisfying to apply and will give you a few months of solid protection.
- Paint Sealant: This is a synthetic polymer that creates a stronger bond with your paint, offering more durability and a sharp, reflective finish. Expect it to last 4-6 months.
Applying a fresh coat of wax or sealant not only makes the paint look incredible but also creates a slick surface that future contaminants will struggle to stick to. It's the step that truly finishes the job. For those wanting to dive deeper into long-term defense, learning about the best way to protect car paint can introduce you to even tougher solutions like ceramic coatings.
Smart Strategies to Keep Sap Off Your Car in the First Place
The old saying "an ounce of prevention is worth a pound of cure" has never been more true than when dealing with tree sap. The absolute best way to handle it is to avoid it altogether.
It all starts with where you park. Get to know the trees in your area. Pines, maples, and birches are notorious sap-droppers, especially in the spring and summer months when the sap is really flowing. If you have the choice, parking even a few feet away from overhanging branches can make a huge difference.
Of course, sometimes you have no choice but to park under a tree. That's where a physical barrier becomes your best friend. A high-quality, breathable car cover is a fantastic investment, protecting your paint not just from sap but from bird droppings, dust, and harsh UV rays, too. It's a simple solution that saves a ton of elbow grease later.
Build a Sacrificial Barrier on Your Paint
Keeping a solid layer of protection on your car’s paint is your secret weapon. This creates a slick, sacrificial layer that sap has a tough time sticking to. Instead of bonding with and etching into your clear coat, it sits on top of the protection, making it infinitely easier to remove.
-
Wax or Sealant: A good coat of wax or a synthetic paint sealant is your frontline defense. I recommend reapplying it every 2-3 months. Think of it as routine maintenance that pays off big time when you find that first sticky spot.
-
Ceramic Coating: If you're looking for a more "set it and forget it" solution, a professional ceramic coating is the way to go. This creates a hard, glass-like shell over your paint that's incredibly resistant to sap and other environmental contaminants. It's a bigger upfront investment, but the protection lasts for years.
I always tell people to think of wax or a ceramic coating as a non-stick pan for their car. The sap might land on the surface, but it won't be able to burn itself into the paint underneath.
Finally, if you have problematic trees hanging over your own driveway, don't just live with it. A little proactive yard maintenance goes a long way. Consider calling in professional tree trimming services to prune any overhanging branches. It's a small step that can eliminate the problem at its source.
Common Questions About Removing Tree Sap
When you're staring at a sticky blob of tree sap on your car's hood, a few questions always come to mind. Let's tackle the most common ones I hear from car owners so you can get the job done right without making a costly mistake.
Can I Just Use Hand Sanitizer or WD-40?
I see this one all the time in online forums, and it makes me cringe. While it might seem like a clever hack, grabbing something like hand sanitizer is a huge risk. The high alcohol content can be incredibly harsh, drying out your car's clear coat and causing it to fail prematurely.
And WD-40? Sure, it's a solvent and might dissolve the sap, but it leaves behind an oily residue. That greasy film is a magnet for dust and road grime, meaning you'll have to do a full degreasing wash just to clean up your "fix." It's best to just stick with products made for automotive paint.
What’s This Dull Spot Left Behind After I Removed the Sap?
If you've cleaned the sap off and now see a dull or hazy patch, you're looking at the first stage of paint damage, known as etching. This happens when the sap's acidity has started to eat into the clear coat.
For light, superficial dullness, you can often correct it yourself. Grab a quality, fine-cut automotive polish and a microfiber applicator pad.
A good rule of thumb: Gently work the polish into the area with small, circular motions. If the shine comes back, you're all set. But if you can feel the edge of the etch with your fingernail, it's time to stop and call a professional detailer. Trying to fix a deeper etch without experience can burn right through the paint.
How Fast Does Tree Sap Actually Damage Paint?
The clock starts ticking the moment the sap lands, but how fast it ticks depends on the weather. On a hot, sunny day, that sap will bake onto the surface and can start etching into the clear coat in just a matter of hours. If it's cool and overcast, you might have a couple of days before real damage sets in.
My advice? Treat tree sap the same way you'd treat a bird dropping: remove it as soon as you possibly can. The longer it sits, the harder it is to get off and the greater the risk of permanent damage.
For a faster, safer wash that helps you spot and remove contaminants like tree sap before they cause damage, trust the SwiftJet Car Wash Foam Gun. It delivers thick, clinging foam to gently lift away grime. Learn more and get yours today at swiftjetusa.com.