
That stubborn, dark film clinging to your wheels is more than just an eyesore—it’s a destructive mix of tiny metal particles and adhesives that are literally baked onto the surface. To get rid of it for good, you need a dedicated wheel cleaner and the right set of soft brushes. This isn't a job for a simple garden hose rinse; you have to chemically dissolve and physically agitate the grime, or you risk permanent damage to your wheel’s finish.
Why Brake Dust Is Your Wheels' Worst Enemy
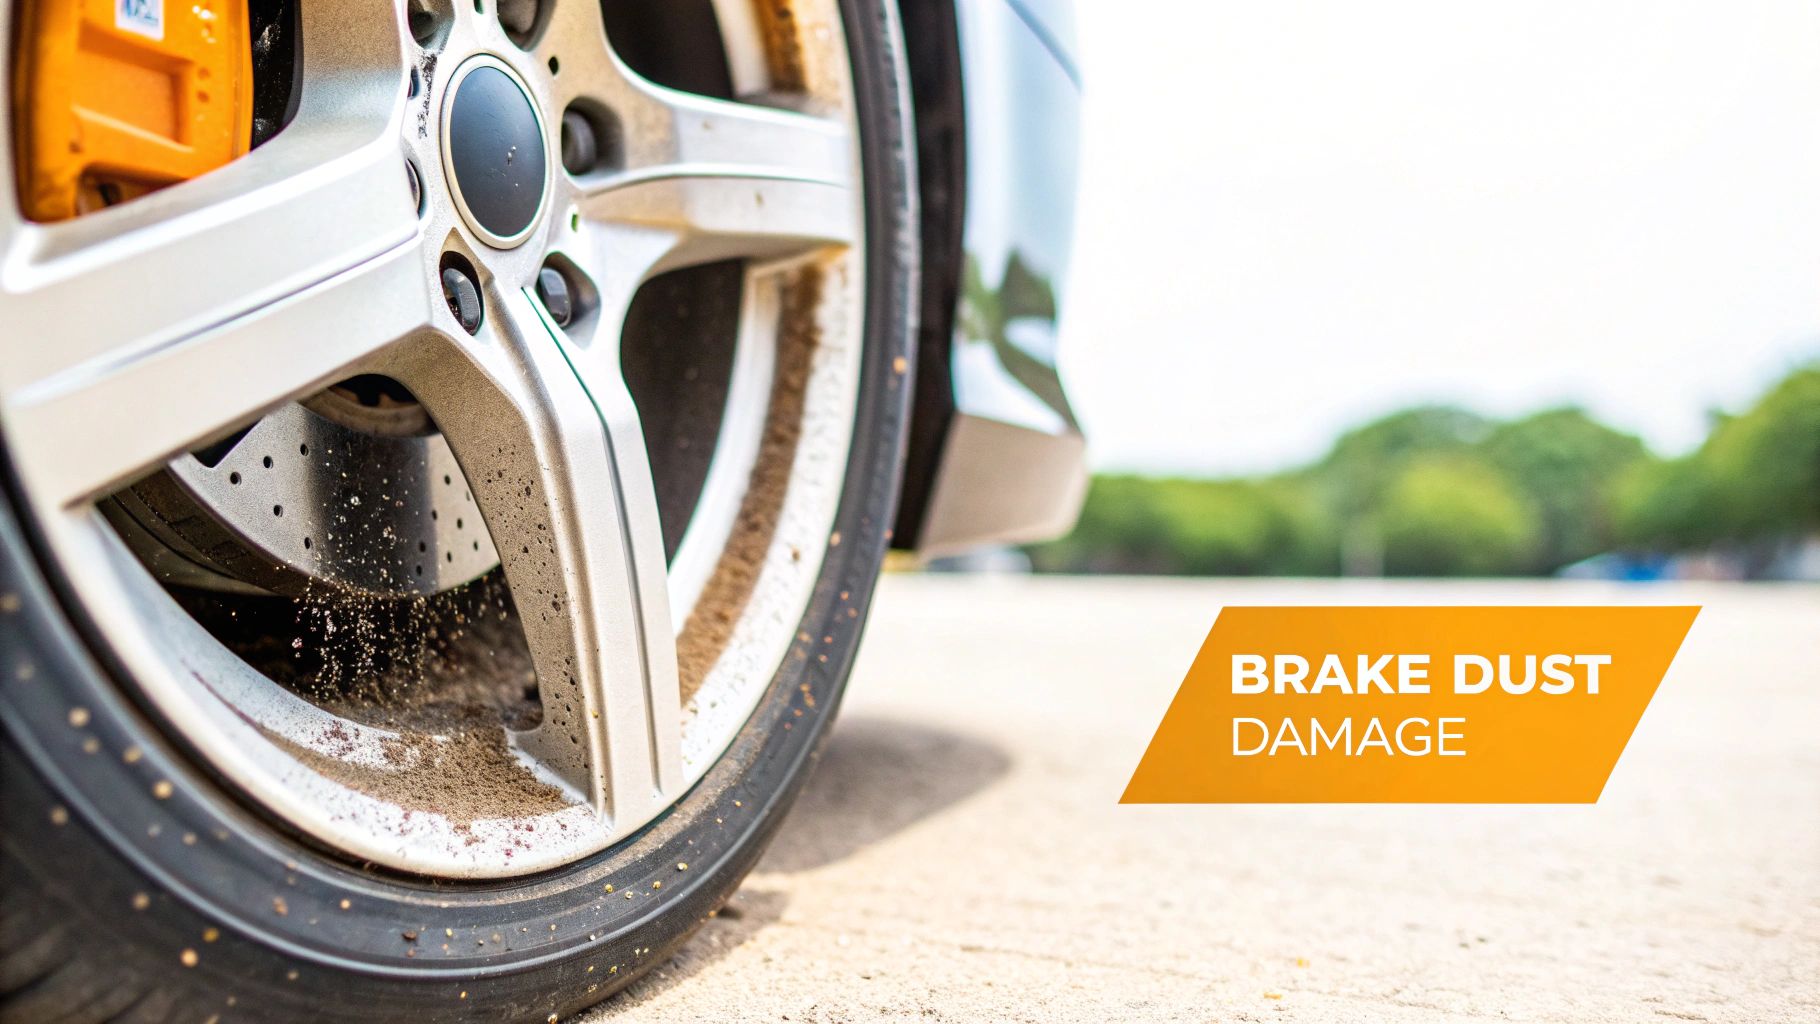
Every single time you hit the brakes, the friction between your brake pads and rotors grinds off microscopic particles. This isn't just road dirt. It's a nasty, gritty cocktail of sharp metal shavings from the rotor, carbon fibers, and super-heated adhesive gunk from the pads. This abrasive dust settles all over your wheels in a fine, metallic layer.
The real trouble starts when your wheels heat up from driving. The heat essentially bakes that corrosive dust right into the clear coat or finish, causing it to chemically bond with the surface. If you let it sit, that bond becomes permanent damage.
The Real Damage Behind the Grime
Ignoring brake dust is a fast track to ruining your wheels. The damage goes way beyond just looking dirty and can get pretty expensive if you're not careful.
- Pitting and Corrosion: Those little iron particles in the dust start to oxidize (or rust) as soon as they get wet. This reaction eats right through the protective clear coat, creating tiny pits and permanent corrosion. This is especially brutal on pricey alloy or chrome wheels. For really tough cases, check out our guide on https://www.swiftjetusa.com/blogs/news/how-to-clean-rust-off-wheels to see just how deep the problem can go.
- Staining and Discoloration: Once brake dust has been baked on for a while, it leaves behind ugly yellowish or brownish stains. Your regular car wash soap won’t even touch them.
- Reduced Resale Value: Think about it—clean, shiny wheels are one of the first things people notice. Wheels that are scarred by pitting and corrosion can make an otherwise pristine car look neglected, and that will absolutely hit your vehicle's resale value.
The scale of this problem is massive. The global Brake Cleaner market was valued at USD 2.514 billion in 2024, a number driven by the constant need to fight this exact issue. This isn't just about looks; heavy buildup can even impact braking performance.
More Than Just a Surface Problem
This nasty buildup isn't just an external issue. If left unchecked, excessive brake dust can work its way into the brake caliper and around the pads, potentially gumming up the works and hindering their smooth operation. While it takes some serious neglect for this to happen, that accumulation can contribute to uneven wear and make your brakes feel less responsive.
At the end of the day, understanding what brake dust is and how it eats away at your wheels is the first step. A quick spray-and-rinse just isn't going to cut it. A dedicated, methodical cleaning routine is the only real way to protect your investment and keep your wheels looking like new.
Assembling Your Wheel Cleaning Toolkit
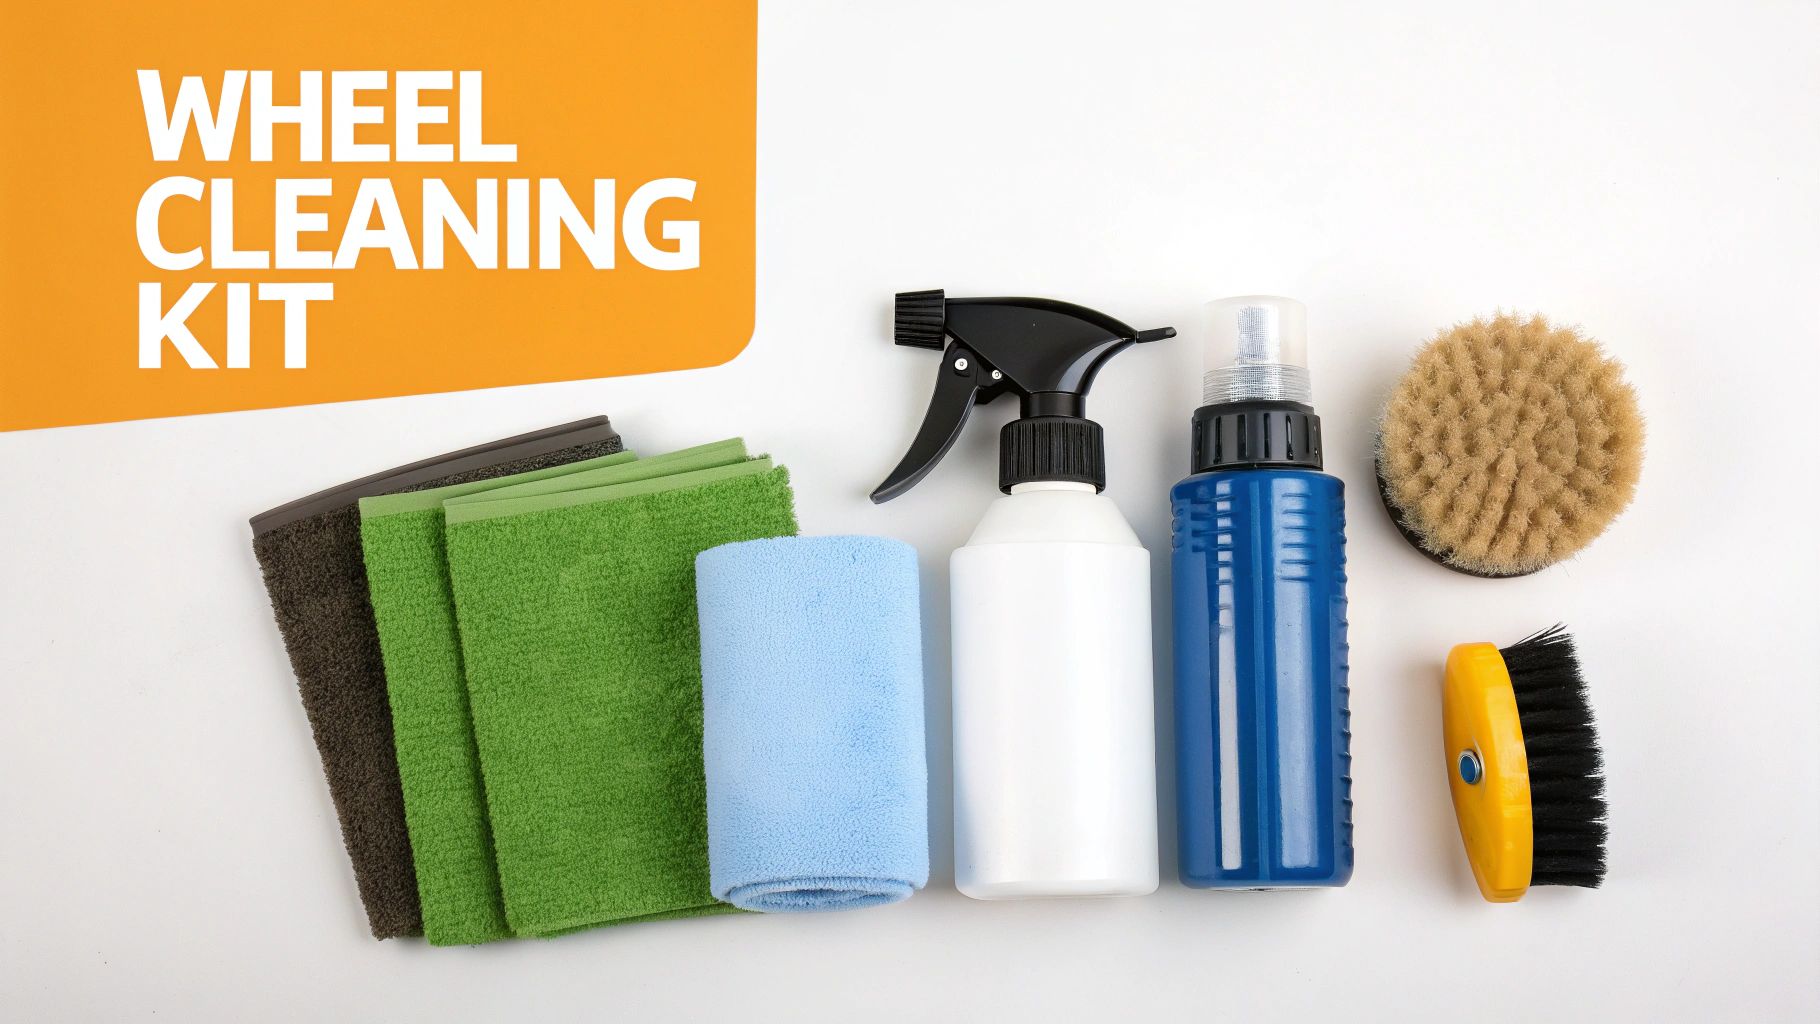
Getting a truly deep, professional-level clean on your wheels all comes down to having the right gear before you even think about turning on the water. If you think a single bucket of soapy water and an old sponge will do the trick, you're in for a frustrating afternoon. That caked-on, chemically bonded brake dust just laughs at general-purpose soap.
Brake dust is a uniquely stubborn problem. It's so persistent, in fact, that the global market for Tire & Wheel Cleaners hit USD 1.35 billion in 2023 and is expected to climb to USD 2.25 billion by 2032. That massive demand is driven by the fact that most modern cars, especially those with alloy wheels (which make up 29.5% of the market), show every last speck of grime. You can see more on this trend in the global market analysis on DataIntelo.com.
This isn't just about looks; it's about using the right chemistry to get the job done without damaging your expensive wheels.
Choosing the Right Cleaners and Brushes
The absolute cornerstone of a successful wheel detail is the cleaner itself. You have to match the product to your wheel's finish, because the wrong chemical can cause permanent staining, etching, or peeling.
Picking the right cleaner is crucial. Here’s a quick guide to help you choose the right product for your wheels and avoid costly mistakes.
Choosing the Right Wheel Cleaner
| Cleaner Type | Best For | Pros | Cons |
|---|---|---|---|
| pH-Neutral | Most OEM factory wheels (painted, powder-coated, clear-coated). | Very safe, won't strip waxes or sealants, great for routine cleaning. | May struggle with extremely heavy, baked-on brake dust. |
| Acid-Based | Heavy-duty cleaning on chrome or specific bare metal wheels (check manufacturer). | Extremely powerful and fast-acting on stubborn contamination. | Highly corrosive; can easily damage sensitive finishes if misused. |
| Iron Removers | Deep cleaning all painted, clear-coated, and alloy wheels. | Chemically dissolves embedded iron particles; provides visual confirmation (turns purple). | Can have a strong smell; often more expensive than other types. |
After you've sorted out the cleaner, you need the right tools for agitation. A good set of dedicated, non-abrasive brushes is non-negotiable. I always keep a soft-bristled brush for the wheel faces, a long-handled barrel brush to get deep inside the wheel, and a small detailing brush for the intricate lug nut area. You can find more of my go-to tools in our complete car detailing supplies list.
The Power of a Foam Gun Pre-Soak
If there's one tool that truly elevates the process, it’s a foam gun like the SwiftJet. This simple attachment connects right to your garden hose and whips your wheel cleaner into a thick, clinging foam that sticks to every surface.
This foam pre-soak is a game-changer. It lets the cleaning solution dwell on the wheel, giving it time to break down grime and brake dust before you even touch it with a brush. This massively reduces the risk of scratching the finish.
It's a simple step that makes the whole job safer, quicker, and far more thorough. By coating every nook and cranny, you're setting yourself up for a much easier and more effective clean.
Using a Foam Pre-Soak to Safely Lift Grime
With the wheel cool and rinsed, we get to my favorite part of the job: the foam pre-soak. This isn't just for looks—it’s a game-changing step that does most of the heavy lifting for you. The whole point is to safely loosen that baked-on grime before you ever touch the wheel with a brush. We’re letting chemistry do the work, not elbow grease.
A foam gun like the SwiftJet is the perfect tool for this. It hooks right up to a regular garden hose and turns your wheel cleaner into a thick, clinging foam that looks like shaving cream. This is so much better than just spraying a liquid cleaner on, which usually just drips right off the vertical surfaces of the wheel in seconds.
The Science of a Good Dwell Time
Once you’ve completely covered the wheel in a blanket of foam, let it sit. You’re looking for a dwell time of about 3 to 5 minutes. This waiting period is everything. It gives the cleaners in the foam time to get in there, surround the abrasive brake dust particles, and start breaking them down.
You'll actually see it happen in real-time. The clean, white foam will start to turn a dirty brown or gray as it pulls all that metallic gunk and road film off the wheel's finish. It’s pretty satisfying to watch, honestly, because you know the contamination is literally lifting off the surface.
Here's the golden rule for this step: never let the foam dry on the wheel. If you see it starting to dry, especially if you're working in the sun or on a hot day, rinse it off immediately. Dried-on cleaner can leave nasty spots and residue that are a real pain to remove.
Why This Method Protects Your Wheels
This hands-off approach is the secret weapon against swirl marks and fine scratches. By letting the foam dissolve and lift the sharpest, grittiest particles first, you avoid grinding them into your wheel's finish when you start cleaning with brushes.
Think about it—instead of pushing harsh grit around on a delicate clear coat, you're now working with a pre-softened layer of grime that comes off with very little effort. This is non-negotiable for sensitive finishes like gloss black, chrome, or polished aluminum wheels, which seem to show every single tiny flaw.
Getting the most out of your foam gun comes down to knowing how to use it. For a complete breakdown, check out our guide on how to use a foam gun. It has some great tips on dialing in the perfect foam consistency for maximum cleaning power.
This simple pre-soak step completely changes the game, making the rest of the cleaning process safer, easier, and way more effective.
Getting Hands-On: The Art of Agitation
Alright, the foam pre-soak has broken down the worst of the grime. Now it's time to get in there and do the detailed work. The golden rule here is simple but crucial: work on one wheel at a time. If you try to do all four at once, the cleaning solution will inevitably dry on some of them, leaving stubborn spots and forcing you to do it all over again.
Focusing on one wheel from start to finish ensures you don’t rush and that every nook and cranny gets the attention it needs. It’s just a smarter, more efficient way to work.
Using the Right Tool for the Right Spot
This is where your collection of wheel brushes really shines. Picking the right brush for each part of the wheel isn't just about being thorough—it’s about protecting your wheel's finish from accidental scratches.
- Wheel Faces: For the spokes and face of the wheel, you'll want a soft, feathered-bristle brush. It’s gentle enough for even the most delicate finishes but has enough bite to lift away the grime loosened by the foam.
- Inner Barrels: This is a job for a long-handled, flexible barrel brush. These are designed specifically to snake behind the spokes and get deep into the barrel, which is where a ton of brake dust loves to accumulate.
- Lug Nuts & Tight Spots: A small, soft detailing brush is your go-to for the tight spaces around lug nuts, valve stems, and any intricate design elements. Grime hides in these spots, and this is the only way to get it out.
Remember, you’re just agitating the surface. Let the cleaner and the soft bristles do the work. No need for aggressive scrubbing or brute force.
This diagram shows just how critical that pre-soak step is. It's what makes the hands-on agitation process so much easier and safer for your wheels.
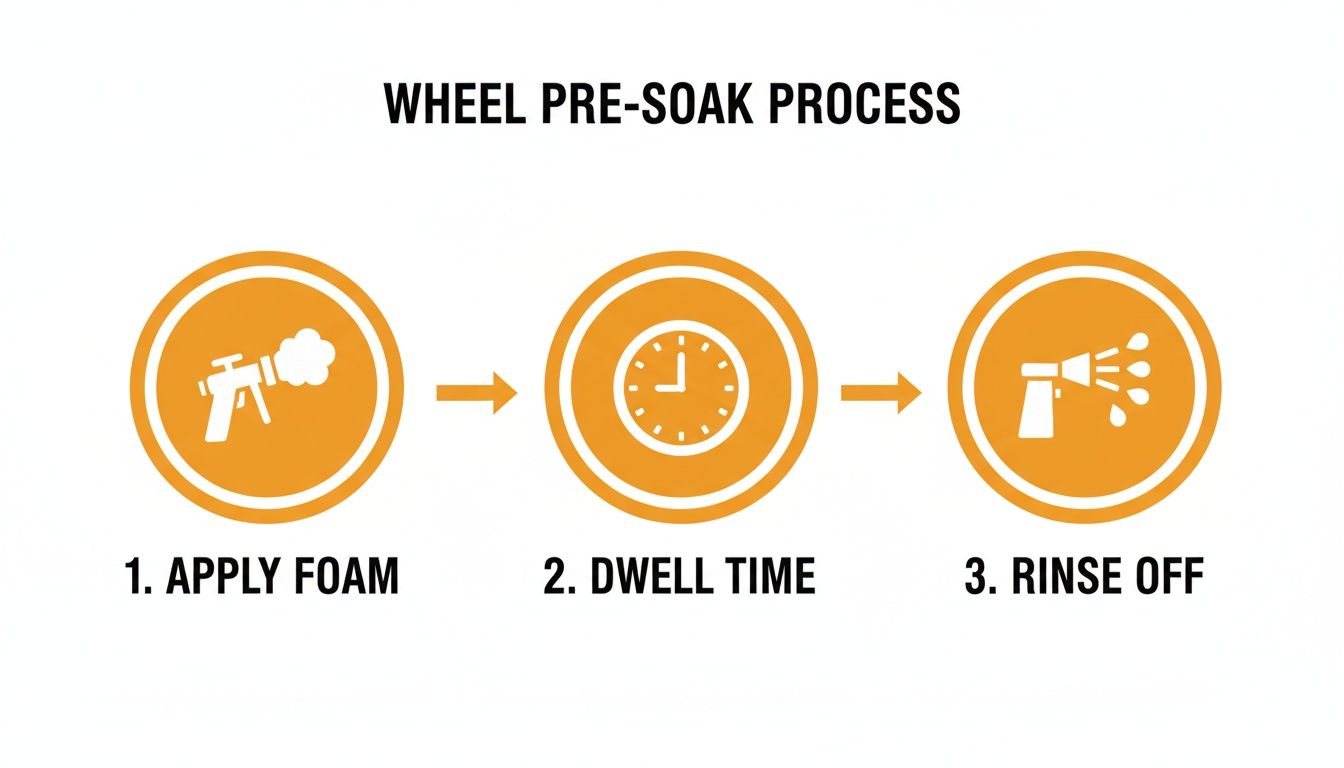
That simple foam-dwell-rinse sequence is the secret to a safe and effective deep clean.
Why This Matters for Your Wallet
Keeping your wheels clean isn't just about looks; it's smart financial sense. The market for Automotive Brake Parts Cleaners was valued at USD 387 million in 2024 and is expected to climb to USD 617 million by 2031. For the owners of over 280 million cars in the US, letting brake dust build up can lead to 12% more frequent rotor replacements, a repair that can cost an average of $400 per axle.
This is where tools like the SwiftJet Foam Gun make a real difference. By lifting up to 90% of dust in one pass, it makes regular maintenance far more effective and helps you avoid costly repairs down the road. You can read more about these market trends on Valuates Reports.
Pro Tip: Keep a second bucket filled with plain water just for rinsing your brushes. Swish your brush in it after every few passes. This stops you from dragging the grit you just removed back across the wheel's surface, which is a major cause of micro-scratches.
The Final, All-Important Rinse
Once you’ve agitated every surface, the final rinse is your last—and most critical—step. Don't be shy with the water. You need a strong, steady stream from your hose or pressure washer to flush everything away completely.
Always rinse from the top down. Gravity is your best friend here, helping pull all the suds, dirt, and brake dust down and off the wheel. Give extra attention to the inner barrels, the lug nut holes, and the area behind the brake calipers where grime can get trapped.
How do you know you're done? The water running off the wheel will be perfectly clear. That's your signal that the surface is squeaky clean and ready for the most satisfying part: applying a layer of protection. A perfect rinse leaves zero residue behind, ensuring that any sealant or ceramic coating will bond properly for long-lasting results.
Applying Protection to Repel Future Brake Dust
A truly professional job doesn't stop just because the dirt is gone. After all that work getting your wheels spotless, this final step is what separates a good clean from a great one: applying protection.
Think of it as working smarter, not harder. You're creating a barrier that keeps your wheels looking pristine for weeks, not just for the next drive around the block. Without it, that perfectly clean surface is just a blank canvas for fresh brake dust to immediately start baking on.
By applying a dedicated wheel sealant or a ceramic coating, you create a slick, hydrophobic layer that grime just can't grab onto. It’s a simple move that dramatically cuts down on how much brake dust accumulates and, believe me, makes your next wash ridiculously easy.
Choosing Your Shield: Sealant or Coating
When it comes to wheel protection, the two most popular choices are synthetic wheel sealants and full-blown ceramic coatings. Both are fantastic options, but they cater to different needs based on your budget, your time, and how much durability you're after.
-
Wheel Sealants: These are polymer-based products and are incredibly easy to use. You just wipe them on with a small applicator, let them haze up for a few minutes, and buff them off with a clean microfiber towel. A quality sealant will give you a solid 2-3 months of protection.
-
Ceramic Coatings: If you're looking for the ultimate long-term defense, nothing beats a ceramic coating. These create a hard, semi-permanent shell that can last for a year or even longer. The application is definitely more involved and requires meticulous prep, but the payoff in durability and ease of cleaning is on another level.
For most people cleaning their car at home, a high-quality wheel sealant hits that sweet spot between great performance and user-friendliness.
The real magic of both options is creating a surface so slick that brake dust and road grime struggle to find a foothold. Water will bead up and practically jump off the wheel, taking a lot of the dirt with it.
The Application Process for a Solid Bond
Before you even think about applying protection, the wheel has to be perfectly clean and, just as importantly, completely bone dry. Any lingering moisture, oils, or residue will stop the sealant from bonding correctly, killing its effectiveness and lifespan before it even has a chance.
Start with a final wipe-down. I use an isopropyl alcohol (IPA) solution or a dedicated panel prep spray to go over the entire wheel. This step strips away any leftover oils from your fingers or residues from the cleaning chemicals, leaving a perfectly sterile surface for the sealant to grab onto.
Next, grab a foam or microfiber applicator pad and apply a small amount of your chosen sealant to the entire wheel—face, spokes, and even the inner barrel. A little bit goes a long way here; you're aiming for a thin, even layer.
Now, let it cure. Follow the product’s specific instructions, but it's usually somewhere between 5-15 minutes. You’ll see the product haze over, which is your signal that it's ready to be buffed off.
Finally, take a clean, plush microfiber towel and gently buff off the sealant residue. You'll be left with a slick, glossy finish that looks incredible.
Once protected, your wheels won't just look better; they'll actively resist that nasty brake dust, making your maintenance routine quicker and a whole lot more rewarding.
Got Questions About Brake Dust? We've Got Answers.
Even with the best process, you're bound to run into a few tricky spots. I've heard just about every question in the book when it comes to wheel cleaning, so let's tackle the most common ones. Getting these sorted will help you detail your wheels with more confidence and get that perfect finish every time.
How Often Should I Really Be Cleaning My Wheels?
Honestly, it depends on how you drive. For daily commuters, especially if you're in a lot of stop-and-go city traffic, a bi-weekly wash is the sweet spot. This keeps that nasty, corrosive brake dust from getting a permanent foothold on your wheel's finish.
If you have a shorter commute or spend most of your time on the highway, you can probably get away with a deep clean once a month. The real key is not letting the dust sit for weeks on end, especially after it rains. Moisture is the catalyst that kicks the chemical bonding process into high gear, and that's what leads to pitting and corrosion.
Can I Just Use One Cleaner for Both Wheels and Tires?
It's tempting to grab one bottle to simplify things, but this is one area where you absolutely shouldn't cut corners. Your wheels and tires are made of completely different materials and need different kinds of cleaners.
- Tires: They're covered in old, brown, greasy tire dressings and road grime. You need a strong degreaser to cut through all that gunk.
- Wheels: These have delicate finishes—clear coat, powder coat, polished aluminum. They need a specialized, often pH-balanced cleaner that’s formulated to be tough on brake dust but gentle on the surface.
If you spray a harsh tire cleaner on your wheels, you risk stripping off your protective sealant or, even worse, damaging the clear coat. Trust me, using two separate, dedicated products is the only safe way to go.
I see this mistake all the time: someone assumes "all-purpose" means safe for all surfaces. When we're talking about a set of wheels that can cost thousands of dollars, that's a risk you just don't want to take. Always use a product designed specifically for the job to avoid a very expensive headache.
What’s the Secret to Removing That Stubborn, Baked-On Brake Dust?
When you’re up against brake dust that seems practically baked into the wheel, a regular cleaner just won't cut it. This is where an iron remover becomes your go-to problem solver. These cleaners are chemically engineered to target and dissolve the iron particles that make up brake dust.
You’ll see it work right before your eyes—the clear or yellowish liquid will turn a deep, dramatic purple as it reacts with the iron. This "bleeding" effect is the chemical reaction breaking the bond between the dust and your wheel, letting you simply rinse it away. Just spray it on a cool, dry wheel, let it sit for a few minutes (but don't let it dry!), give it a light pass with a soft brush, and rinse it all away. It's so much safer and more effective than trying to scrub that caked-on mess off by force.
For a tool that makes the initial pre-soak and rinsing stages more effective and efficient, the SwiftJet Car Wash Foam Gun turns your garden hose into a high-performance cleaner. Learn more at https://swiftjetusa.com.