

You've got the polisher on the bench, a stack of new pads in front of you, and one simple question hanging over the whole job, which pad do I start with? Most first-time detailers assume the compound is the hero and the pad is just a sponge that helps spread it around. That's the wrong mental model, and it's why a lot of early paint correction jobs end with haze, dust, or a finish that looks better only from ten feet away.
Why the Pad Matters More Than the Product on Top
The pad is the part that physically touches the paint, so it decides how the machine feels, how much bite you get, and how refined the finish ends up. The same compound can feel mild on one pad and aggressive on another because the pad is the mechanical interface doing the core work between the machine and the clear coat. That's why a seasoned detailer does not shop for a pad as a one-product decision, they choose a system, pad, polish, and machine all working together.
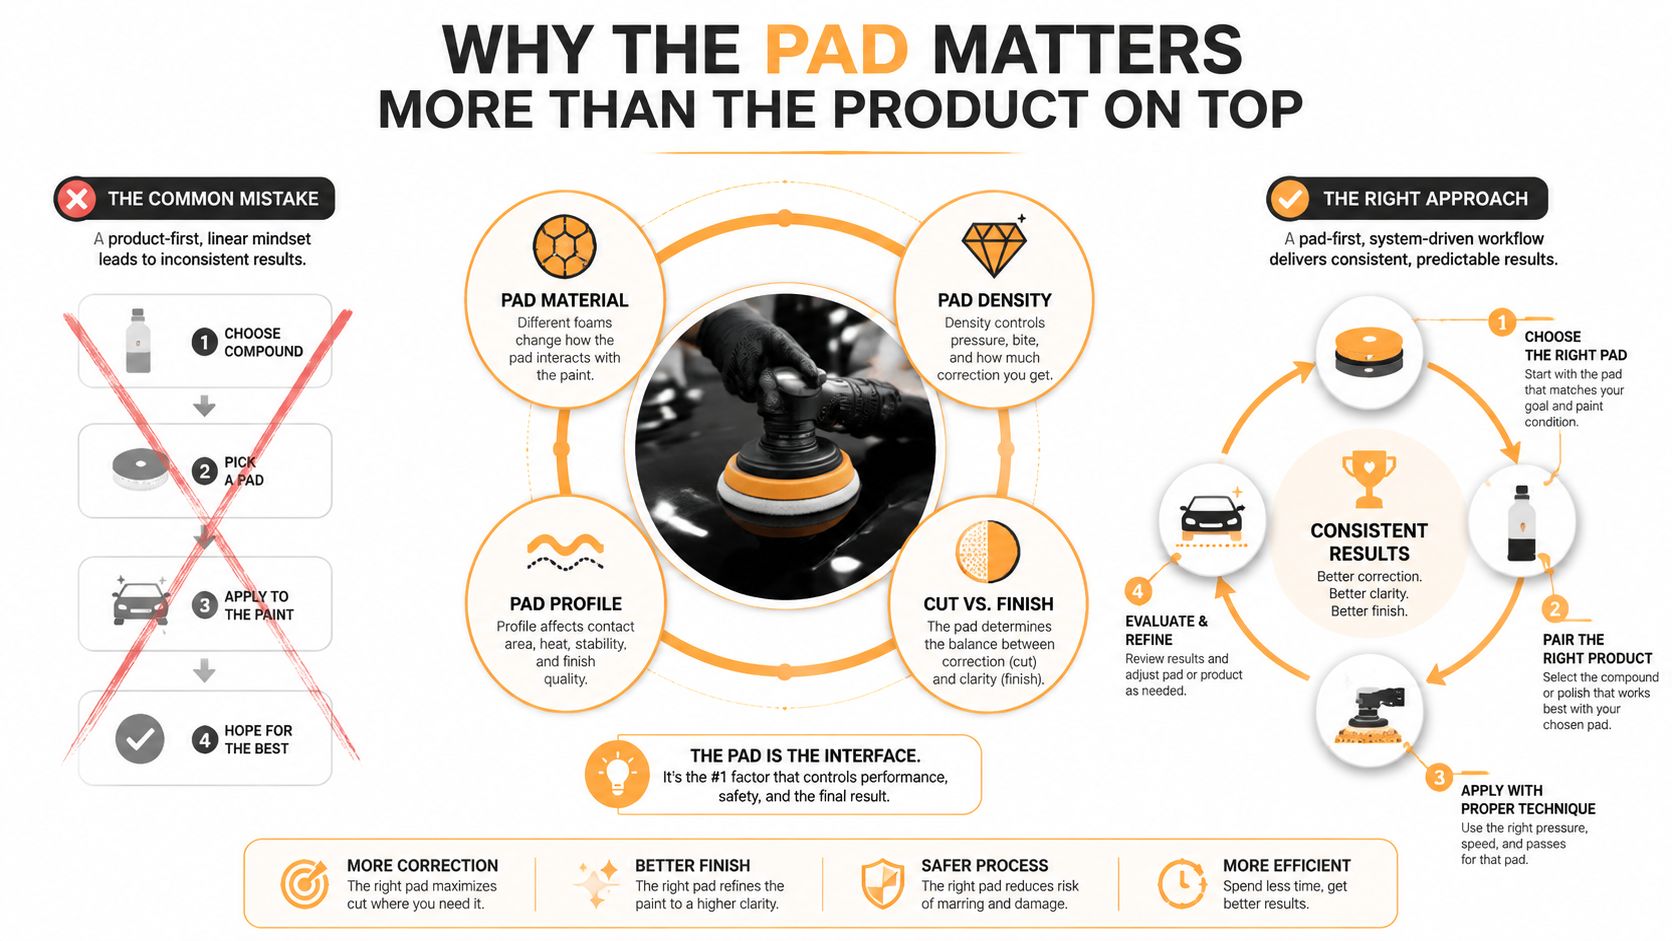
A beginner usually sees colors. A pro sees behavior. One foam face may feel soft but still cut enough for light swirls, while another pad with the same compound can leave more haze because it pushes harder on the paint and holds the abrasive differently. In other words, the pad is the hidden half of the result.
The category itself keeps growing, which tells you this is not a tiny niche of enthusiasts swapping accessories. The global polyurethane foam buffing and polishing pads market was valued at USD 301.82 million in 2022 and is projected to reach USD 489.47 million by 2030, with a 6.23% CAGR from 2023 to 2030, according to Global Newswire's market assessment. That growth makes sense once you've buffed a car yourself, because the pad is where control lives.
Practical rule: if you're changing one variable at a time, change the pad before you blame the polish.
What a Buffing and Polishing Pad Actually Does
A buffing and polishing pad is the contact face that carries the abrasive product, transfers the machine's motion, and controls how much clear coat gets refined on each pass. Similar to sandpaper grit, but on a powered machine, a coarser grit removes more material faster, and a finer grit leaves a cleaner surface behind. In detailing, the pad and liquid polish work together instead of the pad acting alone.
That's where terms like cut, finish, and density start to matter. A pad with more cut pushes more aggressively, which helps on deeper swirls, oxidation, and heavier defects, but it also raises the chance of micro-marring or haze if you skip the refining step. A finishing pad behaves more gently and is better for clarity, gloss, and the final pass on sensitive paint.
The pad's face structure matters too. Some pads hold product tightly, others release it more freely. Some are firmer and keep their shape under pressure, while others compress and spread the load over a wider surface. Those small differences change how the pad feels on the panel, how fast it warms up, and how much residue it leaves behind.
If you want a second plain-English explanation of the difference between polish and wax before you start, car detailing advice for GTA drivers is a useful reference point. For a practical look at machine basics, this internal guide on car buffer polisher fits naturally with the same learning curve.
A pad that loads up too fast or feels grabby is usually telling you the product, pad, and pressure aren't matched well.
Foam, Wool, Microfiber, and Hybrid Pads Compared
The four families people reach for most are foam, wool, microfiber, and hybrid. Foam is the everyday workhorse because it can move from light correction to finishing without feeling mysterious. Wool is the heavy hitter, microfiber sits in the middle with strong bite and more control, and hybrid pads try to balance cut with a cleaner finish.
The easiest mistake is assuming two pads that “cut fast” behave the same way. They don't. A heavy-cut foam pad usually feels more controlled and finishes cleaner than wool, but wool can remove defects faster when the paint is stubborn. Microfiber often gives strong correction with less chaos than wool, though it still needs careful cleanup afterward. Hybrids vary by design, but they exist because detailers keep looking for a better compromise between speed and finish.
| Buffing and Polishing Pad Materials at a Glance | |||
|---|---|---|---|
| Pad Type | Cut Level | Finish Quality | Best For |
| Foam | Moderate to mild, depending on firmness | Usually strong | One-step work, polishing, finishing |
| Wool | Highest in many setups | Rougher, needs refining | Heavy defect removal |
| Microfiber | Strong | Better control than wool | Faster correction with more restraint |
| Hybrid | Varies by design | Balanced | Mixed jobs where speed and finish both matter |
For a broader real-world example of how pad behavior changes across surfaces, expert tips for semi truck wheels shows how polishing demands shift when the surface and access change. That same logic applies to automotive paint, where a pad that works beautifully on one panel can feel too aggressive on another.
Foam is usually the safest first buy because it teaches you the feel of correction without making every mistake catastrophic. Wool belongs in the toolbox when you're dealing with serious defects and you're ready to refine afterward. Microfiber and hybrid pads make sense once you know what kind of finish you expect and how much work you want the pad to do.
Backing Plates, Sizes, and Machine Compatibility
A great pad on the wrong backing plate is still the wrong setup. The pad has to sit flat, spin or orbit cleanly, and stay centered on the machine so it can do its job without hopping or wobbling. If the plate is too small, too large, or mismatched to the tool, the pad won't contact the panel evenly and the result gets unpredictable fast.
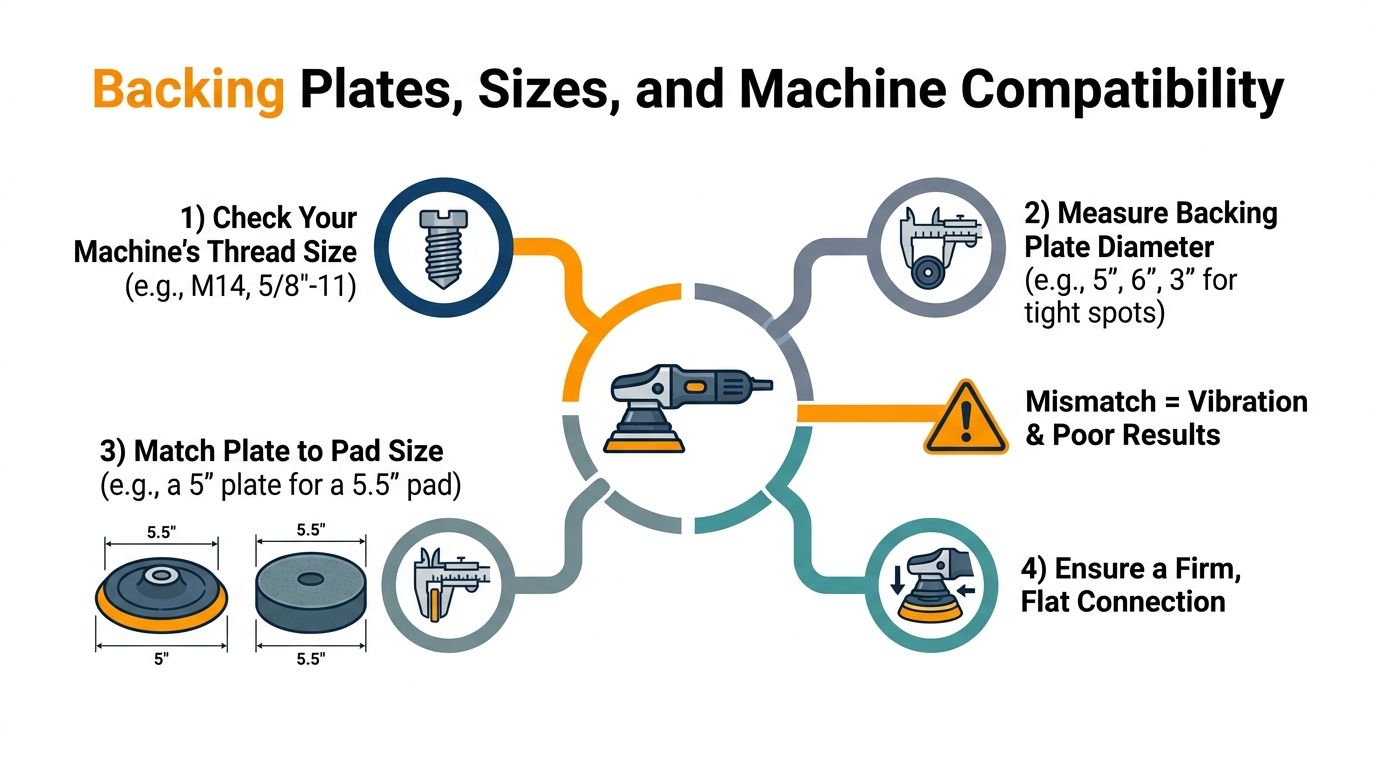
The common rookie mistake is pairing a large pad with a plate that doesn't support it properly. That setup can make the outer edge flex too much, which means less control and more vibration. A pad and plate should feel like one unit, not two pieces fighting each other.
Start with the machine, not the pad wall
Dual action polishers usually favor stable, centered pad-and-plate combinations that keep the face flat against the paint. Rotary machines can be more direct and more aggressive, so pad balance becomes even more important. Mini polishers help in tight spots, badges, mirror caps, and complex body lines where a full-size pad would be clumsy.
The machine matters so much that a guide like electric polishers for cars is worth reading before you buy a stack of accessories you can't actually use. The thread size, plate diameter, and pad size all need to match the tool's design, or you'll be chasing vibration instead of correction.
Hook-and-loop fastening is the norm because it makes pad changes fast and repeatable. Some pads also use ventilation holes or face designs that help move spent compound away from the paint, while others hold product longer for sustained cutting. The right choice depends on whether you want fast breakdown, better cooling, or longer working time.
Matching Pads to Compounds and Paint Conditions
Pad choice makes the most sense when you stop thinking in single items and start thinking in stacks. The question is not “Which pad is strongest?” It's “Which pad, combined with this compound, on this paint, gets me the result I want with the fewest side effects?”
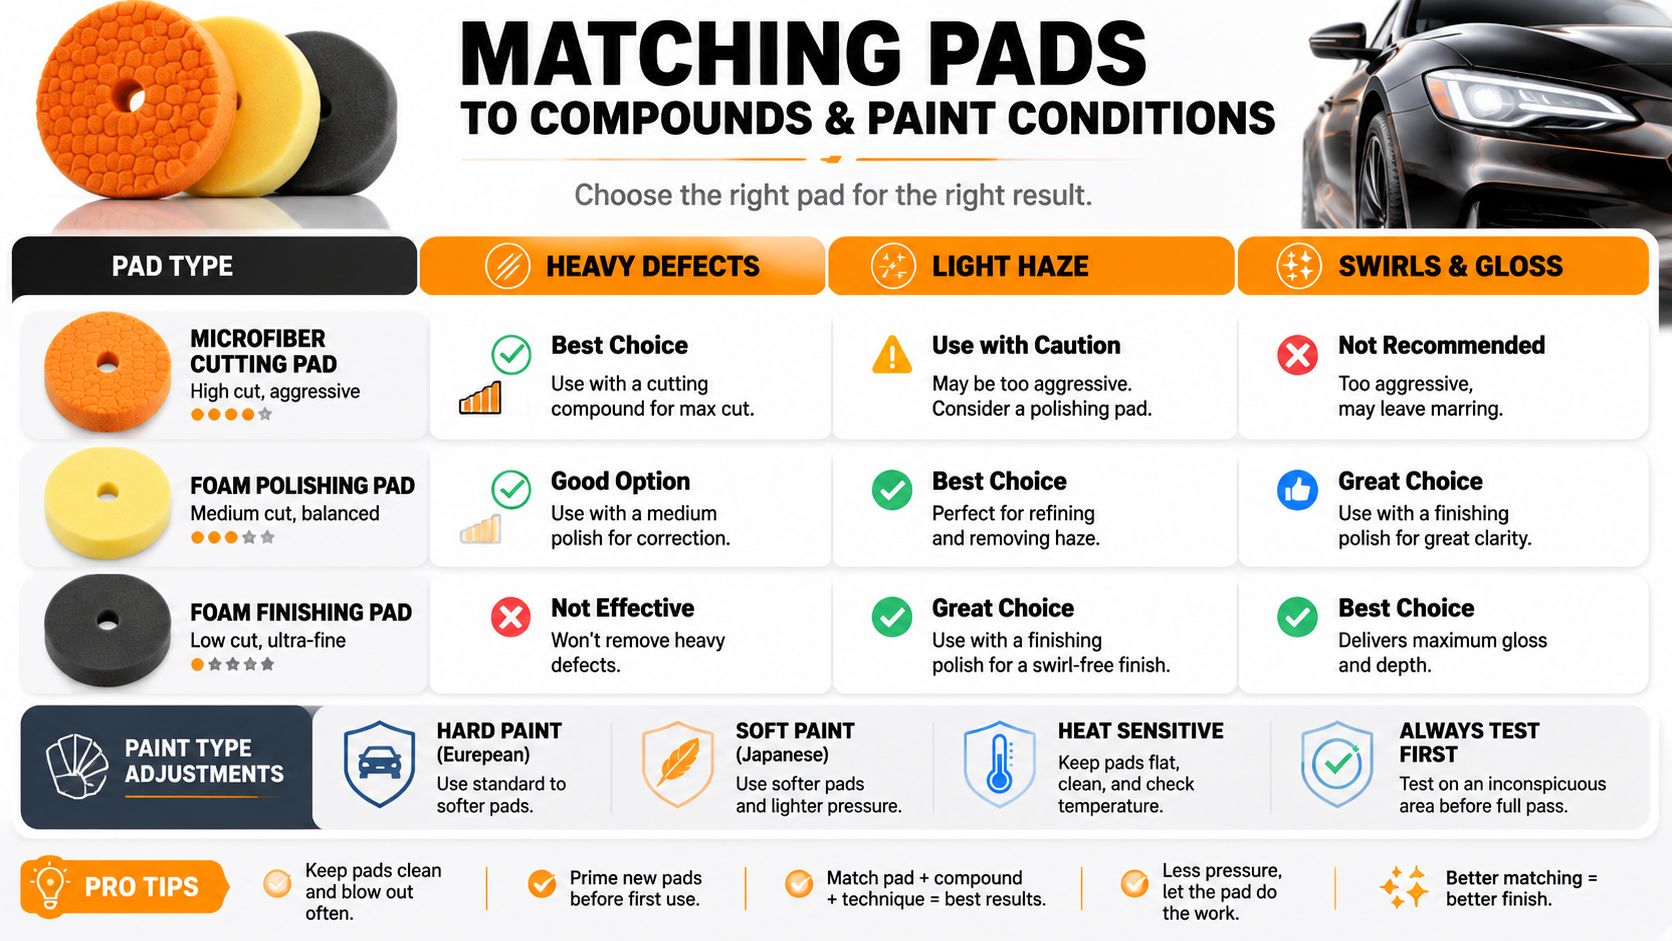
A simple correction plan usually runs in three stages. First comes heavy cut for the worst defects. Then comes polishing to remove the marks left behind. Finally, finishing restores clarity and gloss. Skipping a stage can work on light paint, but it usually means you're forcing one pad to do two jobs badly instead of one job well.
Read the paint before you grab the pad
Hard paint often tolerates more aggressive combinations, while soft paint can haze if you push too hard too soon. Single-stage paint and older finishes can also respond differently from modern clear coats, so the same pad that works cleanly on one car may leave trails on another. That's why the face of the paint matters just as much as the defect you're trying to remove.
For compound selection, compound for cars is a helpful companion read because the abrasive liquid and the pad have to work as a team. A heavy compound on a heavy-cut pad can erase defects quickly, but it can also leave enough cleanup work that you've just moved the problem to the next step.
Practical rule: when the finish still looks cloudy after correction, don't reach for more pressure first, reach for a less aggressive pad and a better refining step.
A black hood showing holograms is a classic example. If the first step cut well but left trails, a softer foam polishing pad with a finer liquid usually clears the issue. On the other hand, heavy oxidation on neglected paint may need a stronger cut stage before any finish pad can do useful work. The pad is not just removing defects, it's setting up the next stage.
Cleaning, Decontaminating, and Storing Pads the Right Way
A dirty pad stops behaving like the pad you bought. It loads up with spent compound, paint residue, and heat, then starts acting inconsistent from one panel to the next. That's why pad care is not an afterthought, it's part of the correction process.
Keep the face clean while you work
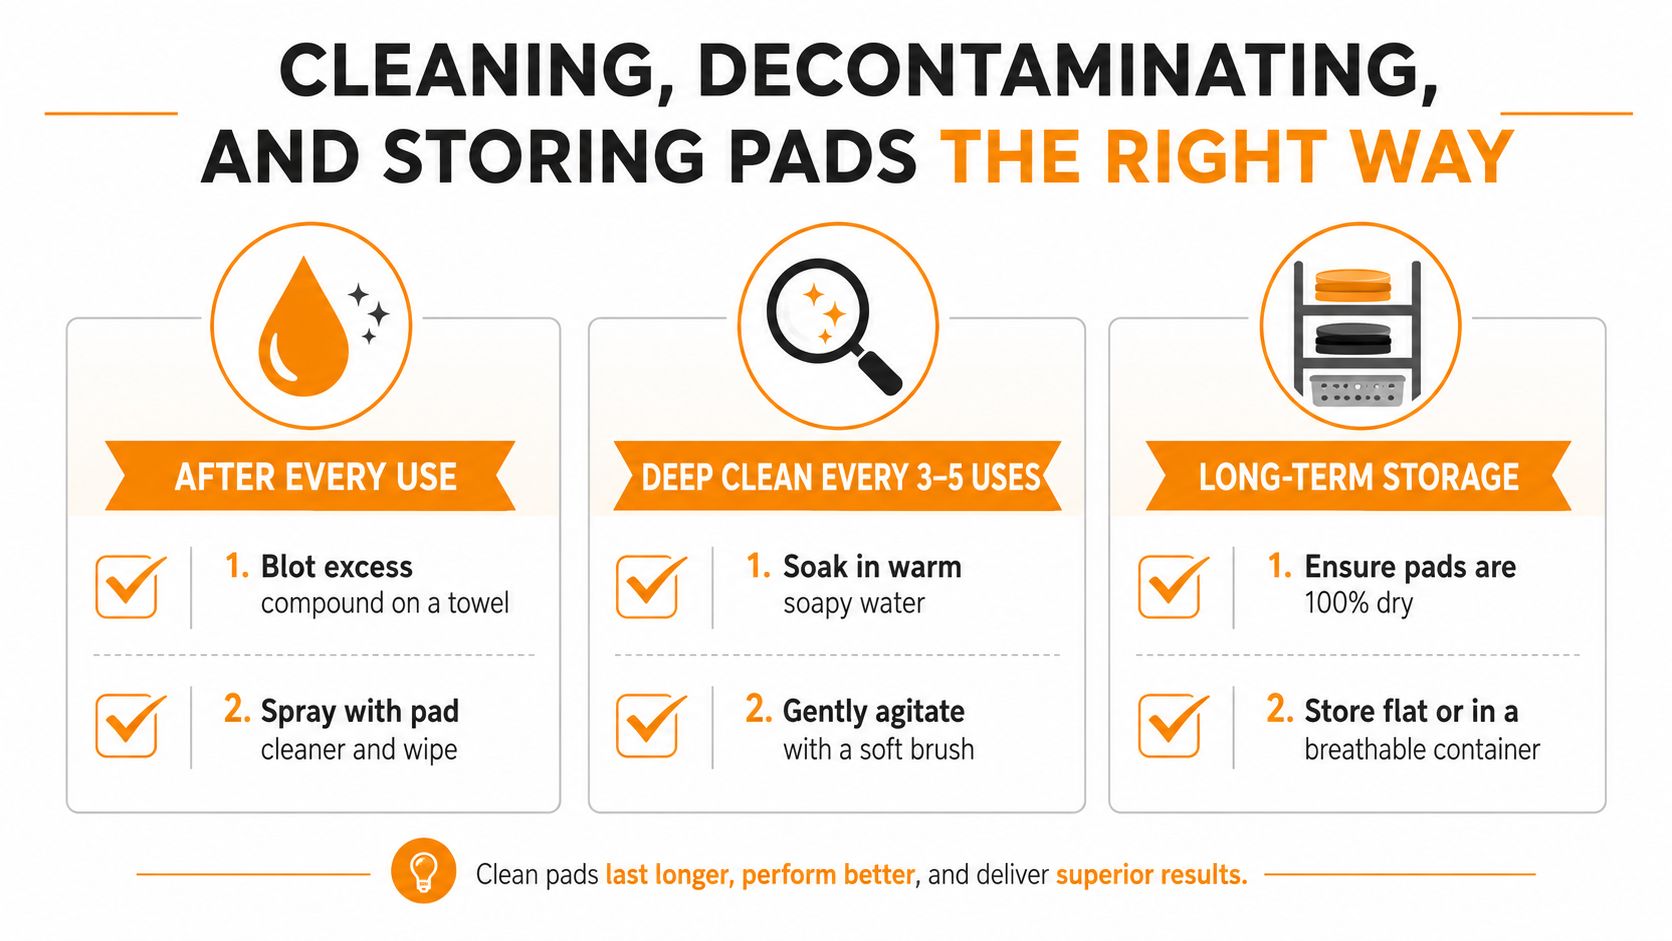
After each section, knock out excess product before it cakes into the pores or fibers. A light clean on the fly keeps the pad cutting consistently and helps it stay cooler. If you wait until the face looks glazed over with residue, the pad starts leaving uneven marks and the machine feels less predictable.
Deep clean before the pad turns tired
When a pad is past light cleaning, wash it thoroughly and let it dry completely before storing it. Foam pads need careful drying so they don't stay damp in the center, and microfiber or wool needs enough cleaning to release trapped product from the fibers. Store cutting pads apart from finishing pads so you don't cross-contaminate a refinement step with heavier residue.
The biggest storage mistake is tossing pads into a hot trunk, a sealed bucket, or a box while they're still damp. Heat, moisture, and pressure can deform the face and shorten the life of the pad. Separate bins, breathable containers, and flat storage all help the pad keep its shape.
A pad that feels “off” on the paint is often dirty, heat-soaked, or partly collapsed, not necessarily worn out.
Common Pad Problems and How to Fix Them
Most pad problems start with the same assumption, that more cut automatically means a better result. That mindset pushes people into using a pad that is too aggressive, too dry, or too loaded with product for the paint they're working on. The result is usually not speed, it's extra cleanup.
Holograms usually mean the pad and machine left directional marks behind, which is common when the correction step was too aggressive or the finish step was skipped. Micro-marring is the lighter version of the same story, a faint network of tiny marks that only really shows up in sun or strong shop lights. If you see either one, the fix is usually to drop pad aggressiveness and refine with a cleaner finishing setup.
Pad hop often comes from imbalance, excessive pressure, or a pad that's too large for the machine and panel shape. Caked product points to too much liquid, too little cleaning, or both. Glazing happens when the face becomes saturated and stops breaking down abrasives evenly, which makes the correction feel lazy instead of controlled.
Know when to retire the pad
A pad that's torn, permanently domed, hardened, or shedding material is done. No amount of cleaning fixes a face that has lost its structure. If the pad still has shape and grip, cleaning may bring it back, but if the foam is collapsing or the fibers are matting permanently, it belongs in the discard pile.
The face tells you a lot. If the edges are frayed, the center is deformed, or the hook-and-loop backing won't hold reliably, stop using it. A worn pad can still move product, but it won't move it evenly, and that's where finish quality falls apart.
Buying Buffing and Polishing Pads and Staying Safe
If you're buying your first set, start with a small, sensible mix of pad types rather than a giant wall of nearly identical foam. Look for consistent foam density, strong hook-and-loop backing, and a face that feels balanced in your hand. A cheap pad that sheds, delaminates, or loses grip quickly becomes more expensive than a better one bought once.
For a practical setup, keep your wash process clean before correction begins. A proper wash with a foam cannon, like the one SwiftJet sells, helps remove loose grit before the pad ever touches paint, and that matters because dirt left behind can waste the best correction setup. From there, dry with clean microfiber and inspect the surface under strong lighting before you pick a pad.
Safety matters because pad work concentrates friction in a small area. Use eye protection if dust is flying, keep ventilation moving in enclosed spaces, and stay careful around edges, body lines, and high spots where clear coat is thinner. If a panel starts heating up fast, back off and let the pad and product do the work instead of pressing harder.
A smart starter kit usually means one or two foam polishing pads, one finishing pad, and a more aggressive option only if you know you need it. That approach teaches you how the system behaves without burying you in choices. Buy for the jobs you'll do, not for every possible defect you might someday see.
If you're building out your own correction kit, start with pads that match your machine and the level of paint work you do, then fill in the gaps as you learn how each combo behaves. SwiftJet offers foam-based wash gear that fits neatly into a safer prep routine before polishing, and the same careful mindset applies when you choose pads for correction. Visit SwiftJet to explore tools that support cleaner prep and a more controlled detailing workflow.
