

You're halfway through washing the car, the foam gun is barely producing suds, and the hose has folded into three sharp kinks behind you. At the spigot, one coupling drips. At the nozzle, another refuses to loosen. You bought a decent hose, but the whole setup still feels improvised.
That's because the best garden hose setup isn't just a hose. It's a complete path from spigot to tool, with the right diameter, workable length, reliable washers, sensible fittings, and storage that doesn't punish the hose after every use. Build that system correctly and the same hose works better for car washing, watering, rinsing, and general cleanup.
Why Your Hose Setup Matters More Than the Hose Itself
A garden hose performs inside a system. The spigot controls the available supply, the internal diameter determines how much water can move through the line, fittings create possible restrictions, and storage determines whether the hose lays flat or fights you at the next job.
Two identical hoses can feel like different tools when one runs through a clean, short path with sound washers and the other passes through a long chain of adapters, tight bends, and damaged connectors. The second hose may leak, lose useful flow, and pull sideways on the spigot even if the hose body itself is perfectly sound.
Start at the entire path
Think of the setup as a chain:
- Spigot: Provides the water supply and shutoff.
- Safety and control fittings: Handle backflow protection, splitting, or pressure management.
- Hose: Carries water with as little friction and twisting as practical.
- Quick-connect: Makes tool changes easier without repeatedly disturbing threaded joints.
- Accessory: Delivers the final spray, foam, irrigation pattern, or rinse.
The weakest connection affects the entire chain. A missing washer can create a leak. A narrow tail section can restrict output. A hose that remains twisted can transfer torque into the couplings and make every attachment harder to use.
Practical rule: Fix the layout before replacing the hose. Most frustrating setups need fewer restrictions, better connection habits, or better storage, not another product.
A good system also reduces handling effort. Put the reel or hanger where the hose naturally leaves the spigot, choose a route that avoids sharp corners, and keep the accessory connection accessible. For car washing, the hose should follow you around the vehicle without dragging the foam gun sideways or pulling the spigot connection loose.
The right setup is repeatable. Turn on the water, extend the hose, connect the tool, and work without stopping to untangle, retighten, or swap improvised adapters.
Choosing the Right Hose Diameter and Length
You pull the hose around the car, connect a foam gun, and get a weak stream instead of a dense rinse. The usual culprit is a restrictive setup, not the brand printed on the hose. Diameter controls usable flow more than brand name, so start with the inside diameter and build the rest of the run around it.
For most households, a 5/8-inch hose is the right starting point. At typical residential pressure of 40 to 60 PSI, it delivers about 8 to 17 GPM, or roughly 480 to 1,020 gallons per hour, depending on length, fittings, and nozzle restrictions, according to this garden hose flow-rate reference. Wider hose reduces friction and preserves more pressure at the tool. Treat these figures as planning ranges, not guarantees.
Diameter comparison
| Diameter | Approx. Flow (GPM) | Weight / 50 ft | Best For |
|---|---|---|---|
| 1/2 inch | Roughly 9 to 10 at 50 PSI and 50 feet | Lighter than wider hoses | Containers, patios, light-duty rinsing |
| 5/8 inch | Roughly 12 to 17 at 50 PSI and 50 feet | Balanced handling | General yard work, car washing, foam guns |
| 3/4 inch | Roughly 20 to 23 at 50 PSI and 50 feet | Heavier and bulkier | Long runs, tank filling, multiple spray heads |
Choose length by measurement
Measure from the spigot to the farthest point where you will work, then add only enough slack to move comfortably. Excess length increases weight, drag, storage bulk, and friction. A shorter run with fewer fittings usually delivers better results than a long hose that spends most of its time coiled on the ground.
Use the garden hose ratings guide to compare construction and rated performance, but keep the layout as the deciding factor. Product specifications cannot compensate for unnecessary hose length or a narrow connector section.
Choose 5/8 inch for general yard work, car washing, and foam-gun use. Use 1/2 inch when low weight matters more than output, such as container filling, patios, and light rinsing. Choose 3/4 inch for high-volume work, including tank filling, multiple spray heads, or a longer run where preserving flow matters. For a foam gun, keep 5/8 inch from spigot to tool and avoid narrowing the final connection. A consistent diameter gives the accessory a better chance of receiving the flow it needs.
Matching Hose Material to How You Actually Use It
Material determines whether the hose behaves when you pull it across concrete, coil it beside the garage, or leave it in a cold storage space. The cheapest option often becomes expensive through repeated replacement, while an overly heavy hose can make a simple wash tiring.
Compare the materials honestly
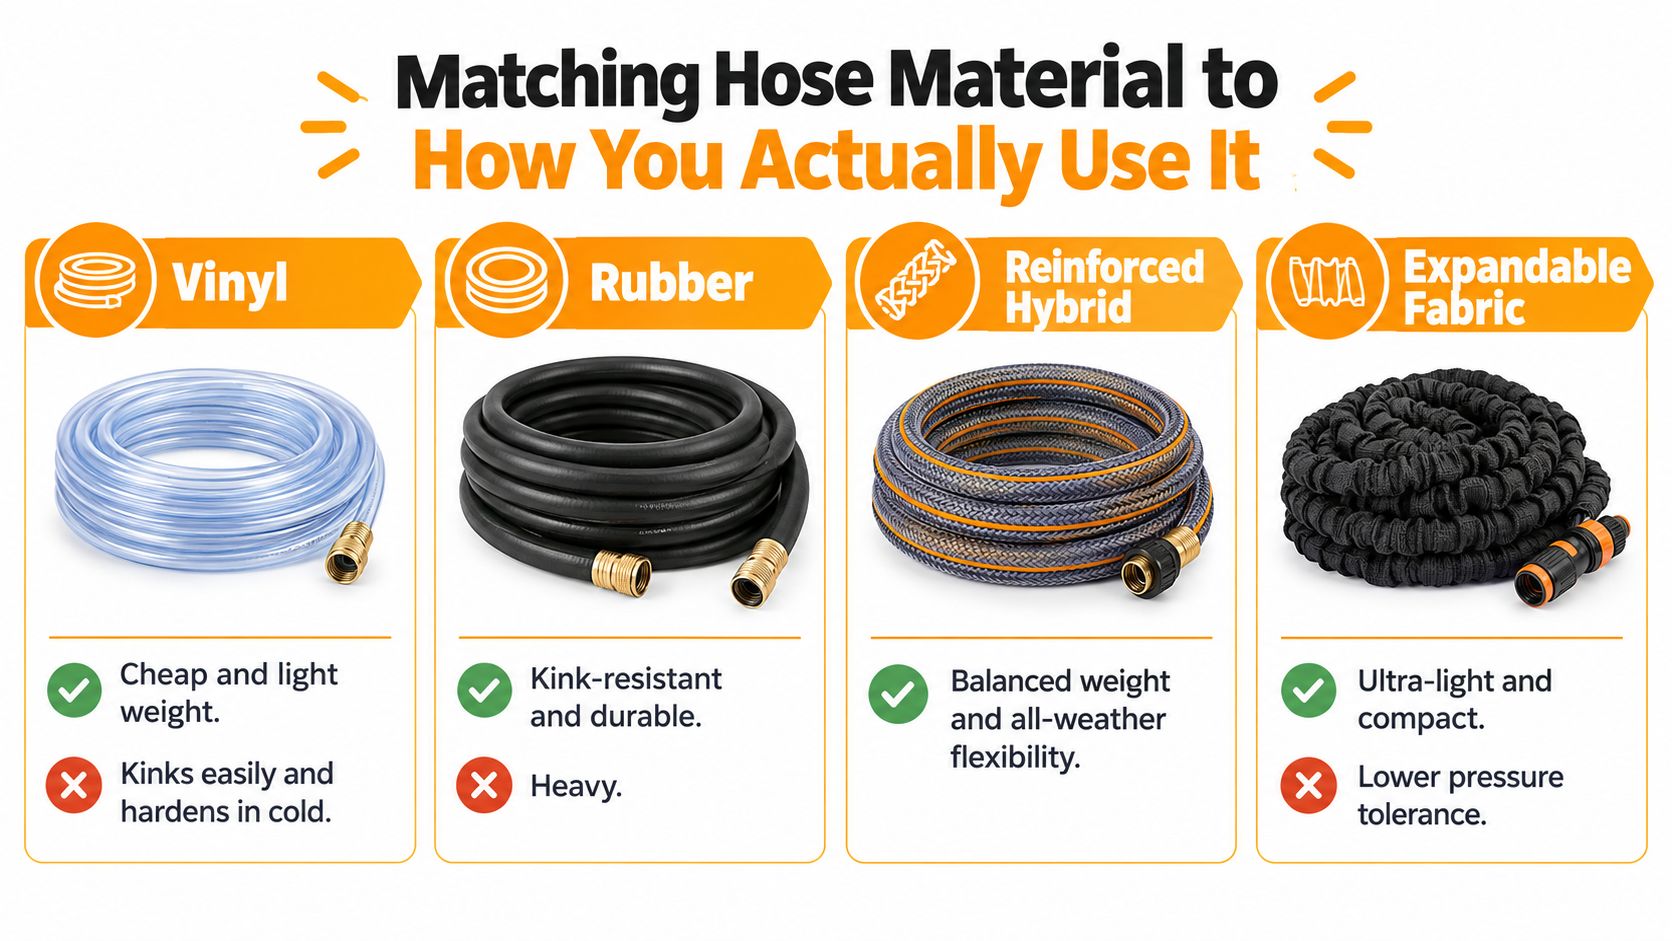
Vinyl keeps weight and purchase cost down, but it tends to kink during ordinary bends and can become stiff in cold conditions. It suits light patio work when easy replacement matters more than long service life. It isn't my choice for a hose that gets dragged around a vehicle or deployed every weekend.
Rubber handles abuse well and resists the sharp folding that plagues cheaper vinyl. It lays down with authority and works well in demanding outdoor conditions, but you'll feel the extra weight every time you move it, especially when it contains water.
Reinforced hybrid construction is the practical middle ground. A quality hybrid can stay flexible while providing better abrasion resistance than basic vinyl, making it the strongest fit for most home users who want one hose for washing, watering, and cleanup.
Expandable fabric hoses store compactly and feel easy to carry, but they aren't my recommendation for foam-gun work or repeated dragging. Their changing shape can make connection handling awkward, and the fabric exterior offers less protection against rough surfaces.
For a standard 5/8-inch home hose, pick reinforced rubber or a reputable hybrid when the hose will see regular sun, gravel, vehicle washing, or seasonal storage. If the hose only waters nearby pots, vinyl can be adequate. If you detail cars, prioritize a line that lies flat and follows you smoothly. A stiff hose can tug the tool, shift your hand position, and interrupt the steady movement that produces even foam coverage.
Don't judge material by softness in the package. Bend the hose, inspect the strain relief around both fittings, and look for connectors that won't collapse the passage at the ends. A flexible body paired with weak fittings still produces a poor setup.
Building a Leak-Free Connection Stack From Spigot to Nozzle
Every joint can leak, restrict flow, or introduce unwanted movement. Build the connection stack in a deliberate order instead of adding adapters wherever a problem appears.
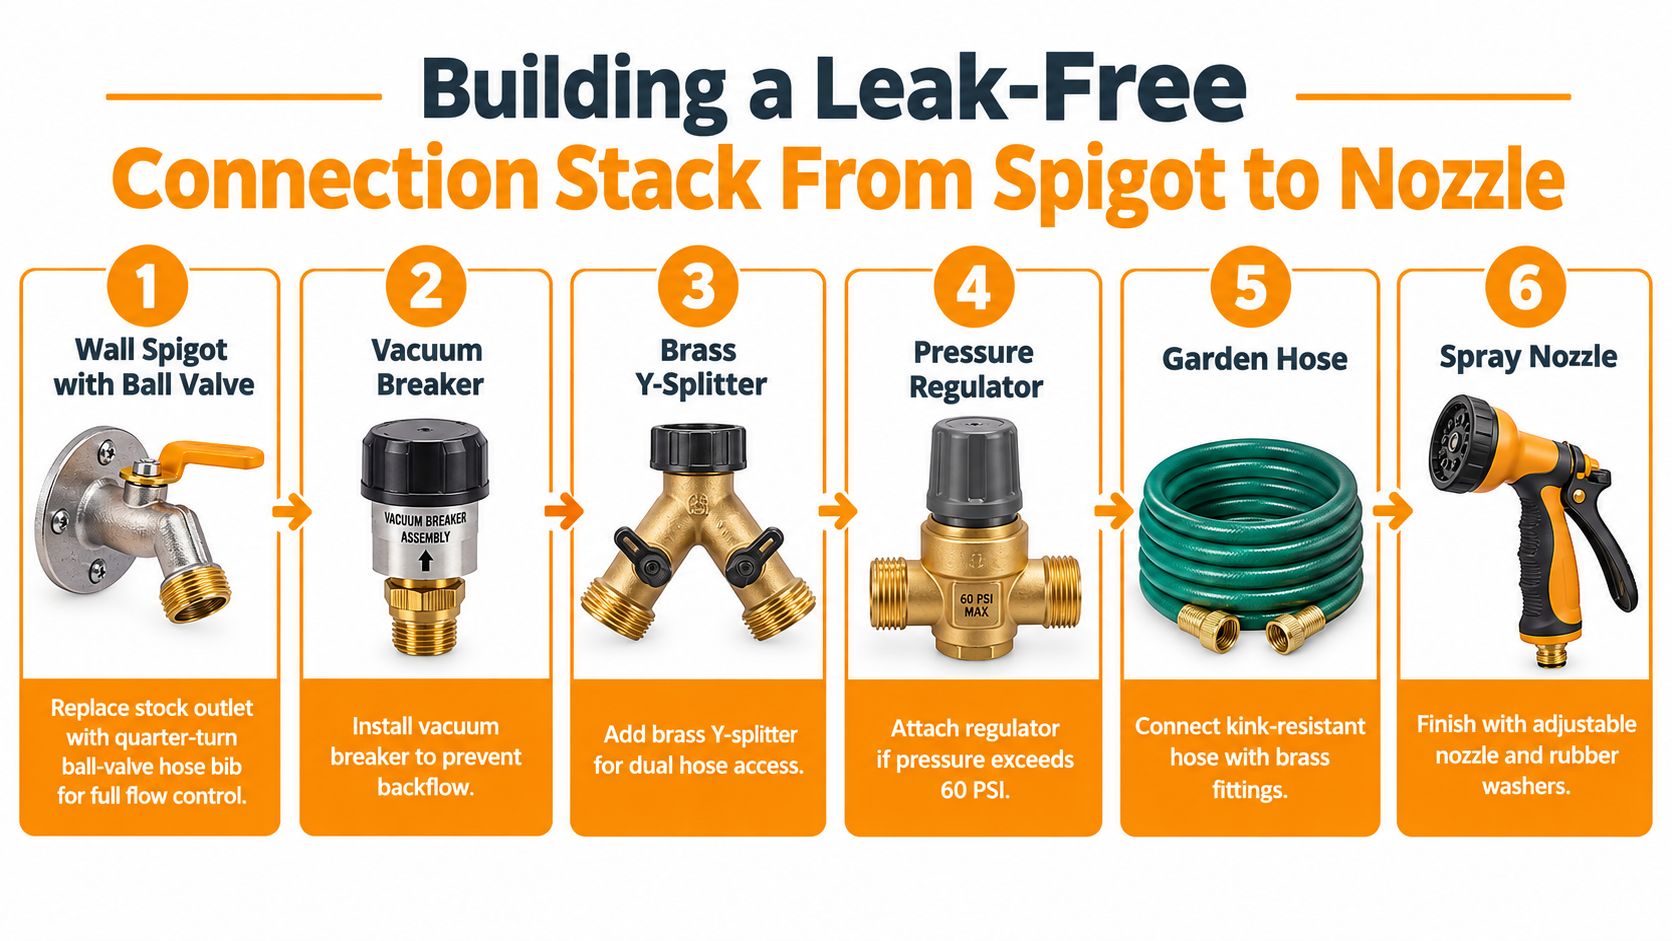
Use this order
- Inspect the spigot. If the outlet is old, difficult to turn, or lacks precise control, replace it with a quarter-turn ball-valve hose bib. A smooth shutoff makes tool changes safer and prevents you from forcing a stiff valve.
- Add backflow protection. Install a vacuum breaker where appropriate, especially when using hose-end sprayers or accessories that could allow water to move backward toward the household supply.
- Install a splitter only for a real need. A brass or stainless Y-splitter makes sense when you need two active zones, such as a hose and a timer. If you only use one hose, skip the extra joint.
- Add pressure control when the system requires it. A regulator belongs on the hose side of the splitter, so downstream tools receive a steadier supply. This helps keep foam-gun behavior and sprinkler coverage predictable.
- Connect the hose with fresh washers. Place a rubber washer in every male-female connection. Inspect the washer face, seat it flat, and thread the fitting by hand before adding a small final turn.
- Finish with the accessory. Attach the nozzle, foam gun, sprinkler, or wand only after the hose is fully uncoiled and relaxed.
For a deeper explanation of connector styles and where each one belongs, use this guide to hose connector types. Match the fitting material to the workload. Brass or stainless connectors make more sense than delicate plastic when you connect and disconnect tools frequently.
Connection habit: Hand-tighten first. If the joint still seeps, shut off the water, remove it, inspect the washer and threads, then reconnect. More force isn't a substitute for correct seating.
PTFE tape can help on threaded nipples, but it won't repair a missing washer or cross-threaded garden-hose connection. Avoid tool-tightening hose couplings because excessive force can distort the washer or damage the mating surfaces.
For irrigation planning beyond a hose-end sprinkler, these Peoria yard irrigation basics provide useful context on laying out a broader watering system.
Wiring Quick-Connects and a Foam Gun Into the System
Quick-connects are valuable when you treat them as a tool interface, not as a way to keep stacking adapters. Set up one female quick-connect on the hose end, then give each accessory its own matching male plug.
Build a clean tool-swapping point
Use a male quick-connect with an integrated shutoff valve for accessories that sit disconnected from the hose during swaps. That includes a foam gun, watering wand, or sprinkler base. The valve keeps water from dumping out when you remove the tool, which also limits the amount of air you introduce into the line.
Choose brass or stainless quick-connects for frequent use. Plastic can work for occasional watering, but repeated coupling, sideways pulls, and outdoor exposure are hard on inexpensive parts. Keep the connection straight while locking it, and check that the collar has fully seated before opening the spigot.
Protect foam-gun performance
A foam gun needs a consistent supply, not a long route full of restrictions. Keep the run from the regulator to the foam gun short, and stay with 5/8-inch hose throughout the path. A smaller tail section can become the bottleneck even when the main hose is correctly sized.
Use one dedicated male plug for each accessory. Label the foam-gun plug, rinse nozzle, and sprinkler plug if several tools live on the same reel. This small habit prevents cross-threading and lets you change tools without disturbing the main hose connection.
The garden-hose foam-cannon connection guide can help you verify the basic attachment sequence. For a hose-fed vehicle wash, the SwiftJet Car Wash Foam Gun is one option that connects to a standard garden hose and uses an on/off trigger for foam application and rinsing.
Don't expect a foam gun to overcome a restricted line. Open the spigot fully, remove kinks before adjusting the tool, and test the spray with the gun held in its normal working position. If foam remains weak, inspect the hose diameter, quick-connect opening, inlet screen, and water supply before blaming the soap mixture.
Storage Setups That Protect Pressure and Prevent Kinks
Storage should match the way the hose moves, not just the appearance of the wall or patio. A hanger works well when the hose stays near one spigot. A reel earns its space when you pull the hose through different zones and need the line to rotate without twisting at the connection.
Match the storage to the layout
| Storage Type | Best Yard Size | Hose Length | Use Frequency | Key Benefit |
|---|---|---|---|---|
| Wall-mounted hanger | Small patio or compact yard | Short to moderate run | Frequent nearby use | Simple storage with little hardware |
| Freestanding reel | Medium or changing work areas | Moderate to long run | Regular movement between zones | Swivel reduces twisting during extension |
| Hideaway box reel | Visible front yard or wash area | Moderate to long run | Frequent, tidy storage | Protects the hose from exposure and hides clutter |
| Cart reel | Large property with distant corners | Long run | Repeated relocation | Moves the hose and storage together |
A wall hanger is the cleanest choice when the hose exits the spigot and returns to the same area. Mount it high enough to keep the hose off the ground, but don't force a tight bend at the outlet. The first loop should form naturally.
A freestanding reel suits a hose that travels between watering beds, driveway, and side yard. Its swivel helps absorb rotation, but it doesn't excuse careless winding. Guide the hose onto the reel in even layers so one side doesn't pile up and create a hard bend.
Hideaway boxes suit homeowners who want a tidy wash station near a bucket or garage wall. They need a flat base and a clear guide path. If the hose enters at an angle, it can bunch during retraction and jam inside the box.
Drain before you store
Turn off the spigot, open the nozzle, and let trapped water escape before coiling. Keep the hose relaxed while winding it, and don't press it into sharp loops that flatten the wall. During winter storage, disconnect the hose, drain it completely, and keep connectors dry.
For long runs, a cart is more practical than repeatedly dragging a heavy coil across the yard. The goal isn't the fanciest reel. It's a storage method that lets the hose leave and return without twists, crushing, or sharp bends.
Common Hose Setup Mistakes That Quietly Kill Performance
Most hose failures start with ordinary habits. People overtighten fittings, store the line under pressure, drag it around corners, and then blame the hose when the nozzle sputters.
Stop forcing the connections
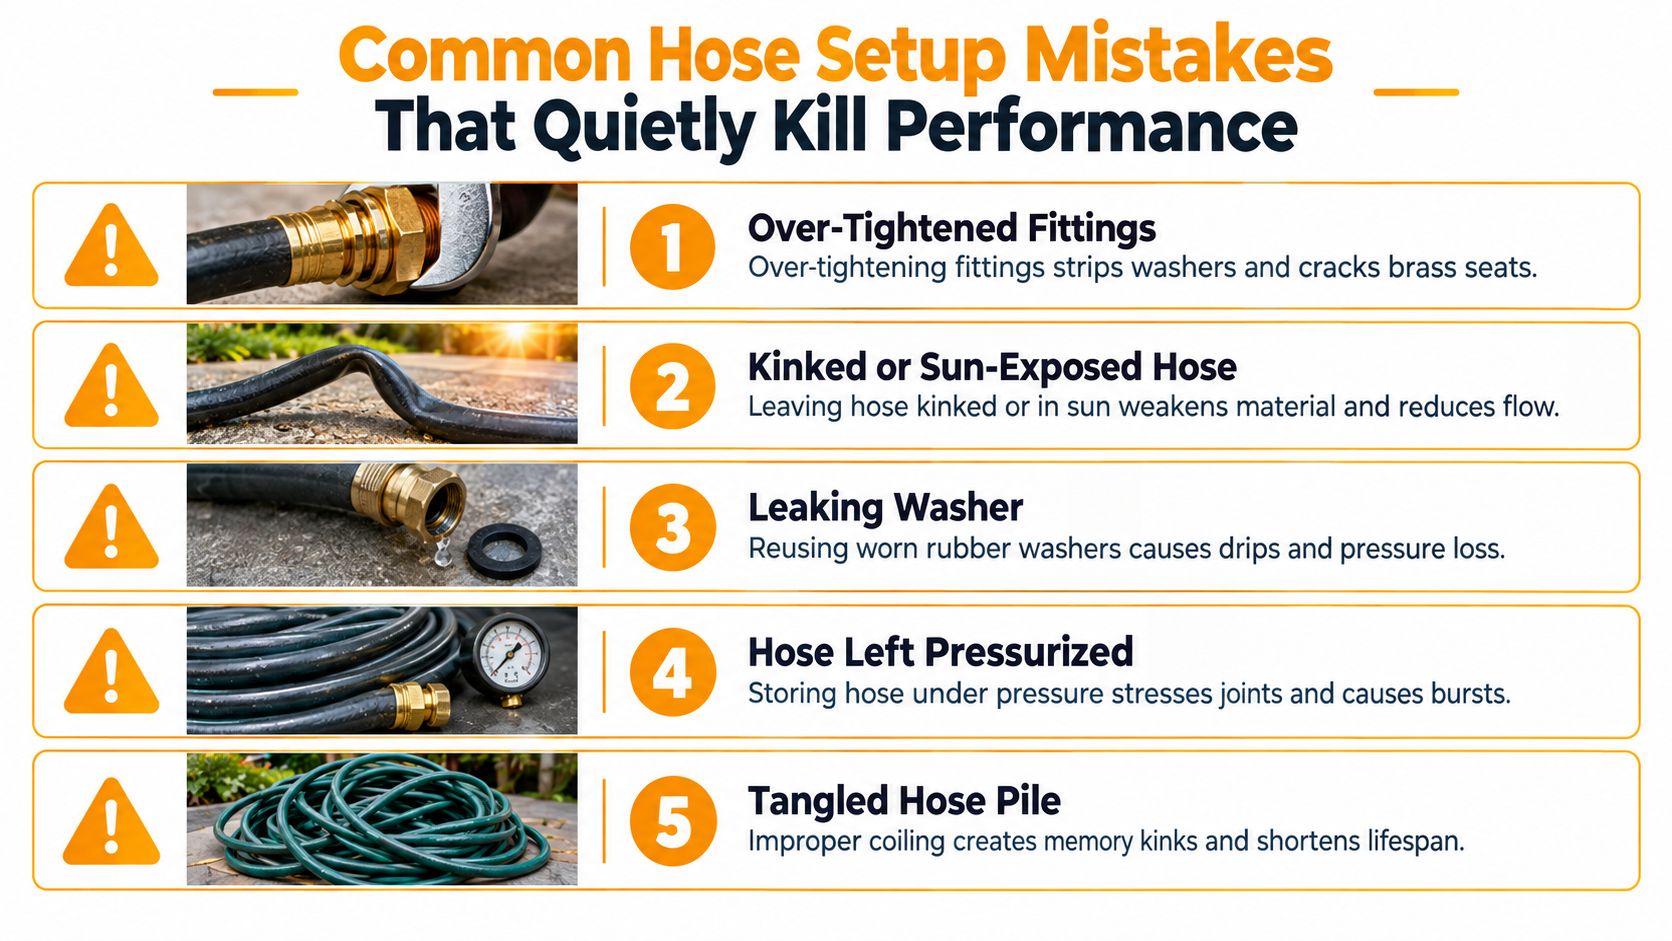
A hose coupling needs a properly seated washer, not brute force. Thread it by hand until snug, then use only a small final turn if necessary. Cranking beyond that can deform the washer, damage the fitting seat, and make the next connection harder.
Don't bury a regular hose under mulch unless it's designed for that environment. Abrasion and hidden bends make damage difficult to spot, and you won't discover the problem until flow drops or a weak section splits.
Control pressure before storage
Never coil a hose while it still holds full line pressure. Shut off the spigot, open the nozzle, and let the water drain before winding it. Pressurized storage stresses joints and keeps every bend loaded in the hose wall.
Reusing worn washers causes slow leaks that look like low pressure at the tool. Keep spare rubber washers in the same storage area as the hose, and replace any washer that looks flattened, cracked, or permanently distorted.
A slow drip is a diagnosis, not a minor annoyance. Find the joint, replace the washer, and reconnect it before changing the nozzle or buying a new hose.
A long, narrow hose can also starve a demanding accessory. If a 1/2-inch line runs a long distance to a foam gun, the restricted internal diameter can leave the tool with disappointing output. Use the 5/8-inch baseline from the spigot to the accessory, or move the work closer to the water source.
Disconnect quick-connects when seasonal storage begins. Dry the O-rings, keep dirt out of the sockets, and avoid leaving tools hanging from a loaded fitting. Add a vacuum breaker where the accessory and plumbing arrangement require backflow protection, particularly for hose-end chemical or fertilizer applications.
Your Complete Garden Hose Setup Checklist
Use this as a practical build sheet. You can assemble the system in an afternoon, test it, and remove the weak points before the next wash or watering session.
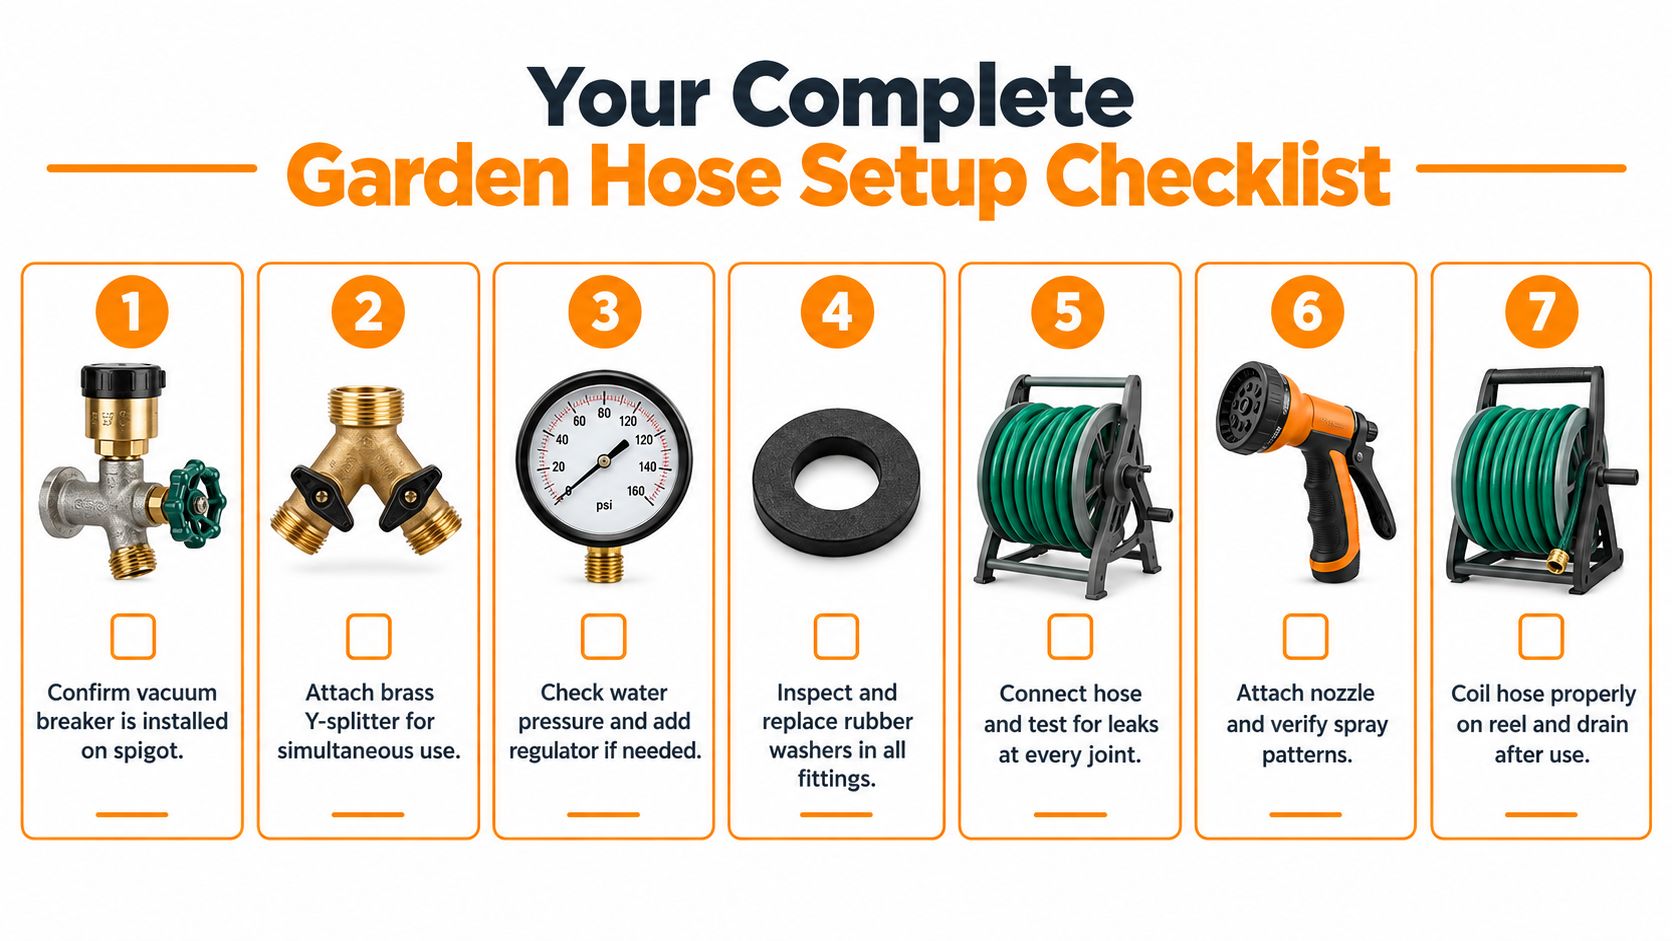
Build from the tap outward
- Confirm backflow protection: Check that the spigot has a suitable vacuum breaker before connecting hose-end sprayers or chemical accessories.
- Add a splitter only when needed: Use a brass Y-splitter for simultaneous hose, timer, or zone use. Skip it when one outlet does the job.
- Check supply behavior: If pressure is inconsistent or excessive for your tools, add an in-line regulator downstream of the splitter.
- Inspect every washer: Replace flattened or cracked rubber washers before testing the system.
- Choose the main hose: Use a 5/8-inch reinforced rubber or hybrid hose for general home washing and yard work, then size the length to the route rather than buying excess reach.
- Install the tool interface: Put the quick-connect on the hose end and dedicate matching plugs to the nozzle, foam gun, and sprinkler.
- Test before storage: Open the spigot, inspect every joint, confirm the spray pattern, then drain and coil the hose without sharp bends.
For plumbing concerns beyond a hose-end connection, consult a trusted plumber for San Antonio homes rather than forcing an aging or damaged outdoor outlet. A professional can address the spigot, supply line, and backflow questions that a new hose can't solve.
Labeling each accessory also makes the system repeatable. Store the foam gun with its quick-connect plug, keep the rinse nozzle nearby, and return spare washers to the same container. The best garden hose setup is the one you can operate without rebuilding it every Saturday.
If you want to turn that setup into a faster vehicle-washing workflow, explore SwiftJet for a garden-hose foam gun designed to apply vehicle-cleaning foam with an on/off trigger. Pair it with a properly sized 5/8-inch hose, sound washers, and a clean quick-connect so the tool receives steady flow instead of fighting the rest of the system.
