
Achieving a professional, head-turning finish on your vehicle is more accessible than ever. Gone are the days when a flawless shine was reserved for high-end detail shops; with the right techniques and tools, you can transform your car's appearance right in your own driveway. This guide breaks down eight essential automotive detailing tips, moving beyond a basic wash and wax to explore the methods used by seasoned professionals. We'll provide actionable steps to elevate your results, ensuring you have the knowledge to protect your investment and take pride in a truly immaculate vehicle.
From mastering the foundational two-bucket wash method and executing a proper clay bar treatment to tackling paint correction and applying advanced ceramic coatings, you will gain the confidence to handle a complete detail from start to finish. We will also cover often-overlooked areas like comprehensive wheel and tire restoration, interior deep cleaning, and specialized care for paint protection films.
A key first step in this journey is the pre-wash foam bath, a technique made simple with tools like the SwiftJet foam gun. This critical process lifts heavy dirt and grime before you ever touch the paint with a mitt, drastically reducing the risk of swirl marks and setting the stage for a safer, more effective detail. This list will equip you with the practical skills to achieve a showroom-quality look.
1. Master the Foundation: The Two-Bucket Wash Method
One of the most crucial yet simple automotive detailing tips for preventing paint damage is adopting the two-bucket wash method. This technique is the professional standard for a safe, scratch-free wash. It relies on a simple principle: isolating the dirt you remove from the car so it never gets reapplied to the paint with your wash mitt.
The setup involves two separate buckets. The first contains your car wash soap solution, and the second is filled with plain, clean rinse water. By rinsing your dirty wash mitt in the clean water bucket before reloading it with soap, you trap grit and abrasive contaminants, preventing them from being dragged across your vehicle’s clear coat. This single change dramatically reduces the risk of creating swirl marks and micro-scratches, the fine web-like scratches that dull your paint's finish.
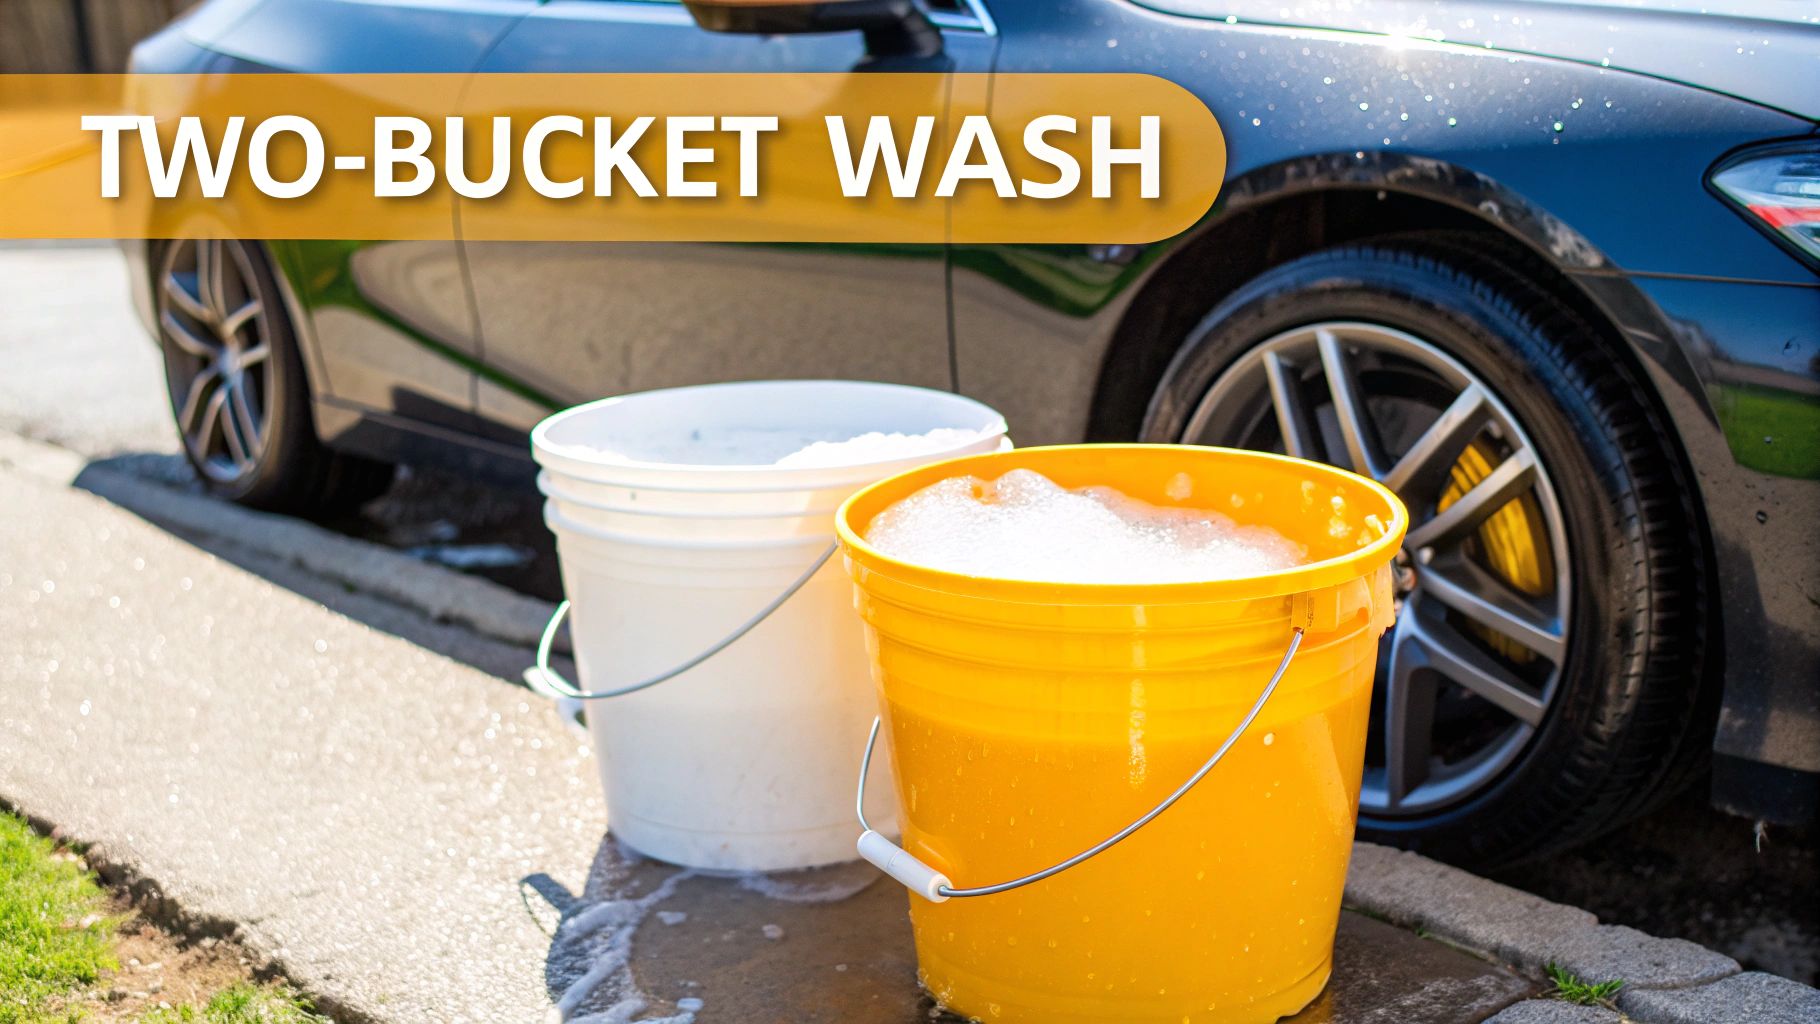
How to Implement the Two-Bucket Method
Implementing this method is straightforward and requires minimal extra equipment. It is the foundational step for any proper hand wash, used every time you clean your vehicle's body panels.
- Bucket Setup: Designate one bucket for your car wash soap and another for rinsing. To maximize effectiveness, place a Grit Guard at the bottom of each. These plastic inserts allow dirt to fall to the bottom and prevent it from being stirred back up into the water.
- Washing Process: After washing a single panel (e.g., a door or half the hood), dunk your dirty wash mitt into the rinse bucket first. Agitate it against the Grit Guard to dislodge trapped dirt.
- Reload with Soap: Once the mitt is clean, wring it out slightly and then dip it into the soap bucket to gather fresh, clean suds before moving to the next panel.
Pro Tip: For an even safer wash, especially on vehicles with heavy contamination, consider using a third bucket and dedicated wash media exclusively for the wheels and lower rocker panels, which are typically the dirtiest parts of the car. This prevents brake dust and heavy road grime from ever touching your primary wash mitts.
2. Decontaminate with a Clay Bar Treatment
Even after a thorough wash, your vehicle's paint can still feel rough to the touch. This is due to bonded surface contaminants that a regular wash cannot remove. A clay bar treatment is an essential automotive detailing tip for mechanically decontaminating the paint, gently lifting and removing embedded particles like industrial fallout, tree sap, and brake dust to restore a glass-smooth surface.
This process uses a polymer clay compound that glides over the lubricated paint, grabbing and pulling out anything protruding from the clear coat. The result is a truly clean surface, which is the perfect foundation for applying wax, sealant, or a ceramic coating, allowing them to bond better and last longer. Show car preparations and professional ceramic coating applications almost always begin with a thorough clay bar treatment.
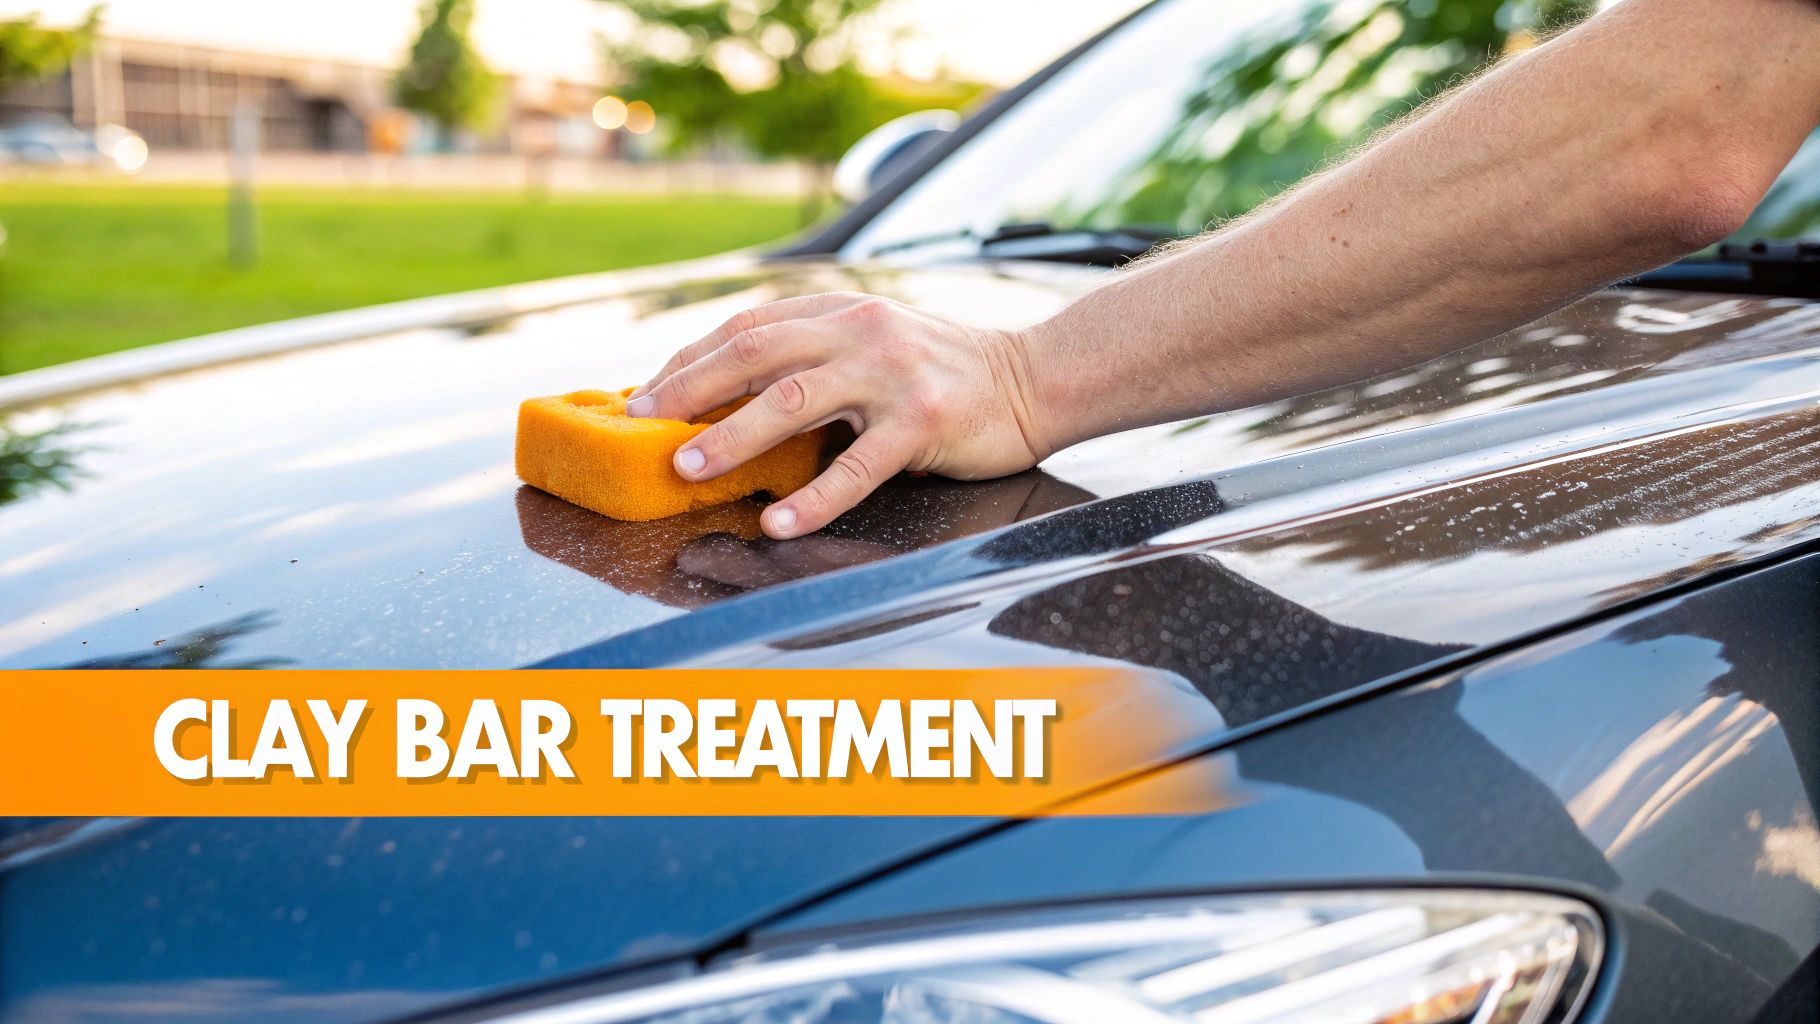
How to Implement a Clay Bar Treatment
Using a clay bar is a straightforward process best performed once or twice a year, or whenever you plan to apply a fresh layer of paint protection. It requires careful technique to avoid marring the paint.
- Preparation: Start with a clean, cool, and dry vehicle, out of direct sunlight. Knead a small piece of the clay bar into a flat patty, about the size of your palm.
- Lubrication is Key: Liberally spray a dedicated clay lubricant or a quick detailer spray onto a small 2x2 foot section of the paint. You cannot use too much lubricant; the clay should glide effortlessly.
- Clay Application: Gently glide the clay patty over the lubricated area in straight-line motions, first vertically and then horizontally. You will feel and hear the clay picking up contaminants. Continue until it glides smoothly and silently.
- Inspect and Fold: Periodically check the clay's surface. When it becomes dirty, fold the clay in on itself and knead it to expose a fresh, clean surface. Crucially, if you drop the clay on the ground, discard it immediately.
Pro Tip: After completing the clay treatment, it's a best practice to perform a light polish on the vehicle. While modern clay bars are very safe, the process can sometimes inflict minor marring. A quick polish will remove any imperfections and dramatically enhance gloss before you apply your final layer of protection.
3. Paint Correction and Polishing
Paint correction is the advanced process of removing surface imperfections from a vehicle's clear coat to restore its original gloss and clarity. This meticulous procedure uses machine polishers and abrasive compounds to permanently remove defects like swirl marks, fine scratches, water spots, and oxidation. Unlike waxes or sealants that merely hide these flaws, paint correction levels the paint surface, creating a flawless, mirror-like finish that significantly enhances the vehicle's appearance.
This process is what separates a good detail from a great one, transforming dull, tired-looking paint into a surface with incredible depth and reflectivity. It is the secret behind the jaw-dropping results seen in high-end detailing shops and classic car restorations. By carefully removing a microscopic layer of the clear coat, detailers can erase years of damage caused by improper washing, environmental fallout, and general wear.
How to Approach Paint Correction
Proper paint correction is a multi-stage process that requires patience, the right tools, and a systematic approach. The key is to start with the least aggressive method necessary to remove the defects, preserving as much of the vehicle’s clear coat as possible.
- Assessment: Begin by thoroughly washing, decontaminating, and claying the paint. Inspect the surface under intense, direct lighting to identify the types and severity of the imperfections you need to correct.
- Test Spot: Always perform a test spot on a small, inconspicuous area (typically 2x2 feet) to dial in your pad and polish combination. Start with a fine polish and a finishing pad before moving to more aggressive options.
- Polishing Technique: Work in small sections using a cross-hatch pattern (overlapping passes in a up-and-down, then left-and-right motion) to ensure even coverage and consistent defect removal. Wipe the panel clean and inspect your work before moving on.
This infographic outlines the typical progression for a multi-stage paint correction.
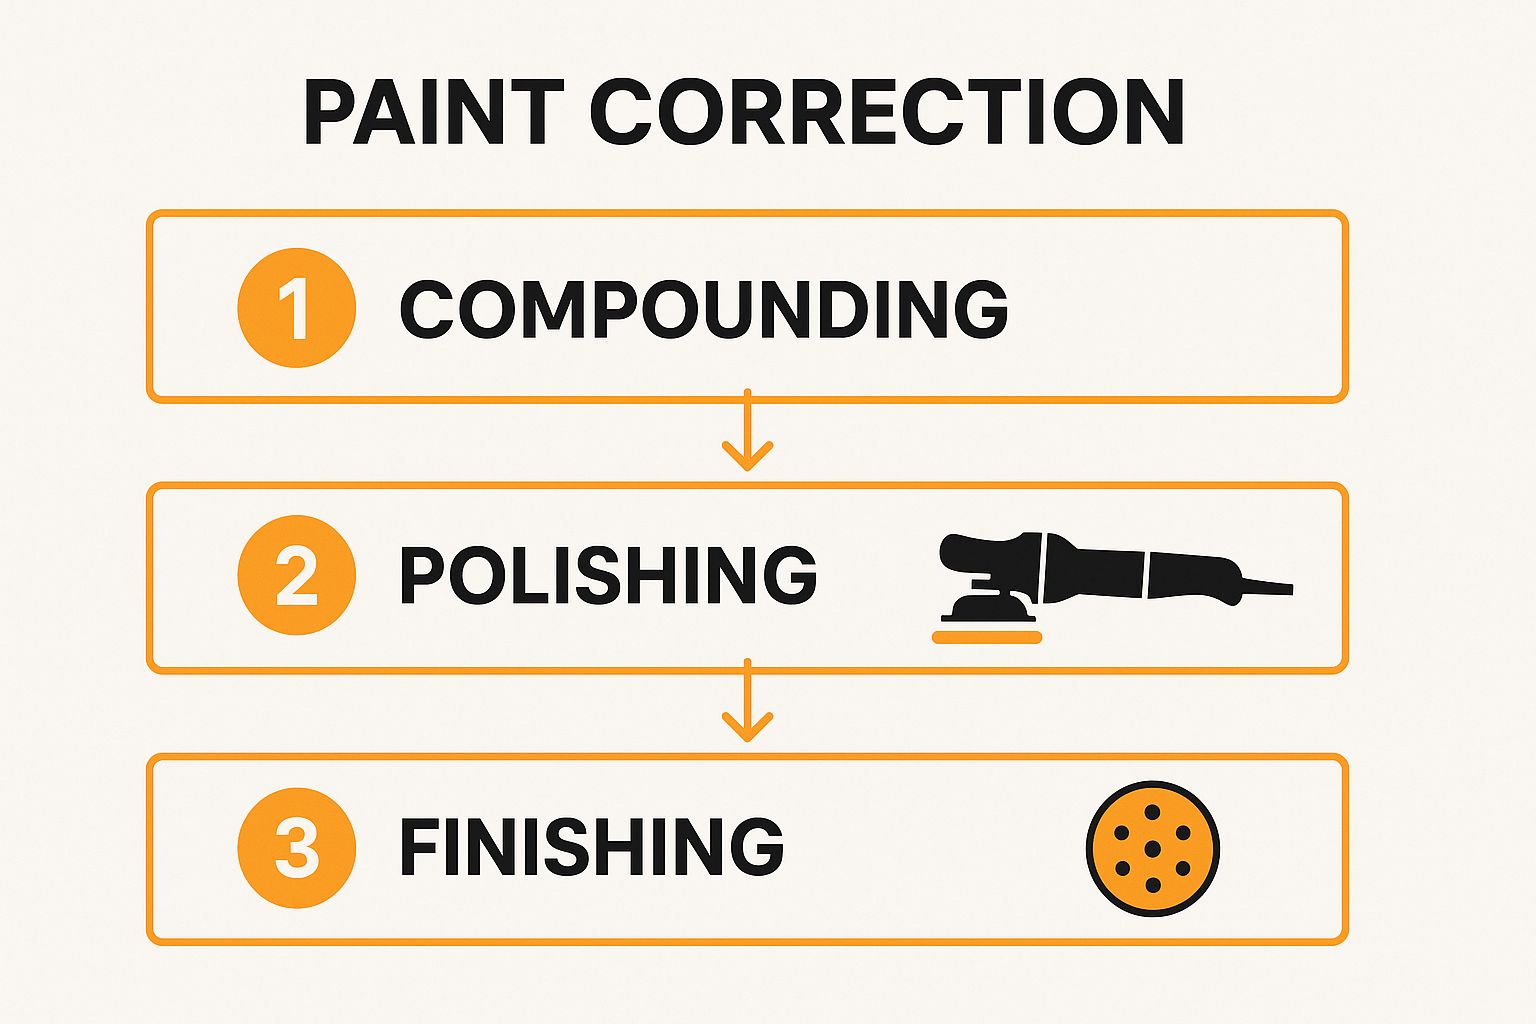
The flow illustrates how you move from the most aggressive stage for heavy defects to the final refining stage to maximize gloss.
Pro Tip: Invest in quality lighting. A dedicated detailing light is one of the most critical automotive detailing tips for paint correction, as it reveals imperfections that are invisible under normal garage lighting or sunlight. You cannot correct what you cannot see. After correction, it's crucial to apply a durable wax, sealant, or ceramic coating to protect the newly perfected finish. For a deeper dive into the specifics, you can learn more about how to polish car paint and protect your work.
4. Interior Deep Cleaning and Protection
Just as important as a flawless exterior is a pristine interior, and this goes far beyond a quick vacuum. A comprehensive interior deep clean is one of the most transformative automotive detailing tips you can master. This process involves systematically cleaning, conditioning, and protecting every surface inside your vehicle, from the headliner down to the carpets, to remove embedded grime, eliminate odors, and prevent premature aging of materials like leather and plastic.
This methodical approach addresses different materials with specific products and techniques. It removes dirt, stubborn stains, and contaminants while restoring the original look and feel of your cabin. Properly protecting surfaces with dedicated conditioners and UV blockers afterward prevents cracking, fading, and discoloration, preserving your car’s value and making future cleanings much easier. The result is a cabin that not only looks new but also feels and smells fresh.
How to Implement Interior Deep Cleaning
A successful interior detail is about process and patience. This service is ideal for rejuvenating a newly purchased used car, preparing a vehicle for sale, or performing a seasonal refresh to maintain a like-new environment. For a deeper dive, explore these pro car interior cleaning tips.
- Preparation and Takedown: Begin by removing all personal belongings, trash, and floor mats. A thorough vacuuming is the essential first step before any wet cleaning begins. Use compressed air to blow debris out of tight crevices like vents and seat tracks.
- Systematic Cleaning: Work from top to bottom. Gently clean the headliner with a dedicated fabric cleaner, then move to vinyl and plastic dashboards, door panels, and the center console. Agitate cleaners on fabric and carpets with a soft-bristled brush to lift embedded dirt.
- Protection and Finishing: After cleaning, treat surfaces with appropriate protectants. Apply a quality leather conditioner to seats and trim to prevent cracking, and use a non-greasy UV protectant, like those from 303 Products, on all plastic and vinyl to prevent sun damage.
Pro Tip: Always test cleaning products on a small, inconspicuous area first to ensure they don't cause discoloration. For stubborn odors from pets or smoke, an enzyme cleaner is highly effective at breaking down the organic sources of the smell rather than just masking them.
5. Ceramic Coating Application
Applying a ceramic coating is one of the most transformative automotive detailing tips for DIY enthusiasts seeking lasting shine and protection. Ceramic coatings, also known as nano-ceramic or glass coatings, chemically bond with a vehicle’s factory clear coat to create a semi-permanent hydrophobic barrier. Once cured, this protective layer resists UV damage, chemical etching, scratches, and environmental contaminants while enhancing gloss and simplifying maintenance.
How to Implement Ceramic Coating Application
Implementing a ceramic coating requires careful attention to environment, surface prep, and application techniques:
- Paint Correction First: Perform a complete paint correction by claying and polishing panels to remove swirl marks, oxidation, and bonded contaminants. Coating bonds to the clear coat, not dirt.
- Controlled Environment: Work indoors or in a garage at 60-80°F with low humidity. Stable conditions ensure even curing and avoid moisture interference.
- Proper Lighting: Use LED inspection lamps to monitor the coating as it bonds. Uniform coverage prevents high spots and streaks.
- Section-by-Section Application: Divide the vehicle into 2×2-foot zones. Apply coating in a crosshatch pattern to each section, then level within the manufacturer’s working time.
- Immediate Leveling: After applying, wipe the panel with a clean microfiber towel within the allotted timeframe to remove excess product and achieve a smooth finish.
- Curing and Layering: Allow an initial cure for at least 24 hours before water exposure. For increased durability, apply multiple thin layers with proper flash time between coats.
- Maintenance Washes: Use pH-neutral shampoos and avoid automatic car washes. Hand wash twice a month with the two-bucket method to preserve hydrophobic performance.
Pro Tip: To accelerate curing, consider using infrared lamps on each panel. This speeds up bonding and ensures optimal durability from professional coatings like CarPro Cquartz or Gtechniq Crystal Serum.
Ceramic coating earns its place in any automotive detailing tips roundup due to its unmatched protective properties, long-term gloss enhancement, and ease of maintenance. For more information, visit https://www.ceramicpro.com.
6. Wheel and Tire Detailing
One of the most impactful automotive detailing tips for transforming your car's appearance is to give proper attention to the wheels and tires. These areas are ground zero for heavy contamination like brake dust, road grime, tar, and iron particles. A dedicated wheel and tire detailing process not only cleans these surfaces but also protects them, preventing permanent damage like pitting, staining, and corrosion.
This specialized approach involves using dedicated cleaners and tools to safely dissolve and agitate stubborn contaminants that a standard car wash soap cannot remove. Because brake dust can etch into a wheel’s clear coat, and road grime can degrade tire rubber, treating them with the right process is essential. This elevates the final look from a simple wash to a true detail, creating a sharp contrast that makes the entire vehicle look cleaner and more valuable.
How to Implement Wheel and Tire Detailing
Always detail your wheels and tires before washing the rest of the car to avoid splashing brake dust and grime onto freshly cleaned paint. This process should be done when the wheels are completely cool to the touch.
- Gather Dedicated Tools: Use separate buckets, wash mitts, and brushes exclusively for your wheels. This is critical to prevent transferring abrasive brake dust to your car's paint. Tools like Wheel Woolies or various-sized boars' hair brushes help you reach tight areas like behind spokes and around lug nuts.
- Apply the Right Cleaner: Select a cleaner appropriate for your wheel's finish (e.g., painted, chrome, polished aluminum). A quality product like Sonax Wheel Cleaner or P&S Brake Buster is designed to break down brake dust safely. Spray the cleaner liberally onto the dry wheel and let it dwell for the recommended time.
- Decontaminate and Agitate: For a deeper clean, use an iron remover like CarPro Iron-X, which turns purple as it chemically dissolves embedded iron particles. Agitate all surfaces with your brushes, then rinse thoroughly.
- Clean and Dress Tires: Scrub the tire sidewalls with a dedicated tire cleaner and a stiff-bristled brush to remove old dressing and browning. Once dry, apply a quality tire dressing like Gyeon Q² Tire, buffing off any excess to prevent sling onto the paint.
Pro Tip: For long-term protection and easier cleaning, apply a dedicated wheel sealant or a ceramic coating. This creates a slick, hydrophobic barrier that repels brake dust and grime, often allowing you to clean the wheels with just soap and water during subsequent washes.
7. Proper Drying Techniques
One of the most essential automotive detailing tips is mastering the drying process, a critical step that prevents water spots and swirl marks from ruining a freshly cleaned finish. Improper drying can instantly undo all the hard work of a careful wash, as tap water contains minerals that, when left to evaporate, etch into the clear coat and create unsightly spots. Professional drying methods minimize physical contact and remove water quickly to ensure a flawless, streak-free result.
The goal is to remove all standing water from the vehicle’s surface before it can air-dry. This is achieved by using a combination of high-quality tools like plush microfiber towels and dedicated air blowers. By safely whisking away water, you preserve the paint’s clarity and depth, avoiding the micro-scratches caused by dragging a low-quality or dirty towel across the surface. This final touch is what separates an amateur wash from a professional detail.
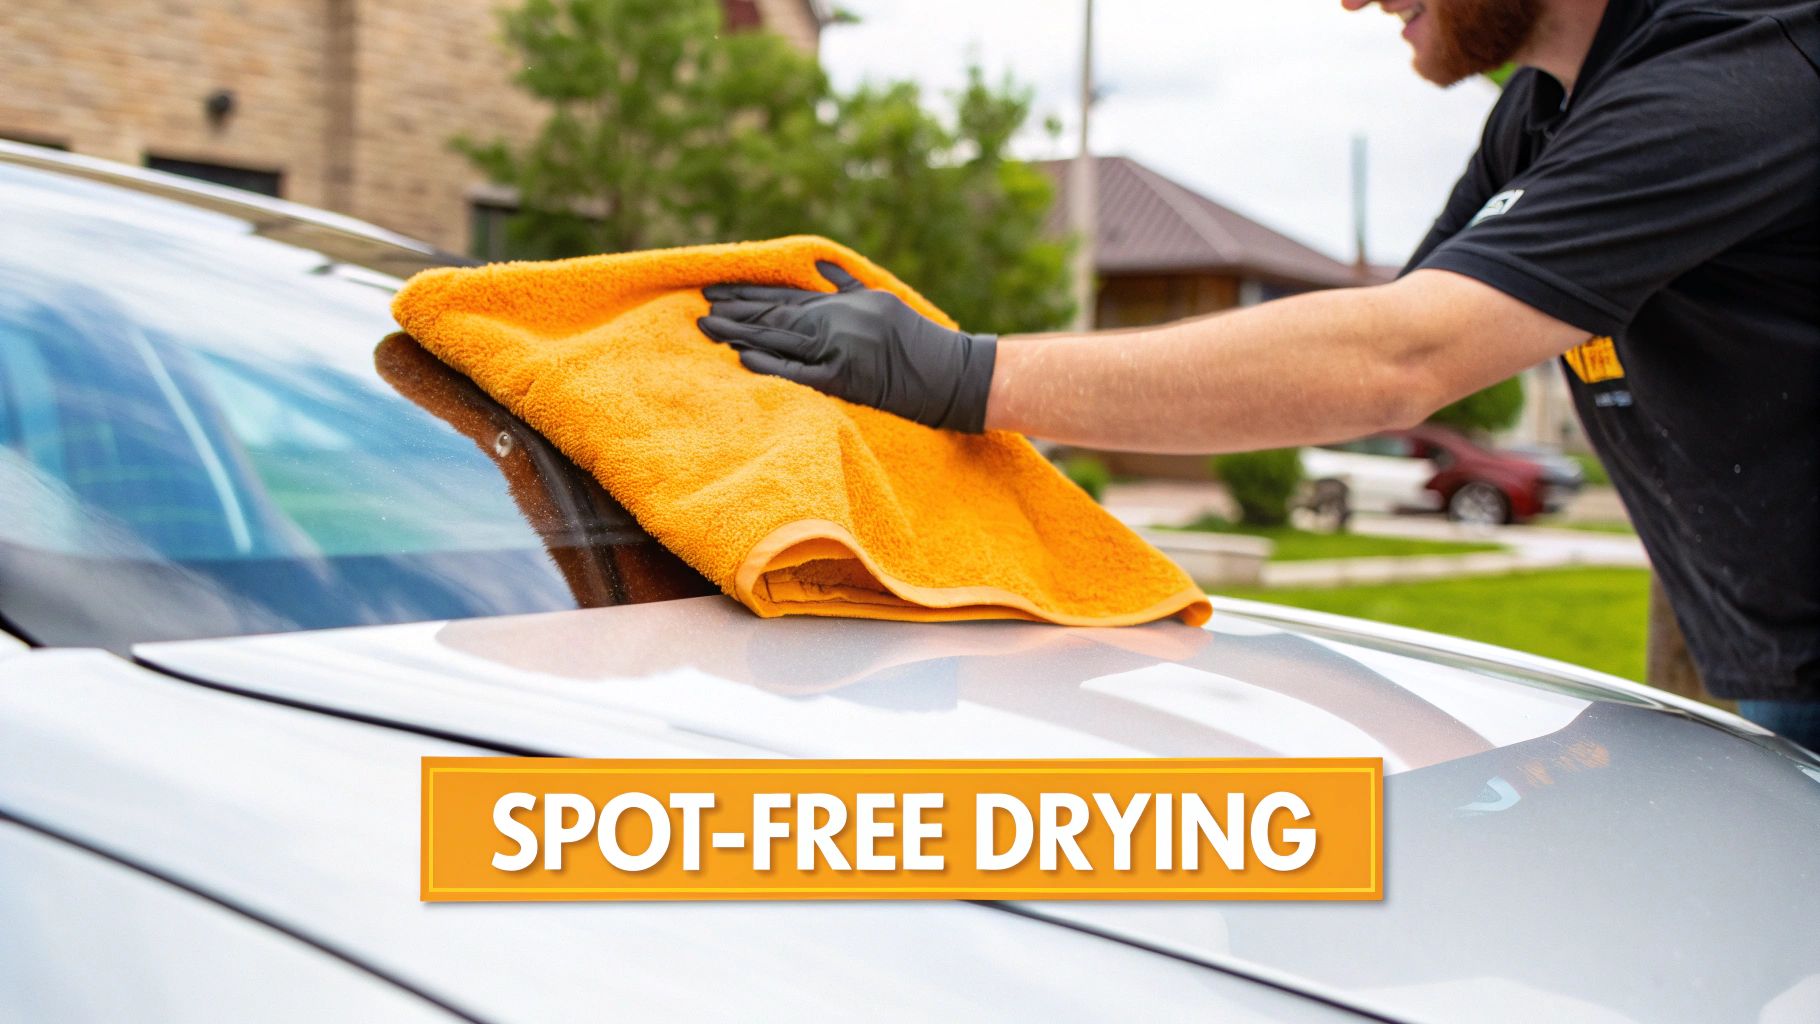
How to Implement Proper Drying Techniques
Adopting a professional drying strategy is crucial after every wash to maintain your vehicle’s pristine condition. The key is to work quickly and with the right tools, always prioritizing the softest touch possible.
- Blow-Dry First: Use a dedicated car dryer or even a leaf blower to force the majority of water off the paint and out of tight spaces like mirrors, grilles, and emblems. This "touchless" drying step removes a significant amount of water without any physical contact, drastically reducing the risk of scratching.
- Blot, Don’t Wipe: Lay a large, high-GSM (grams per square meter) microfiber drying towel, like those popularized by The Rag Company, flat on the panel and gently pat or blot the remaining water. Avoid dragging the towel, which can pull hidden grit across the paint.
- Use a Drying Aid: Lightly mist a drying aid or quick detailer spray onto a panel before toweling. This provides lubrication for the towel, further reducing friction and adding a layer of protection and gloss.
Pro Tip: To make drying even easier and safer, consider a final rinse with deionized or filtered water. This removes the minerals responsible for water spots, giving you more time to dry the vehicle perfectly without the risk of spots forming, especially when working in warm or sunny conditions. For more in-depth methods, explore these top tips for a spotless finish.
8. Paint Protection Film (PPF) and Vinyl Wrap Care
Protecting your vehicle with Paint Protection Film (PPF) or a vinyl wrap is a significant investment in its appearance and longevity. These specialized materials require specific care techniques that differ from traditional paint maintenance. PPF is a durable, clear urethane layer that shields against rock chips and scratches, while vinyl wraps offer custom aesthetics and a protective barrier. Proper care is essential to preserve their finish and protective qualities.
Understanding that these films are not paint is the first step. They have unique chemical sensitivities and physical properties, such as self-healing capabilities, that demand a tailored approach. Using the wrong products or methods can lead to discoloration, premature lifting, or permanent damage, nullifying the benefits of your investment. Adhering to a dedicated care regimen is one of the most critical automotive detailing tips for wrapped vehicles.
How to Maintain PPF and Vinyl
Proper maintenance extends the life of your film, keeping it looking pristine and ensuring it continues to protect the paint underneath. These steps should become a regular part of your cleaning routine.
- Gentle Washing: Always hand wash using the two-bucket method and a pH-neutral car soap. Avoid harsh chemicals and degreasers, as they can degrade the film's top coat and adhesive. Never use abrasive polishes or compounds.
- Edge and Seam Awareness: When using a pressure washer, maintain a safe distance and never aim the spray directly at the edges or seams of the film. This can cause lifting and allow water and contaminants to get underneath.
- Prompt Stain Removal: Immediately clean contaminants like bird droppings, bug splatter, and tree sap. Their acidic nature can permanently etch or stain the film if left to bake in the sun.
- Utilize Self-Healing: Many modern PPF products have self-healing properties. Minor swirls and light scratches can often be removed by parking the car in the sun or gently applying heat with a heat gun to the affected area.
Pro Tip: Apply a ceramic coating specifically designed for PPF and vinyl, such as Gtechniq HALO or Ceramic Pro PPF. This creates a hydrophobic, slick surface that makes cleaning significantly easier, enhances gloss, and provides an additional layer of UV and chemical resistance.
Automotive Detailing Tips Comparison Guide
| Item | Implementation Complexity 🔄 | Resource Requirements ⚡ | Expected Outcomes 📊 | Ideal Use Cases 💡 | Key Advantages ⭐ |
|---|---|---|---|---|---|
| Two-Bucket Wash Method | Moderate - requires setup of two buckets and grit guards | Low - two buckets, grit guards, mitt, soap | Reduces swirl marks, safer paint cleaning | Routine exterior washing, beginner to professional | Cost-effective, reduces paint marring |
| Clay Bar Treatment | Moderate - requires technique, lubricant, and time | Medium - clay bar, lubricant/detail spray | Removes bonded contaminants, smooth surface | Paint decontamination before polishing or coating | Removes contaminants regular wash can't |
| Paint Correction & Polishing | High - multi-stage, machine and compound use | High - polishers, pads, compounds, lighting | Restores gloss, removes defects | Severe paint defects, prepping for protection | Dramatic defect removal, long-lasting results |
| Interior Deep Cleaning | Moderate to High - multiple steps and products | Medium to High - specialized cleaners, extraction tools | Removes dirt, stains, odors, protects materials | Deep interior maintenance for comfort, resale | Improves air quality, extends material life |
| Ceramic Coating Application | High - requires prep, controlled environment | High - coating product, correction tools | Long-lasting protection, enhanced gloss | Long-term paint protection, luxury/exotic cars | Durable protection, ease of maintenance |
| Wheel and Tire Detailing | Moderate - specialized cleaners and brushes needed | Medium - wheel cleaners, brushes, dressings | Cleans, protects wheels and tires | Regular wheel care, performance and appearance | Prevents corrosion, improves aesthetics |
| Proper Drying Techniques | Low to Moderate - requires correct tools and method | Low to Medium - drying towels, air blowers | Spot-free finish, prevents swirl marks | Final stage of washing to avoid water damage | Minimizes water spots, protects paint/correction |
| Paint Protection Film (PPF) & Vinyl Wrap Care | High - specialized products and careful maintenance | High - PPF-safe cleaners, coatings, edge care | Preserves film integrity, prevents damage | Protection for high-wear areas, color change wraps | Self-healing, protects paint, easy maintenance |
Elevate Your Detail: The Road to a Perfect Finish
The journey from a simple car wash to a full-fledged automotive detail is one of precision, patience, and passion. Throughout this guide, we've explored the foundational techniques and advanced strategies that separate a decent clean from a stunning, showroom-quality finish. From mastering the Two-Bucket Wash Method to prevent swirls to understanding the transformative power of Paint Correction and Polishing, you now have a comprehensive roadmap to achieving professional-grade results right in your own driveway.
True mastery of these automotive detailing tips lies in understanding that each step builds upon the last. A flawless ceramic coating application, for instance, is only possible after meticulous paint decontamination with a clay bar and thorough polishing. Similarly, pristine wheels and tires amplify the impact of a perfectly detailed body, while a deeply cleaned and protected interior completes the experience, creating a vehicle that feels as good to be in as it looks from the outside.
Key Takeaways for Your Detailing Journey
To truly elevate your skills, focus on these core principles:
- Process Over Speed: Rushing through a detail is the fastest way to introduce imperfections. Adhere strictly to processes like using separate wash and rinse buckets, applying products in the shade, and allowing protectants proper time to cure.
- The Right Tool for the Right Job: Investing in quality microfiber towels, dedicated brushes for wheels and interiors, and effective applicators is not an expense; it's an investment in your vehicle's finish. As we've seen, tools like a quality foam gun for the pre-wash stage can dramatically reduce the risk of scratching.
- Consistency is Crucial: A single, perfect detail is impressive, but consistent care is what preserves a vehicle’s value and appearance long-term. Incorporate these techniques into a regular maintenance schedule to prevent dirt, grime, and environmental contaminants from causing permanent damage.
Your Path to a Flawless Finish
Embarking on this journey transforms car care from a weekend chore into a rewarding craft. It’s an opportunity to connect with your vehicle on a deeper level, taking pride in every gleaming panel and spotless surface. You are no longer just washing a car; you are preserving an asset, restoring its beauty, and protecting it from the elements.
Start small. Introduce one new technique from this guide into your next wash, whether it's the clay bar treatment or a more methodical interior cleaning process. As your confidence and skills grow, you'll find that achieving that head-turning, mirror-like shine is not only possible but also incredibly satisfying. The road to a perfect finish is paved with attention to detail, and you now have all the signposts you need to get there.
Ready to revolutionize your wash process and achieve a safer, more effective clean? Equip yourself with the SwiftJet foam gun to apply a thick, lubricating layer of foam that lifts dirt before you even touch the paint. Explore the difference a professional-grade pre-wash can make by visiting SwiftJet today.