
The 2 bucket method wash isn't just a fancy trick—it's a professional detailing technique that’s non-negotiable for anyone serious about protecting their car's paint. By simply separating your clean, soapy water from your dirty rinse water, you dramatically cut down on swirl marks and scratches.
It’s a straightforward approach that ensures only a clean wash mitt ever touches your car, preserving that deep, glossy finish we all chase.
Why Pros Swear By the Two Bucket Wash Method
Ever wonder how professional detailers get that flawless, mirror-like shine every single time? The secret isn't some rare, expensive potion. It's all about their process, and it starts with avoiding the single biggest mistake most of us make: washing a car with dirty water.
Think about it. Using just one bucket means you're dipping your mitt back into a soup of abrasive grit, road grime, and all the other gunk you just pulled off the car. You’re essentially turning your wash mitt into a piece of fine-grit sandpaper, dragging those contaminants right back across your paint.
This is exactly how those frustrating swirl marks are born. They're just thousands of tiny, microscopic scratches that build up over time, robbing your paint of its clarity and depth.
To give you a clearer picture, let's break down the core differences.
Single Bucket vs Two Bucket Wash At a Glance
Here’s a quick comparison that highlights why making the switch is so important for your vehicle's long-term health.
| Feature | Single Bucket Method | Two Bucket Method |
|---|---|---|
| Water Contamination | High. Dirt and suds mix, contaminating the wash mitt. | Low. Separate buckets for soap and rinse keep grit isolated. |
| Scratch & Swirl Risk | Very High. Abrasive particles are reapplied to the paint. | Minimal. The mitt is cleaned before reloading with fresh soap. |
| Paint Finish | Tends to dull the finish and create visible imperfections over time. | Preserves clarity, gloss, and depth for a professional look. |
| Efficiency | Seems faster, but leads to paint correction work later. | Adds a few seconds per panel but prevents costly damage. |
As you can see, the two-bucket method is less of a preference and more of a best practice for anyone who wants to avoid damaging their paint.
The Power of Separation
The 2 bucket method wash is the gold standard for a reason. This technique, championed by detailers everywhere, is designed from the ground up to minimize paint damage. One bucket holds your car shampoo, and the other is filled with plain, clean water just for rinsing your wash mitt.
This separation is the whole game.
After cleaning a section of your car, you dunk the dirty mitt into the clean water rinse bucket first. This is where you agitate it to dislodge all that harmful grit and debris before you even think about getting more soap. Only then do you dip it into the suds bucket. This simple discipline ensures only clean, lubricated suds touch your paint on every pass.
The core idea is simple yet powerful: Never introduce dirt back into your clean soap. This is the foundation of paint preservation and the first step toward a truly professional-looking finish.
Preventing Damage Before It Starts
Every swirl mark you see on a car is just a tiny scratch in the clear coat. They might seem minor on their own, but their cumulative effect is what makes a car look aged and neglected. The two-bucket method is all about being proactive—it's about preventing this damage before it even has a chance to start.
If your car's paint is already showing signs of wear and tear, it's not too late. You might find our guide on how to remove swirl marks from car paint really helpful for restoring its appearance.
But moving forward, adopting this washing technique is the single most impactful change you can make. It's the best way to stop creating new imperfections, helping you maintain your vehicle's value and stunning looks for years to come.
Getting Your Detailing Gear in Order
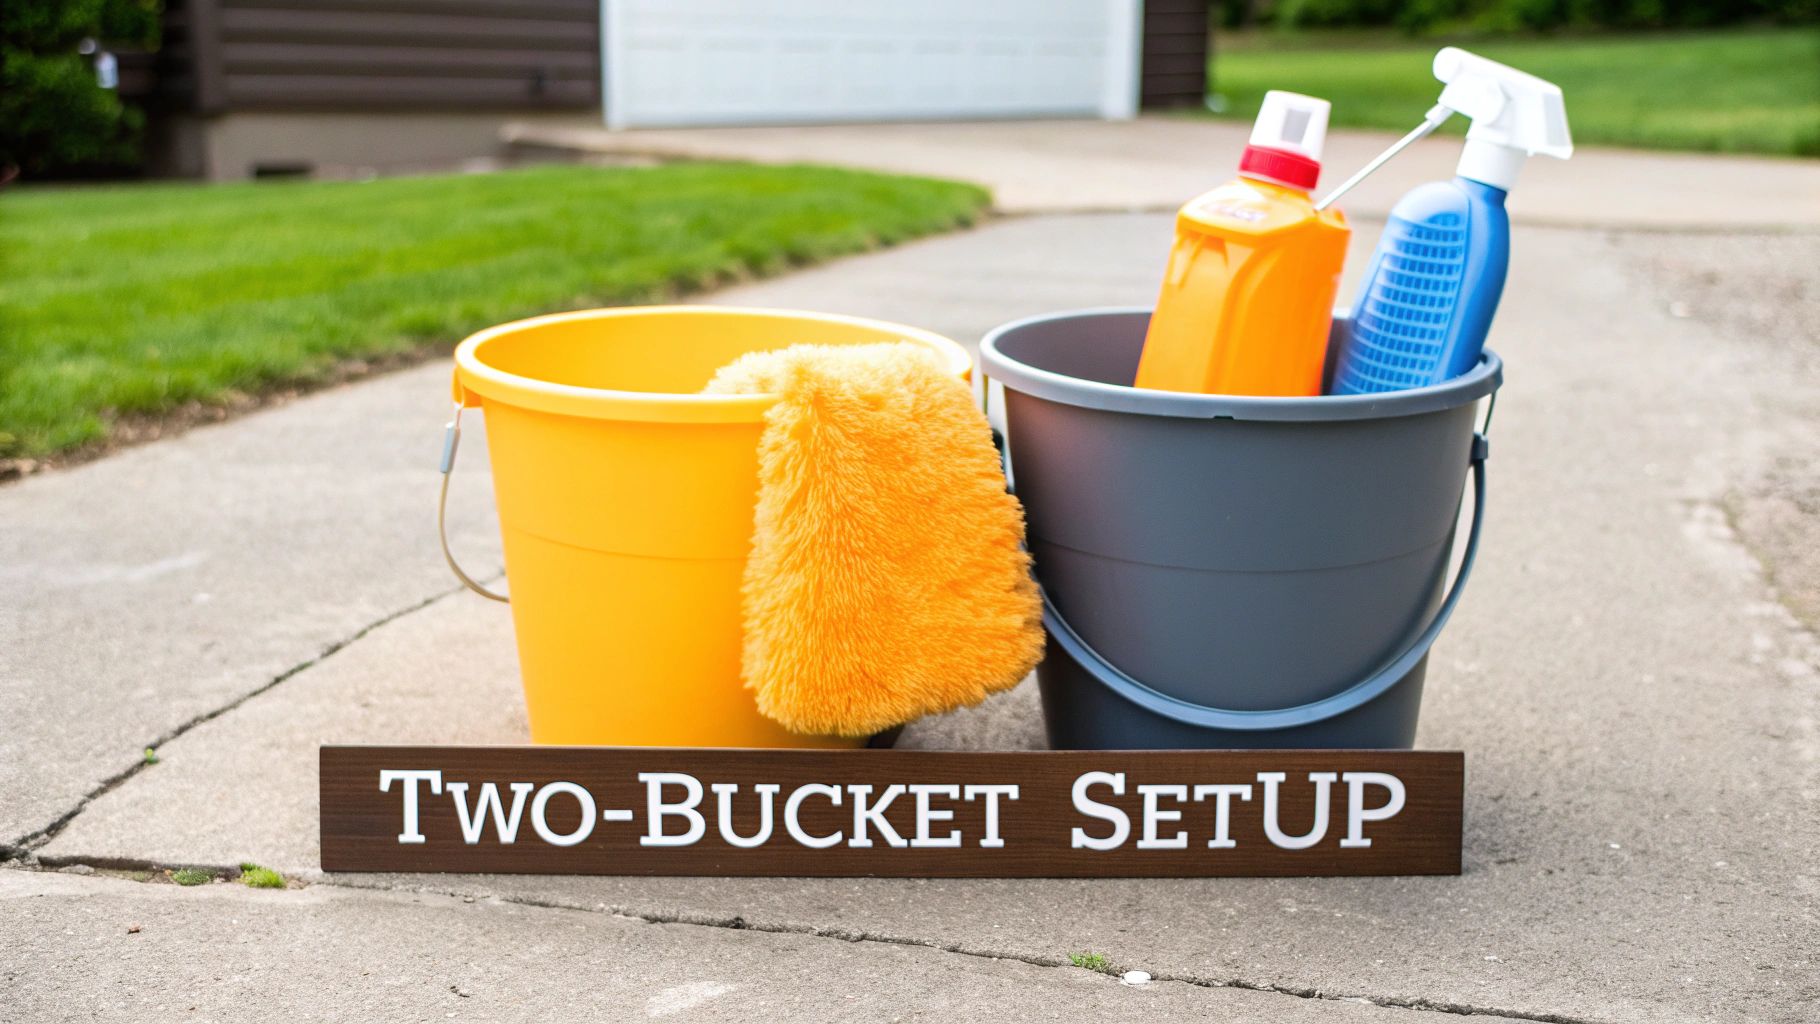
If you want to master the 2 bucket method wash, you've got to start with the right tools. I've seen it time and time again—investing in the right gear isn't just about making the job easier; it’s about actively protecting your car's paint from preventable damage. This is your definitive checklist for getting that professional-level shine, and I’ll explain exactly why each piece is so important.
The absolute cornerstone of this whole process is a pair of 5-gallon buckets. You might be tempted to grab something smaller, but that's a mistake. This size gives you plenty of water to get the soap dilution right and, more importantly, gives your wash mitt the space it needs to drop all the grime it's picked up. A smaller bucket just concentrates all that dirt, completely undermining what we're trying to accomplish.
Your Must-Have Tools for a Flawless Wash
Let’s talk about what goes in those buckets. Grit Guards are completely non-negotiable. These are simple plastic grates that sit at the bottom, creating a false floor. As you dunk your mitt, the grid scrapes off the dirt, which then settles safely underneath. This one simple tool is probably the single best defense you have against swirl marks.
Next up is your wash mitt. Please, throw out those old yellow sponges. They are notorious for trapping a piece of grit on their flat surface and then dragging it all over your paint. What you need is a high-quality, plush microfiber wash mitt. Its long, soft fibers are designed to pull dirt and debris deep inside, lifting it safely away from the finish.
The soap you choose is just as critical. You absolutely have to use a pH-neutral car shampoo. Household cleaners like dish soap are way too aggressive; they’re designed to strip grease and will do the same to your wax, sealant, or ceramic coating. A proper car soap gently cleans the dirt while leaving your paint’s protection intact, which saves you a ton of work down the line.
Remember, the goal is to clean the surface, not strip it bare. A quality pH-neutral soap provides excellent lubrication, allowing your mitt to glide safely across the paint with minimal friction.
Finally, don't ruin all your hard work with a bad drying technique. Old bath towels and traditional chamois can be surprisingly abrasive and cause micro-scratches. The right tools here are key:
- Large, plush microfiber drying towels: These things are incredibly absorbent. The trick is to blot the water or gently drape the towel and pull it off—don't wipe aggressively.
- Waffle-weave towels: I swear by these for glass. They leave a perfectly clear, streak-free finish without leaving any lint behind.
Getting your kit dialed in from the start makes all the difference. If you're looking for a more exhaustive checklist for your garage, check out our full car detailing supplies list for more of our top picks.
The Two-Bucket Wash in Action
Alright, you've got your gear ready to go. Now it's time to put it all together and see why this method is the gold standard for a safe, swirl-free wash. I’m going to walk you through the exact process I use, turning a weekend chore into a satisfying ritual that actually protects your car’s finish.
Let's start with the most critical, non-negotiable step: the pre-rinse. Never, ever take a wash mitt to a dry, dirty car. That's a one-way ticket to scratches. Grab your hose or pressure washer and give the entire vehicle a thorough rinse to knock off all the loose dirt, dust, and grime. I always spend extra time on the lower panels, behind the wheels, and on the bumpers—these spots are magnets for the nastiest, most abrasive debris. This simple rinse does half the cleaning for you before you even touch the paint.
Start at the Top and Work Your Way Down
With the loose stuff gone, you can start the actual wash. The golden rule is simple: work from the top down. Gravity is your best friend here. You want to clean the least dirty parts first (roof, windows, hood) and save the grimiest areas for the very end.
Think about it—if you start scrubbing the rocker panels, you're just going to drag all that heavy road filth up onto the doors and fenders. Working from the top ensures all the dirt and soap suds flow down and off the vehicle, keeping your wash water and your mitt cleaner for longer.
This is where the magic really happens. The thick, lubricated suds are your primary defense against scratching.
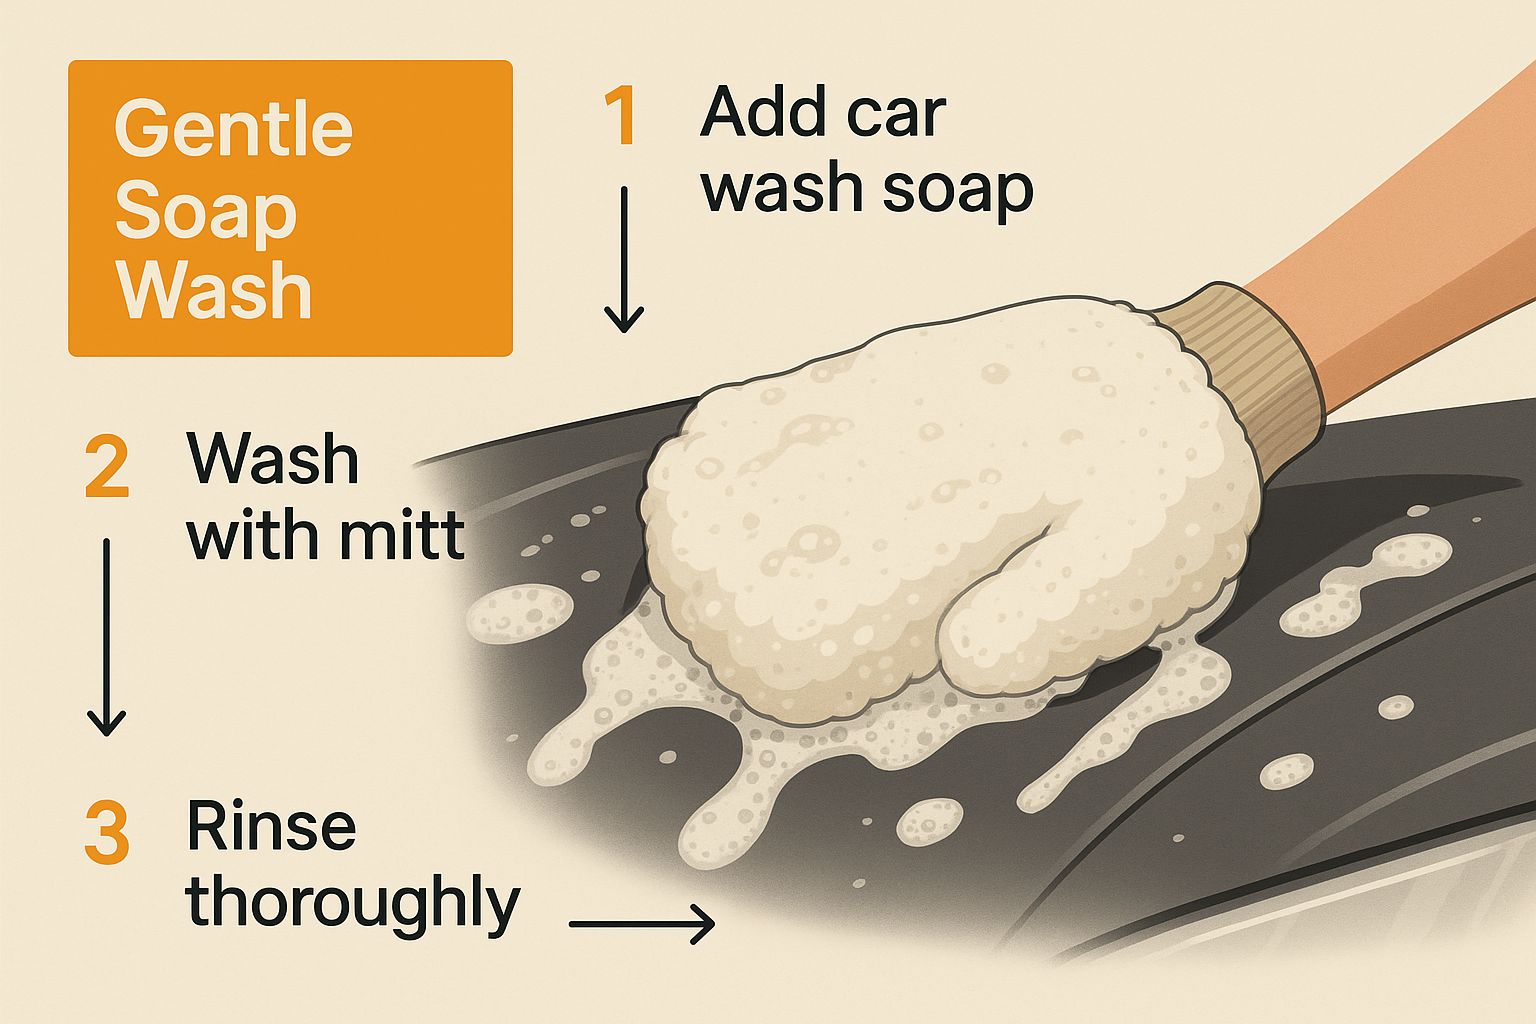
The whole point is to let that slick foam lift the dirt away, allowing your mitt to glide effortlessly instead of grinding grit into the clear coat.
Finding Your Rhythm
Now for the core of the 2 bucket method wash. This is the cycle you'll repeat for every single panel, and consistency is what makes it work so well.
- Load Up: Start by dunking your clean microfiber mitt into the soap bucket. Get it completely saturated with fresh, foamy suds.
- Wash One Panel: Gently wash a small section, like one door or half the hood. I always recommend using straight-line motions, not circles. If any fine scratches happen to occur, they're far less visible than circular swirls.
- Rinse the Mitt: Here's the crucial part. Before you even think about getting more soap, plunge that dirty mitt into your rinse bucket.
- Scrub it Clean: Vigorously rub the mitt against the Grit Guard at the bottom. You’ll literally see the dirt and grit fall out of the fibers and get trapped safely below the guard.
- Reload and Go Again: Now that your mitt is clean, you can go back to the soap bucket, load up on fresh suds, and move on to the next panel.
This disciplined cycle is the heart and soul of the two-bucket method. By dunking and scrubbing in the rinse bucket after every single panel, you stop cross-contamination in its tracks and guarantee that only clean, lubricated suds are touching your paint.
Think of your rinse bucket as a filter. Every time you clean your mitt, you're resetting the process and preventing the dirt from one panel from scratching the next. It’s a simple extra step that makes a world of difference.
This isn't just theory, either. Detailing pros and studies have shown that strictly separating your wash and rinse water is incredibly effective. A proper two bucket washing method can slash the risk of new swirl marks and micro-scratches by an estimated 50-75% compared to a sloppy one-bucket wash. It’s powerful proof of how this process stops dirt from being dragged across your paint. For more deep dives into paint protection, check out this informative detailing channel.
Embracing this methodical approach transforms your car wash from a potential damage zone into a protective maintenance routine. It’s the single most important habit you can adopt to keep your vehicle’s paint looking its absolute best for the long haul.
The Washing Mistakes You Absolutely Have to Avoid
Knowing how to do a proper 2 bucket method wash is one thing, but knowing what not to do is what really separates the beginners from the pros. I see it all the time—well-meaning car owners accidentally creating more work for themselves, or worse, damaging their paint, just by making a few common mistakes.
Let’s break down the most frequent slip-ups and how you can steer clear of them for a flawless finish.
One of the biggest blunders is washing your car in direct sunlight or while the panels are still hot. Heat is the enemy here. It causes the water and soap to evaporate almost instantly, which creates two huge problems. First, you lose all the suds and lubrication that let your wash mitt glide safely over the paint. Second, it leaves behind nasty mineral deposits, which turn into stubborn water spots that can actually etch into your clear coat.
Pro Tip: Do yourself a favor and wash in the shade or wait for a cooler time of day, like the early morning or late evening. If you absolutely have to wash in the sun, work on one small panel at a time and rinse it immediately before the soap has a chance to dry.
Bad Tools, Bad Results
Using the wrong stuff is another classic mistake. I can't tell you how many times I've seen people reach for dish soap. This is probably one of the worst things you can do. That soap is a powerful degreaser designed to strip grease off a dinner plate, and it will do the exact same thing to your car—stripping away any wax or sealant and leaving your paint totally unprotected.
Then there's the dreaded moment we've all experienced: dropping the wash mitt. The rule here is simple and non-negotiable: if it hits the ground, it's done for the day. It doesn't matter if it was for a split second. That mitt is now covered in tiny bits of grit and sand. Using it again is like taking a piece of fine-grit sandpaper to your finish. Keep a spare mitt handy for this very reason.
Your Technique Makes All the Difference
Even with the best gear, a poor technique will hold you back. A common shortcut is using the same bucket and mitt for the entire car, wheels included. That's a surefire way to scratch your paint. Your wheels are covered in some of the worst stuff imaginable—gritty road grime and highly abrasive brake dust.
- A Bucket Just for Wheels: You need a completely separate setup for your wheels and tires. Get a dedicated bucket, a few brushes, and a separate wash mitt that only touch the wheels. This is critical to avoid cross-contamination and keep that metallic brake dust far away from your paintwork.
- The Right Way to Dry: Don't just grab an old towel and start rubbing the car down. Aggressively wiping, even with a good microfiber towel, can introduce fine swirls and scratches. The best method is to blot dry. Take a high-quality, plush drying towel, lay it flat on a panel, and gently pat it to absorb the water. Then, lift it off and move to the next section. It's a gentle, friction-free way to get the car dry and keep that finish perfect.
Weaving a Foam Cannon Into Your Wash Routine

If you're already committed to the 2 bucket method wash, you're serious about protecting your car's paint. The next logical step, and one of the best upgrades you can make, is introducing a foam cannon like the SwiftJet into the mix.
Let's be clear: a foam cannon doesn't replace your two buckets. Instead, it supercharges the process by acting as a critical pre-wash stage. Its entire purpose is to safely loosen the heavy, caked-on grime before your wash mitt ever touches the paint.
The thick foam clings to the surface, dissolving and softening all those nasty, abrasive particles. When you rinse the foam away, most of that potentially scratching grit goes with it—all without any physical contact. This is your best defense against swirl marks, especially when you're starting with a really dirty vehicle.
Getting the Pre-Wash Just Right
Using a foam cannon is pretty intuitive. Your goal is a thick, rich foam—think shaving cream consistency—that sticks to the car's vertical panels instead of just sliding off. This "dwell time" is what gives the soap a chance to work its magic and break down the grime.
For this to happen, you'll need a proper foam cannon soap, which is specifically designed to create those ultra-thick suds. Let the foam sit on the car for about 3-5 minutes. The key is to rinse it off before it starts to dry, which is especially important if you're washing in the sun or on a warm day.
The real win with a pre-wash foam is how little work is left for your wash mitt. By getting the worst of the grit off the car first, the main two-bucket wash becomes exponentially safer and easier.
This focus on paint safety is why so many enthusiasts have adopted this method. In fact, studies show that a proper hand wash using two buckets can slash paint damage by up to 70% compared to corner-cutting techniques. It’s a practice valued by car owners globally, a fact supported by industry data from groups like the International Carwash Association.
Dialing In That Perfect Foam
Nailing the perfect foam consistency comes down to a simple balancing act between three variables. Once you get the hang of it, you’ll be getting pro-level results right in your own driveway.
- Soap-to-Water Ratio: Always start with what the soap bottle recommends. It's usually around 1-2 ounces of soap for every 10 ounces of warm water in your cannon's bottle. From there, you can experiment to get thicker or thinner foam.
- Pressure Washer Output: The GPM (gallons per minute) of your pressure washer plays a big role. Generally, machines with a higher GPM will produce a richer, denser foam.
- Foam Cannon Adjustments: Your SwiftJet has two main controls. The top knob adjusts the soap-to-water mixture, and the nozzle at the front lets you change the spray pattern from a direct stream to a wide, paint-covering fan.
Don't be afraid to play with these settings. A little experimentation is all it takes to get your setup dialed in. Soon you'll be blanketing your car in a thick layer of protective suds, making your 2 bucket method wash safer and more satisfying than ever. For a more detailed walkthrough, don't miss our complete foam cannon for car washing setup guide.
Answering Your Questions About the 2-Bucket Method
Even with the steps laid out, you probably have a few questions. That's a good thing—it means you're thinking like a pro. Let's tackle some of the most common things people ask so you can get started with confidence.
Do I Really Need Grit Guards in My Buckets?
Yes. Full stop. Think of them as cheap insurance for your paint job.
Sure, you could technically do the wash without them, but you’d be missing the whole point. The Grit Guard creates a false bottom in the bucket, acting as a washboard to release dirt and a barrier to trap it underneath.
Without one, every time you dunk your wash mitt into the rinse bucket, you risk picking up the same sharp bits of grit you just washed off and dragging them right back across your car's finish. For a few bucks, they make your wash infinitely safer. Skipping them is like trying to run a marathon in flip-flops—you just shouldn't do it.
A Grit Guard is the key to isolating contaminants. Once that dirt is off your mitt, it needs to stay at the bottom of the bucket, period. That's what this little plastic disc does so well.
How Often Should I Change the Rinse Water?
The honest answer? When it looks dirty. There’s no magic number here because it all comes down to how filthy your car is.
If you're just washing off a week's worth of light dust, you’ll likely get through the whole car with the same bucket of rinse water. But if you're tackling a 4x4 caked in mud or a daily driver covered in winter road salt, you have to be more proactive.
Here's a good way to judge:
- Do a visual check. After you finish the dirtiest parts of the car—usually the lower panels behind the wheels—take a look at your rinse bucket.
- If it's murky, dump it. Can you still see the Grit Guard clearly at the bottom? If the water is cloudy and opaque, it's time for a refill.
Don't be lazy about this. A clean rinse bucket is the core of this whole process. Fresh water costs nothing, but a single deep scratch can be a real pain to fix.
Can I Use This Method for a Rinseless Wash?
That’s a common point of confusion, but the answer is no, not really. The two-bucket system is built for a traditional wash where you have a hose for a full pre-rinse and final rinse.
Rinseless and waterless washes are completely different animals. They use specialized polymers to encapsulate and lift dirt safely, relying on a technique with multiple microfiber towels and often just a single bucket of solution.
Trying to mix and match these methods just makes things complicated and less effective. You'd lose the benefits of both. Stick to the script: if you're using a rinseless wash product, follow its specific directions. If you're doing a traditional wash with soap and water, the two-bucket method is your go-to.
Ready to take your car wash from a weekend chore to a paint-preserving ritual? The SwiftJet Foam Gun is the perfect first step in your two-bucket routine. It lays down a thick blanket of pre-wash foam that loosens and lifts the heavy, abrasive grit before your wash mitt ever touches the paint.
Grab your SwiftJet today and see the difference a safer clean makes.