
So, you’ve noticed those frustrating spiderweb-like scratches on your car’s paint, especially under direct sunlight. The only real way to get rid of them is through a process called paint correction. This involves using a machine polisher and a specialized compound to ever-so-gently level out your car's clear coat.
Think of it as a permanent fix. We're actually removing the microscopic scratches, not just filling them in with a wax that will wash away in a few weeks.
What Are Swirl Marks, Anyway?
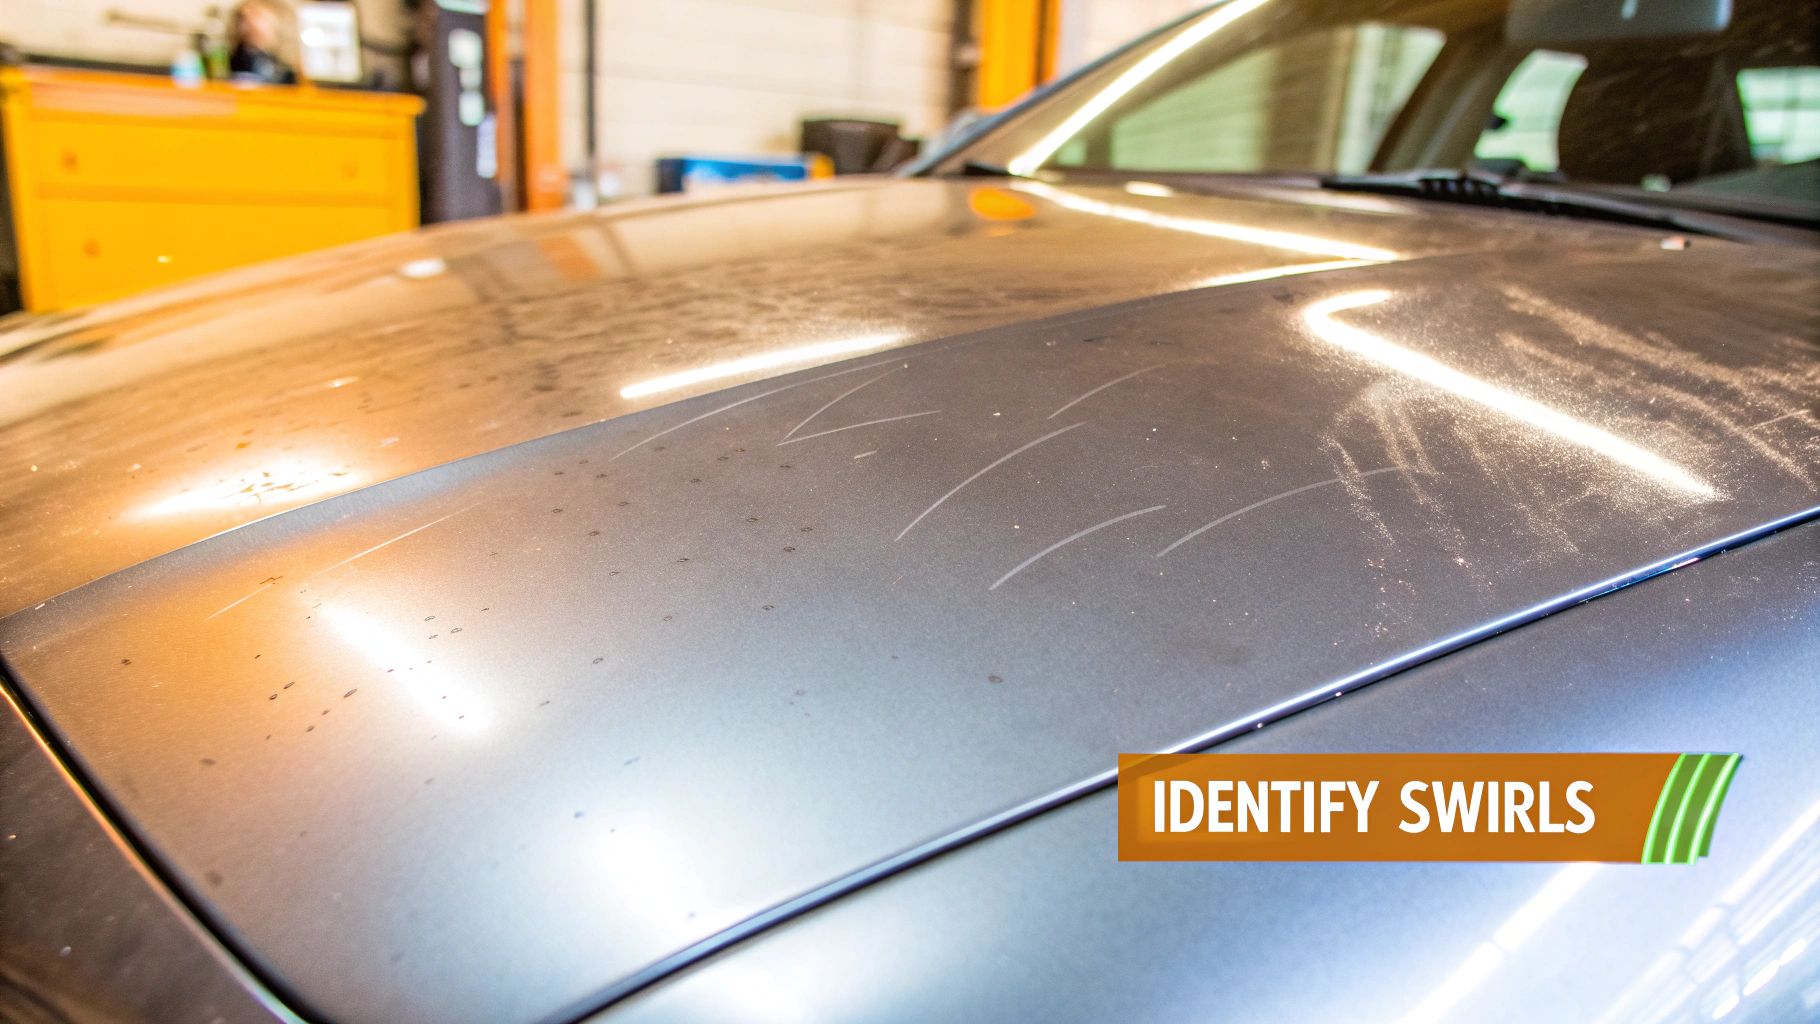
Before we can tackle the problem, let's get a clear picture of what we're dealing with. Swirl marks are just thousands of incredibly fine scratches on your car's outermost layer of paint—the clear coat. When a bright light hits these scratches, it bounces off in all directions, creating that ugly hologram effect that makes your paint look dull and hazy.
The hard truth is, these marks are almost always self-inflicted. They come from improper washing and drying techniques. Once you know what causes them, you can prevent them from coming back after you've spent all that time making your paint perfect again.
The Usual Suspects Behind Swirl Marks
More often than not, the culprits are part of what seems like a normal car wash routine. Here's what to watch out for:
- Automated Car Washes: Those giant, spinning brushes might seem convenient, but they're incredibly abrasive. They pick up dirt and grit from every car that goes through and then slap it all over your paint.
- Poor Hand-Washing Habits: Using just one bucket means you're dunking your wash mitt back into dirty water. A gritty sponge or an old bath towel for drying will trap abrasive particles and drag them right across the clear coat.
- Wiping a Dry, Dusty Car: It's tempting to quickly dust off your car with a dry towel, but this is one of the fastest ways to create a mess of fine scratches.
My Go-To Inspection Tip: Grab your phone and head to a dark garage. Turn on the flashlight and hold it directly against a panel. If you see a web of fine lines spreading out from the light, you've got swirls. Deeper, straight lines are usually just random isolated scratches.
If you’re fighting this battle, you're in good company. The global car care product market hit USD 11.04 billion in 2024 and is still climbing, which just goes to show how many people are realizing the importance of proper vehicle maintenance.
For a more detailed breakdown, our complete guide on https://www.swiftjetusa.com/blogs/news/how-to-remove-swirl-marks will walk you through the entire paint correction process from start to finish.
Choosing Your Paint Correction Toolkit
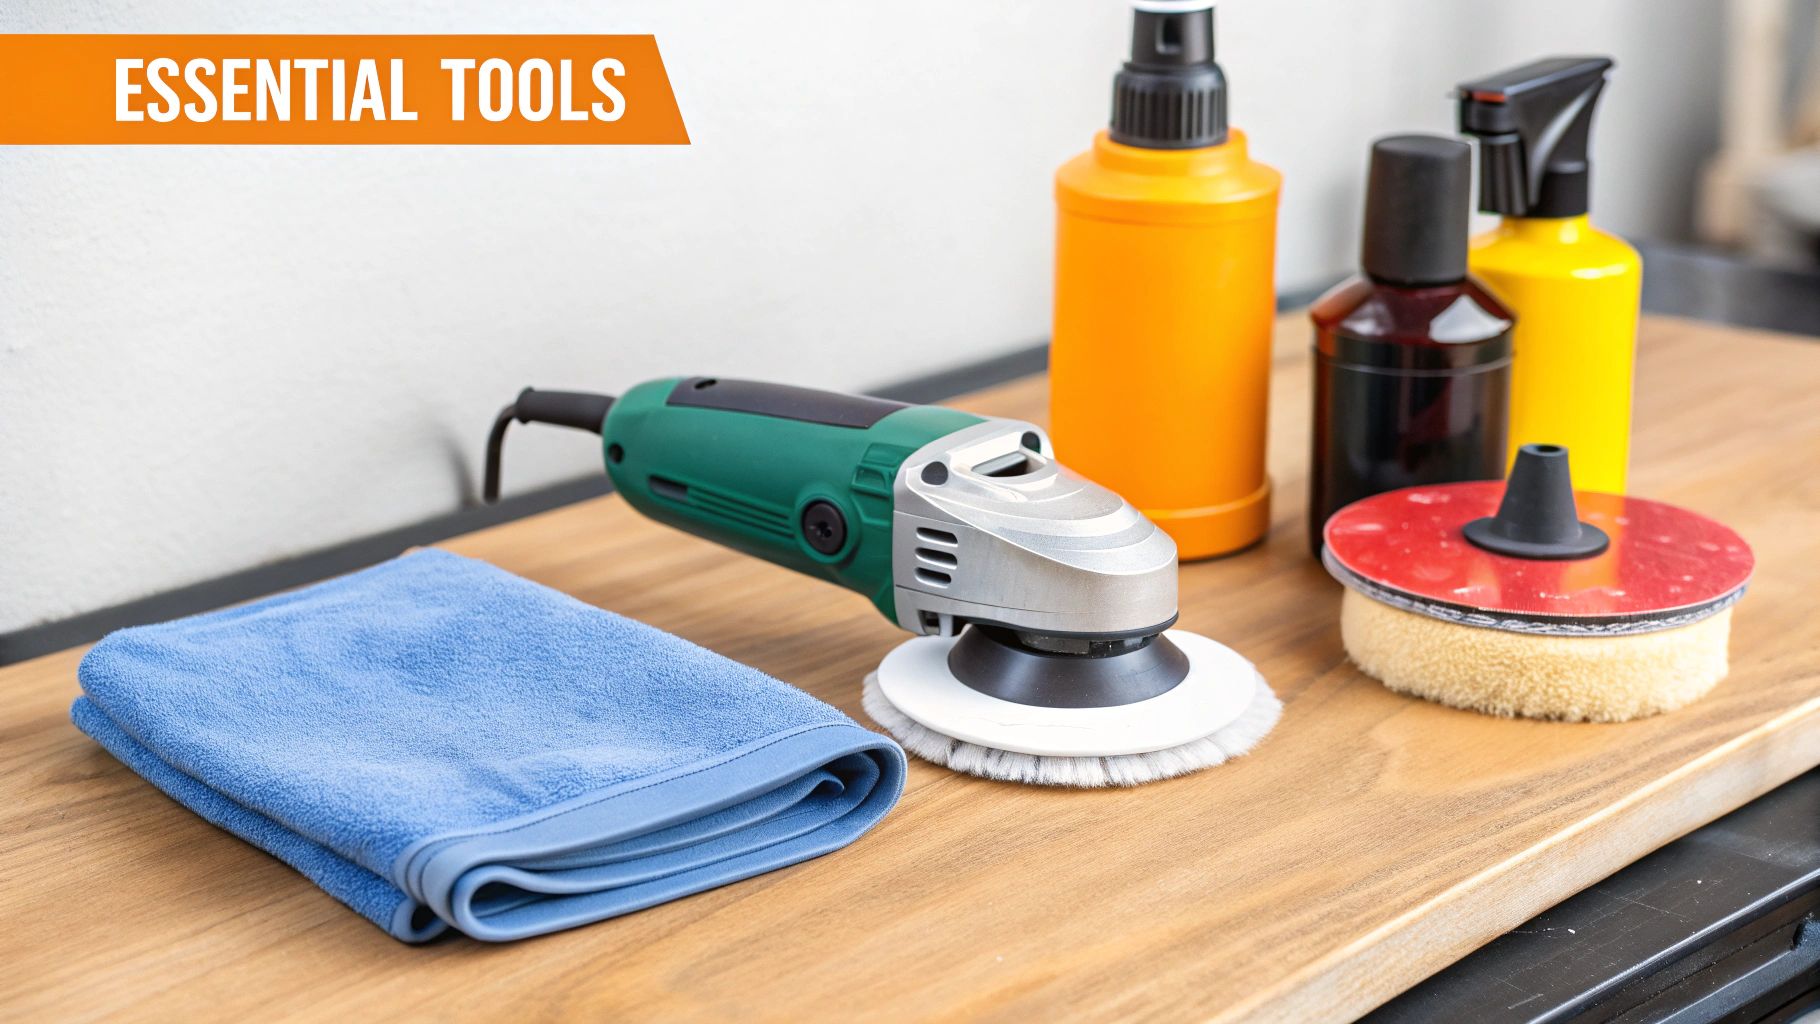
Let's be honest, getting that perfect, swirl-free finish on your car isn't magic. It all comes down to having the right tools for the job. You don't need a professional-grade garage stuffed with gear, but a few key items will make all the difference.
The heart of your setup is the machine polisher, and this is where a lot of people get decision paralysis.
You'll hear about two kinds: rotary and dual-action (DA). For anyone new to this, the choice is a no-brainer: get a dual-action polisher. A DA machine moves the pad in a random, oscillating pattern. This makes it incredibly forgiving, generates far less heat, and virtually eliminates the risk of burning through your paint—a nightmare scenario for any car owner.
Rotary polishers, on the other hand, spin on a single, fixed axis. They have incredible cutting power, but that power comes with a steep learning curve. In inexperienced hands, a rotary can cause serious damage in seconds. Stick with a DA polisher; you'll get fantastic results safely.
Pairing Pads and Compounds
Your polisher is just one part of the equation. The real work is done by the combination of your polishing pad and your compound. It’s best to think of these like different grits of sandpaper, going from aggressive to ultra-fine.
- Compounds: These are the liquid abrasives that actually level the paint. A heavy "cutting" compound is for deep scratches, while a "finishing" polish uses tiny abrasives to restore that brilliant, wet-look shine.
- Pads: Foam or microfiber pads also have their own level of aggressiveness. A firm, dense foam pad will "cut" more, while a soft, plush finishing pad is all about creating gloss.
Pro Tip: Always, always start with the least aggressive combination you think might work. Try a finishing polish on a soft pad in a small, hidden test spot. If that doesn't clear up the swirls, then you can move up to a stronger pad or compound. This simple rule prevents you from removing more clear coat than necessary.
Essential Tools for Swirl Mark Removal
Putting together your first paint correction kit can feel daunting. This table breaks down the absolute must-haves to get you started on the right foot.
| Tool/Product | Purpose | Beginner Recommendation |
|---|---|---|
| Dual-Action Polisher | Safely applies compounds and polishes to remove paint defects. | A quality entry-level DA from a brand like Griot's Garage or Porter-Cable. |
| Cutting Compound | Abrasive liquid used to remove deeper swirl marks and scratches. | A well-regarded medium-cut compound that finishes down nicely. |
| Finishing Polish | Fine abrasive liquid for removing light hazing and maximizing gloss. | A dedicated fine polish to refine the surface after compounding. |
| Foam/Microfiber Pads | Attach to the polisher to apply the product to the paint. | A variety pack with cutting, polishing, and finishing pads. |
| Clay Bar or Mitt | Removes bonded contaminants (tar, fallout) from the paint surface. | A fine or medium-grade clay mitt is often faster and easier to use. |
| Microfiber Towels | Essential for safely wiping away polish residue without scratching. | Get a pack of plush, high-GSM towels (at least 350 GSM). |
| Isopropyl Alcohol (IPA) | A 50/50 mix with water to clean the panel and inspect your work. | Standard rubbing alcohol diluted with distilled water in a spray bottle. |
With these items in hand, you'll have a capable and safe toolkit that can tackle most swirl mark issues and deliver a finish you can be proud of.
Don't Skip The Prep Work
Finally, a word of warning: don't get so excited about polishing that you neglect the prep. A high-quality clay bar or clay mitt is non-negotiable. If you try to polish paint that still has bonded grit on it, you’ll just be grinding those contaminants into the finish and creating even more scratches.
You also can’t have enough clean, soft microfiber towels. You'll need a stack of them for wiping off polish residue. Using a dirty or low-quality towel at this stage can instantly undo all your hard work. Skimping on the basics is the fastest way to get a disappointing result.
Prepping Your Car for a Perfect Finish
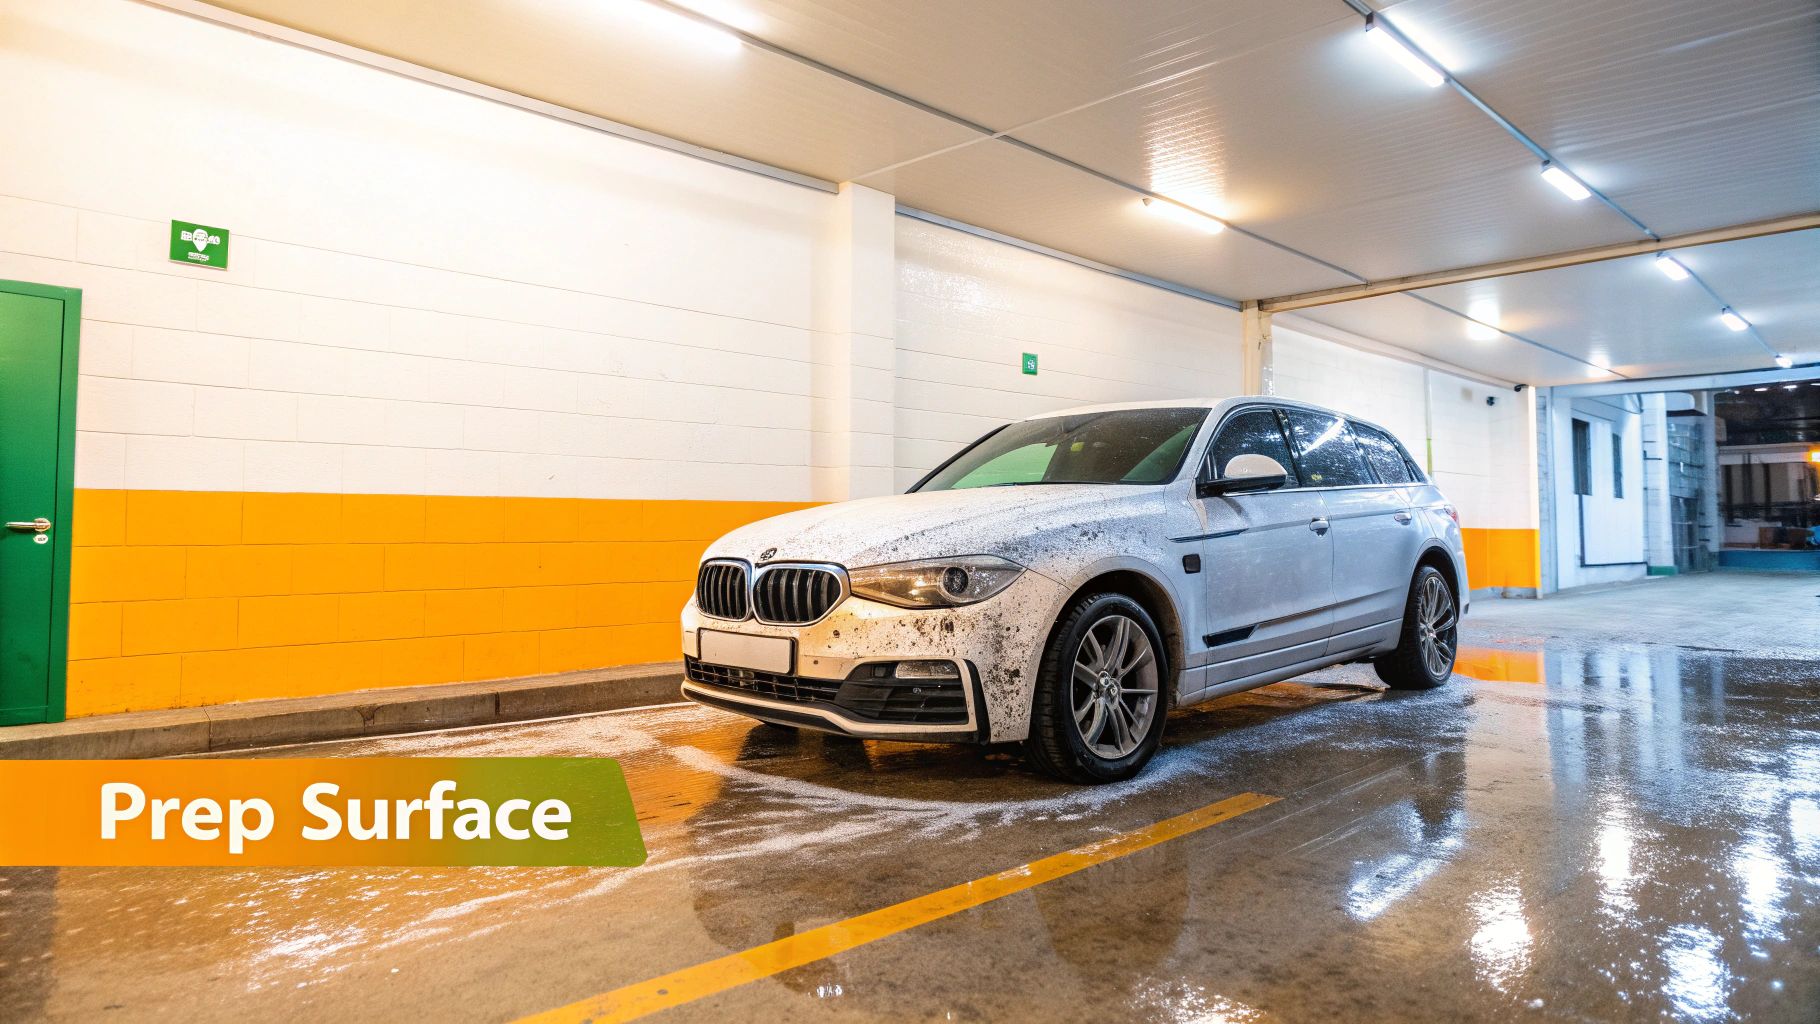
The secret to a flawless, swirl-free shine isn’t actually in the polishing—it’s in the prep work you do before you ever touch the machine. Trust me, jumping straight to the polisher is the single biggest mistake you can make. All you'll do is grind a layer of embedded dirt and grit right into your clear coat, creating even more damage.
It all starts with a proper wash, and I don't mean a quick trip through the automatic car wash. You need to use the two-bucket method. Fill one bucket with your car soap and another with plain rinse water. After you wash a single panel, rinse your mitt in the clean water bucket before putting it back in the soap. This tiny step is what keeps you from dragging the grit you just removed all over the rest of the car.
Decontaminating the Paint
Even after a great wash, your car's paint is covered in microscopic junk that has bonded to the surface. To get rid of it, you need to attack it from two different angles.
-
Chemical Decontamination: First up is an iron remover. You just spray it on, wait a few minutes, and watch as it reacts with embedded iron particles like brake dust and industrial fallout. It's actually pretty cool to see—the spray will turn a deep purple as it dissolves the contaminants, which you then simply rinse away.
-
Mechanical Decontamination: Next, you'll physically remove what's left with a clay bar or a clay mitt and some lubricant. This is what pulls off stubborn stuff like tree sap, road tar, and overspray. When you're done, the paint should feel as smooth as glass.
I can't stress this enough: if you glide the clay bar over the paint and feel any grittiness or hear a rough sound, the surface is not clean enough for polishing. Keep claying that section until it moves silently and smoothly.
This level of intense prep work is what separates an amateur job from professional paint correction. It's a huge part of why the car detailing market, valued at USD 37.41 billion in 2024, is so massive. These are the crucial steps that prime the surface for a perfect result, a trend detailed in this market analysis on Fortunebusinessinsights.com.
Once your car is washed, fully decontaminated, and bone-dry, you’re finally ready for the fun part: erasing those swirls for good.
Mastering the Polishing Technique
This is where the real transformation begins. Now that your car's surface is perfectly clean and prepped, it's time to gently level the clear coat and make those swirls disappear for good. The secret here is patience and a methodical approach—don't rush it.
Always Start with a Test Spot
Before you go all-in on the entire car, you absolutely must do a test spot. This is a non-negotiable rule every pro detailer follows. Find a small, out-of-the-way section, maybe 2x2 feet on a lower door panel, and grab your least aggressive polish and pad combination. This "start gentle" strategy is crucial because the goal is to remove the absolute minimum amount of clear coat needed to get the job done.
Once you’ve worked that small area, wipe it down with an isopropyl alcohol (IPA) mix. This step is key—it strips away any polishing oils that can temporarily fill in and hide leftover scratches. Now, get a good light source and inspect your work. If the swirls are gone, fantastic! You've found your process. If they're still hanging around, you can try a slightly more aggressive pad or polish and repeat the test.
Perfecting Your Machine Technique for a Flawless Finish
Once you’ve figured out the right pad and polish combo on your test spot, it's time to apply that same technique across the rest of the car. Consistency is what separates an okay result from a truly professional one.
Always work in small, manageable sections, about 2x2 feet at a time. This is critical because it gives the polish's abrasives enough time to break down and work their magic before the product starts to dry up.
Pro Tip: Resist the temptation to polish an entire hood or door in one go. Sticking to smaller sections helps you maintain even pressure and control, ensuring a uniform finish without any blotchy or inconsistent spots.
Start by dabbing a few pea-sized drops of polish onto your pad. Place the polisher on the paint before turning it on, and use a low speed to spread the product evenly. Then, you can bump up the speed to start the actual correction work.
Your motion should be a slow and steady cross-hatch pattern. Move the polisher side-to-side across your section, then switch to an up-and-down motion. Just let the machine do the heavy lifting. All you need is enough gentle pressure to keep the pad flat against the paint. A slow arm speed, around one inch per second, is the sweet spot.
This handy visual breaks down the workflow for each little section you tackle.
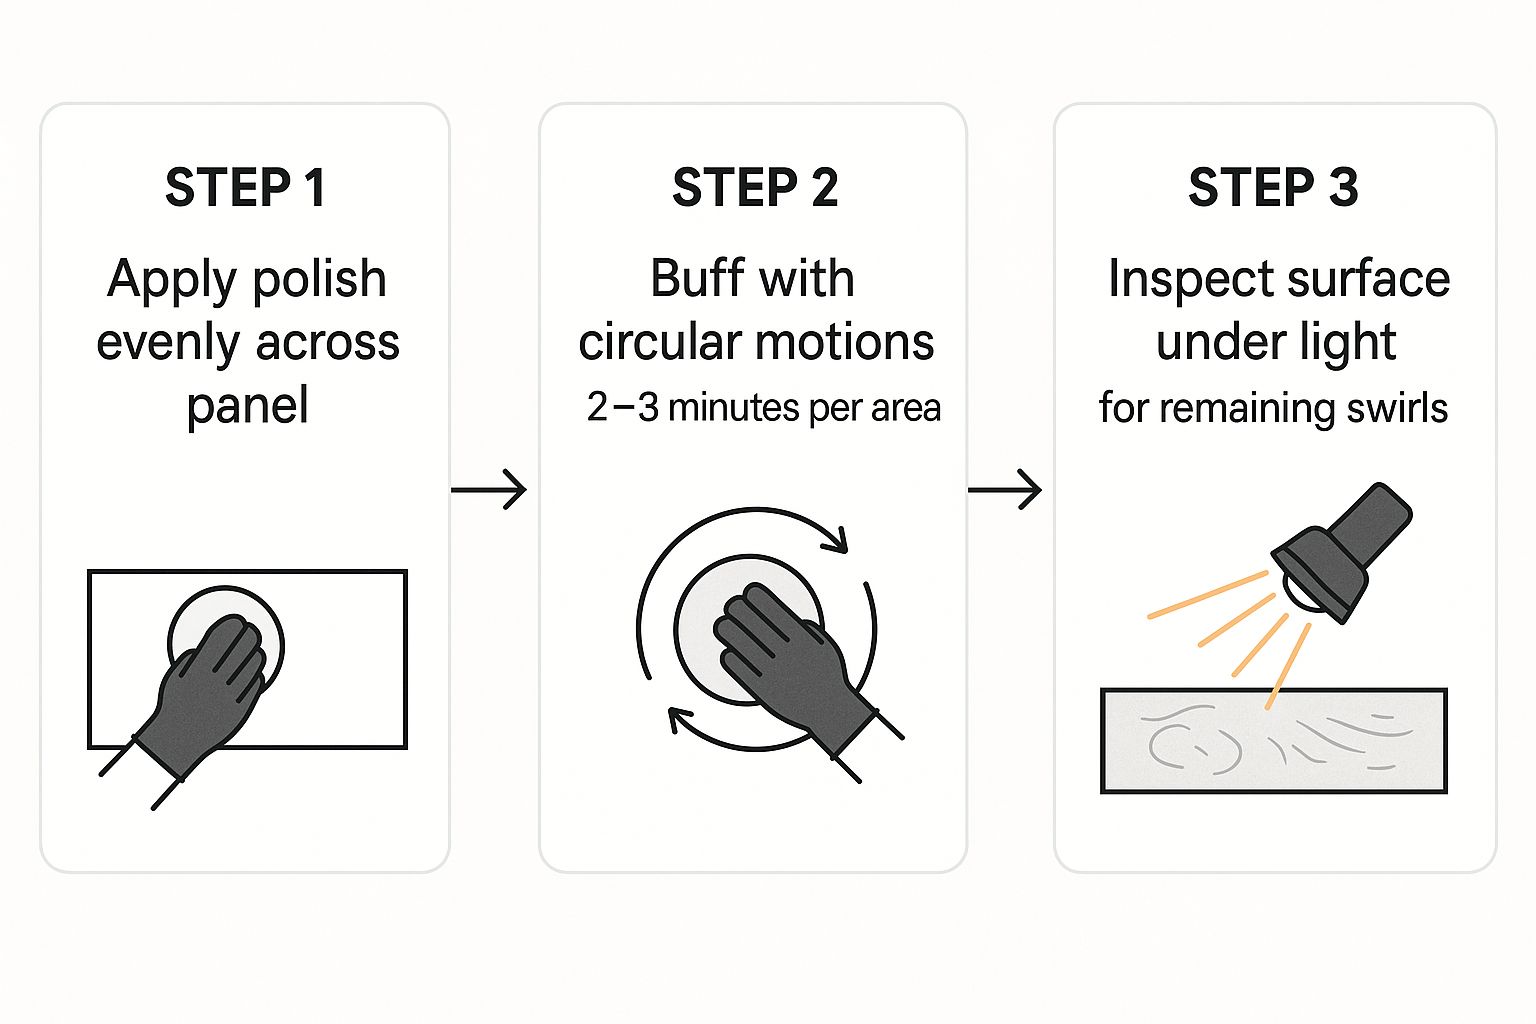
The image lays out the simple loop you'll follow: apply the polish, work the area, and inspect the results. This cycle is the heart and soul of good paint correction.
After you've made a few passes, you'll notice the polish residue becomes clear or almost oily. That's your cue that the abrasives have fully broken down. Now, you can wipe it off with a clean, plush microfiber towel. Be sure to flip the towel frequently to a fresh side so you don't accidentally re-introduce any residue back onto your beautifully polished surface.
If you want to really get into the weeds on machine polishing, our full guide on how to polish car paint has you covered.
Protecting Your Paint and Preventing New Swirls
https://www.youtube.com/embed/ustTEVGMOTI
You’ve just spent hours getting that paint back to a flawless, mirror-like shine. The last thing you want is to see those frustrating swirl marks reappear after a few washes. Now it's time to lock in all that hard work with a solid layer of protection. This step not only seals the deal but adds a wicked gloss and makes keeping the car clean way easier.
You've got a few solid options here, and the best one for you really comes down to how much time you want to spend and how long you want it to last.
A classic carnauba wax gives you that incredible, warm glow that car show enthusiasts love, but you'll be reapplying it every couple of months. For something with more legs, a synthetic paint sealant is a great choice, typically giving you up to six months of solid protection.
If you're looking for the king of durability, a ceramic coating is the answer. This isn't just a wax; it's a hard, sacrificial layer that bonds to your paint and can last for years, not just months.
Adopting Swirl-Free Habits
Adding protection is crucial, but it's only half the equation. The real secret to a long-lasting, swirl-free finish is changing the way you wash your car. It all boils down to one simple concept: touch the paint as little, and as gently, as possible.
Here are a few game-changing habits to adopt:
- The Two-Bucket Method: This is non-negotiable. One bucket holds your soapy suds, and the other is for rinsing your wash mitt. Pop a grit guard in the rinse bucket, and you’ll trap all the dirt and grime at the bottom instead of dragging it all over your paint.
- Quality Microfiber is a Must: Throw out those old bath towels and t-shirts. High-quality, plush microfiber towels are designed to lift dirt away from the surface, not grind it in.
- Go Touchless for Drying: One of the best detailing hacks is using a leaf blower to dry your car. You can blast off 80-90% of the water without ever laying a hand on the paint, massively cutting down the risk of drying-induced scratches.
Remember, every single time you touch your car's paint, there's a risk of creating an imperfection. The goal is to make every touch count and be as gentle as possible. This is the fundamental principle that separates amateurs from pros.
There's a reason the global car detailing market is projected to hit USD 10.2 billion by 2032—professionals have mastered these preventative techniques. You can see the data for yourself in this market research from Acumen Research and Consulting.
To learn even more about keeping your finish looking its best for the long haul, take a look at our complete guide on how to protect car paint with pro secrets.
Common Questions About Swirl Mark Removal
Even with a solid plan, a few questions always seem to pop up during the paint correction process. Let's tackle some of the most common ones we hear from folks new to detailing.
Can I Really Just Remove Swirls by Hand?
Technically, you can slightly reduce the look of the very lightest swirls by hand, but it’s an absolute marathon of effort. The results are often patchy and inconsistent. You'll work yourself to exhaustion and likely still be unhappy with the finish.
A machine polisher, particularly a good dual-action (DA) model, is the right tool for the job. It delivers the consistent speed, power, and movement needed to properly level the clear coat. This is how you achieve that uniform, professional shine across the entire vehicle—something that's just not feasible to do manually.
How Do I Pick the Right Polish and Pad?
This is a big one. The golden rule is to always start with the least aggressive combination you have. Think of it as a safety net for your car's paint.
Grab a finishing polish and a soft foam pad. Find a small, out-of-the-way spot on the car—about a 2x2 foot area is perfect—and do a test section. Once you've worked the polish in and wiped it off, inspect your results under good light.
If the swirls are gone, great! That's your combo for the rest of the car. If they're still there, you can step up to a medium-cut polish or a slightly firmer pad. This methodical approach is crucial because it ensures you only remove the absolute minimum amount of clear coat necessary to get the job done.
A classic rookie mistake is jumping straight to the most aggressive compound and pad. This chews through way more clear coat than needed and actually creates more work for you, as you'll have to spend extra time refining the finish afterward. A little patience with your test spot will save you a lot of headaches.
Ready to wash your car the right way and stop swirls from coming back? The SwiftJet Car Wash Foam Gun makes it easy to blanket your car in thick, lubricating foam that protects your paint from scratches. Order yours today and get a free microfiber mitt!