
Absolutely. Washing your car when it's cold out isn't just about keeping it looking good—it's about fighting off the serious damage that road salt and winter grime can do. When the temperature drops, the stuff they use to treat the roads becomes your car's number one enemy, fast-tracking rust and corrosion on the undercarriage and body.
Think of a good winter wash as essential maintenance, not just a cosmetic touch-up.
Why Bother Washing Your Car in the Winter?

I get it. The last thing you want to do when it's freezing outside is stand there with a hose. But that's exactly when your car needs the most protection. Winter roads are a mess of corrosive materials, and your vehicle is right in the thick of it.
Road salt, sand, and chemical de-icers are fantastic for making driving safer, but they are brutal on your car's paint and metal. These materials stick to every surface, quietly eating away at the clear coat and leaving the paint and metal exposed.
The Real Damage from Road Salt
Road salt is basically a rust accelerator. Once it mixes with water and oxygen, it kicks off an electrochemical reaction that makes things corrode at an alarming rate. This is precisely why washing a car in cold weather is so critical; you're breaking that destructive cycle.
That salty slush gets into every nook and cranny, but it loves to attack these spots in particular:
- The Undercarriage: Your car’s frame, exhaust system, and suspension parts get a constant blast of salty spray.
- Wheel Wells: This area is a trap for grime and moisture, making it a perfect breeding ground for rust.
- Brake Components: Salt can eat away at brake lines, calipers, and rotors, which is a major safety concern.
- Paint Chips: Even tiny little rock chips become gateways for saltwater to creep under the paint and attack the metal directly.
This goes way beyond cosmetics. If you let corrosion go unchecked, you're looking at serious structural problems, failing parts, and a huge hit to your car's resale value. We go into even more detail in our complete guide to car salt removal to help you keep your vehicle protected.
Safe Winter Washing Temperature Guide
Knowing the right time to wash is half the battle. You don't want to create a sheet of ice on your driveway or, worse, on your car itself. Here’s a quick reference guide I use to decide if it's a good day for a wash.
| Condition | Ideal Temperature | Proceed with Caution | Avoid Washing |
|---|---|---|---|
| Why it's safe/unsafe | Warm enough for water to evaporate properly. | Water can freeze on surfaces, especially in the shade. | Water will freeze instantly, potentially damaging seals and locks. |
| Outdoor Temperature | Above 40°F (4°C) | 35°F to 40°F (1°C to 4°C) | Below 35°F (1°C) |
| Tips | The perfect time for a thorough hand wash. | Wash in direct sunlight during the warmest part of the day and dry immediately. | Opt for a touchless car wash or wait for a warmer day. |
Ultimately, common sense is your best friend. If it feels way too cold, it probably is. Waiting a day or two for a slight warm-up is always the smarter move.
It's More Than a Pretty Finish
A winter wash is a defensive move. Beyond protecting the body, getting all that salt and grime off is a safety issue. It coats your headlights, taillights, and windows, seriously cutting down on your visibility. A clean car is simply a safer car.
The reality is that frequent washing during winter isn't an indulgence—it's one of the most effective ways to preserve your vehicle's structural health and prevent costly repairs down the road.
In any region that gets significant snow and ice, road salt is a fact of life. But that means the risk of rust is always there for cars that aren't cleaned regularly. Putting it off lets those corrosive agents sit on your paint for weeks, causing damage that you might not even notice until it's too late. A regular wash is truly your best line of defense.
Your Essential Cold Weather Wash Kit
Washing your car when it’s freezing out isn’t about speed; it’s about having the right gear lined up before you even think about grabbing the hose. Putting together a solid winter wash kit is the secret to working safely and efficiently, letting you combat the grime without causing new problems.
This isn’t just a hunch. Think about the pros—winter is their second busiest season. In fact, a whopping 31% of owners see a major uptick in customers trying to get corrosive road salt off their vehicles. You can get those same professional results right in your own driveway by adopting their mindset: use the right tool for the right job.
The Foundation: A Two-Bucket System
If you take only one piece of advice, make it this: use the two-bucket wash method. It’s simple. One bucket is for your soapy water, the other is for clean rinse water. After you wash a single panel, you dunk your gritty wash mitt into the rinse bucket first. This knocks all the abrasive salt and gunk loose before you dip it back into your clean, soapy water.
This simple step is absolutely non-negotiable in the winter. It’s what stops you from dragging sharp salt crystals and sand across your car's finish, which is hands-down the biggest cause of swirl marks and scratches during the cold months.
Pro Tip: Drop a grit guard into the bottom of each bucket. These simple plastic inserts act as a filter, trapping all the heavy debris at the bottom so your wash mitt can't accidentally pick it back up.
Soaps and Tools for the Job
What you wash with is just as important as how you wash. A harsh, aggressive soap will just strip away the wax or sealant that’s acting as your car’s only shield against the elements.
- pH-Neutral Car Soap: Always go for a soap that’s formulated to be gentle on existing protection. A quality pH-neutral car wash will get the job done without undoing all your hard work of waxing or sealing.
- A High-Quality Foam Gun: This is where the SwiftJet foam gun really shines. It lays down a thick blanket of suds that clings to every surface, giving the soap time to break down and lift stubborn grime before you ever have to touch the paint. That pre-soak makes a world of difference and seriously cuts down on the scrubbing you have to do.
- Plush Microfiber Wash Mitt: A good mitt with a deep, soft pile is designed to pull dirt away from the surface and trap it deep within its fibers. It holds onto that grit until you release it in your clean rinse bucket.
For a full checklist of what to keep on hand, our comprehensive car detailing supplies list has you covered for every season.
Don't Forget Your Own Gear
Lastly, let's be realistic—you can't do a great job if you're shivering. Protecting yourself is just as critical as protecting your car. A solid pair of thermal, waterproof gloves is non-negotiable. They’ll keep your hands warm and dry, which means you can feel what you're doing and focus on the details instead of rushing to get back inside.
How to Hand Wash Your Car in the Cold
Alright, with all your gear in place, it's time to get down to business. Washing your car by hand when it's cold isn't rocket science, but you definitely need to adjust your technique. If you don't, you can easily create more problems than you solve. The whole game is about working smart, tackling small sections at a time, and never giving water or soap a chance to freeze.
Your usual summer routine of blanketing the entire car in foam and washing at a leisurely pace? Throw that out the window. In the cold, the strategy is much more deliberate—a panel-by-panel attack that ensures every part of your car is cleaned and dried before ice can even think about forming.
Start with a Lukewarm Pre-Rinse
First things first: a gentle pre-rinse. But the water temperature here is non-negotiable. Never use hot water. The extreme temperature difference, known as thermal shock, is a fantastic way to crack your windows or damage your paint's clear coat. Instead, you want lukewarm water—just warm enough to melt any light frost and start breaking down those stubborn layers of caked-on road salt and slush.
Think of this step as more of a pre-soak. You're not trying to blast every speck of dirt off. The real goal is to loosen up the heavy grime so your foam and wash mitt can do their work without you having to scrub aggressively. Make sure you hit the lower body panels, wheel wells, and undercarriage a little extra, since that's where the most corrosive gunk loves to hide.
This infographic breaks down the essential gear you'll need for a successful winter wash.
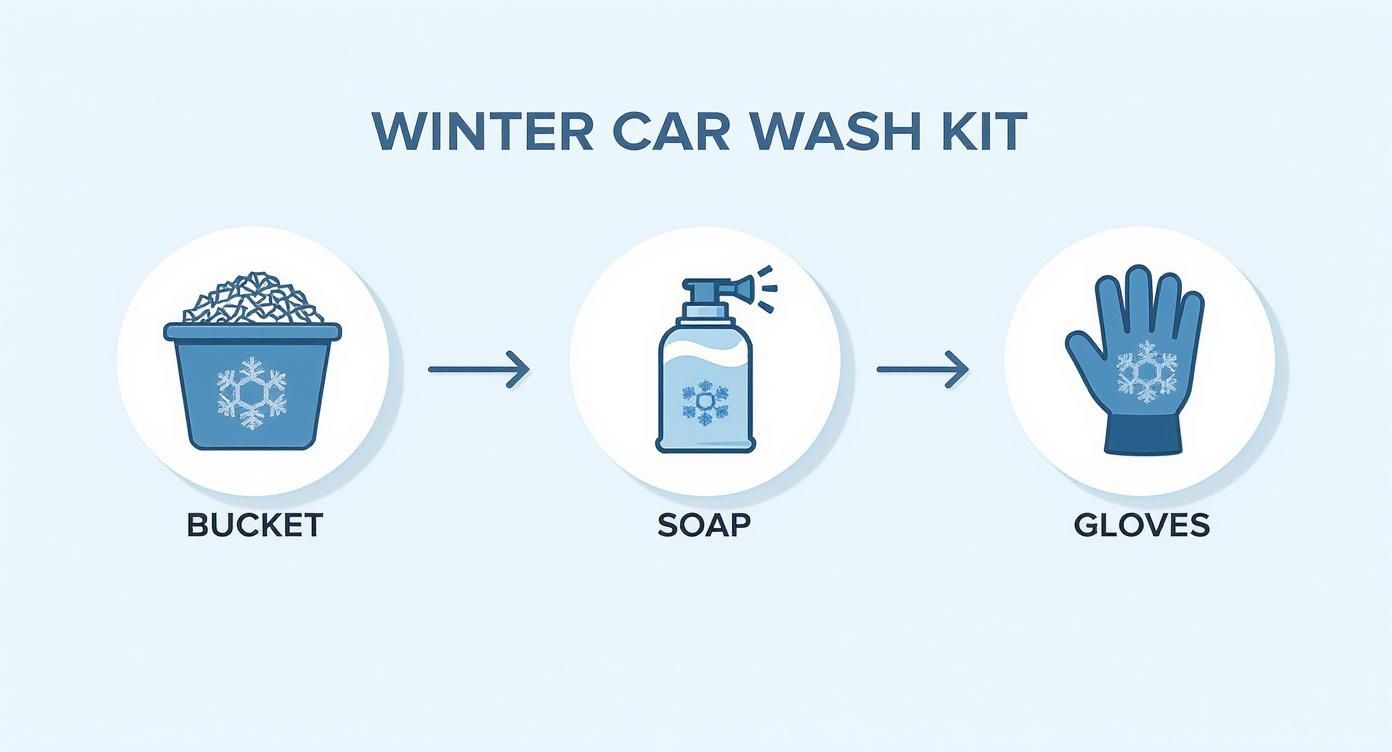
As you can see, every tool plays a specific role, from the two-bucket system protecting your paint to the foam gun doing the dirty work.
Master the Top-Down, Section-by-Section Wash
With the pre-rinse done, it's time to grab your SwiftJet foam gun. The magic of a good foam gun is its ability to lay down a thick, clinging blanket of suds that does the real cleaning for you. This foam gets in there, encapsulates all those nasty salt and dirt particles, and lifts them off the surface so you can just rinse them away.
Here’s the method I’ve perfected over years of cold-weather detailing to wash a car without turning it into a popsicle:
- Divide and Conquer: Before you spray a single drop of soap, mentally break your car down into small, workable zones. The roof is one section. The hood is another. Then maybe a single door or fender.
- Foam One Section at a Time: Coat only the section you're about to wash with a thick layer of foam. Let it sit there for a minute or two; you’ll practically see it dissolving the grime.
- Wash with the Two-Bucket Method: Grab your microfiber wash mitt from the clean, soapy water bucket. Gently wash the foamed-up panel, always working from the top down.
- Rinse Your Mitt: Now, before you even think about touching the car again, dunk that dirty mitt into your rinse water bucket. Give it a good scrub against the grit guard at the bottom to release all the trapped debris. Then you can go back to your soap bucket.
- Rinse the Panel Immediately: Before moving on to the next section, give the one you just washed a thorough rinse with your lukewarm water. Get all that soap off.
By sticking to these small, contained areas, you stay in complete control. It’s the single best way to prevent soap from drying on your paint or, even worse, freezing. That's what causes those ugly streaks and can seriously damage your clear coat.
Don't Forget the Grimiest Spots
As you work your way around the car, panel by panel, make sure to give a little extra love to the areas that take the worst beating in winter. These are the places where salt and moisture team up to start the dreaded rust process.
- Behind the Wheels: The area right behind each tire gets sandblasted with slush and salt.
- Rocker Panels: Those low-slung panels along the sides of your car are absolute magnets for road spray.
- The Undercarriage: It’s a pain to reach, I know. But even a quick blast with the hose or pressure washer can knock off the worst of the salt buildup and make a huge difference.
Once you’ve made a full circuit, do one last, gentle rinse of the entire car, starting from the top and letting the water sheet down. This final pass catches any leftover soap residue and leaves you with a perfectly clean surface, ready for what is arguably the most critical step of any winter wash: drying it immediately and completely.
Drying Your Car Without Freezing Doors Shut
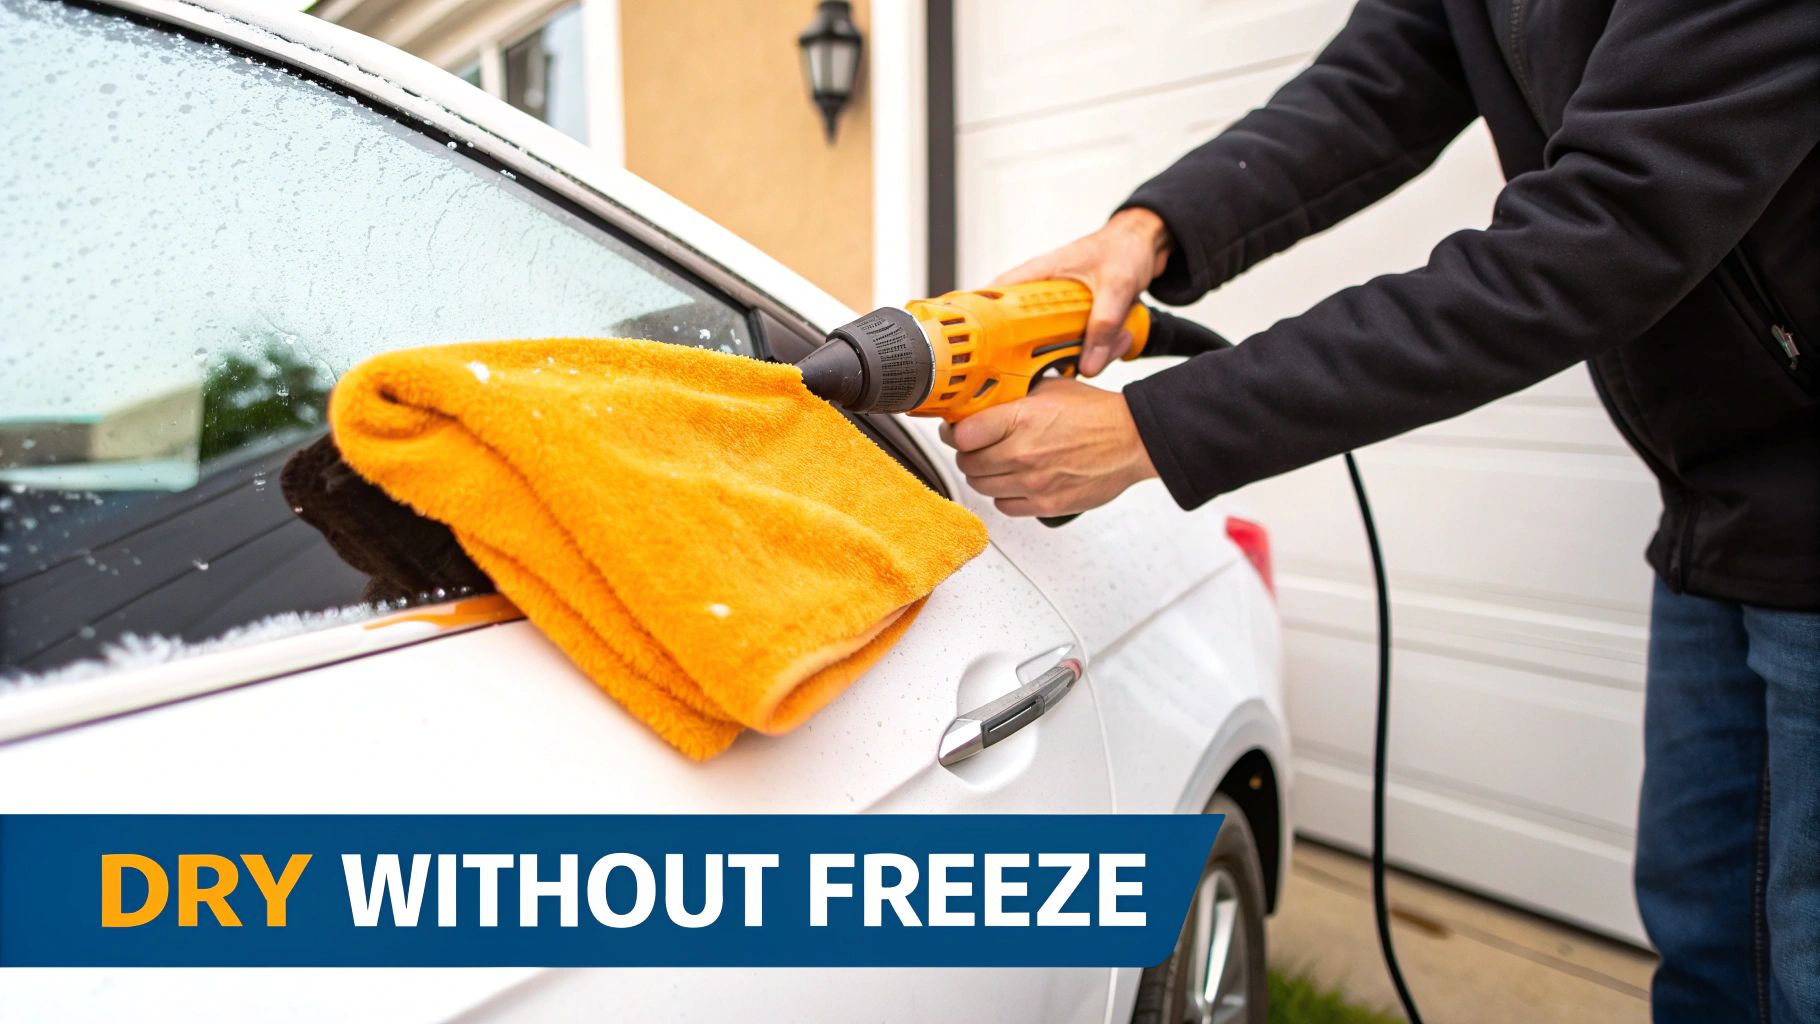
You’ve just meticulously washed your car in the freezing cold. The final step—drying—is where you either lock in that perfect shine or create a frozen disaster. Letting your car "air dry" in winter isn't just lazy; it's a recipe for trouble. Water will freeze instantly, sticking to your paint, damaging seals, and locking you out.
Your best friend for this job is a premium, plush microfiber drying towel. These things are incredibly absorbent and designed to lift water away from the paint without leaving a single scratch. Always start from the top and work your way down. Gently blot or drag the towel across the big surfaces—the roof, hood, trunk, and side panels.
The Secret Weapon for Tricky Spots
A towel is perfect for the main body panels, but it’s pretty useless for all the nooks and crannies where water loves to hide. This is where a leaf blower or some compressed air completely changes the game for winter washing.
Use the forced air to blast water out of these sneaky areas:
- Door Jambs and Sills: This is ground zero for frozen-shut doors. Get every drop out.
- Mirrors and Grilles: These spots trap a shocking amount of water that will drip down and freeze into ugly streaks later on.
- Door Handles and Locks: Forcing water out of lock cylinders is non-negotiable if you want to get back into your car.
- Around Headlights and Taillights: Moisture gets trapped in these seals and can lead to icy patches on your lights.
Combining a quality towel for the body and forced air for the details is hands-down the most effective way to get your vehicle bone dry. We dive even deeper into this in our guide on the best way to dry a car after washing.
The goal isn't just to make the car look dry; it's to remove every last drop of water that could freeze and expand, causing real damage to your vehicle’s components overnight.
Proactive Steps to Prevent Freezing
Once the car feels dry, there are a couple of pro-level steps you can take to make absolutely sure your doors and locks work flawlessly the next morning. It’s these little details that make a huge difference.
First, open and close all the doors, the trunk, and the hood a few times. It sounds simple, but this action physically breaks the seal and dislodges hidden water droplets that your towel or blower missed, especially deep within the weather stripping.
Next, grab a can of silicone spray or a rubber protectant and treat all the rubber seals around your doors and windows. This creates a water-repellent barrier that ice simply can't stick to, preventing that classic scenario where your door is frozen solid to the frame. A quick wipe-down with this stuff is one of the smartest five-minute investments you can make.
Applying Winter-Ready Paint Protection
Getting all that corrosive road salt off your car is a huge win, but it's really only half the battle. To truly come out on top this winter, your car needs a defensive shield that stops grime from sticking in the first place. This final step is what makes all your hard work last and keeps future washes from feeling like a marathon.
Think of it this way: a freshly cleaned car is a blank canvas, but it’s also completely exposed. Without a protective layer, that pristine paint is immediately vulnerable to a fresh assault of salt and slush the moment you pull out of the driveway. A quality sealant or wax creates a slick, hydrophobic barrier that forces water, road grime, and de-icing chemicals to bead up and roll right off.
There's a reason the global car wash market is projected to be worth around USD 28.22 billion in 2025. A huge chunk of that is driven by seasonal needs. In North America, which accounts for over 40% of the market, a lot of that demand comes from drivers like us trying to protect our vehicles from harsh winter climates. You can see more data on how climate shapes the car wash industry on Mordor Intelligence.
Choosing Your Winter Armor
Not all paint protection products are built for the cold. Traditional carnauba waxes, while famous for their deep shine, can be a real pain to work with when the temperature drops. They often struggle to cure properly and just don’t have the staying power to stand up to a winter's worth of abuse.
When you're washing a car in cold weather, you need something tougher and, frankly, easier to apply.
- Synthetic Paint Sealants: These are the workhorses of winter protection. They create a strong polymer bond with your paint that’s far more durable than a natural wax. A good sealant can easily give you three to six months of solid protection, which is usually enough to get you through the entire season.
- Spray-On Ceramic Coatings: These are fantastic options, offering incredible durability and that signature ceramic water-beading. The best part is that modern spray formulas make them so much faster to apply than traditional ceramic coatings—a huge plus when you're racing against a dropping thermometer.
For winter, a high-quality spray sealant is almost always the smartest play. It cures quickly in cooler temperatures and can be applied in just a few minutes, giving you weeks of tough protection without the endless buffing of a traditional paste wax.
Application for a Durable Bond
Applying your protection in the cold requires a bit of strategy. First things first: make sure the panel you’re working on is completely dry and cool to the touch. Even on a cold day, never apply a sealant or wax in direct sunlight. It can cause the product to flash and cure too quickly, leaving you with ugly streaks.
Just like with the wash, work in small, manageable sections. Apply the product in a thin, even layer, and then follow the manufacturer’s instructions for buffing it off. My go-to method is to work one panel at a time—apply it to the driver's side fender, buff it off, and then move on to the door. This focused approach ensures you get a perfect, uniform bond that will be repelling slush and salt for weeks.
Answering Your Winter Car Wash Questions
Even for seasoned detailers, washing a car when it's freezing outside can feel a bit counterintuitive. You've got the right gear, you know the basic steps, but some tricky questions always seem to pop up. Let's clear the air on some of the most common concerns I hear.
Getting these details right is what separates a successful, protective wash from a frustrating, icy mess.
What's the Coldest I Can Get Away With?
Everyone wants to know the magic number. Ideally, you want to wash your car when the temperature is above 40°F (4°C). This is the sweet spot where you have enough time to work before water starts freezing on you.
But let's be realistic. Sometimes the salt is just eating away at your paint, and you can't wait for a warm spell. If you're in a pinch, the absolute lowest I'd recommend is around 35°F (1.7°C).
Anything colder than that and you're entering the "flash freeze" danger zone. This is when water freezes almost instantly on contact with your car's cold panels. It's a recipe for frozen door locks, cracked plastic trim, and potentially even damaging your paint.
If you have no other choice and have to wash in those borderline temperatures, work in direct sunlight. Tackle one small section at a time and have your drying towels and air blower ready to go the second you finish rinsing. Don't let the water sit for a moment.
Is It Okay to Use a Pressure Washer in the Winter?
Yes, and honestly, you'll be glad you have one. A pressure washer is your best friend for fighting off the worst of winter's attack. It has the power to blast away the caked-on slush and corrosive salt from your wheel wells and undercarriage—the places where rust loves to start.
The trick is to be smart about it. Keep a good distance from the paint to avoid causing any chips, especially if you have an older vehicle. And be careful around the delicate bits. You don't want to force high-pressure water into rubber seals, electrical connections, or wheel bearings.
Are Touchless Car Washes a Decent Option?
For a quick and safe cleanup, a touchless automatic car wash is a great plan B. This is especially true if it's just too bitter cold to do it yourself. Their main advantage is simple: no brushes touch your car, which means zero risk of new swirls and scratches from dirty brushes used on hundreds of other salty cars.
The biggest downside? The drying cycle. Those big blowers do a decent job on the main body panels, but they always miss the spots where water collects.
Think about these common trouble spots:
- Inside your door jambs and on the sills
- Behind the side mirrors
- Around your license plate and trunk handle
- Inside the fuel filler door
Keep a dedicated microfiber drying towel in your car. As soon as you pull out of the wash bay, do a quick walk-around and wipe down all those hidden spots. It only takes a minute and will stop those areas from freezing shut.
Ready to make your winter washes faster and more effective? The SwiftJet Foam Gun turns any garden hose into a professional-grade foaming system. Get yours today at SwiftJetUSA.com and tackle winter grime like a pro.