
When you learn how to properly detail a car, you quickly realize it's about much more than just a simple wash. It's a comprehensive process of deep cleaning, restoring, and protecting every inch of your vehicle. The goal isn't just to make your car look incredible right now, but to preserve its long-term value by stopping wear and tear in its tracks.
Why Detailing Is More Than Just a Car Wash
Let's be honest, for most of us, washing the car feels like a weekend chore. You drag out the bucket, sponge, and hose to get rid of the week's road grime. But what if you saw it differently? What if it was an investment in your vehicle's health and longevity? That’s exactly where car detailing separates itself from a standard wash.
Detailing is the art of preservation. It’s a top-to-bottom restoration that tackles issues a quick scrub-down could never fix. Think of it this way: a car wash gets the loose dirt off the surface. Detailing, on the other hand, aims to bring the car back to its absolute best condition—and then shield it from future damage.
This isn't just a niche hobby anymore. Car owners are catching on, and the market shows it. The global car detailing industry was valued at around USD 41.40 billion and is projected to hit USD 58.06 billion by 2030. This growth tells us one thing: people understand that proper maintenance is the secret to keeping a car looking great and holding its value. You can find out more about the growth of the car detailing market to see the full picture.
Protecting Your Investment from the Elements
Your car’s paint is under constant assault. Harsh UV rays from the sun cause oxidation and fading, while road salt, bird droppings, and tree sap can literally eat through your clear coat. A typical wash might get this stuff off, but it does nothing to prevent the next attack.
This is where detailing steps in with protective layers like waxes, sealants, or ceramic coatings. These products create a durable shield over your paint. Not only does this barrier produce that deep, glossy shine we all love, but it also makes the surface slicker, so dirt and grime have a much harder time sticking. That makes your next wash way easier.
Pro Tip: A foundational step in modern detailing is the pre-wash. Using a foam gun, like the SwiftJet, to cover the car in a thick blanket of foam lets the soap do the heavy lifting. It dwells on the surface, loosening and encapsulating heavy dirt, so you can rinse most of it away before your wash mitt ever touches the paint. This simple step is one of the best ways to reduce the risk of creating swirl marks and fine scratches.
Preserving the Interior and Boosting Resale Value
Detailing isn’t just about a shiny exterior. The inside of your car faces its own battles—UV rays cracking the dashboard, and dirt and oils breaking down upholstery fibers. A full interior detail goes far beyond a quick pass with the vacuum.
- Deep Cleaning: This means using specialized cleaners for every material—fabric, leather, vinyl—to lift out embedded stains and grime, not just wipe the surface.
- UV Protection: Applying conditioners and protectants to the dashboard, door panels, and leather seats is crucial. It keeps them from drying out, fading, and cracking over time.
- Odor Elimination: Real detailing tackles the source of smells by treating the car's ventilation system and deep-cleaning carpets, rather than just covering them up with an air freshener.
All this meticulous care has a direct and positive impact on your car's resale value. A well-maintained interior and a glossy, swirl-free exterior are immediate signals to a potential buyer that the vehicle has been genuinely looked after, which can easily justify a higher asking price.
To really see the distinction, it helps to put the two approaches side-by-side.
Detailing Task vs Standard Wash Comparison
The table below breaks down how a detailer approaches common tasks compared to someone just giving their car a quick wash. The difference is in the goal for each step.
| Task | Standard Car Wash Goal | Car Detailing Goal |
|---|---|---|
| Paint Cleaning | Remove loose dirt and grime. | Decontaminate the surface, remove embedded particles, and prepare for polishing. |
| Interior | Quick vacuum and wipe down. | Deep clean all surfaces, treat stains, and condition materials like leather and plastic. |
| Protection | Minimal to none. | Apply a durable layer of wax, sealant, or ceramic coating for long-term protection. |
| Wheels & Tires | Basic rinse and scrub. | Thoroughly clean wheels, remove baked-on brake dust, and dress tires for a lasting finish. |
As you can see, the intent behind detailing is far more restorative and preventative.
Ultimately, learning the fundamentals of car detailing empowers you to get professional-level results right in your own driveway. With modern tools like a foam gun making the process safer and more effective than ever, maintaining your vehicle’s condition becomes less of a chore and more of a satisfying act of preservation.
Assembling Your Home Detailing Toolkit
Walking into an auto parts store can feel like a mission impossible. You're hit with a wall of brightly colored bottles, all screaming promises of a perfect, showroom shine. It's easy to get overwhelmed and walk out with a cart full of stuff you don’t actually need.
Let's cut through that noise. Building a great home detailing kit isn't about buying everything on the shelf; it's about making smart choices that get the job done right and, most importantly, safely. The foundation of a jaw-dropping detail is laid long before you ever turn on the hose.
The Washing and Drying Essentials
This is where the real work begins, and it's also where most scratches and swirl marks are born. Tossing an old bath towel and a single dirty bucket at your car is a recipe for disaster. Here’s what you actually need.
First, the two-bucket method is non-negotiable. It's simple: one bucket for your soapy water, and another filled with clean water for rinsing your wash mitt. After you wash a single panel, you dunk and scrub the mitt in the plain water bucket before it ever goes back into the soap. This one trick keeps the grit you just pulled off the paint from getting reintroduced.
To make this system virtually foolproof, grab a pair of Grit Guards. These simple plastic discs sit at the bottom of your buckets. They trap all the dirt and grime that sinks, keeping your wash mitt from ever reaching it. It’s a tiny investment for massive protection.
Finally, the soap you use matters more than you think. Always grab a pH-neutral car shampoo. These are formulated to obliterate dirt and road film without stripping away any wax or sealant you've painstakingly applied. Your protection lives to see another day.
This is where a good foam gun, like the SwiftJet, completely changes the game. It hooks right up to your garden hose and blankets your car in thick, clingy foam. This pre-soak step is crucial—it loosens up the heavy dirt and grime, letting it slide off the paint with minimal effort. It dramatically reduces the risk of scratching when you finally make contact with your mitt.
Microfiber: The Unsung Hero of Detailing
Forget old t-shirts and bath towels. Not all cloths are created equal, and using the wrong one can instantly undo all your hard work. Microfiber is the undisputed champion for a reason—its unique, ultra-fine fibers are designed to trap dirt and absorb water without leaving a trace of damage behind.
You'll want a small arsenal for different jobs:
- Plush Wash Mitts: These are infinitely safer than old-school sponges, which are notorious for trapping grit on their flat surface and dragging it across your paintwork.
- A Waffle-Weave Drying Towel: Invest in at least one large, high-quality drying towel. I'm talking about a GSM (grams per square meter) of 900 or higher. These things are incredibly absorbent and can often dry an entire vehicle with little to no wringing. Less wiping equals fewer chances for scratches.
- General Purpose Towels: A multi-pack of towels in the 300-400 GSM range is perfect. Use these for dirtier jobs like wiping down door jambs, cleaning wheels, or buffing off interior protectants.
Pro tip: Color-code your towels for different tasks (e.g., blue for paint, gray for wheels, green for interior) to avoid cross-contamination. You never want the brake dust from your wheels making its way to your pristine paint. For a more exhaustive breakdown of gear, take a look at our complete auto detailing equipment list for the ultimate setup.
Tools for Decontamination and Interior Care
With your washing and drying dialed in, a few more tools will elevate your detail from good to great.
After a thorough wash, your paint might still feel slightly gritty to the touch. That’s embedded contamination—stuff that soap alone can't handle. A clay bar or clay mitt is the answer. It gently glides over the paint, pulling out these tiny particles and leaving the surface perfectly smooth.
Don't forget the inside! For the interior, you'll need:
- A good shop vac with brush and crevice attachments to get into all the nooks and crannies.
- A quality all-purpose interior cleaner that’s safe on plastic, vinyl, and fabric.
- Dedicated leather cleaner and conditioner if you have leather seats—don't use the all-purpose stuff here.
- A set of soft-bristled detailing brushes for agitating dirt in air vents, around buttons, and in tight seams.
With this curated toolkit, you're armed with everything you need for a safe, comprehensive detail at home. You'll be achieving that professional finish without the professional price tag in no time.
The Pre-Wash: Your First Line of Defense

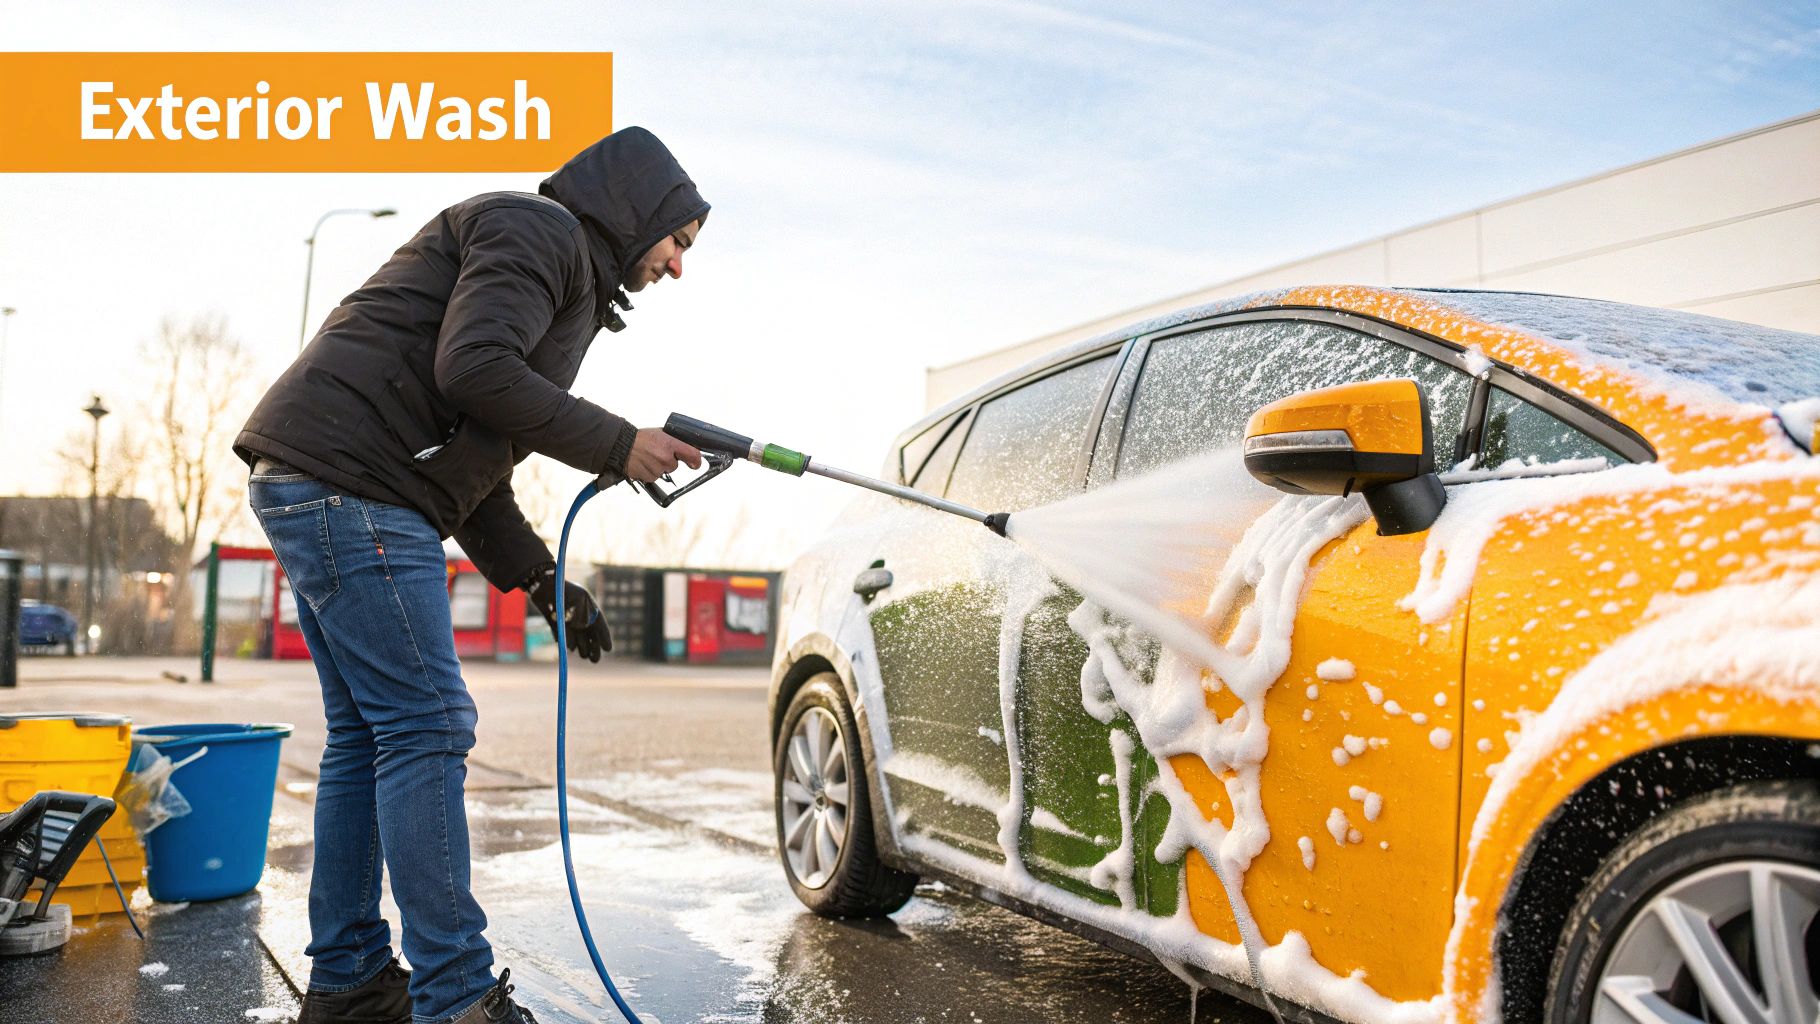
If there’s one thing every car enthusiast learns—sometimes the hard way—it’s this: never, ever start scrubbing a dry, dirty car. That’s the fastest way to create swirl marks, those fine, web-like scratches that seem to appear out of nowhere in direct sunlight. All that dust and road grime on your paint acts like sandpaper when you grind it in with a wash mitt.
This is exactly why we have the pre-wash. This critical first step is all about removing the worst of the grit and grime before your hands and a mitt ever touch the paint. And this is where your SwiftJet foam gun really shines, turning a standard garden hose into an essential tool for protecting your car's finish.
Nailing the Perfect Foam Consistency
The whole point of a foam gun is to create a rich, clinging foam—something that looks more like shaving cream than bubbly water. It's this thick consistency that allows the soap to hang on vertical panels and do its job. Watery suds just run right off, taking almost no dirt with them.
Getting that perfect foam blanket all comes down to the soap-to-water ratio in your SwiftJet canister.
- Lay the Soap Foundation: Start by pouring 2-4 ounces of a quality, pH-neutral car shampoo into the reservoir. You’ll get much better results with a soap specifically designed for foam cannons versus a generic car wash liquid.
- Top it Off with Water: Next, fill the rest of the canister with water. Pro tip: fill it slowly to keep the soap from sudsing up inside the bottle before it's even mixed.
- Give it a Gentle Swirl: Screw the lid on securely and gently swirl the canister to mix everything together. You don't need to shake it like a cocktail; a simple swirl is all it takes.
With your solution ready, just click the SwiftJet onto your garden hose. That dial on top is your secret weapon for controlling foam thickness. If you’re tackling a seriously grimy car, start with a richer setting (more soap) and adjust from there.
I see a lot of people make the mistake of thinking more soap equals a better wash. But if you make the mix too rich, the foam becomes heavy and just slides off in clumps instead of clinging. Take a minute to experiment with your soap and water pressure to find that perfect, sticky consistency.
The Art of Application and Soaking
How you spray the foam matters just as much as what’s in the bottle. The professional technique is to work from the bottom of the car to the top. This might feel backwards, but it prevents clean foam from running down dirty panels. It ensures the filthiest parts of your car—the bumpers and rocker panels—get the longest soak time.
Start low, then work your way up the doors, hood, and finally, the roof. Don't be timid with it; lay down a thick, even layer that covers every inch of paint.
Now for the easy part: waiting. This is called dwell time, and it’s when the cleaning agents in the soap get to work, breaking down and lifting dirt away from the surface. You'll want to let it sit for a good 5-10 minutes.
Patience is key, but you also have to watch the clock and the weather. Never let the foam dry on the car, especially in direct sun or on a hot day. Dried soap can leave stubborn spots that are a pain to remove. If it looks like it's starting to dry, it's time to rinse.
Rinsing It All Away
When your dwell time is up, it’s time to rinse. And just like with the application, there's a specific technique to follow.
For the rinse, you’ll reverse the process and work from the top down. Starting at the roof allows gravity to do the heavy lifting, pulling all the foam and loosened grime down and off the car.
Make sure to get into all the nooks and crannies—panel gaps, grilles, and around the side mirrors are all places where foam loves to hide. A thorough rinse is non-negotiable, as any leftover soap residue can interfere with the next stage of your wash.
If you really want to master your foam gun skills, our ultimate guide to choosing an auto foam gun has even more tips and tricks.
Once you’re done, you’ll have safely removed the vast majority of contaminants without ever having to touch the paint. Your car is now properly prepped for a contact wash, and you’ve significantly lowered the risk of adding any new scratches. This foam bath isn't just for show; it's the foundation of a truly flawless finish.
Getting Hands-On: The Safe Contact Wash & Drying Method
The foam has done its job, lifting and loosening the heavy stuff. Now it’s time for the contact wash, the part where you actually touch the paint. Your whole mission here is to get rid of that stubborn layer of traffic film without accidentally dragging grit across your car's delicate finish.
This is where the legendary two-bucket method comes into play. It’s what separates the pros from the amateurs, and it's surprisingly simple. You’ll have one bucket with your pH-neutral car soap mix and a second one that’s just clean water, preferably with a Grit Guard at the bottom.
Here's how it works in practice: after washing a small section, like one door panel, you dunk your dirty wash mitt into the plain water bucket first. Give it a good swirl against the Grit Guard. This knocks all the dirt and debris loose, which then sinks to the bottom, trapped beneath the guard. Then, and only then, do you dip your now-clean mitt back into the soapy water and move on to the next panel.
Start from the Top and Work Your Way Down
When it comes to the actual washing, the golden rule is simple: work from the top down. Let gravity be your friend. The roof is almost always the cleanest part of your car, while the lower areas—like the rocker panels and bumpers—are magnets for road grime.
Begin with the roof, then move onto the glass, the hood, and the trunk. From there, tackle the upper parts of the doors and fenders. You want to save the dirtiest lower sections for the very end. This systematic approach stops you from pulling nasty contaminants from the bottom of the car all over the cleaner paint up top.
One more pro tip: always use a completely separate wash mitt and bucket for your wheels and tires. Brake dust is incredibly abrasive, and you never want the mitt that cleaned your wheels to ever touch your car's paint.
The whole game is about managing contamination. By washing from the top down and using a dedicated rinse bucket, you’re drastically reducing the chances of creating those ugly swirl marks. It’s a simple process that makes a world of difference.
This graphic really puts the whole process into perspective, showing how a proper wash is the foundation for everything that follows.
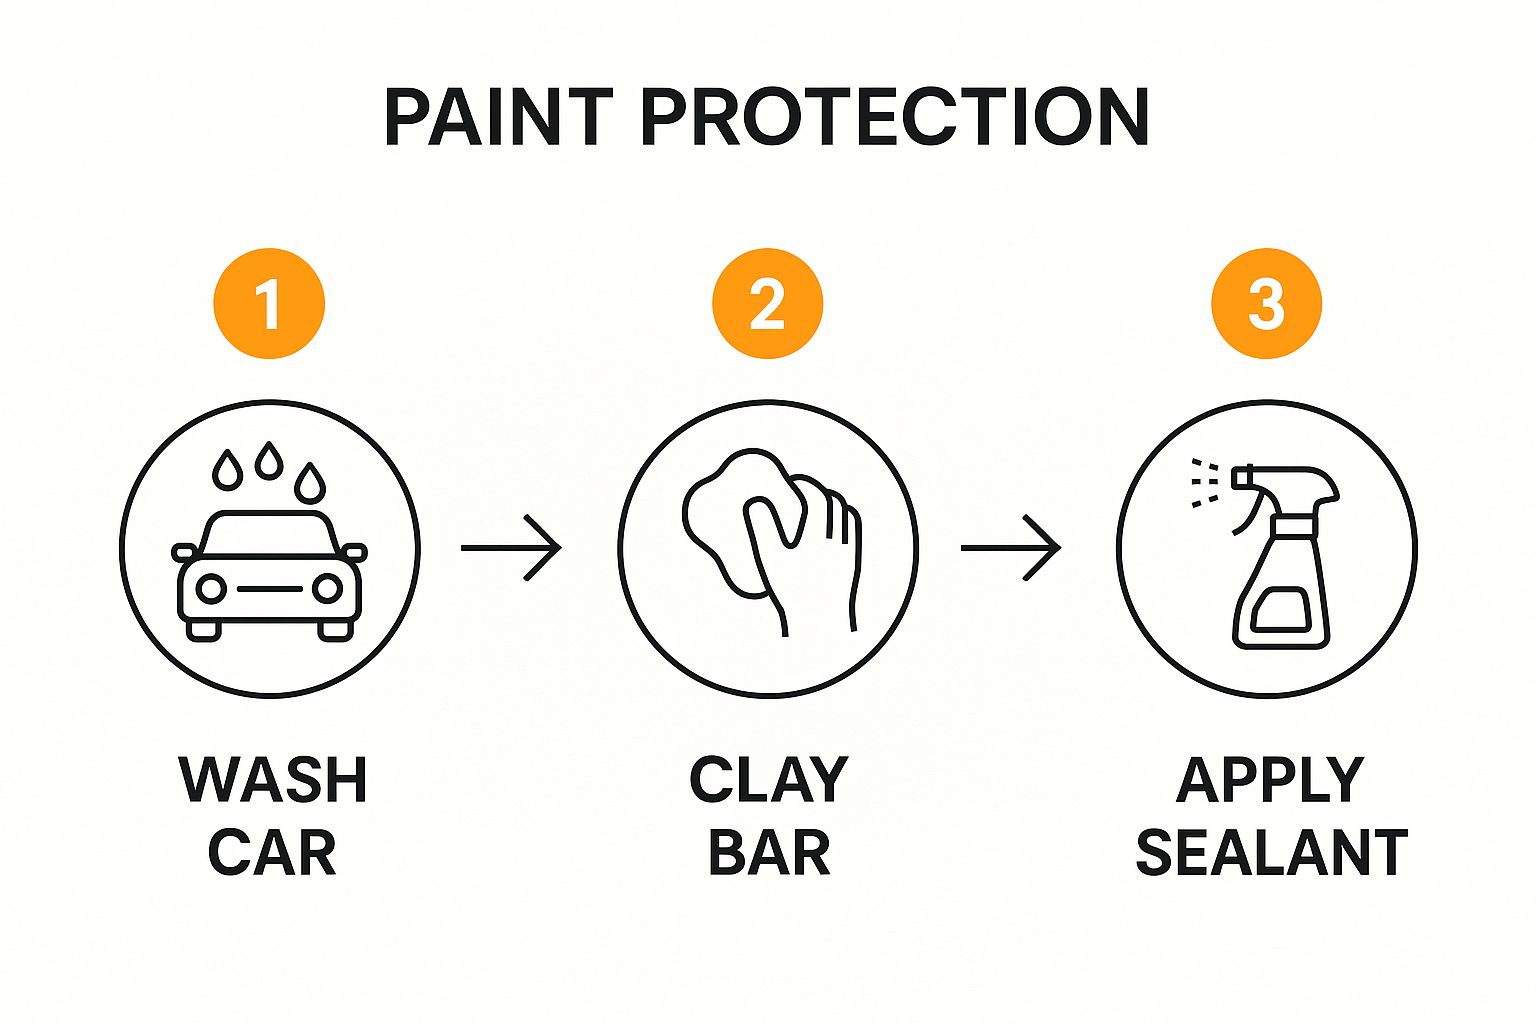
As you can see, you can't even think about claying or applying a sealant until you’ve nailed the wash.
Don't Ruin Your Hard Work: The Art of Drying
You've done everything right so far, but believe me, the drying stage is where many people undo all their careful work. Tossing an old bath towel on the paint or, even worse, using a squeegee blade is a recipe for scratches. You need a method that’s both gentle and incredibly effective.
The detailing world has moved far beyond old-school techniques, with a huge focus on paint preservation. This is why things like paint sealants and ceramic coatings are so popular, and that same careful mindset needs to apply to drying. You can read more about trends in car detailing practices to see just how much the industry prioritizes safe methods.
Here are the two best ways to get your vehicle bone-dry without causing any harm:
- The Blotting Method: This is my go-to. You'll need a large, high-quality microfiber drying towel—look for one that's 900 GSM (grams per square meter) or thicker. Instead of wiping and dragging, you just lay the towel flat across a panel, pat it gently, and lift. The ultra-plush fibers will wick the water away with almost zero friction.
- The Touch-Free Air Dry: For a 100% scratch-free finish, you can’t beat forced air. A simple electric leaf blower or a dedicated car dryer is perfect for this. It blasts water out of tight spots like panel gaps and mirror housings, and it gets the paint dry without anything ever physically touching the surface. This is the ultimate way to prevent water spots and swirls.
Honestly, the best approach is often a combination of the two. Use a leaf blower to get the majority of the water off, especially from all the little crevices, and then come back with a plush microfiber towel to blot any last remaining droplets. Nail these wash and dry steps, and you’ll be rewarded with a flawless finish every single time.
Reviving Your Car's Interior
Now that the outside has that perfect, swirl-free shine, let's bring that same energy inside. A truly detailed car feels just as good to sit in as it looks from the curb. Think about it—the interior is where you actually experience the car, and a clean, fresh cabin can completely change how you feel about your daily drive.
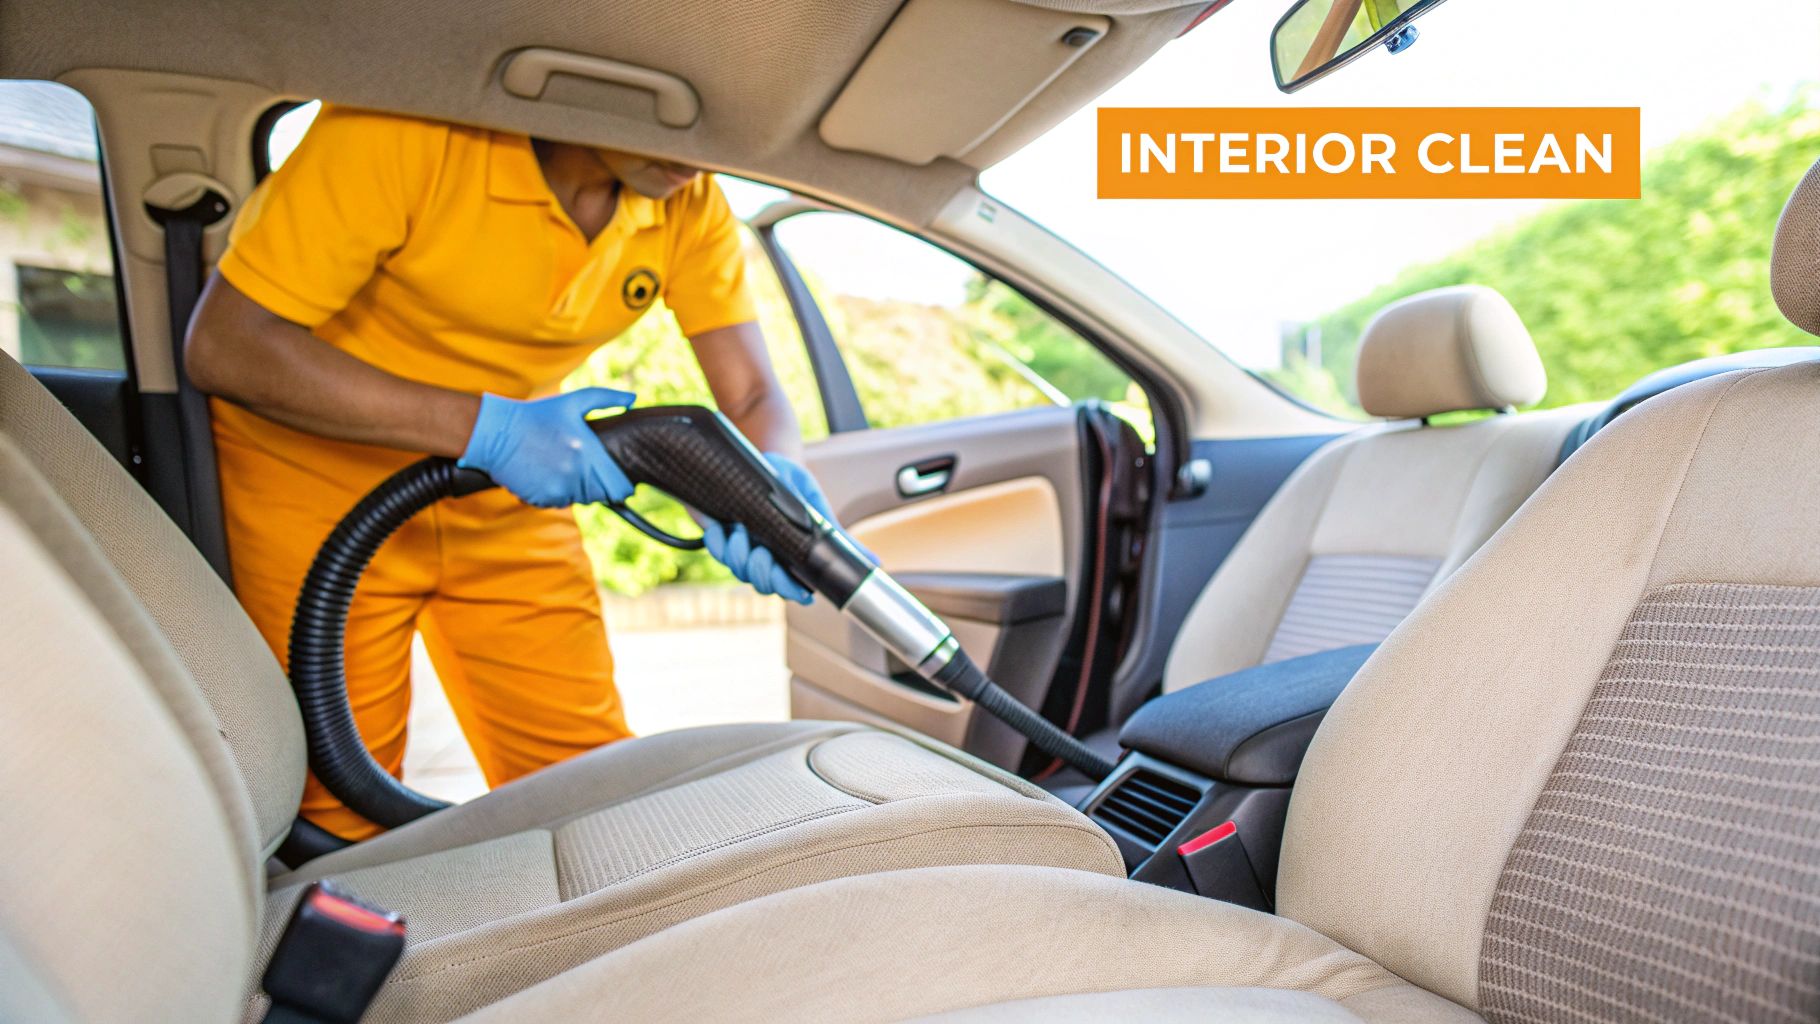
The whole process kicks off with a simple but non-negotiable first step: get everything out and give it a deep, thorough vacuum. This isn't just a quick once-over on the floor mats. It's about getting into every single nook and cranny to hunt down every last crumb and dust bunny.
The Foundation: A Proper Vacuum
Before you even touch a bottle of cleaner, you need a totally clean slate. Start by emptying the car completely. Pull out the floor mats, clear out the glove box and center console, and fish out whatever has been living under the seats. This is the only way to get unobstructed access to every surface.
Next, give those floor mats a good shake—or even whack them against a wall—to knock out all the caked-in dirt. Set them aside for now. Your best bet here is a shop vac with a couple of key attachments: a crevice tool and a soft-bristled brush.
- The Seat Shuffle: Slide the front seats all the way forward to get everything lurking underneath, then push them all the way back to clean the front half of the floor.
- Master the Crevice Tool: This attachment is your secret weapon. Use it to get deep into the seams of the seats, down the sides of the center console, and along every carpet edge.
- Brush and Vac Combo: For dusty air vents, switch clusters, and textured dash plastics, use a soft detailing brush to agitate the dust while you hold the vacuum nozzle right next to it. The brush kicks it up, and the vacuum sucks it away instantly.
Honestly, this initial vacuum is one of the most satisfying parts of the job. It sets the stage for everything that follows.
Cleaning All The Different Surfaces
With all the loose gunk gone, it’s time to focus on the different materials inside your car. A huge mistake I see people make is grabbing one of those generic, all-purpose cleaners and blasting everything with it. That stuff can dry out plastic, ruin leather, and leave behind a greasy film that’s a magnet for dust. The pro approach is to use the right product for the right surface.
For your dashboard, door panels, and other plastic trim, grab a dedicated interior cleaner. Here’s a key tip: spray the cleaner onto your microfiber towel, not directly onto the dash. This stops you from getting overspray on your windows or infotainment screen. Wiping with a cleaner-dampened towel lifts off the grime without leaving that cheap, shiny look.
My biggest pet peeve is a greasy, armor-alled dashboard. It looks terrible and can create a dangerous glare on the windshield. A quality interior detailer should leave behind a clean, matte, factory-fresh finish. That’s how you know you’ve got the good stuff.
If you've got fabric seats or carpets, you'll need a good upholstery cleaner. After vacuuming, lightly mist any stained areas and use a medium-stiff brush to gently work the cleaner into the fibers. You want to see a light lather, then use a clean, damp microfiber towel to blot the area and pull the dirt out. Just be careful not to soak the fabric—too much moisture can lead to mildew.
Leather seats need a special two-step process. First, use a dedicated leather cleaner and a soft brush to gently scrub the surface. This lifts out the oils and dirt that get trapped in the grain. Wipe away the grime with a clean microfiber towel. Right after cleaning, follow up with a quality leather conditioner. This puts moisture back into the leather and protects it from UV rays, which is what prevents it from cracking and fading over time.
Nailing The Final Details
The little things are what really separate a decent interior clean from a professional-level detail. People often forget about windows and screens, but they make a huge difference.
For perfectly streak-free glass, try the two-towel method. Use one towel with an ammonia-free glass cleaner to do the initial wipe-down. Immediately follow with a second, completely dry microfiber towel to buff the glass to a crystal-clear finish. Don't forget to roll the windows down about an inch to clean that top edge that always gets missed!
Infotainment screens and instrument clusters are incredibly easy to scratch, so be careful. Never spray any cleaner directly on them. Instead, lightly mist a fresh, soft microfiber towel and gently wipe the screen. This is one of the most important things to remember if you want to avoid a very expensive repair bill.
With every surface now clean and protected, your car's interior won't just look amazing—it'll feel and smell fresh, making every single drive that much better.
Get That Lasting Shine: It's All About Protection
You've done the hard work. After all that washing, claying, and careful drying, your car’s paint is perfectly clean, but it's also completely exposed. This is the crucial moment to lock in that incredible shine and shield your paint from the world. Applying protection is non-negotiable; it's the barrier that stands between your pristine finish and damaging UV rays, acid rain, and daily road grime.
Think of it as sunscreen and a raincoat for your car. A good wax, sealant, or ceramic spray creates a sacrificial layer that takes the beating so your factory clear coat doesn't have to. The bonus? You get that amazing water-beading effect, where water just rolls off, taking dirt along for the ride.
Choosing Your Shield: Wax, Sealant, or Ceramic?
The world of paint protection can seem overwhelming, but for most of us working in our own driveway, it really comes down to three fantastic options. Each one strikes a different balance between how long it lasts, the kind of shine it creates, and how you put it on.
Traditional carnauba wax is the classic choice. It’s loved by enthusiasts for the deep, warm glow it imparts, especially on darker-colored cars. It’s a joy to apply by hand, but it's more of a short-term fling, usually lasting only 4 to 6 weeks. This is perfect if you genuinely enjoy the ritual of waxing your car every month or so.
Then you have paint sealants. These are lab-engineered, fully synthetic products built for one thing: endurance. You won't get that same warm carnauba look, but you will get a sharp, almost glass-like shine. More importantly, you get much longer protection—typically 4 to 6 months. For a daily driver, a sealant is a brilliant set-it-and-forget-it option.
Finally, we have the new-school hero: ceramic spray coatings. These products deliver a taste of professional-grade ceramic technology in a simple spray bottle. The water beading is off the charts, and they leave the paint feeling incredibly slick and glossy. While they aren't a substitute for a true multi-year ceramic coating, a good one can easily give you 6 to 12 months of solid protection.
For a much deeper look at your options, check out our complete guide on how to protect car paint with these pro secrets.
Car Protection Product Showdown
Still on the fence? This table breaks down the key differences to help you pick the right shield for your ride.
| Protection Type | Durability | Shine Type | Application Difficulty |
|---|---|---|---|
| Carnauba Wax | 4-6 Weeks | Warm, Deep Glow | Easy |
| Paint Sealant | 4-6 Months | Sharp, Glass-like | Easy |
| Ceramic Spray | 6-12 Months | Slick, Hyper-Glossy | Very Easy |
Ultimately, the best choice is the one that fits your car and your lifestyle.
A Perfect Bond Starts with a Flawless Application
Whichever product you choose, your technique is what separates a good result from a great one. Always, always work on a panel that’s cool to the touch and out of direct sunlight. Trying to apply wax or sealant to a hot surface is a recipe for a streaky, frustrating mess.
Work in small, manageable sections, about 2x2 feet at a time. Using a foam applicator pad, apply a very thin, even coat of the product. Seriously, less is more here. A thin layer bonds better and is a thousand times easier to buff off.
Let the product cure and haze over according to the directions on the bottle—this usually just takes a few minutes. Grab a clean, plush microfiber towel and gently buff off the residue to reveal that brilliant shine. My pro tip? Always follow up with a second, completely clean microfiber for a final wipe-down to catch any "high spots" or remaining residue.
The secret to a durable, lasting finish isn't slathering on a thick coat of product. It's applying a micro-thin, even layer to a perfectly prepped surface. That’s how you get a proper bond.
Don't Forget the Finishing Touches
With the paint protected and gleaming, it's time to nail the details that pull the whole look together. Faded plastic trim and brownish, dull tires can completely undermine an otherwise perfect detail.
- Dress the Tires: Grab a quality water-based tire dressing to restore that deep, satin-black finish. Steer clear of those cheap, greasy silicone dressings that sling oily spots all over your fresh paint job.
- Restore the Trim: Use a dedicated trim restorer with UV protection on all your exterior black plastics, like the mirror housings or the cowl panel below the windshield. This not only brings back their rich color but, more importantly, prevents them from fading and cracking down the road.
These final steps are what frame your amazing paintwork. Now you can step back and admire a car that doesn’t just look clean—it’s deeply restored and properly protected from the elements. Job well done.
Common Car Detailing Questions Answered
Even with a solid game plan for detailing your car, questions are bound to come up. It happens to everyone. Let's tackle some of the most common ones I hear, so you can detail with confidence and sidestep those frustrating rookie mistakes.
How Often Should I Really Detail My Car?
This is probably the number one question I get. For a full-blown detail—we're talking clay bar, sealant, the works—you should aim to do it twice a year. Think of it as spring cleaning to prep for summer and a fall session to shield your paint from winter's harshness.
But don't let that be the only time you wash your car! Those maintenance washes with your SwiftJet foam gun are your best friend. Try to get one in every week or two. This quick wash stops dirt, bird droppings, and road grime from getting baked onto your paint.
Is It Okay to Detail My Car in the Sun?
I know it's tempting on a beautiful sunny day, but please, try to avoid it. The short answer is a hard no.
Direct sunlight heats up your car's panels, causing water and cleaning products to evaporate way too fast. What does that leave you with? Nasty water spots and streaks of dried-on chemicals that are a real pain to buff out. For the best results, always work in the shade, inside a garage, or wait for a cool, overcast day.
My Pro Tip: Sometimes you can't avoid the heat. If you're stuck working in warmer conditions, just work in smaller, more manageable sections. Wash and rinse one panel at a time, keeping the surface cool before applying any products. This little trick is a lifesaver for preventing spots and ensuring an even finish.
Will a Pressure Washer Damage My Paint?
This is a valid concern. The answer is yes, a pressure washer is perfectly safe... if you use it correctly. It’s fantastic for rinsing away thick grime and suds.
The key is to use common sense. Always use a wide-angle nozzle, like a 40-degree tip, and keep a safe distance of at least 12-18 inches from the paint. Getting too close or using a narrow, high-pressure stream is how you end up with chipped paint or damaged trim.
Ready to take your car wash game to the next level? The SwiftJet foam gun is designed to give you that thick, professional-grade foam for a safer, scratch-free wash right at home. Get your SwiftJet today and experience the difference.