
A true, professional-level car detail is so much more than just a wash. It’s a complete process that transforms your vehicle by deep cleaning, correcting, and protecting every single surface. This isn't your average weekend car wash; we're talking about a multi-stage approach that includes a pre-wash foam bath, a safe two-bucket hand wash, thorough paint decontamination, and a final protective layer that locks in a lasting, showroom-quality shine.
Your Definitive Guide to a Showroom Shine
Ready to turn your daily driver into a gleaming showpiece? Let's walk through how to do it right. This isn't about just slinging some soap and water—it's a meticulous, restorative process that you can absolutely master in your own driveway. We're going to demystify professional detailing and break it down into a simple, manageable workflow.
I'll help you cut through the confusing jargon and avoid the costly mistakes many beginners make. We'll cover everything from the must-have gear, like the SwiftJet Foam Gun, to the pro techniques that create that deep, wet-looking gloss. Most importantly, you’ll learn the why behind each step, from proper prep all the way to that final wax or sealant. This ensures your hard work not only looks incredible but also protects your car's value.
Understanding the Detailing Workflow
The secret to a successful detail is following a logical, structured approach. Each phase builds on the one before it, which is crucial for preventing things like swirl marks and getting the best possible finish. The idea is to work smarter, not harder, by using the right techniques at the right time.
This chart lays out the fundamental stages of any detailing project: preparation, cleaning, and protection.
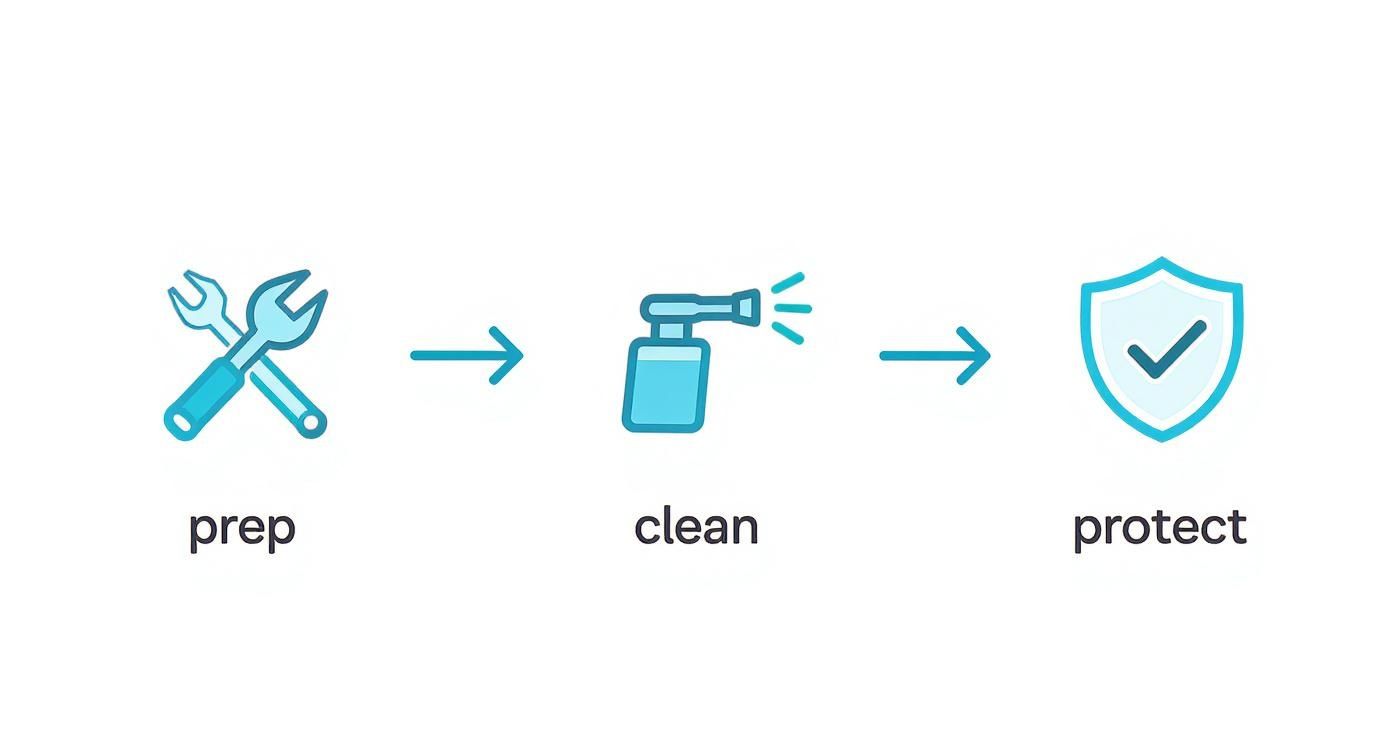
As you can see, the process emphasizes removing loose dirt before you ever touch the paint with a mitt. That right there is the number one way to prevent scratches.
Why At-Home Detailing Matters
Detailing your own car is more than just a hobby—it offers some pretty significant benefits. You get total control over the products and methods you use, letting you sidestep the harsh chemicals and abrasive brushes found in many automatic car washes. It's also an incredibly rewarding skill that saves you money and, for many of us, deepens the connection we have with our cars.
And it’s not just us—the interest in proper car care is exploding.
The global car detailing service market is booming, valued at USD 37.41 billion in 2024 and projected to hit USD 56.59 billion by 2032. This growth is driven by a much greater awareness of what it takes to properly maintain a vehicle. You can discover more insights about the car detailing market from Fortune Business Insights.
This guide is your ticket to joining this movement. It will give you the knowledge you need to get professional-grade results. Let's get started and unlock the secrets to that flawless finish that turns heads wherever you go.
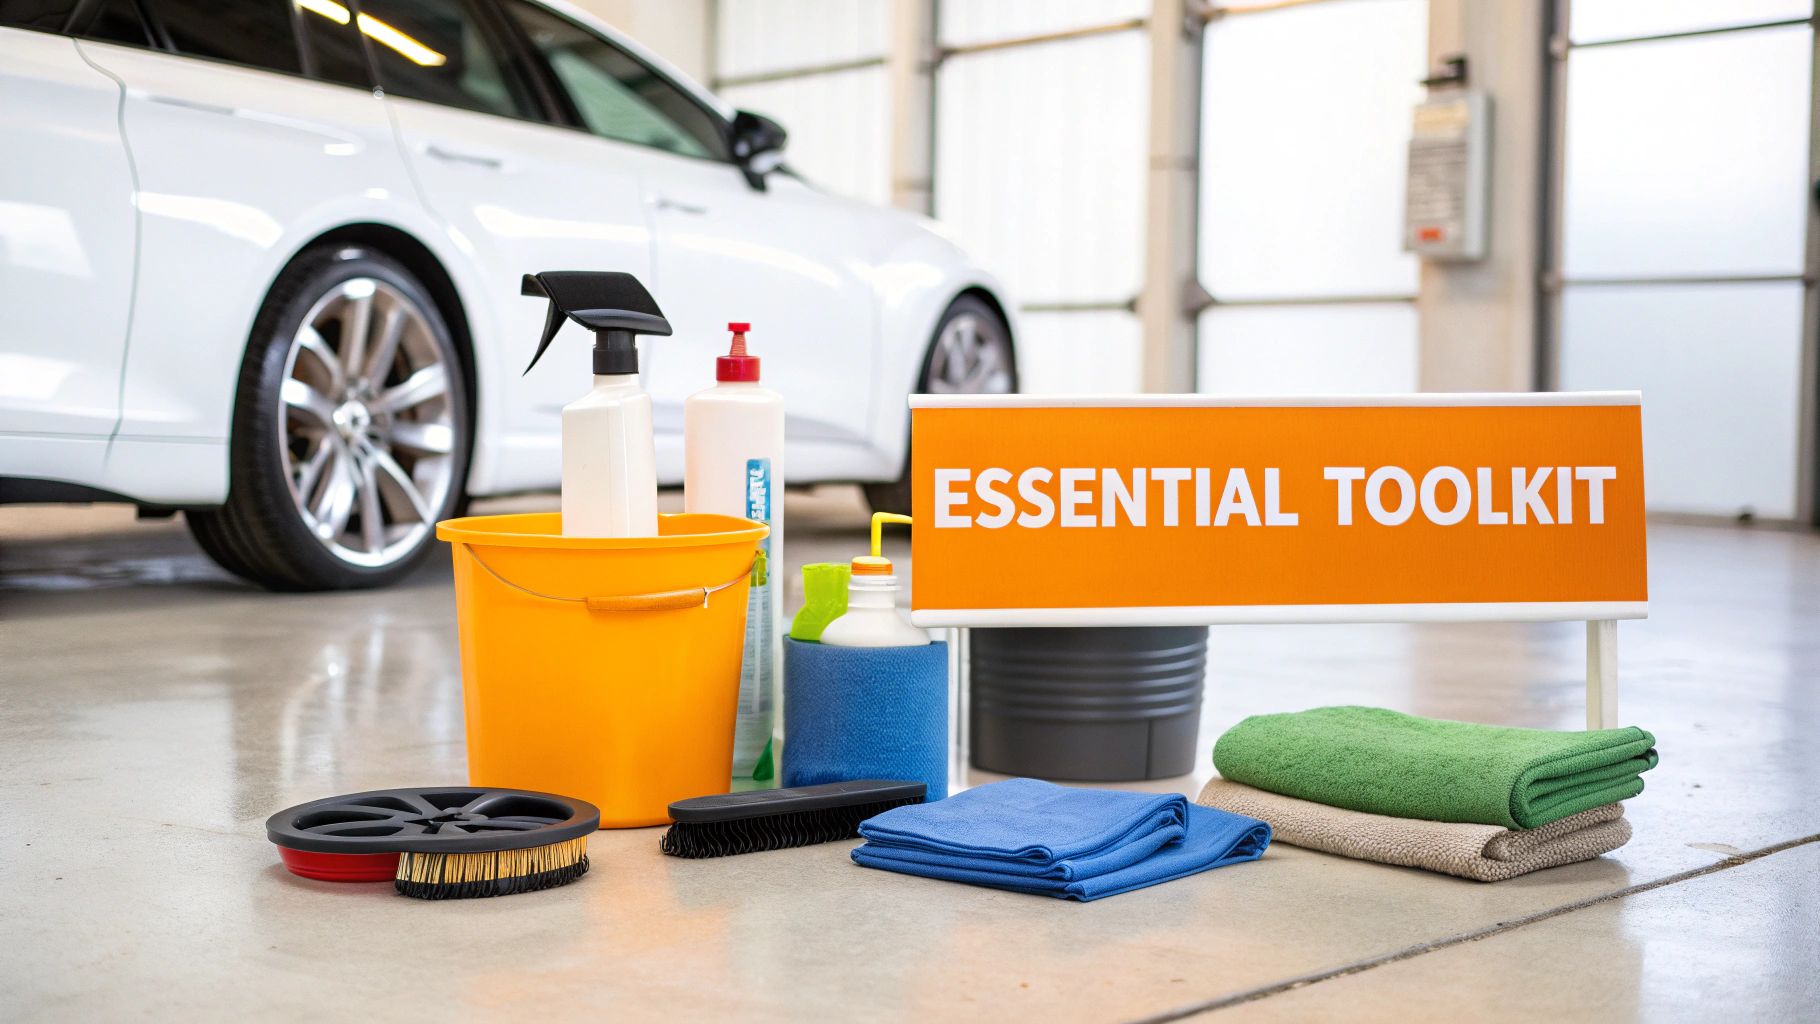
Setting Up Your At-Home Detailing Arsenal
Before you even think about firing up the hose, let’s talk tools. Getting that jaw-dropping, professional finish isn't about having a garage full of every gadget imaginable. It’s about having the right tools for the job.
Think of it this way: a master chef doesn't use a butter knife for everything. They have specific knives for specific tasks. Detailing is the same. The right gear not only makes the job easier and faster but, more importantly, keeps your car's paint safe.
The Heart of a Safe Wash
Most of the swirls and fine scratches you see on cars happen right here, during the wash. Your mission is simple: get the dirt off without grinding it into the paint. This is where a few key items are non-negotiable.
- Two Five-Gallon Buckets: This is the cornerstone of the two-bucket method. One bucket is for your sudsy shampoo, the other is just for rinsing your wash mitt. You'd be shocked at how much dirt you keep out of your clean water this way.
- Grit Guards: These are simple plastic grates that sit at the bottom of your buckets. When you dunk your mitt, you scrub it against the guard, which releases the dirt and traps it underneath. It's a cheap and incredibly effective way to protect your paint.
- A Solid pH-Neutral Car Shampoo: Step away from the dish soap! It's designed to strip grease, and it will do the same to your car's wax, sealant, and essential oils in the paint, leaving it totally exposed. A good pH-neutral shampoo cleans effectively while respecting the protective layers you've worked hard to apply.
Honestly, if you skip any of these three, you're just pushing grit around on your car's delicate finish.
Your Tools for Touch and Dry
With your bucket system ready, you need the right tools to get the suds on the car and, just as crucially, get the water off without leaving a trace.
First up is a high-quality wash mitt. Look for one made from plush microfiber or chenille. Its job is to hold tons of soapy water (for lubrication) and trap dirt deep within its fibers, pulling it safely away from the paint. Old sponges are a detailer's nightmare—they trap grit on their flat surface and act like sandpaper.
When it's time to dry, microfiber is your best friend. The quality is measured in GSM (grams per square meter)—the higher the number, the softer and more absorbent the towel.
- A Big Drying Towel (600+ GSM): Get a large waffle-weave or twisted-loop towel. These things are incredibly thirsty and will pull water off the big panels like the hood and roof in one or two passes.
- General Purpose Towels (300-400 GSM): These are your workhorses. Use them for drying door jambs, cleaning wheels, and buffing off waxes or sealants.
Pro Tip: Never, ever use fabric softener on your microfiber towels. It clogs the fibers and completely ruins their ability to absorb water and trap dirt. Wash them separately with a dedicated microfiber detergent if you can.
To see a full shopping list and make sure you haven't missed anything, take a look at our complete car detailing supplies list.
Tackling the Tough Stuff
Finally, you’ll need a couple of specialized cleaners for jobs that your regular car shampoo just can't handle.
A dedicated wheel cleaner is a must. It's formulated to dissolve the stubborn, baked-on brake dust and road grime that clings to your wheels. You also need a good, ammonia-free glass cleaner. Ammonia can damage window tint and dry out rubber seals, so an automotive-specific cleaner is key for streak-free, safe results.
To give you a clearer picture, here’s a quick-reference table of the essentials.
Essential Car Detailing Toolkit
| Category | Essential Items | Pro Tip |
|---|---|---|
| Washing | Two 5-gallon buckets, Grit Guards, pH-neutral car shampoo | Label one bucket "Wash" and the other "Rinse" so you never mix them up in the heat of the moment. |
| Application | High-quality microfiber or chenille wash mitt | Use a separate, cheaper mitt or sponge exclusively for wheels and lower body panels to avoid cross-contamination. |
| Drying | One large (600+ GSM) drying towel, several general-purpose (300-400 GSM) towels | After the final rinse, use a "sheeting" method with your hose (no nozzle) to let water run off in sheets. This leaves less for you to dry. |
| Specialty | Dedicated wheel cleaner, ammonia-free glass cleaner, detailing brushes | Use a soft-bristled brush to agitate the wheel cleaner in tight spots like around lug nuts and brake calipers. |
Getting all this gear together is the first real step toward detailing like a pro. Once you're properly set up, keeping your products organized is just as important. For ideas on creating a clean and efficient workspace, check out these guides on optimal garage storage and workbench setups. A tidy space makes for a much better detailing day.
Mastering the Pre-Wash and Foam Bath
Every pro detailer knows the secret to a flawless finish isn't in the wax—it's in the prep work. The most critical part of that prep is the pre-wash. This is our chance to get all the nasty, abrasive grime off the paint before we ever touch it with a wash mitt.
Think about it: if you skip this step, your mitt essentially becomes a piece of sandpaper, dragging all that grit across your clear coat. That’s how you get swirl marks. The pre-wash is all about working smart, letting the foam do the heavy lifting for you.
The First Rinse and Why Wheels Come First
Before you even think about foam, grab your hose or pressure washer and give the whole car a good rinse. You want to knock off all the loose stuff—dust, pollen, light mud. I always start at the roof and let gravity do its thing, pulling all that debris down and off the car.
With the loose dirt gone, it's time to zero in on the wheels. In any professional step by step car detailing process, you always, always do the wheels first. Why? Simple. They are by far the filthiest part of your vehicle, caked in corrosive brake dust and road gunk.
Cleaning the wheels first is a game-changer. It stops you from splashing all that potent wheel cleaner and brake dust onto the panels you just cleaned. It’s a simple trick that prevents a ton of rework and cross-contamination.
Get in there with a dedicated wheel cleaner and a good set of brushes. Make sure you hit the faces, the barrels, and everything in between. Once they’re looking brand new, give them a final, heavy rinse. Now we’re ready for the main event.
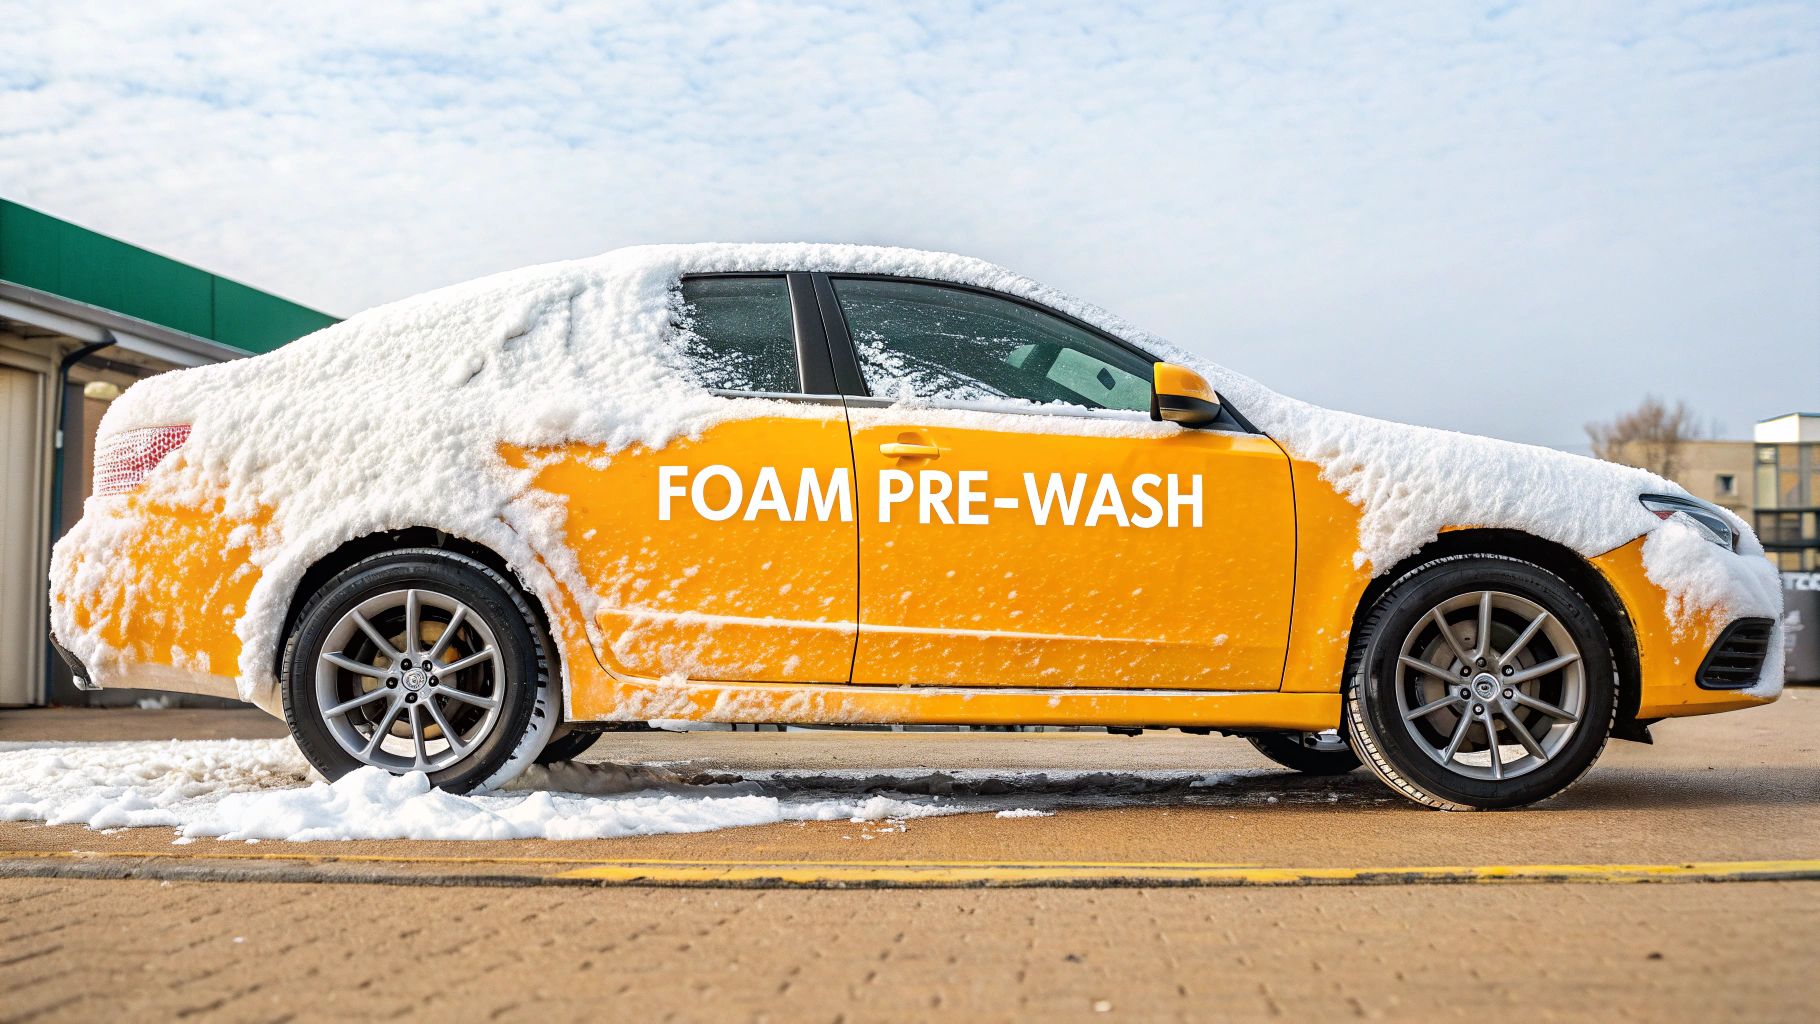
Unleashing a Blanket of Foam
This is where the real fun begins. Laying down a thick blanket of foam with the SwiftJet Foam Gun is the cornerstone of a safe wash. This isn't just for looks; that foam is working hard. The suds cling to the car, get into every nook and cranny, and start to soften and lift all that bonded-on grime.
As the foam slowly drips down the paint, it encapsulates the dirt and pulls it safely away. This drastically reduces the amount of grit left on the surface for when you start the contact wash.
Getting that perfect, shaving-cream-like foam is a bit of an art. It comes down to your water pressure, your foam gun settings, and the soap you’re using.
- Pick the Right Soap: You’ll want a quality, pH-neutral car shampoo made specifically for foam guns. These are engineered to produce those super thick, clinging suds.
- Get the Mix Right: I find a great starting point is 2-4 ounces of soap in your foam gun reservoir. Fill the rest with warm water—it really helps the soap dissolve and create better foam.
- Dial in the SwiftJet: The SwiftJet has an adjustable dial to control the foam thickness. I usually start on a higher setting to get that rich foam and then dial it back if needed. You're looking for foam that's thick enough to stick but not so heavy it just slides off in clumps.
If you really want to master your foaming technique, our guide on how to use a foam gun has even more pro-level tips.
Application and Dwell Time: The Waiting Game
With your foam gun ready to go, it’s time to cover the car. Start at the roof and work your way down, laying down an even layer on every single panel. Don’t forget the glass and trim! Overlap your passes slightly so you don't miss any spots. The goal is to make the car look like it just drove through a snowstorm.
Now, let it sit. The foam needs to dwell on the surface for a solid 5-10 minutes. This is where the magic happens. You’re giving the cleaning agents time to get to work, breaking the bond between the dirt and your paint. You can actually see the grime start to run down the car with the suds.
Essential Foaming Do's and Don'ts
| Action | Best Practice | Why It Matters |
|---|---|---|
| DO | Wash in the shade or on a cooler day. | Hot panels and direct sun will dry the foam out in seconds, leaving behind nasty water spots and soap scum that’s a pain to remove. |
| DON'T | Let the foam dry on the car. | If you see it starting to dry, rinse it off immediately. Dried soap can leave streaks and is much harder to wash off. |
| DO | Rinse thoroughly from the top down. | Use your pressure washer to blast away every last bit of foam. Pay close attention to panel gaps, mirrors, and trim where it loves to hide. |
After that final rinse, your car is not just cleaner—it's prepped for a truly safe wash. You’ve just removed the most harmful grit without ever having to touch the paint. Trust me, making this pre-wash routine a habit is the single best thing you can do to keep your car’s finish looking incredible for years.
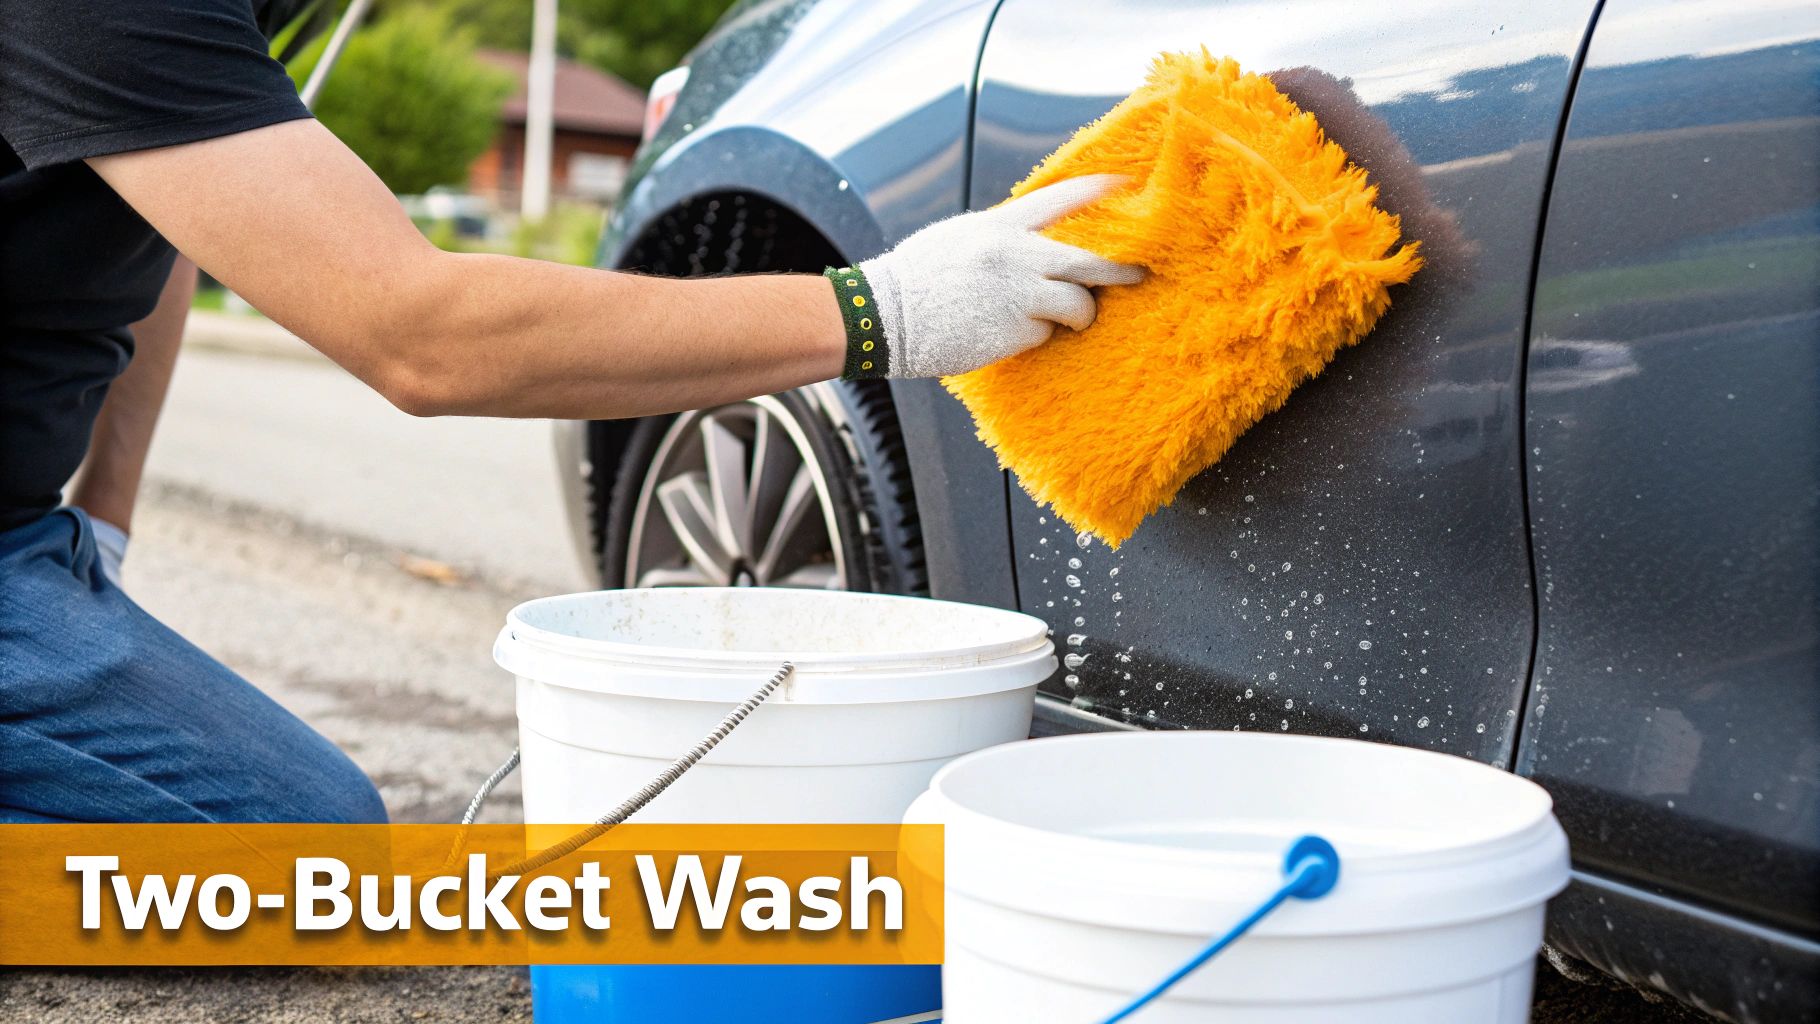
The Two-Bucket Hand Wash: Your Best Defense Against Scratches
Alright, the foam pre-wash has done the heavy lifting, getting rid of that top layer of loose grit. Now it’s time for the main event: the contact wash. This is the part that really separates a pristine, swirl-free finish from a paint job full of fine scratches. We’re going to do this the right way, using the time-tested two-bucket method.
Honestly, this technique is your number one weapon in the fight against swirl marks. It’s a brilliantly simple system that ensures the dirt you pull off your car stays off your car.
Getting Your Wash and Rinse Stations Ready
The setup couldn't be simpler. You just need two five-gallon buckets, but here’s the non-negotiable part: each one needs a Grit Guard sitting at the bottom. These simple plastic inserts are critical. They create a barrier that traps all the nasty grit at the bottom of the bucket so your mitt can’t pick it back up.
- The "Wash" Bucket: Fill this one about three-quarters of the way with water and add the right amount of your favorite pH-neutral car shampoo. Give it a quick blast with your hose to get a nice, thick head of suds going.
- The "Rinse" Bucket: This bucket is just for clean, plain water. Think of it as your mitt's decontamination station.
The whole method is just a simple cycle you repeat over and over. You'll dip your clean mitt in the soapy wash bucket, gently wash a small part of the car, and—this is the crucial step—you dunk and scrub that dirty mitt in the clean rinse bucket before ever going back for more soap. You will be shocked at how fast that "clean" rinse water turns into murky grey soup.
The Top-Down Wash Strategy
With your buckets set, you’re ready to go. The golden rule here is to always work from the top of the car downwards. It’s common sense, really. Gravity will pull dirty water down, so you don't want to wash your grimy rocker panels and then have all that filth run down over the clean doors you just washed.
I always start with the roof. Get a quality microfiber wash mitt loaded up with suds—lubrication is everything here—and gently glide it across the paint. Use straight, overlapping lines, not frantic circles. Circular motions are a surefire way to create noticeable swirl marks if you happen to pick up any stray grit.
After you finish a single panel (think half the roof, or one door), it's back to the buckets. Plunge your mitt into the rinse bucket and give it a good scrub against the Grit Guard. This dislodges all the contaminants it just picked up. Once it's clean, and only then, you can dip it back into your sudsy wash bucket and move on to the next section.
This methodical, panel-by-panel routine might feel a little slow at first, but trust me, it’s the secret to a truly professional-level wash. Rinsing your mitt after every single panel is the only way to guarantee you're only ever touching your paint with a clean, soapy mitt, dramatically cutting down the risk of scratches.
Choosing Your Weapon: The Right Wash Mitt
The tool you use is just as important as the technique. First thing's first: throw away any old-school sponges you might have. Their flat surface is notorious for trapping grit and dragging it across your paint like a piece of sandpaper.
Instead, invest in a quality wash mitt. Here’s a quick rundown of what to look for:
| Mitt Material | Why It Works | Best For |
|---|---|---|
| Chenille Microfiber | Its long, noodle-like fibers pull dirt deep into the mitt, safely away from the paint. | A fantastic all-rounder that's great for trapping larger dirt particles. |
| Plush Microfiber | Incredibly soft and gentle, it glides over the surface while offering excellent cleaning power. | Perfect for cars that are well-maintained or have more delicate paint. |
| Lambswool | The king of softness and water absorption. It provides the ultimate level of lubrication. | The go-to choice for show cars or dark-colored vehicles where every tiny flaw shows. |
No matter which one you pick, the idea is the same. The deep fibers are designed to pull dirt away from your car’s delicate clear coat. Pro tip: I always keep a separate, cheaper mitt just for the really grimy parts of the car, like the lower rocker panels and bumpers. This prevents me from dragging road tar and heavy brake dust all over the rest of the car. Following this system is the heart of a safe and truly effective hand wash.
Drying and Decontaminating Your Paint
All your hard work can go down the drain in these final steps. Seriously. One of the quickest ways to put fine scratches and annoying water spots on your paint is by drying it the wrong way, and that just undoes everything you've just accomplished. This stage isn't just an afterthought; it’s the bridge from cleaning to preparing the paint for that final, show-stopping protection.
The name of the game here is minimizing friction. Forget about that old-school chamois or, worse, an old bath towel. Instead, you need a large, plush microfiber drying towel—look for one with a high GSM (grams per square meter) rating. The best methods barely involve any rubbing at all.
Just lay the towel flat across a panel, like the hood or roof, and give it a few seconds to soak up the water. Then, lift it straight off and move to the next spot. We call this the blotting method, and it's by far the safest way to dry your paint. For vertical panels like your doors, try the dragging method: hold two corners and gently pull the towel down the surface in one fluid motion.
Forced Air for a Flawless Finish
Here’s a pro tip: even the plushest towel can’t get into every nook and cranny. Water loves to hide in places like mirror housings, grilles, and around emblems. It just sits there, waiting to drip out later and leave ugly streaks all over your perfectly clean car.
This is where forced air becomes your secret weapon. You don't need a high-dollar, dedicated car dryer; a simple electric leaf blower from your garage works wonders. Before you even touch the paint with a towel, blast the water out of all those tight spots. It's a quick trick that not only speeds things up but guarantees you get a truly drip-free finish.
Uncovering Hidden Grime with Decontamination
Okay, the car is dry, and it looks clean. But looks can be deceiving. Your paint is likely still holding onto a layer of stubborn, embedded gunk—things like industrial fallout, tree sap, and road tar that have literally bonded to the clear coat. A regular wash just won't touch them.
Go ahead, run the back of your hand gently over the paint. Does it feel anything less than perfectly smooth, like glass? If so, it's time to decontaminate.
This is where a clay bar or a clay mitt comes into play. These tools, when used with a lubricant, glide across the paint and shear off those bonded contaminants, leaving behind an incredibly pure surface. This isn't just for show; getting this grit off is absolutely critical before you even think about polishing or waxing.
A properly decontaminated surface is the true foundation for any wax, sealant, or ceramic coating. Without this step, you're just sealing in microscopic bits of grime, which prevents the protective layer from bonding properly and dulls the final shine.
The Clay Bar Process in Action
Using a clay bar might sound like something only pros do, but it’s surprisingly straightforward. There's just one golden rule: always use plenty of lubrication. A dedicated clay lube or even a quality quick detailer spray is non-negotiable. It’s what allows the clay to glide instead of stick, preventing any marring of the paint.
- Work Small: Tackle one small 2x2 foot section at a time. This ensures your lubricant doesn’t dry out before you’re done.
- Get It Wet: Liberally mist the section with your clay lube. You want the surface slick and dripping.
- Glide, Don't Press: Gently glide the flattened piece of clay over the lubricated area. Use straight-line motions, first horizontally, then vertically. You’ll actually feel and hear the contaminants being picked up by the clay.
- Feel the Difference: Once the clay glides silently with zero resistance, you know the area is clean. Wipe the lubricant residue away with a fresh microfiber towel.
- Keep It Clean: Check the clay surface often. As soon as you see it’s dirty, fold the clay in on itself and knead it to reveal a fresh, clean surface.
Want to really master this crucial part of your step by step car detailing routine? Our full guide on how to clay bar a car breaks it down even further. This is the process that turns a simple wash into a true detail and sets you up for an unbelievable shine.
This kind of attention to detail is exactly what people are looking for now. The U.S. mobile car wash and detailing market is expected to grow at a CAGR of 8.7% from 2025 to 2035, powered by demand for convenient, high-quality services. You can read the full research on mobile detailing market trends to see where the industry is headed.
Answering Your Top Car Detailing Questions
Even with the best guide in hand, you’re bound to run into a few questions once you start working. It happens to everyone. Let's dig into some of the most common things people ask when they're trying to get that perfect, professional-looking finish.
Getting these little details right is what separates a decent wash from a truly stunning detail.
How Often Should I Actually Detail My Car?
This is the big one, and the real answer is, "it depends." A full-blown detail—we’re talking wash, decontamination, paint correction, and protection—isn't a weekly chore. Honestly, doing it that often would be overkill and could even wear on your paint.
For a car you drive every day, a complete detail is really only needed 2-3 times per year. That’s the sweet spot for keeping it protected from the elements without going overboard.
But that doesn't mean you can ignore it the rest of the time.
- Maintenance Washes: This is your regular upkeep. A simple, safe wash using a foam gun pre-soak and the two-bucket method should happen every 1-2 weeks. This quick wash stops corrosive stuff like bird droppings and bug guts from baking into your paint.
- Factor in Your Climate: If you're dealing with road salt all winter or brutal sun in the summer, you might want to do a full detail every four months or so. This keeps that protective layer on your paint strong when it needs it most.
It all comes down to consistency. A series of gentle, regular washes will do far more for your car's finish than a single, aggressive cleaning session every six months.
Can I Wash My Car in the Sun?
I get this question a lot, and my answer is always a firm no, if you can possibly help it. Trying to detail a car in direct sunlight or when the panels are hot to the touch is a fast track to frustration.
When the surface is hot, water and soap evaporate almost instantly. This creates a couple of major headaches:
- Nasty Water Spots: As water evaporates, it leaves mineral deposits behind. On a hot surface, these can etch into your clear coat, leaving marks that are difficult or impossible to remove.
- Streaky Chemical Residue: Car shampoos and cleaners aren't meant to dry on the surface. When they do, they leave a streaky, filmy mess that’s a pain to clean off.
- No Time to Work: Your thick foam will turn into a dry crust before it has a chance to lift the dirt, and your clay lubricant will vanish, making the process ineffective and unsafe.
Always try to wash in the shade, inside a garage, or during the cooler parts of the day like early morning or late evening. If you absolutely have no other choice, you have to work incredibly fast on one small section at a time, constantly rinsing the entire car to keep it from drying. It's a challenge, to say the least.
Wax, Sealant, or Ceramic Coating? What's the Difference?
Walking down the car care aisle can be overwhelming. Waxes, sealants, and coatings all promise to protect your paint and make it shine, but they work very differently and last for different amounts of time.
Here's a quick breakdown:
| Protection Type | Made From | Lasts For | Best For |
|---|---|---|---|
| Wax | Natural (Carnauba) | Weeks to Months | Giving the paint a deep, warm glow. |
| Sealant | Synthetic Polymer | 4-6 Months | A slick, glassy finish with solid chemical resistance. |
| Ceramic Coating | SiO2 (Silicon Dioxide) | Years | Creating a hard, sacrificial layer with insane water beading and long-term protection. |
For most people starting out, a quality synthetic sealant is the perfect middle ground. It lasts much longer than a traditional wax but is way easier and more forgiving to apply than a full ceramic coating. It's a fantastic upgrade to any step by step car detailing process.
This shift toward more durable protection isn't just a local trend. Globally, the demand for advanced detailing is surging. The Asia Pacific car detailing market, for instance, is expected to grow at a CAGR of 9.68% between 2025 and 2030. It’s all driven by car owners wanting better products and services. You can learn more about these global car care market findings and see how the industry is changing worldwide.
Why Do I Still Get Swirl Marks After Washing?
There’s nothing more defeating than finishing a wash, pulling the car into the sun, and seeing a spiderweb of fine scratches. These swirl marks are almost always caused by grit being dragged across your paint during the wash and dry stages.
If you’re still seeing them, it’s time to audit your technique:
- Are you really using two buckets with grit guards? This one is non-negotiable for safe washing.
- Is your wash mitt perfectly clean? You have to dunk and scrub it against the grit guard in your rinse bucket after every single panel.
- Are you using enough lubrication? Never wash a dry-looking panel. The surface should be covered in thick, slick suds.
- How are you drying the car? Stop rubbing with a towel. Gently blot the water or use the "towel drag" method with a high-quality microfiber drying towel.
Preventing swirls is all about being careful and deliberate. It’s not a race. Every time you touch the paint, it should be with a clean, lubricated medium.
Ready to make every wash safer and more effective? The SwiftJet Foam Gun is your best defense against swirl marks, lifting away the most harmful grit before you ever have to touch the paint. It's time to elevate your detailing game.