

You spot it when the afternoon light hits the windshield: a pale, dry dashboard with a crack running toward the instrument cluster, or a soft vinyl pad that looks worse after every hot day. The first instinct is usually to buy a conditioner, spread it over the surface, and hope the damage disappears. Sometimes that works. Often, it only makes the dash shinier while the failure underneath keeps moving.
To restore a dash properly, start by identifying the material and the depth of the damage. A light scratch, a deep gouge, a cracked padded dash, and brittle plastic may all look similar from the driver's seat, but they need completely different repair methods. The right decision can save you from wasting products on a surface that needs reinforcement, removal, re-covering, or replacement.
Assessing Your Dashboard Damage Before Starting
Start with a hands-on inspection before choosing a product. Run a clean fingernail across each scratch. If the nail barely catches and the mark fades after light cleaning, the defect is probably limited to the finish. If your nail drops into a groove, material is missing, so the repair may require filler, texture work, and recoloring rather than conditioner alone.
Press gently around cracks and discolored areas. A firm panel with a narrow, stable split calls for a different repair from a soft or swollen section that shifts under light pressure. Softness can point to foam breakdown or separation beneath the visible vinyl. Professional dashboard repair guidance describes repairs that may involve removing the dashboard, disconnecting electronics, stripping foam and vinyl, and rebuilding the pad. That work belongs beyond a quick surface treatment.
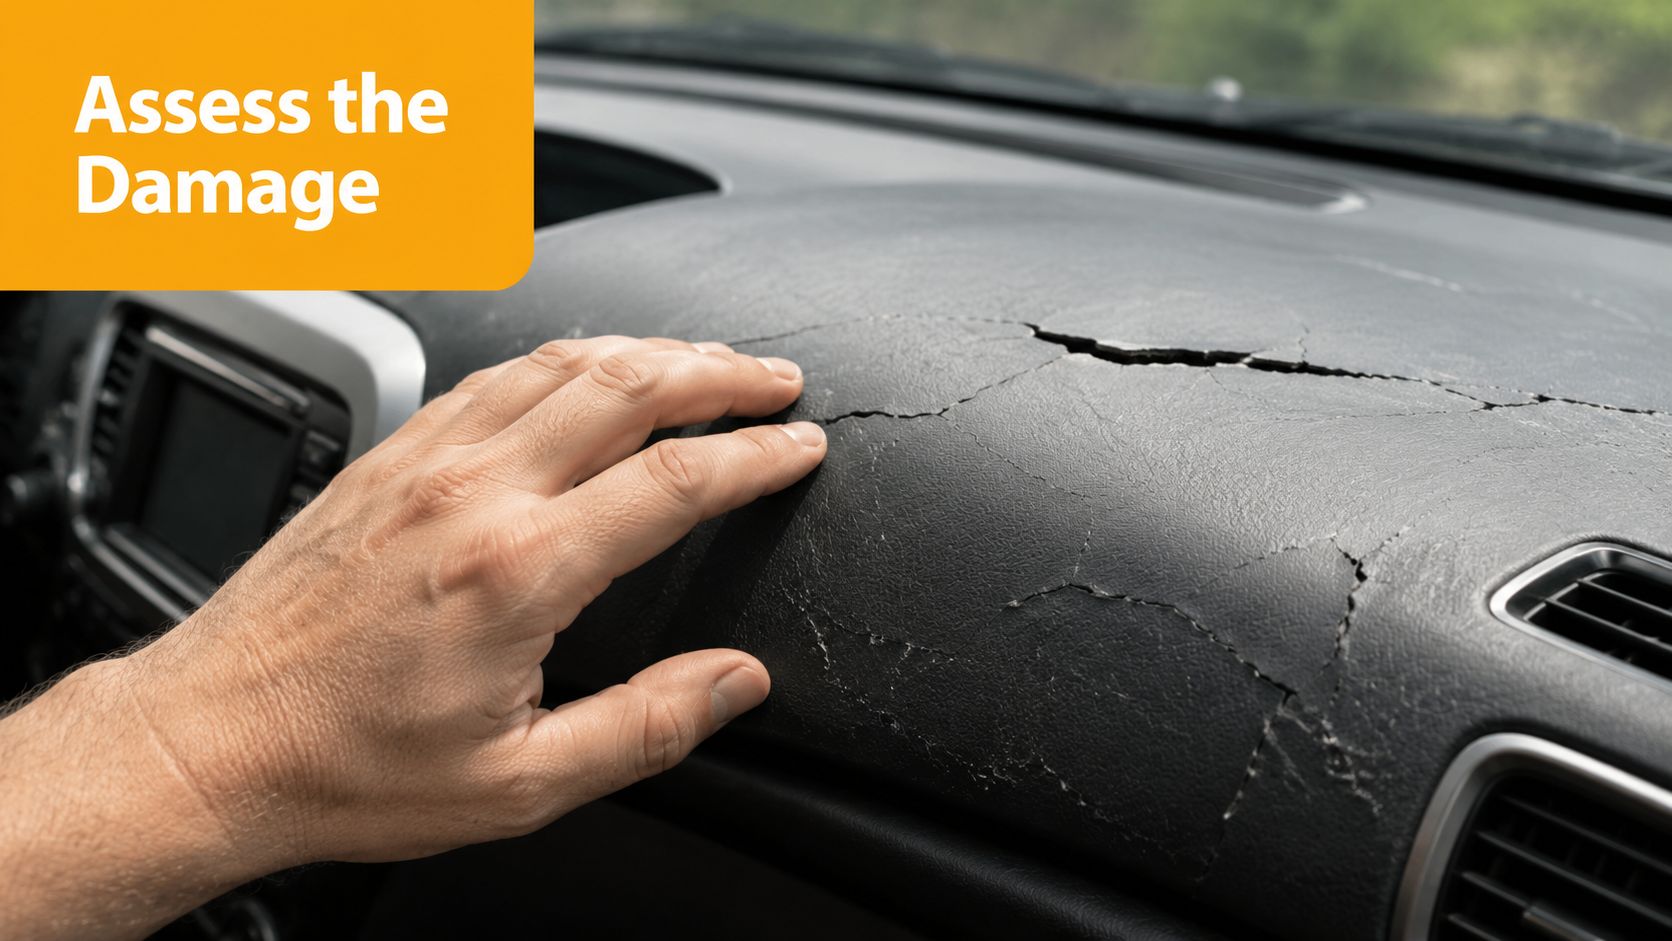
The inspection that prevents a bad repair
Examine the edges of every defect. A stable scratch has defined edges and no surrounding distortion. A spreading crack may show raised lips, branching lines, or a gap that changes when you press the panel. Delamination can look like bubbling or lifting, and a lightly tapped section may sound hollow.
Determine whether the damage is localized or widespread. One gouge beside a vent can justify a targeted cosmetic repair. A dashboard covered with cracks, fading, brittleness, and loose material has likely aged through the substrate. Filling the visible lines may improve its appearance briefly, while leaving the structure weak.
Sticky residue, discoloration, or unexplained marks can interfere with cleaners and repair chemicals. Use this contamination identification guide to help identify the residue before selecting products.
Your practical verdict
Use the inspection to choose the repair path:
- Light fingernail scratches: Clean, lightly abrade when suitable, then recolor or condition the affected area.
- Deep gouges: Stabilize loose edges, apply compatible flexible filler, and recreate the surface texture.
- Cracked padded sections: Inspect underneath. A moving, separated, or soft pad may need reinforcement or professional removal.
- Brittle plastic: Test a hidden area before using heat or recoloring products. Crumbling or distortion makes replacement the safer option.
A $20 conditioner can suit dry but stable material. It cannot stabilize a failing pad. Confirm that the visible defect is only a surface problem before applying filler, because a smooth repair will split again when the material beneath it continues to move.
Choosing the Right Repair Path for Your Damage Type
The best way to restore a dash is to match the repair to the failure, not to the product advertised as a universal solution. A conditioner can improve dry-looking vinyl, but it can't rebuild missing foam. A filler can level a gouge, but it won't hold a cracked pad together if the split continues through the substrate.
| Damage Type | Repair Approach | Skill Level | Expected Outcome |
|---|---|---|---|
| Light surface scratch | Clean, lightly prepare, use compatible recolor or dressing | Beginner | Improved appearance when the material remains firm |
| Deep gouge | Trim loose edges, apply flexible filler, sand, texture, and recolor | Intermediate | A blended repair, though close inspection may remain possible |
| Cracked padded dash | Access the underside, reinforce, bond with two-part epoxy, then finish the face | Advanced | Stronger repair when the substrate can still be saved |
| Brittle plastic interior | Localized heat-based grain transfer or replacement assessment | Advanced | Useful for small worn areas, unreliable for broad reconstruction |
Light scratches and deep gouges
A shallow scratch often needs less intervention than owners expect. Clean away dressing residue, inspect the sheen and grain, and test a small amount of compatible trim product in an inconspicuous spot. If the mark remains because material has been removed, move to a flexible filler rather than repeatedly applying polish.
Deep gouges require restraint. Remove only loose, lifted material, keep the repair area narrow, and build filler in controlled applications. The surface should be shaped to match the surrounding grain before color is applied. A perfectly flat patch can look more obvious than the original damage because the surrounding dashboard is textured.
Cracks, foam failure, and brittle plastic
A cracked padded dash becomes a structural job when the split opens under pressure, the panel flexes, or the foam beneath has collapsed. Restoration guidance recommends roughening the back, adding a splint or reinforcement, and bonding with two-part epoxy before finishing the visible surface (structural dash repair process). Surface-only filling is the wrong shortcut when the underside hasn't been stabilized.
Heat-based grain transfer has a narrower role. It can help on a localized area of heavily worn plastic, but practitioners caution against treating an entire panel this way because broad grain recreation is unreliable. If the plastic has become brittle across the dashboard, replacement or professional re-covering may produce a more dependable result than trying to disguise widespread failure.
Practical rule: If the panel moves, separates, or feels soft, stop treating it like a scratch.
Deep Cleaning and Surface Preparation
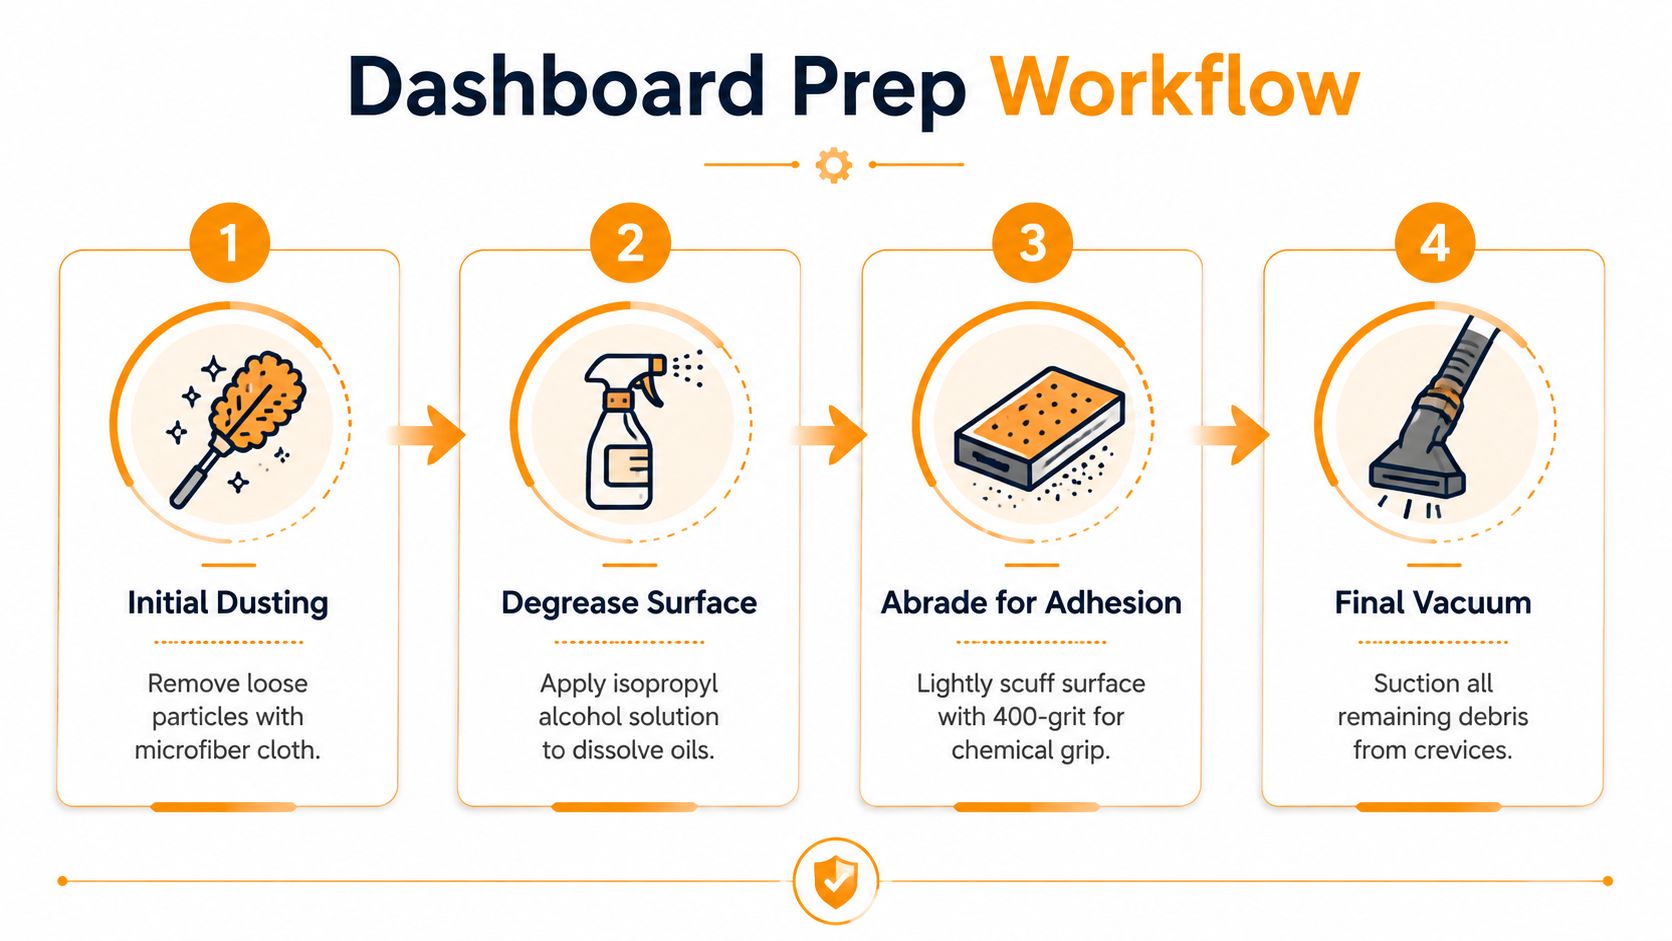
A dashboard can look clean and still reject every repair product. Silicone dressing, hand oils, dust, sunscreen, and degraded residue remain in the grain and seams, leaving filler, dye, or recolor coatings sitting on contamination instead of bonding to the panel. Preparation determines whether a cosmetic repair lasts.
Clean in stages
Begin with loose dust. Work a soft brush through vents, seams, and textured sections, then vacuum carefully around the instrument cluster and speaker grilles. Use a cleaner matched to the dashboard material, handling small sections so loosened residue does not dry back onto the surface.
After that wash, apply an alcohol-based prep to remove oily film. Test it in a hidden area first, particularly on soft-touch coatings and older vinyl. The panel should feel clean and even, with no greasy shine. A staged approach, covering deep cleaning, alcohol preparation, masking, and small-section application, is outlined in this plastic and vinyl preparation guidance.
Heavy contamination may justify professional cleaning before repair. If you need to compare methods or find interior detailing near Columbus, make sure the service understands delicate vinyl, coated plastics, and dashboard grain rather than treating every interior with the same chemical.
Prepare the repair area
Mask the windshield edge, vents, controls, adjoining trim, and painted surfaces. Use automotive masking tape and film wherever overspray or transferred color could reach glass. Wiping mistakes later can smear product into the grain, change the sheen, or push residue into narrow gaps.
A dash removal changes the job from surface work to structural restoration. Disconnect the battery before handling instrument components. Remove trim methodically, photograph connectors, label wires, and keep fasteners grouped by location. The panel must be out before underside reinforcement or pad rebuilding begins. Rushed removal can cause electrical faults and broken clips unrelated to the original damage.
Choose chemicals by material, not by convenience. Review this guide to interior car cleaner selection before applying a product to soft-touch or coated surfaces.
Create a bondable surface
Once dry, lightly abrade only the area specified by the repair or recolor system. Use controlled pressure around the defect and preserve factory grain beyond the repair zone. Vacuum sanding dust, wipe with the approved prep, and let the panel dry fully.
The surface should be dry, residue-free, and consistently dull where adhesion is required. If it still feels slick, clean it again. A conditioner may improve a sound, faded dash, but silicone left beneath filler or dye will undermine the repair.
Executing the Repair and Recolor Process
A dashboard can look better after filler and dye while remaining structurally weak underneath. Follow the repair order carefully: stabilize the crack first, fill and shape the surface second, recreate texture third, then recolor. Cosmetic work cannot compensate for a split panel or failing foam.
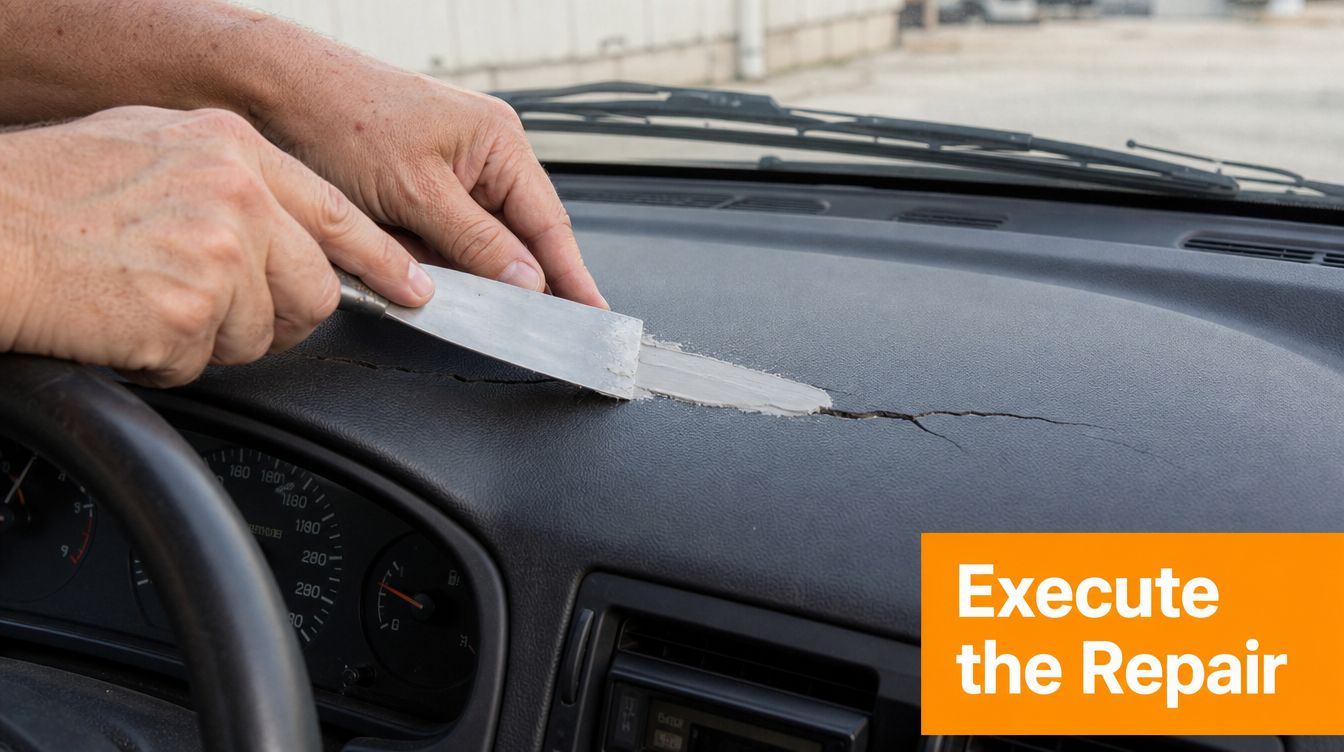
Stabilize cracks from behind
For a padded dashboard with a genuine split, access the rear whenever the vehicle and damage justify the extra work. Roughen the back surface around the crack, fit a suitable splint or reinforcement, and bond it with a two-part epoxy. The reinforcement must bridge sound material on both sides of the split, rather than resting only over loose edges.
Let the adhesive cure according to its instructions before shaping the front. Underside reinforcement improves mechanical integrity compared with filling only the visible face, as described in this reinforced dashboard repair method. If the foam has deteriorated extensively or the frame is damaged, stop treating the job as a cosmetic repair. A professional upholstery or restoration shop is usually the sensible choice.
Fill, shape, and recreate texture
Once the panel is stable, remove loose fragments and soften sharp edges without widening the defect unnecessarily. Apply a compatible flexible filler in thin, controlled passes. Allow each pass to cure fully, then sand it flush with the surrounding surface.
Texture matching determines whether the repair blends into the dashboard or remains visible. Use a compatible grain tool, texture medium, or localized transfer method suited to the material. Extend the work only far enough to blend the transition. A broad smooth patch surrounded by factory grain will reflect light differently, even when the color matches.
Heavily worn plastic may accept localized heat-based grain transfer. Test hidden plastic first and keep the heat controlled. Excessive heat can distort the panel, soften nearby material, or leave a repair that looks worse than the original wear. If the texture cannot be reproduced without enlarging the repair area, replace the panel or seek professional restoration instead.
Recolor in small sections
Apply trim restorer, dye, or recolor product in small sections. Thin, even layers provide better control of color and sheen. Let each layer dry completely before applying the next, then inspect the surface from several angles and under different lighting.
Over-application often causes streaking, uneven gloss, and transfer onto nearby paint or glass. If the surface looks wet and heavy, remove the excess according to the product instructions rather than adding another layer. Keep the finish close to the surrounding dashboard. A glossy patch can make a sound repair look artificial.
Use this dash and console trim detailing guide to compare the expected appearance of cleaned, restored, and recolored trim before committing to a large visible area. If the panel still flexes, the grain remains uneven, or color continues transferring after curing, the problem is beyond a surface-only fix. Reassess the structure before continuing.
Selecting Products That Match Your Dash Material
A dashboard that looks dry may need only a compatible conditioner. A split padded dash, loose surface, or missing material needs a repair system, and sometimes removal and rebuilding. Identify the substrate and the defect before buying products. Vinyl, hard plastic, soft-touch coatings, and leather-wrapped surfaces react differently to solvents, abrasives, fillers, and heat.
Match chemistry to the surface
For vinyl and padded dashboards, use a cleaner and flexible repair system made for automotive interiors. Flexible filler moves with temperature and vibration, while rigid body filler can crack or separate. Choose a recolor product compatible with vinyl or flexible trim, then match the surrounding panel's sheen instead of creating a high-gloss patch.
Hard plastic requires a different set of materials. Use a plastic-safe cleaner, adhesion preparation, plastic recolor, and dedicated plastic sealant rather than wax. Cosmetic products can look effective while failing quickly in strong sun, so a bright shine does not prove that the repair will last (dashboard repair and prevention guidance).
Leather-wrapped surfaces need leather-specific cleaning and conditioning. Vinyl dye or plastic solvent may damage the coating or flatten the grain. Soft-touch panels require even more restraint because aggressive preparation can remove the coating itself.
Separate appearance products from repair materials
A dressing changes appearance and may improve the feel of a dry surface, but it cannot close a gouge or stabilize a crack. Conditioner supports flexibility only while the material remains sound. Filler levels a defect, while dye or paint changes color. Missing foam requires rebuilding, not another surface product.
For initial cleaning, a hose-connected foam tool can loosen embedded grime from textured areas before manual brushing and wiping. It is a cleaning aid, not a repair system. Remove residue, mask adjacent surfaces, and apply the selected materials in controlled layers afterward.
Use this decision guide when assembling supplies:
- Sound but faded vinyl: Interior cleaner, alcohol-based prep, compatible recolor product, microfiber towels, and a UV protectant.
- Deep gouged vinyl: The same preparation materials, plus flexible filler, fine abrasive materials, and a texture-matching tool.
- Cracked padded dash: Removal tools, wire labels, reinforcement material, two-part epoxy, compatible filler, and a finishing system. Treat this as an advanced project, not a quick cosmetic touch-up.
- Worn hard plastic: Plastic-safe cleaner, adhesion prep, plastic recolor, localized grain-transfer materials, and a dedicated plastic sealant.
Read compatibility and curing instructions before application. A low-cost product becomes costly if it streaks, softens the substrate, or must be stripped before restarting. For cleaning chemistry, this reference on pH-neutral cleaning products helps with product selection.
Protecting Your Restored Dashboard from Future Damage
A dashboard can look repaired in the driveway, then start fading or lifting again after repeated hot-weather parking. Direct sun dries and weakens vinyl, foam, and plastic. Heat cycling adds stress to aged materials, so protection must begin as soon as the repair cures. Use dashboard UV prevention guidance when setting up a routine for shade, compatible protectants, and inspection.
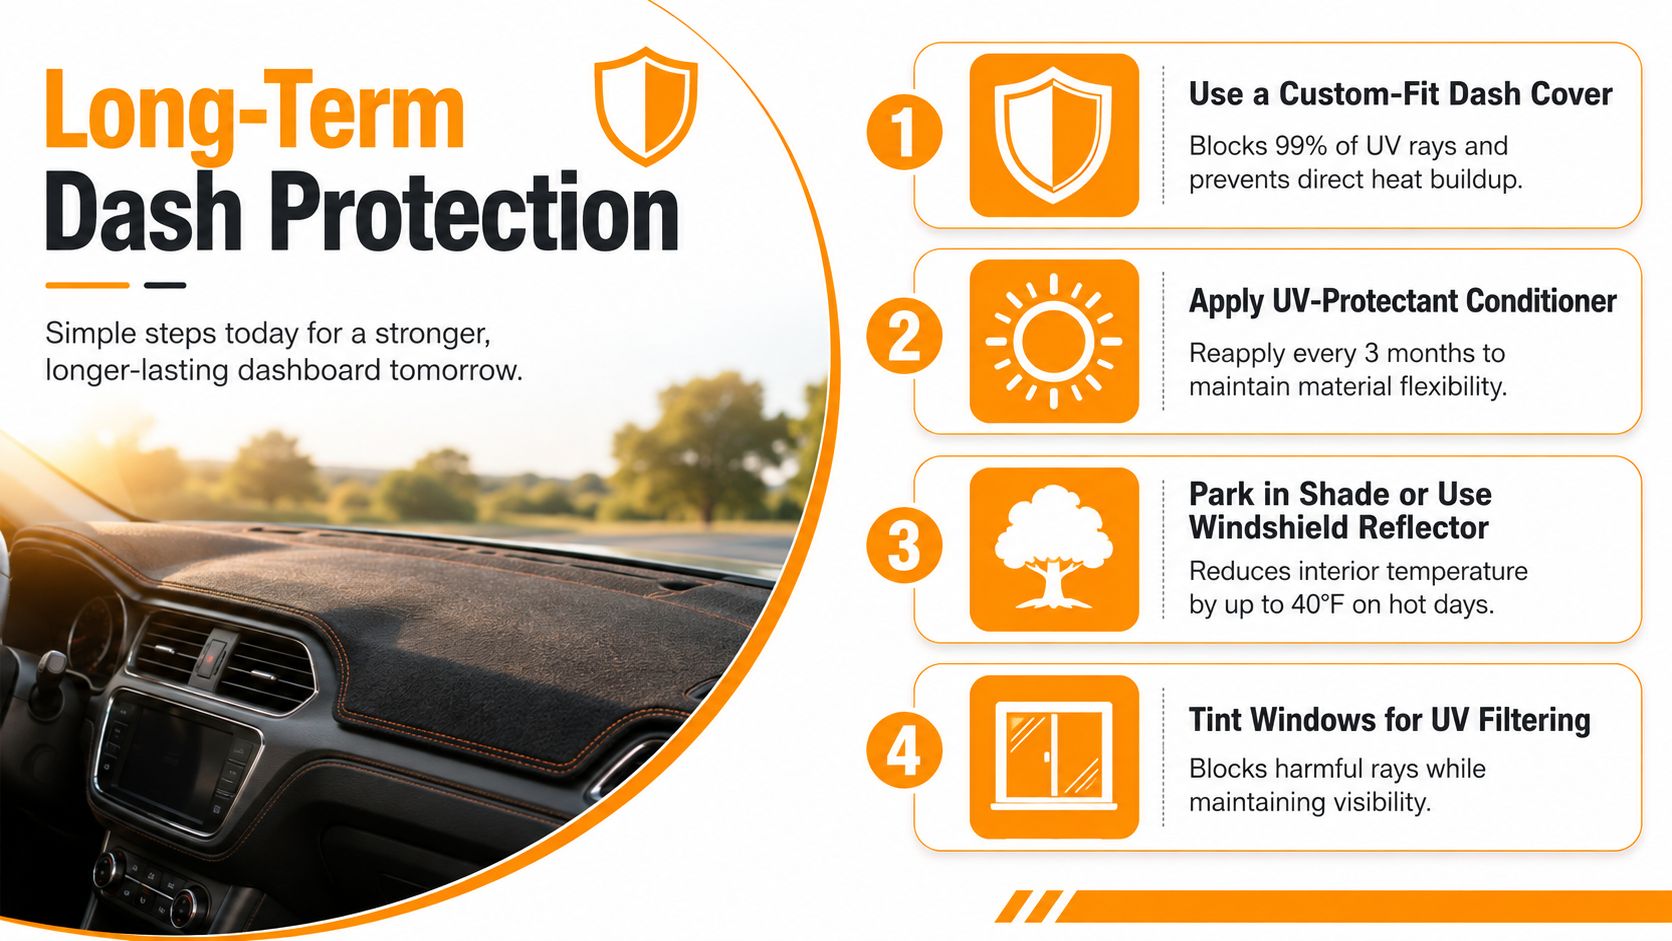
Fit a windshield sunshade whenever the vehicle is parked in direct light. It blocks sunlight and reduces heat reaching the dash. A properly fitted dash cover adds another barrier, while suitable window tint can reduce incoming UV exposure where legally permitted. Choose interior products made for the dash material. Avoid oily dressings that collect dust or leave glare on the windshield.
The repair is finished only when the protection routine begins.
Inspect the repaired area during regular interior cleaning instead of relying on a fixed lifespan. Remove dust and oil with a gentle cleaner, then reapply a compatible protectant according to its label and the vehicle's exposure. Check seams, filler edges, and recolored areas closely. If a seam lifts or a crack changes shape, stop applying dressing and repair the underlying problem before it spreads.
For a visual overview of practical protection habits, watch this dashboard care video:
A shaded, clean, properly conditioned dashboard will generally retain its finish longer than one left exposed and treated only after damage returns. For a daily driver in hot, sunny conditions, prevention usually costs less effort than repeating temporary cosmetic work. If the dash begins separating from its structure, protection products will not solve it. Remove and rebuild the dash instead, or hand that structural work to a professional.
SwiftJet helps with the cleaning stage using a hose-connected foam gun that lays clinging foam across textured, interior-safe surfaces before manual detailing. Visit SwiftJet to explore the tool and start your dash restoration with a cleaner, better-prepared surface.
