
Before a single drop of water touches your paint, a proper car wash begins with getting your gear in order. Having the right tools isn't just about making the job easier—it's your first line of defense in protecting your car's delicate finish from accidental damage.
Gathering Your Car Wash Essentials
The difference between a quick spray-down and a wash that actually protects your car is all in the supplies. It’s tempting to grab some dish soap and an old bath towel, but trust me, that’s a recipe for disaster. Those household items can strip away your car's wax and sealant, leaving the paint vulnerable, and old towels are notorious for creating fine scratches and swirl marks. A small investment upfront in proper equipment will save you a headache later and keep your car looking its best.
Your main weapon in this fight against grime is a good car shampoo. You'll want to find a pH-neutral formula. These soaps are engineered to lift dirt and road film without compromising any protective layers like wax or ceramic coatings. Harsher, more aggressive cleaners can do more harm than good, leaving your paint exposed to the elements.
The Foundation of a Scratch-Free Wash
If there's one technique that separates the pros from the amateurs, it's the two-bucket method. For anyone who's serious about keeping their paint pristine, this is non-negotiable. It's a simple concept: one bucket is for your soapy water, and the other is just for clean rinse water. After washing a panel, you dunk your dirty mitt into the rinse bucket first, releasing all the grit before you dip it back into the clean, soapy water.
To really level up this method, drop a grit guard into the bottom of each bucket. This little plastic grid acts as a washboard for your mitt and traps all the nasty stuff at the bottom, so you're not accidentally dragging it back onto your car.
The entire goal is to make sure only a clean mitt and fresh suds ever touch your paint. Isolating the dirt in a separate rinse bucket is the single best thing you can do to prevent those dreaded swirl marks.
Choosing the Right Tools for the Job
Beyond the buckets and soap, a few other pieces of gear are absolute must-haves. A plush microfiber wash mitt is far superior to any old sponge, as its long fibers pull dirt away from the surface instead of grinding it in. The same goes for drying—a high-quality microfiber drying towel is essential.
To round out your setup, here are a few other items I always have on hand:
- A separate wheel bucket and a few brushes to attack that stubborn brake dust. You never want the tools that touch your filthy wheels to touch your paint.
- A foam gun like the SwiftJet. It hooks up to a regular garden hose and covers the car in a thick layer of suds, which helps loosen up the heavy dirt before you even touch it with a mitt.
- A stack of high-quality microfiber towels specifically for drying. This is how you avoid frustrating water spots and streaks for a perfect finish.
If you're looking to build out your detailing arsenal from scratch, we've put together a full rundown in our car detailing supplies list.
Setting the Stage for a Scratch-Free Wash
Before a single drop of soap touches your car, the real work begins. Where you wash and how you start are the two things that make or break a good detail. Get them wrong, and you’re setting yourself up for swirl marks and a lot of extra work.
First things first: get out of the sun. This is probably the most common mistake I see people make. Washing a car in direct sunlight is a recipe for disaster, causing water and soap to evaporate almost instantly. This leaves behind nasty water spots—mineral deposits that can actually etch into your paint’s clear coat over time. Do yourself a favor and find a shady spot, whether it's in a garage, under a carport, or just next to a big tree.
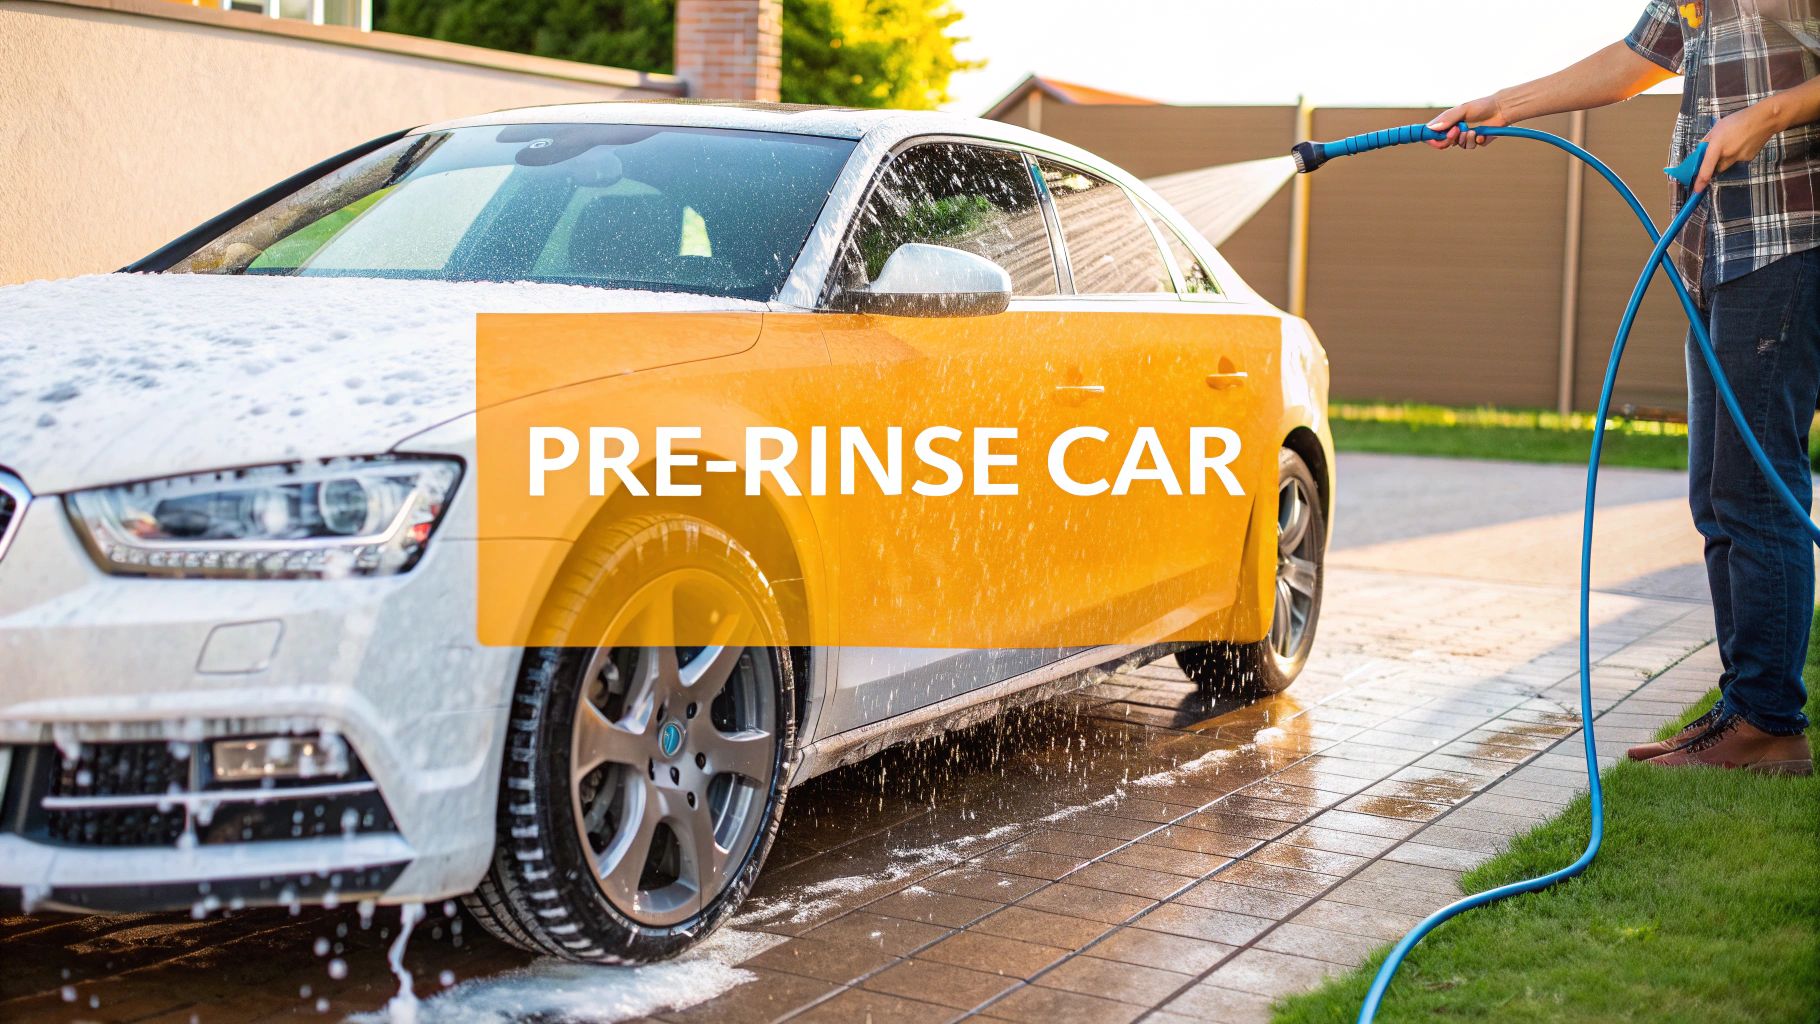
The All-Important Pre-Rinse
Once you’re in the shade, it’s time to rinse. And I don’t mean a quick splash. The pre-rinse is your first line of defense, designed to knock off all the loose grit and grime before you ever touch the paint with a mitt. Think of it this way: you’re clearing away the tiny, scratchy particles that do the most damage.
Grab your garden hose or a pressure washer on a safe, low setting, and give the entire vehicle a thorough rinse. I always follow a top-down approach to let gravity do some of the work for me.
- Start with the roof and let the water carry the dirt downwards.
- Move on to the glass, then the hood and trunk.
- Work down the side panels, saving the dirtiest parts for last.
- Finish with the lower areas like bumpers, rocker panels, and wheels, which are always caked with the worst road grime.
This initial rinse is non-negotiable for preventing swirl marks. A good, patient pre-rinse can remove up to 70% of the loose dirt and grit. That's a huge reduction in the risk of scratching your paint when you finally start the contact wash.
Taking your time here means that when you do bring out the wash mitt, you're only dealing with the grime that’s truly stuck on the surface, not a layer of abrasive sand. This is the foundation of a safe and effective car wash.
Applying a Pre-Wash Foam Blanket
Now that you've knocked off the loose dirt, it’s time for the fun part: laying down a thick blanket of foam. This isn't just for show; it's a critical step that pros use to do most of the heavy lifting before they ever touch the paint. Using a foam gun like the SwiftJet, you’ll create a rich layer of suds that goes to work, softening and encapsulating the stubborn grime your first rinse left behind.
The real secret here is dwell time. As that foam sits on your car, the cleaning agents are busy breaking down road film, bug guts, and bird droppings. This process lifts the grit away from the surface, meaning there's way less abrasive gunk to scrub off later. Ultimately, this dramatically reduces the risk of creating those dreaded swirl marks and fine scratches during the contact wash.
Mixing the Perfect Foam Solution
Getting that thick, shaving-cream-like foam all comes down to the right soap-to-water ratio. This isn’t an exact science, as your water hardness and the specific car shampoo you use can change the formula.
Here’s a good starting point:
- Check the soap bottle. Most brands recommend a starting dilution, which is often around 1 part soap to 10 parts water.
- Fill the canister correctly. Pour your soap in first, then slowly add the water. This little trick prevents you from creating a sudsy mess inside the canister before you even start.
- Dial it in. If your foam looks a bit thin or watery, don't be afraid to add a little more soap on your next wash. You'll quickly find the sweet spot for a perfect, clinging foam.
As the image shows, this pre-wash stage is what sets you up for a safer and more effective hand wash.
Application Technique and Dwell Time
With your SwiftJet loaded and ready, begin foaming the car from the top down. Gravity is your friend here, as the suds will naturally run down and give the dirtiest lower sections of your car a little extra soaking time. Make sure you get complete and even coverage—every nook and cranny should be covered in foam.
The most important thing to remember is patience. Let the foam sit and work its magic for at least 3-5 minutes. You’ll actually see the dirt and grime start to drip right off the car. Just be sure you don't let it dry on the paint, especially if you're washing in the sun.
Once the foam has had time to do its job, give the car another thorough rinse, again working from top to bottom. You'll be surprised how much cleaner the vehicle looks already.
Getting this step right often comes down to the equipment. If you're looking to dive deeper into what makes a great foam gun, check out our ultimate guide to choosing an auto foam gun.
Getting the foam consistency right is key, and the SwiftJet's adjustable ratio dial makes it easy. Here's a quick guide to help you choose the right setting for the job.
Foam Gun Settings for Optimal Cleaning
| Setting (Ratio Dial) | Foam Type | Best Used For |
|---|---|---|
| 1-2 | Wet, Runny Foam | Light dust, routine weekly washes, or when using highly concentrated soaps. |
| 3-4 | Medium, Clingy Foam | The "sweet spot" for most washes. Ideal for moderate dirt and road film. |
| 5 | Thick, Shaving-Cream Foam | Heavy-duty cleaning for very dirty vehicles, bug removal, or caked-on mud. |
Remember, these are just starting points. The perfect setting for you might vary based on your water pressure and the specific soap you're using, so feel free to experiment to find what works best for your setup.
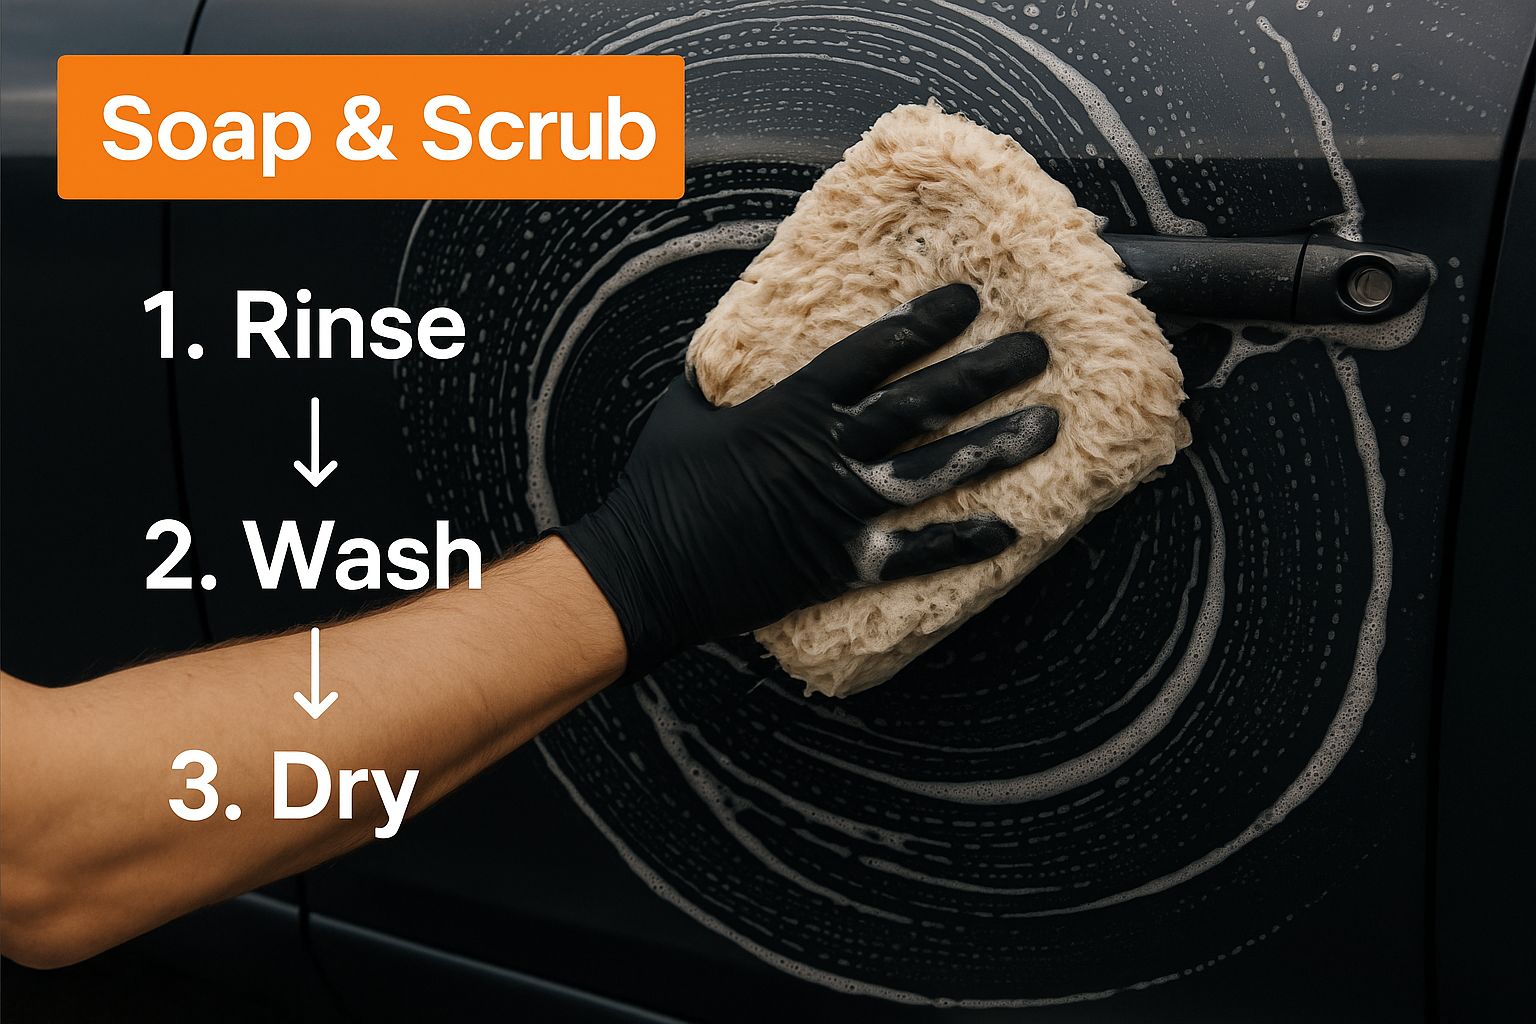
Tackling the Contact Wash with the Two-Bucket Method
The pre-wash foam did its job, lifting away the worst of the grime. Now it's time to get hands-on with the contact wash. This is where your technique really matters, because this is where swirl marks are born—or prevented. The single best way to protect your paint is by using the two-bucket wash method.
It sounds simple because it is. You have one bucket filled with your favorite pH-neutral car soap and another with plain, clean water. The clean water bucket is your rinse station, and this separation is the secret sauce. Instead of plunging a dirty wash mitt straight back into your clean suds, you'll rinse it thoroughly in the water bucket first.
Why Grit Guards Are a Must-Have
To really level up this process, drop a grit guard into the bottom of each bucket. Think of this little plastic disc as a washboard for your mitt. It scrubs off the dirt and grit you've just pulled from your car's paint.
Even better, it traps all that nasty stuff at the bottom of the bucket, keeping it far away from your mitt and your car’s delicate clear coat.
This one simple change—keeping your wash water clean—is what truly prevents micro-scratches. You stop yourself from rubbing abrasive dirt back into the paint, which is what dulls the finish over time.
Want to get the full rundown on this essential piece of gear? Check out our complete guide on using a car wash bucket with a grit guard.
Your Washing Technique Matters
With your buckets set up, grab a quality microfiber wash mitt, load it up with suds, and get to work. Always start at the top of the car and work your way down, one panel at a time.
Here are the key things to remember:
- Go in straight lines. Forget what you saw in old movies. Washing in circles is the fastest way to create noticeable swirl marks. Straight-line passes are much harder to see if they create any micro-marring at all.
- Let the soap do the work. There's no need to scrub. A good soap provides plenty of lubrication, allowing your mitt to glide over the surface and lift the dirt away gently.
- Rinse that mitt constantly. After cleaning a small section, like half a door, dunk your mitt in the rinse bucket. Rub it against the grit guard to release the trapped dirt. Then you can go back to the soap bucket for more suds.
This isn't about speed; it's about being methodical. This careful approach is what separates a quick rinse from a true detail, ensuring you leave behind nothing but a clean, glossy, and scratch-free finish.
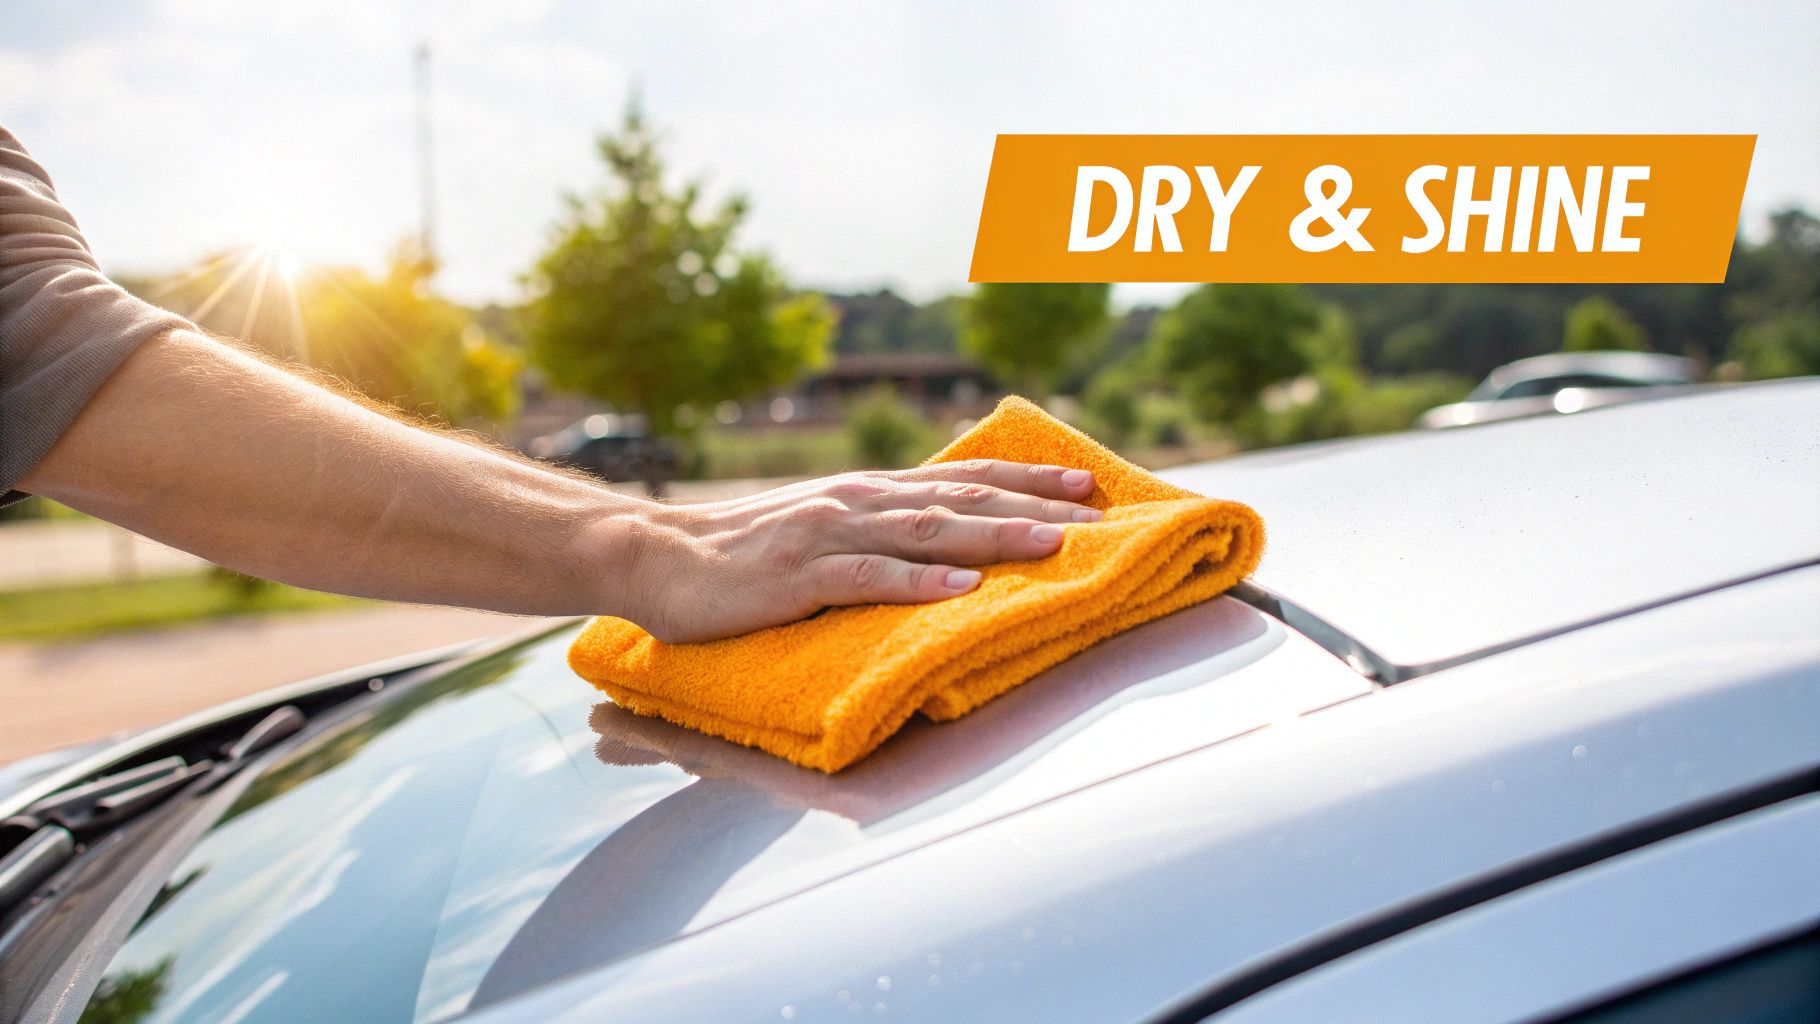
Achieving a Spotless Rinse and Dry
It’s easy to think the hard part is over, but all your careful washing can be undone in the final five minutes. The rinse and dry stage is what separates a decent car wash from a truly great one, leaving behind nothing but that coveted streak-free, glossy finish. Get this wrong, and you're left with water spots and fine scratches, erasing all that hard work.
Start with one last, thorough rinse, working from the top of the car down. You'll want to pay close attention to all the little nooks and crannies—think panel gaps, grilles, and emblems. Soap loves to hide in these spots, and any lingering suds will dry to a chalky residue. Be meticulous here; once you’re positive all the soap is gone, it’s time to dry. And you need to do it fast.
Ditching Old Habits for a Perfect Finish
If you’re still reaching for an old leather chamois or a bathroom towel, it’s time for an upgrade. Modern car detailing has much better tools for the job. Hands down, the best way to dry your car is with a large, plush microfiber drying towel. Its deep, soft pile is engineered to soak up an incredible amount of water safely, pulling moisture away from the paint without causing scratches.
The secret isn't just the towel, but how you use it. Instead of aggressively wiping or dragging it across the paint, use a gentle blotting technique. Just lay the towel flat over a panel, pat it down gently, and lift it straight off. This simple change minimizes friction and is the absolute safest way to prevent swirls and fine scratches.
Pro Tip: Whatever you do, don't let your car air dry. As the water evaporates, it leaves behind all the mineral deposits that were in it, creating those stubborn water spots. Over time, these can actually etch into your clear coat and become a real pain to remove.
For an even better, touchless finish, you can bring out a leaf blower or a dedicated car dryer. This is a game-changer for blasting water out of tight spaces like mirror housings, lug nuts, and grilles, which stops those annoying drips that always seem to appear after you've finished.
The growing interest in these more advanced at-home car care methods is part of a much larger trend. The global car wash service market, which was valued at USD 26.2 billion in 2025, continues to expand as more car owners get serious about vehicle maintenance. You can find more insights on this growing market over at Future Market Insights.
Answering Your Top Car Washing Questions
Even after you've got the gear and the basic steps down, a few questions always pop up. It's totally normal. Getting these details right is what separates a decent wash from a truly fantastic, damage-free shine. Let's dig into some of the things people ask me all the time.
How Often Should I Really Be Washing My Car?
For the average driver, a good wash every two weeks is a solid rule of thumb. This is frequent enough to stop things like bird droppings, bug guts, and sticky tree sap from etching into your clear coat, which can cause real damage.
But you have to consider your local conditions. Do you live in an area that salts the roads all winter? You’ll want to wash more often, maybe even weekly, to get that corrosive salt off. Same goes for places with heavy pollen or dusty, industrial environments. The key is to get that junk off before it has a chance to bond to the paint.
Can't I Just Use Dish Soap?
I hear this one a lot, and the answer is always a hard no. Think about what dish soap is designed for: stripping stubborn grease off of a dinner plate. It does the exact same thing to your car's paint, aggressively removing the wax or sealant you've applied.
When you strip that protective layer, you leave your paint totally exposed to UV rays, acid rain, and other environmental hazards.
Always, always use a dedicated, pH-neutral car shampoo. It's engineered to lift dirt and grime without compromising the protective coatings. This is probably the single most important part of washing a car safely.
Proper washing isn't just about looks; it's a critical part of your vehicle's overall car maintenance that protects its value and finish.
What's Causing These Annoying Swirl Marks?
Ah, the dreaded swirl marks. Those fine, web-like scratches you see in direct sunlight are almost always self-inflicted from poor washing habits.
They're tiny scratches in your car's clear coat, and here are the usual suspects:
- Using a gritty old sponge or a single dirty wash mitt for the whole car.
- Drying with a rough, abrasive bath towel instead of a soft microfiber towel.
- Washing in circles instead of straight, overlapping lines.
- Dunking your dirty wash mitt back into your only bucket of soapy water, which just puts all that abrasive grit right back onto the paint.
Stick to the two-bucket method and the other techniques in this guide, and you’ll keep those swirls at bay.
Ready to take your at-home car wash to the next level and get that flawless, scratch-free finish? The SwiftJet foam gun is the perfect tool for the job. Get your SwiftJet today!