
To get rid of those frustrating swirl marks, you need to perform what’s known in the detailing world as paint correction. This isn't just a fancy wash; it involves using a machine polisher and special abrasive compounds to carefully smooth out your car's clear coat.
Think of it as leveling the paint surface on a microscopic scale. This process erases those tiny scratches that look like a spiderweb in the sun, bringing back that deep, flawless shine your car had when it was new.
Understanding Swirl Marks and What Causes Them
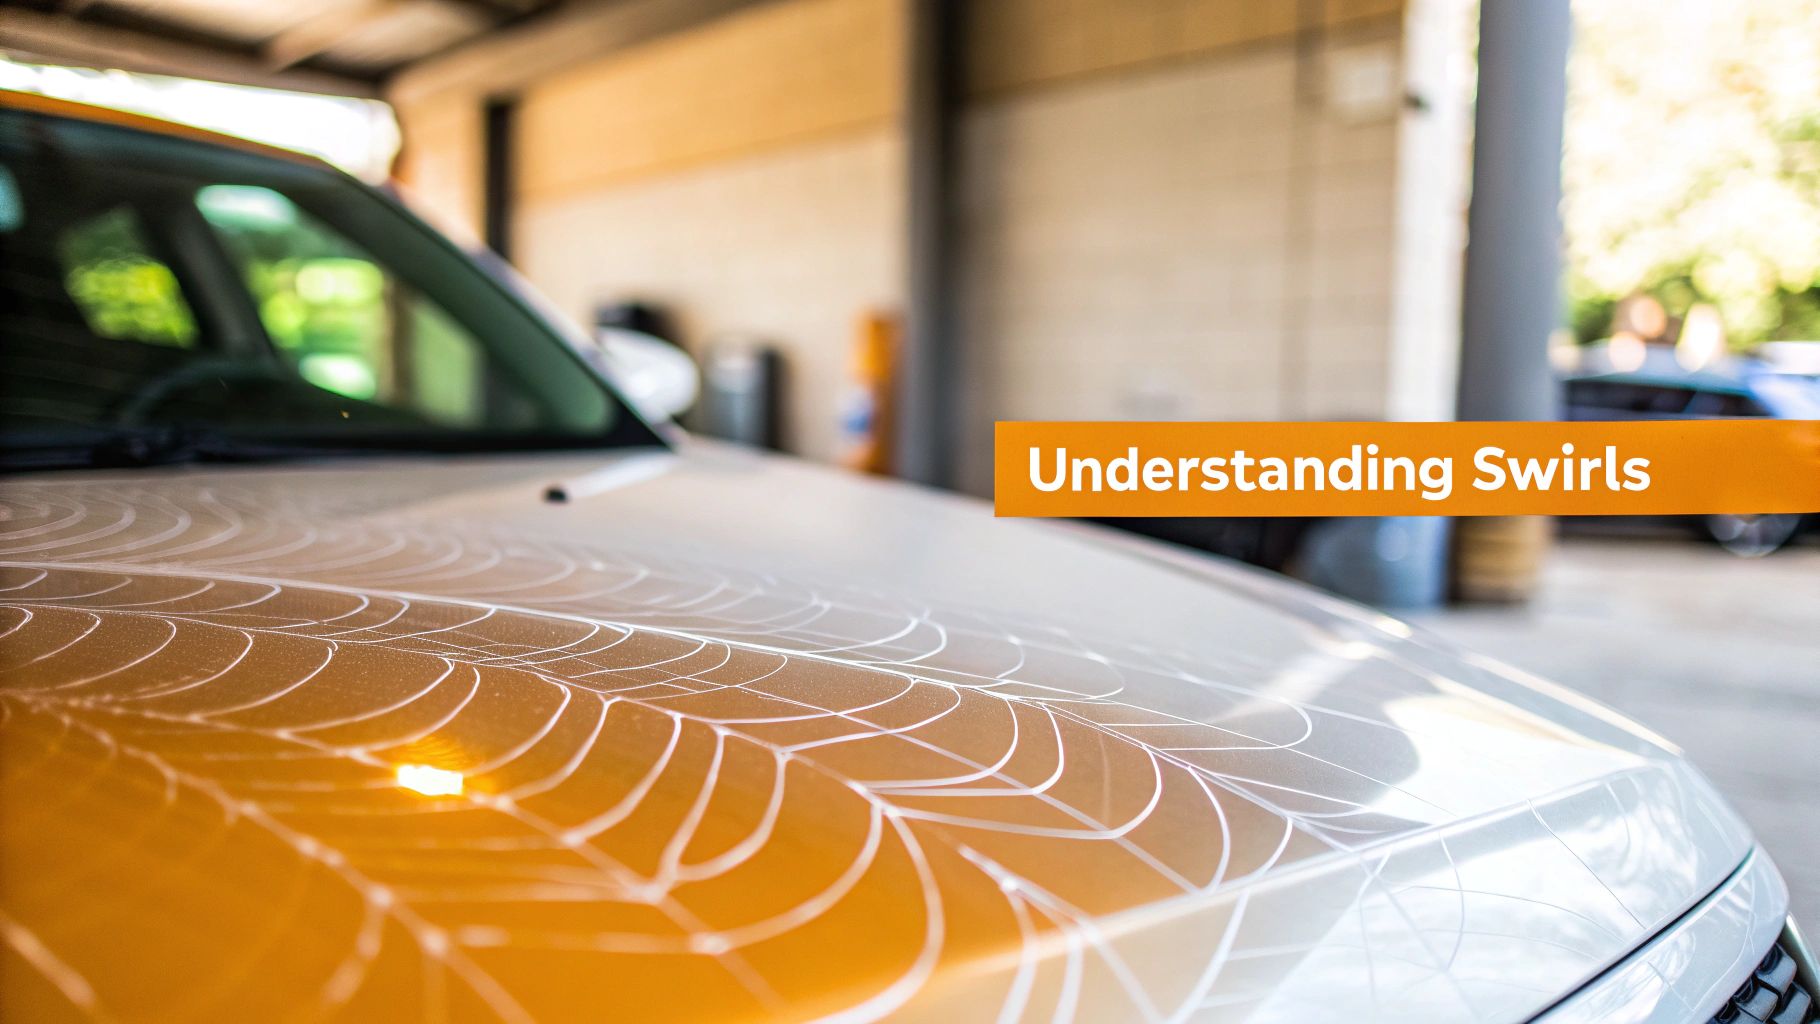
Before diving into how to fix them, it helps to know what you're up against. Those web-like patterns aren't just dirt or grime. They are thousands of microscopic scratches etched directly into your vehicle's clear coat.
When light hits a perfectly flat, unscratched surface, it reflects evenly, giving you that mirror-like gloss. But when it hits these countless tiny scratches, the light scatters in all directions. This is what creates that dull, hazy, swirled appearance that robs your paint of its true color and depth.
So, where do they come from? The main offender is almost always friction from improper washing and drying techniques. Every time a dirty wash mitt, a coarse towel, or the abrasive brushes at an automatic car wash drag across the paint, they grind tiny bits of dirt and grit into the finish.
Common Swirl Mark Culprits
Most swirl marks come from well-intentioned but misguided car care habits. Spotting these common mistakes is the first step to preventing future damage. Here’s a quick breakdown of the usual suspects.
| Common Mistake | Why It Creates Swirls | The Safer Alternative |
|---|---|---|
| Automatic Car Washes | The giant, spinning brushes are caked with dirt and grit from every car before you, effectively sandblasting your finish. | Touchless automatic washes or, ideally, a proper two-bucket hand wash at home. |
| The Single Bucket Wash | Dunking your dirty wash mitt back into your only bucket of soapy water contaminates the entire solution, reapplying grit to the car. | The two-bucket method: one bucket for soapy water and another for rinsing the mitt, trapping dirt. |
| Using Old Towels/Sponges | Regular household sponges, bath towels, or old t-shirts are far too abrasive for automotive clear coats and will cause fine scratches. | A high-quality microfiber wash mitt and dedicated plush microfiber drying towels. |
| Dry Wiping or Dusting | Wiping a dusty car with a dry cloth drags abrasive dust particles across the paint, creating a web of fine scratches instantly. | Use a quick detailer spray to lubricate the surface before gently wiping with a clean microfiber towel. |
Recognizing these patterns is key. Once you see how easily swirls are created, you'll be much more careful about what touches your car's paint.
Key Takeaway: Swirl marks are physical damage, not just stains. They are scratches in the clear coat that can only be removed by carefully leveling the surface through polishing, not by simply washing or waxing over them.
This is such a common headache for car owners that it has spawned a massive industry. The global market for car care products—including the polishes and compounds you need for swirl removal—was valued at USD 4.4 billion in 2022. As more people learn how to care for their vehicles properly, you can explore the market trends for car care products to see how the demand for these solutions continues to grow.
Getting Your Paint Correction Gear Together
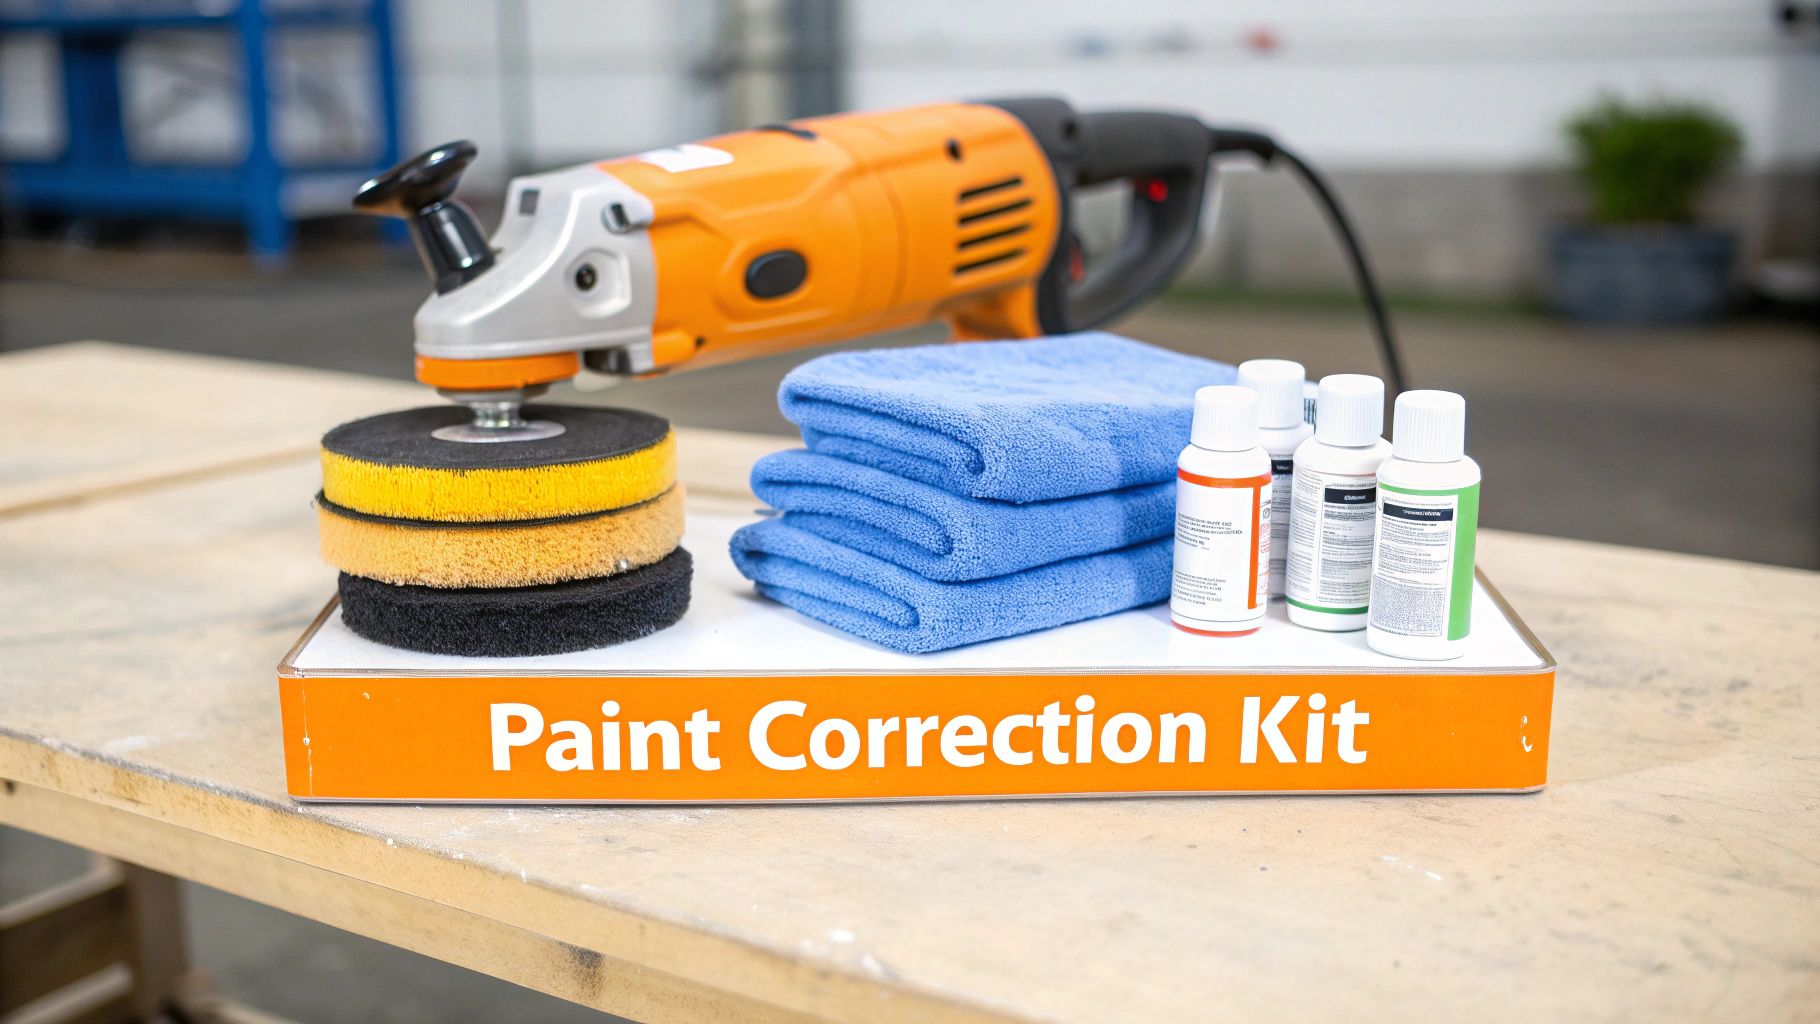
Getting that professional, swirl-free shine starts with having the right tools on hand. This isn't about dropping a fortune on the most expensive stuff you can find. It’s about being smart and investing in the correct tools that make the job easier, safer, and way more effective. Your success in waving goodbye to those ugly swirl marks really depends on what you have in your corner.
The absolute heart of your toolkit is the machine polisher. This is what does all the heavy lifting, using compounds to gently and precisely level the paint. It's no wonder more and more car enthusiasts are picking them up.
In fact, the global market for car polishers is expected to jump from about USD 420 million in 2024 to nearly USD 740 million by 2033. That boom shows just how essential mechanical polishing has become for anyone serious about a flawless finish. You can dig deeper into the expanding car polisher market to see the trends for yourself.
The Right Polisher for the Job
This is probably your biggest decision: rotary or dual-action (DA) polisher? You'll see seasoned pros use rotary polishers because they cut fast and aggressively. The downside? They create a ton of heat and can burn right through your paint in a heartbeat if you don't know exactly what you're doing.
For anyone just learning how to tackle swirl marks, a dual-action (DA) polisher isn't just a suggestion—it's a must. Its head spins but also oscillates in a random pattern. This movement spreads out the heat and friction, drastically cutting down the risk of damaging your paint. It’s the safest, most forgiving path to incredible results.
A dual-action polisher gives you a much friendlier learning curve. Its unique motion lets you remove paint defects without the constant fear of burning through the clear coat, making it the perfect choice for DIY detailers.
Pads, Compounds, and Other Essentials
With your polisher chosen, you'll need the right pads and compounds. Think of these as different grits of sandpaper, from coarse to super fine. They work together to first cut away the defects and then refine the surface to a high gloss.
Here's what your shopping list should look like:
- Cutting Pads & Compound: This is your most aggressive combo. The pads are usually firm foam or microfiber, and they work with the heavy-cut compound to knock down deeper swirls and light scratches.
- Polishing Pads & Polish: A step down in aggression. This pair is for removing the finer hazing left by the cutting stage and starting to build that deep gloss.
- Finishing Pads & Polish: Your final step. The softest pad and a super-fine polish work together to burnish the paint, maximizing clarity and leaving behind that perfect, mirror-like shine.
Beyond the main polishing gear, a few other items are non-negotiable for a clean, professional job. Stock up on a big stack of high-quality microfiber towels—you'll need them for wiping off residue without re-introducing scratches. A good clay bar kit is also key for pulling embedded contaminants out of the paint before you start polishing. And don't forget the painter's tape! It’s your best friend for protecting plastic trim, rubber seals, and badges from the spinning polisher pad.
The Critical Decontamination and Prep Work
If there's one mistake I see people make that guarantees a lousy result, it's trying to polish paint that hasn't been perfectly prepped. Let me put it this way: polishing over dirt you can't even see is like dragging fine-grit sandpaper all over your car. You won't just fail to fix the swirls; you'll carve a bunch of new, deeper scratches right into the finish.
This prep phase is non-negotiable. Honestly, it’s probably the most important part of the entire process.
It all starts with a thorough hand wash. If you're still using a single bucket, it's time to stop. The two-bucket wash method is your best friend here. One bucket is for your soapy water, the other is just clean rinse water. After washing a panel, dunk and scrub your dirty wash mitt in the clean water bucket before going back to the soap.
This simple habit prevents you from dragging the grit you just pulled off the driver's door all over the fender. It’s a game-changer for preventing swirl marks in the first place.
Chemical Decontamination
With the loose dirt gone, it’s time to fight the invisible enemies. Your car’s paint is a magnet for tiny, sharp particles that dig into the clear coat. The worst offenders are ferrous (iron) particles from brake dust and industrial fallout. You can't see them, but trust me, they're there, rusting away and creating tiny pits.
To get rid of them, you need a dedicated iron remover spray.
- On a cool, dry panel, spray the product on generously.
- Let it sit for a few minutes. You’ll know it’s working when you see the clear liquid start to "bleed" a wild purple or red color as it dissolves the iron. It looks dramatic, but it's exactly what you want.
- Before it has a chance to dry, give the panel a complete rinse with your hose or pressure washer.
This chemical bath safely melts away the metallic gunk without you ever having to scrub the paint, clearing the way for the next step.
Physical Decontamination with a Clay Bar
Now that the iron is gone, you still have to deal with bonded contaminants like tree sap, old road tar, and stubborn paint overspray. This is where a clay bar is absolutely essential. The clay glides across a lubricated surface, grabbing and literally pulling these embedded bits and pieces out of the clear coat.
Jumping straight to polishing without claying is a recipe for disaster. Your polishing pad will immediately pick up any of those particles and grind them into the paint, leaving you with a mess of new marring. The process itself is simple, but it demands a little patience. For a full breakdown, you can learn more about how to clay bar a car with our easy step-by-step guide. Getting this right leaves the surface perfectly smooth and ready for correction.
Pro Tip: After washing and drying your car, stick your hand inside a thin plastic sandwich bag and gently glide your fingertips over the paint. If it feels gritty or rough, that’s the bonded contamination a clay bar is designed to remove.
Final Prep: Taping Off Trim
Your last bit of prep work is all about masking. The compounds and polishes you're about to use can easily stain or even damage unpainted plastic trim, rubber seals, and delicate emblems.
Grab some high-quality automotive painter's tape and carefully cover up any area you don't want the polisher to touch.
- Window seals and rubber gaskets
- Black plastic trim on bumpers and mirrors
- The edges of your headlights and taillights
- Vehicle badges and emblems
This might feel tedious, but it saves you a massive headache later on. A few minutes of taping prevents hours of trying to clean stubborn polish residue out of textured plastic. With your car now truly clean, decontaminated, and protected, you're finally ready to start polishing.
Mastering the Art of Paint Polishing
Alright, with the surface prepped and perfectly clean, we've arrived at the main event. This is where the real transformation happens—the moment you physically erase those frustrating swirl marks and restore that deep, wet-looking gloss. If you're new to this, don't feel intimidated. The whole process is very manageable when you take it one step at a time.
The key is to avoid tackling the whole car at once. Instead, we're going to focus on small, manageable sections, about two feet by two feet. This lets you concentrate your efforts, work the polish effectively, and get consistent results across every single panel. Trust me, patience is your best friend here.
Finding Your Perfect Combination
Every car's paint is a little different. Some clear coats are incredibly hard, while others can be on the softer side. Because of this, you never want to just jump in with your most aggressive pad and compound. The very first thing you must do is a test spot.
Pick a spot that's out of the way, like the bottom of a door or a corner of the trunk lid. You'll want to start with your least aggressive combination: think a soft finishing pad paired with a fine polish.
- Work that small section using the technique we'll cover in a moment.
- Gently wipe away the polish residue with a fresh microfiber towel.
- Grab a good light source and inspect your work closely.
If the swirls are gone, you've found your winning combo! If you can still see them, just step up to a slightly more aggressive polishing pad and run the test again. This methodical approach is crucial because it ensures you only remove the absolute minimum amount of clear coat necessary, which is vital for the long-term health of your paint.
Your Dual-Action Polisher Technique
Once you've dialed in the right pad and polish on your test spot, you're ready to apply that magic formula to the rest of the car. A dual-action (DA) polisher is an incredibly safe and effective tool, but it's your technique that will separate a good result from a great one.
Of course, before you even think about turning the polisher on, you have to nail the prep work. The image below lays out the fundamental three-stage process that's non-negotiable for getting a flawless finish.
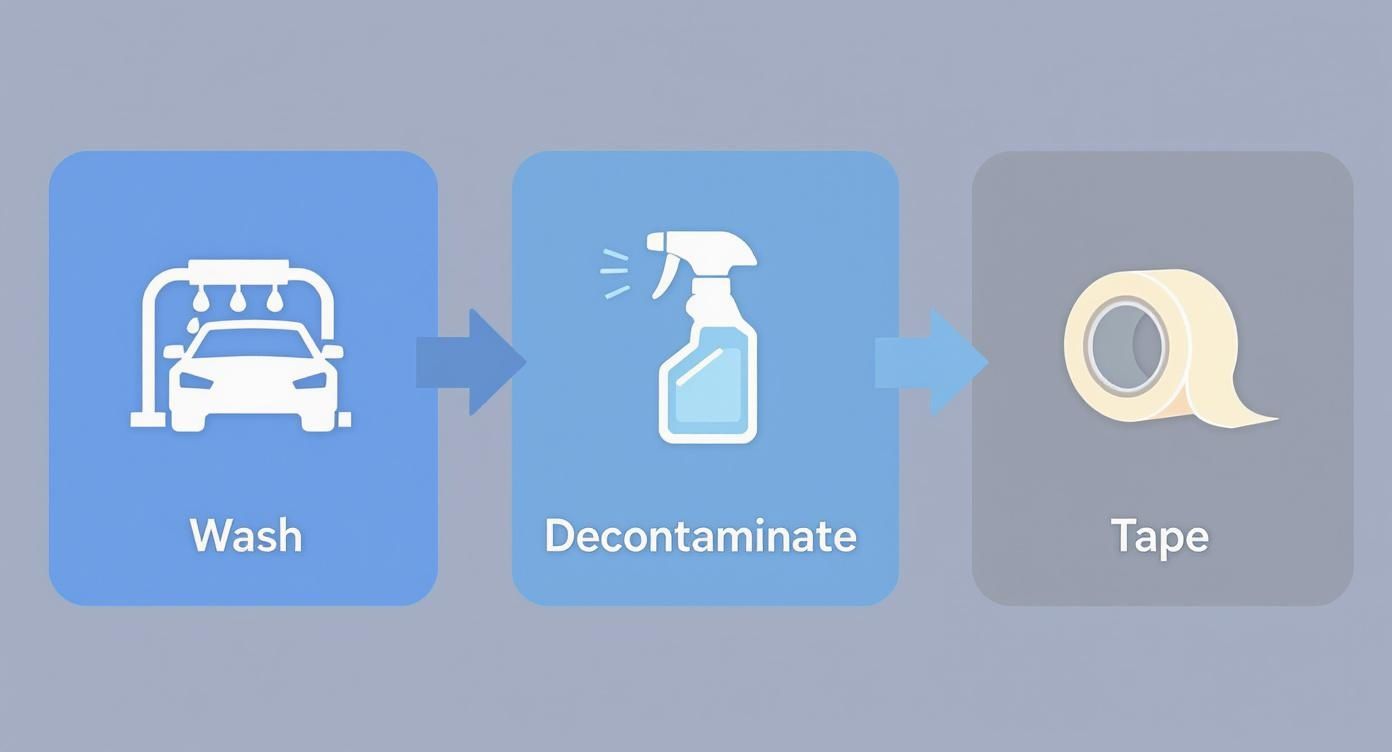
This workflow just reinforces a core detailing truth: an incredible finish is always built on a perfectly clean foundation. You have to wash and decontaminate before you can correct.
To get started, apply four or five pea-sized dots of polish directly onto your pad. Here's a quick tip to avoid slinging product all over your garage: gently dab the pad onto your working section before you switch the machine on.
Technique Tip: Always start and stop the polisher with the pad held flat against the paint. If you lift it while it's still spinning, it can skip and potentially mar the surface. Keeping the pad flat is essential for even pressure and correction.
You'll be using what's called a cross-hatch pattern. Guide the polisher slowly across your section, first in horizontal passes, then in vertical passes. Make sure you overlap each pass by about 50% to get full coverage. Use just enough downward pressure to keep the machine stable; let its weight and orbital motion do the real work.
Your arm speed should be slow and deliberate—think about one inch per second. After two or three complete cross-hatch passes, you'll notice the polish will transform from a hazy film to nearly clear. That's your signal that the abrasives have fully broken down and done their job.
For those who want a quick-reference guide, this table breaks down the essentials of the DA polishing process.
Dual-Action Polisher Technique at a Glance
| Step | Machine Speed (OPM) | Arm Speed | Pressure Level | Purpose |
|---|---|---|---|---|
| Spreading | 1-2 | Moderate | Light | Evenly spread the polish across the work area without slinging it. |
| Correction | 4-5 | Slow (1"/sec) | Moderate | Break down abrasives to remove defects like swirls and scratches. |
| Finishing | 3-4 | Moderate | Light | Refine the surface and burnish the paint to a high-gloss finish. |
This table serves as a great starting point, but always be prepared to adjust your technique based on how the paint is responding.
Checking Your Progress
After you finish a section, grab a clean, plush microfiber towel and wipe away the polish residue. But hold on—here's a pro tip. The oils in many polishes can temporarily fill in fine scratches, which can trick you into thinking the surface is perfect. To see the true result of your work, you need to do an Isopropyl Alcohol (IPA) wipe-down.
Just mix a solution of 50% distilled water and 50% IPA in a spray bottle. Lightly mist it onto the panel you just polished and wipe it clean. This simple step strips away any leftover oils, revealing the true state of the paint. If you still spot some faint swirls, you know you need to make another pass. For deeper scratches or faster correction, some experienced detailers explore high-speed buffing techniques to improve efficiency.
This meticulous, results-driven approach is exactly why professional paint correction has become such a massive part of the auto care world. The global market for these services, valued at an estimated USD 1.98 billion in 2024, continues to climb as more car owners demand that flawless, better-than-new look.
Now, just work your way around the vehicle, panel by panel, repeating the process until every last swirl is gone. If you want to take an even deeper dive into the specifics, check out our full guide on how to polish car paint.
Protecting Your Newly Perfected Paint
You've put in the hours, your back might be a little sore, but the swirl marks are finally gone. Your car's paint looks incredible—a flawless, glossy canvas. But hold on, don't park it just yet. So many people miss this next crucial step.
After all that polishing, your paint is completely naked. The very compounds that smoothed out the scratches also stripped away any old wax or sealant. Right now, your clear coat is exposed to UV rays, bird droppings, road grime... you name it. Skipping this final stage is like refinishing a beautiful hardwood floor and then never sealing it.
This is where your Last Step Product (LSP) saves the day. Its entire job is to lock in all your hard work, shield the finish from the elements, and add that final layer of head-turning gloss.
Waxes vs Sealants vs Coatings
Picking the right protection can seem complicated, but it really just depends on what you value most: durability, looks, or ease of use. Let's break down the main players.
-
Carnauba Wax: This is the old-school favorite, loved by show-car guys for a reason. A natural carnauba wax delivers a warm, deep glow that’s hard to beat—it just makes the paint look wet and rich. The trade-off? It doesn't last. You’ll be lucky to get 4-6 weeks of protection before it's time to reapply.
-
Paint Sealant: Think of this as the modern, synthetic workhorse. Sealants are engineered polymers that actually bond to your paint's surface, giving you way more durability than a traditional wax. A quality sealant can easily last 4-6 months, all while providing excellent UV protection and a sharp, glassy shine.
-
Ceramic Coating: This is the top dog in today's paint protection world. A ceramic coating is a liquid polymer that cures into a hard, sacrificial layer over your clear coat. It’s incredibly tough, resisting chemicals, UV damage, and even light scratches. We’re talking durability measured in years, not months.
For most weekend warriors who just finished their first big paint correction, a high-quality paint sealant is the sweet spot. It offers serious, long-lasting protection without the tricky, high-stakes application process that some pro-level ceramic coatings demand.
Expert Tip: Protection isn't just about shine; it's about making your life easier. A properly sealed or coated car is incredibly slick and hydrophobic (it repels water). Dirt and grime struggle to get a grip, which makes your maintenance washes faster, safer, and much less likely to cause new swirls.
Applying Your Chosen Protection
No matter which product you go with, the application is pretty similar: it's all about patience and attention to detail. First things first, make sure you’re working on a cool, clean, and completely dry surface, preferably in a garage or out of direct sunlight.
Dab a small amount of your wax or sealant onto a soft foam applicator pad. Gently wipe a thin, even layer over one panel at a time. I like to use overlapping, straight-line motions to ensure full coverage. Remember, less is more. Slathering on a thick coat won't give you better protection; it'll just be a pain to buff off.
Let the product cure to a haze, following the directions on the bottle—it's usually just a few minutes. Then, grab a fresh, plush microfiber towel and gently buff away the residue. Flip the towel to a clean side for a final wipe to reveal that brilliant, protected shine. For a deeper dive into long-term care, check out our guide on how to protect car paint with pro secrets. This final, simple step ensures your swirl-free finish stays that way for months to come.
Your Top Swirl Removal Questions, Answered
Even when you have the steps down, a few questions always seem to surface the first time you tackle a real paint correction project. Knowing the answers ahead of time can save you a lot of guesswork and help you get the job done right. Let's dig into the most common ones I hear.
Can I Really Get Rid of Swirl Marks by Hand?
This is probably the number one question I get. The honest answer? Not really.
Sure, you can grab a hand applicator and some polish, and with a ton of elbow grease, you might slightly diminish the look of the faintest swirls. But it’s brutally hard work and the results just aren't there. You can't possibly generate the consistent speed and pressure needed to actually level the clear coat and remove the defects.
For that deep, uniform, truly flawless finish, a dual-action (DA) polisher is non-negotiable. It’s the tool that separates temporarily hiding a problem from actually fixing it for good.
How Often Should I Be Polishing My Car?
This is a big one, and getting it wrong can cause more harm than good. Polishing isn't like washing or waxing—it's not part of a regular maintenance routine. Think of it more like a surgical procedure for your paint.
The process works by abrading away a microscopic layer of the clear coat. Since you only have so much clear coat from the factory, you want to do this as infrequently as possible. For a car you drive every day, you might only need a full paint correction every 2-3 years. If you're super careful with your wash routine, you could go even longer.
The goal isn't to polish often. The goal is to polish once, get the paint perfect, and then lock it in with great protection and safe washing habits so you don't have to do it again for a very long time.
Pro Tip: See polishing as a major "reset" for your paint, not a tune-up. Once you've done the correction, your entire focus should pivot to preventing new swirls from ever forming.
What's the Difference Between a Polish and a Wax?
This is another common mix-up, but the distinction is simple and crucial.
- Polish is the Corrector. It contains abrasives designed to physically cut and smooth the paint surface, removing imperfections like swirl marks. It fixes the finish.
- Wax is the Protector. It contains no abrasives. Its only job is to lay down a sacrificial layer on top of your corrected paint to shield it from UV rays, water, and dirt while adding a ton of gloss.
They are two completely different products with two completely different jobs. You polish to create a perfect surface, then you apply a wax (or a more durable sealant or ceramic coating) to keep it that way.
Will Polishing Get Rid of Deeper Scratches, Too?
Polishing works wonders on defects that are in the clear coat, like swirls and light hazing. But it definitely has its limits. The go-to method for checking a scratch's depth is what we call the fingernail test.
Gently run your fingernail across the scratch. If your nail catches in the groove, the scratch is almost certainly too deep to be safely polished out. Trying to remove a scratch that deep means you risk burning right through the clear coat, and that's a one-way ticket to the body shop for a repaint. Polishing is for surface refinement, not major surgery.
Ready to make your car care routine easier and more effective? The SwiftJet Car Wash Foam Gun turns any garden hose into a professional-grade foam cannon, laying down thick suds that prevent new swirl marks. Get yours today at swiftjetusa.com and keep your newly perfected paint looking its best.