

You finish an automatic wash, pull into the sunlight, and notice a web of fine marks across the hood. The car looks clean, but the gloss has a hazy, gray cast that wasn't there before. That moment is frustrating because the wash was supposed to protect the finish, not leave behind fresh damage.
The good news is that how to prevent car scratches usually comes down to controlling contact. Keep grit away from the paint, use clean tools, dry with minimal pressure, and choose additional protection based on how and where you drive. A wax, coating, or film can help, but none of them can rescue a careless wash routine.
Why Most Scratches Come from Everyday Habits
Keyed panels and shopping carts get attention because they create obvious damage. In practice, many owners create more paint defects through ordinary routines, one wash and wipe at a time. Brushes, trapped dirt, contaminated sponges, and drying towels can drag abrasive particles across the clear coat.
Automotive finish research has described wash-created defects as only a few micrometers wide and several hundred nanometers deep, yet those marks are still measurable and often come from washing rather than driving wear. The contamination identification guide is useful because it reinforces a detailer's first question, what is sitting on the paint before any tool touches it?
The routine damage most owners miss
A driver may rinse quickly, dip a sponge into one bucket, scrub in circles, then wipe the car dry with the same towel used on the lower doors. Each step seems harmless. Together, they move grit from dirty panels back over clean paint and build the spiderweb pattern that becomes obvious under direct light.
The problem isn't a lack of effort. It's uncontrolled friction. Clear coat protects the color beneath, but it can still be marred by repeated low-level abrasion from:
- Washing: Loose road film and sand become cutting particles when a mitt drags them across the panel.
- Drying: A towel can collect dirt from the paint and then spread it across the next section.
- Contact points: Coat zippers, belt buckles, bags, and loading equipment can touch the finish around doors, trunks, and fenders.
- Parking exposure: Carts, branches, sprinklers, and tight spaces create risks that no shampoo can prevent.
Practical rule: Treat every contact with the paint as a risk-management decision. First remove what can scratch, then choose the gentlest tool that can finish the job.
The historical move from bucket-only washing toward foam-assisted pre-soaks reflects that logic. Foam isn't a decorative layer. It helps loosen and carry away contamination before the wash mitt begins making contact.
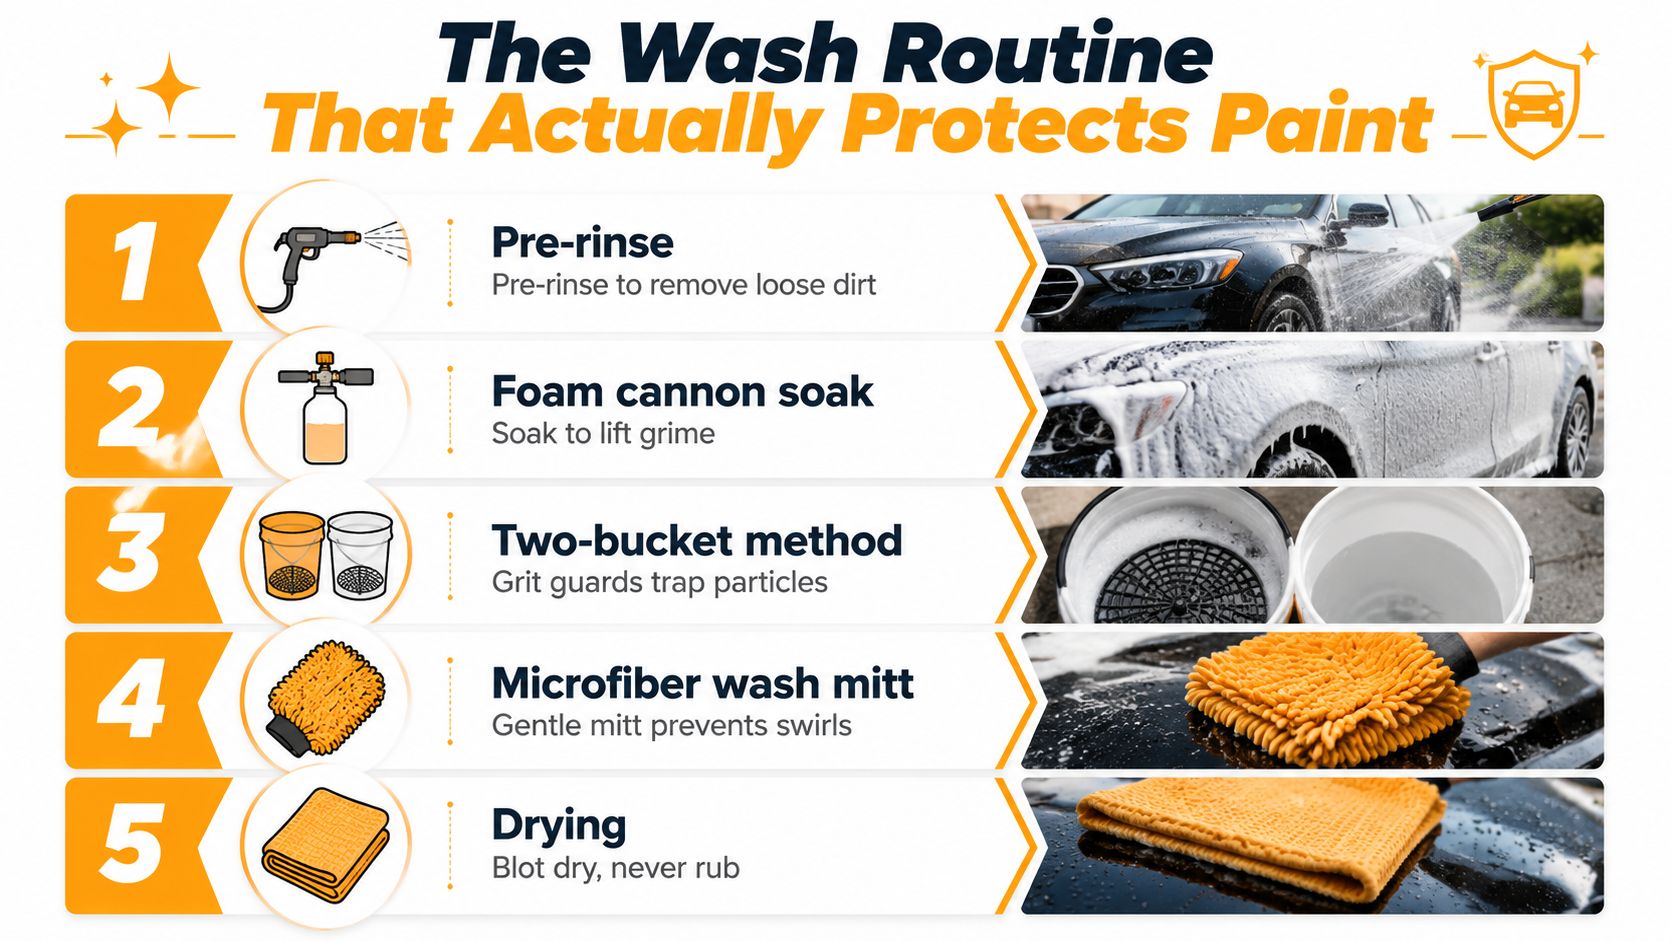
The Wash Routine That Actually Protects Paint
The safest wash is the one that removes the most contamination before you touch the paint. A published summary of vehicle paint testing reported field scratches averaging 237 μm in width, with a median width of 141 μm, demonstrating that wash-related damage can be measured on real vehicles rather than treated as a purely microscopic concern. (Published vehicle paint testing summary)
Start with removal, not scrubbing
- Pre-rinse the entire vehicle. Use a hose or pressure washer to dislodge loose grit, paying attention to rocker panels, wheel arches, bumpers, and the lower doors. Don't put a mitt on dry, visibly dirty paint.
- Apply a foam pre-wash. A snow foam or hose-connected foam gun gives grime time to loosen and drain away. A SwiftJet foam gun is one option for applying clinging foam through a garden hose, and it can be used before contact washing to reduce the contamination left on the surface.
- Set up two buckets. Keep shampoo solution in one bucket and clean rinse water in the other. A grit guard in each bucket helps keep particles below the working surface, but it doesn't replace frequent rinsing or clean media.
Make contact predictable
Use a plush microfiber mitt reserved for painted panels. Load it with plenty of lubrication, place it flat against the surface, and work from the roof downward in straight-line passes. Rinse the mitt after each panel or whenever it feels loaded with dirt, then reload it with soap.
Circular scrubbing is a trap because it distributes any trapped grit in every direction and creates visible circular patterns. Straight passes don't make a scratch impossible, but they make accidental marring less visually chaotic and easier to diagnose. Never use the same mitt on wheels and paint.
Rinse thoroughly before drying. Soap residue, loosened dirt, and hard-water minerals can all make the drying stage more aggressive than it needs to be. For additional guidance on low-contact washing, use this gentle car wash method.
Dry with air and absorption
Use a forced-air blower first, especially around mirrors, badges, trim, grilles, and panel gaps. Then use a clean, high-GSM microfiber drying towel with a pat-and-blot or lay-and-lift motion. Don't lean your weight into the towel, and don't keep using it after it has touched a dirty section.
A Cars.com-cited automotive expert benchmark says a high-quality microfiber drying towel can absorb roughly seven times its own weight in water without scratching. (Detailing guidance on scratch avoidance) The practical lesson is simple, use absorption to move water, not pressure to force it off.
Skip abrasive brushes, dirty chamois, household towels, dry wiping, and automatic washes with spinning cloth. If soap dries on hot paint, rinse and cool the panel before continuing rather than rubbing harder.
Wax, Sealant, PPF, and Ceramic Coatings Compared
Basic washing should come first. Protection is the layer that makes the routine more forgiving and helps match the car to its actual exposure. Natural wax, synthetic sealant, paint protection film, and ceramic coating solve different problems, so the right answer depends on driving conditions, ownership plans, and how much maintenance you'll accept.
Natural carnauba wax gives warm gloss and a satisfying finish, but it needs frequent renewal and offers limited resistance to physical impact. A synthetic sealant generally lasts longer and is easier to apply consistently. Neither should be treated as a barrier against stones.
Paint protection film, or PPF, is a physical urethane layer that protects selected painted areas from road debris, chips, and light scratches. It makes the most sense on high-impact zones such as the front bumper, hood edge, mirrors, and rocker panels. Ceramic coatings bond to the clear coat and add slickness, chemical resistance, and water behavior that can make careful washing easier. They don't make the paint scratch-proof, and they won't stop a hard impact.
For broader context before choosing a package, compare this guide to the best paint protection for your car.
| Protection Type | Durability | Cost Range | Scratch Resistance | Gloss | Maintenance |
|---|---|---|---|---|---|
| Carnauba wax | Short-term | Low | Low | Warm, rich appearance | Frequent reapplication |
| Synthetic sealant | Longer than wax | Low to moderate | Low to moderate | Clean, reflective appearance | Periodic reapplication |
| PPF | Long-term physical barrier | High | Highest of these options against light impacts | Clear, paint-dependent | Careful washing and edge inspection |
| Ceramic coating | Long-lasting bonded layer | Moderate to high | Helps reduce wash marring, not impact-proof | Glossy, slick appearance | Maintenance washes and compatible toppers |
Match protection to the driver
A city commuter who parks outdoors and washes regularly may get excellent value from a sealant and disciplined technique. A highway commuter following trucks, driving through construction areas, or covering long distances should consider PPF on the front end because film addresses impact exposure that wax and coatings cannot.
For a leased vehicle, targeted PPF may be easier to justify than a full-car package if preserving vulnerable areas matters at return. For a keep-forever car, whole-car ceramic coating can make repeated maintenance more manageable, while an enthusiast who enjoys frequent detailing may prefer the appearance and low entry cost of wax or sealant.
The car paint protection products guide can help organize the product side of that decision. The core trade-off remains unchanged, PPF absorbs physical abuse, ceramic coating supports maintenance, and wax or sealant provides accessible surface protection.
Parking and Driving Habits That Prevent Damage
Paint protection doesn't help much if a door, cart, branch, or loose load hits the panel. The best parking choice is often the one that gives you more space, even if it adds a short walk.
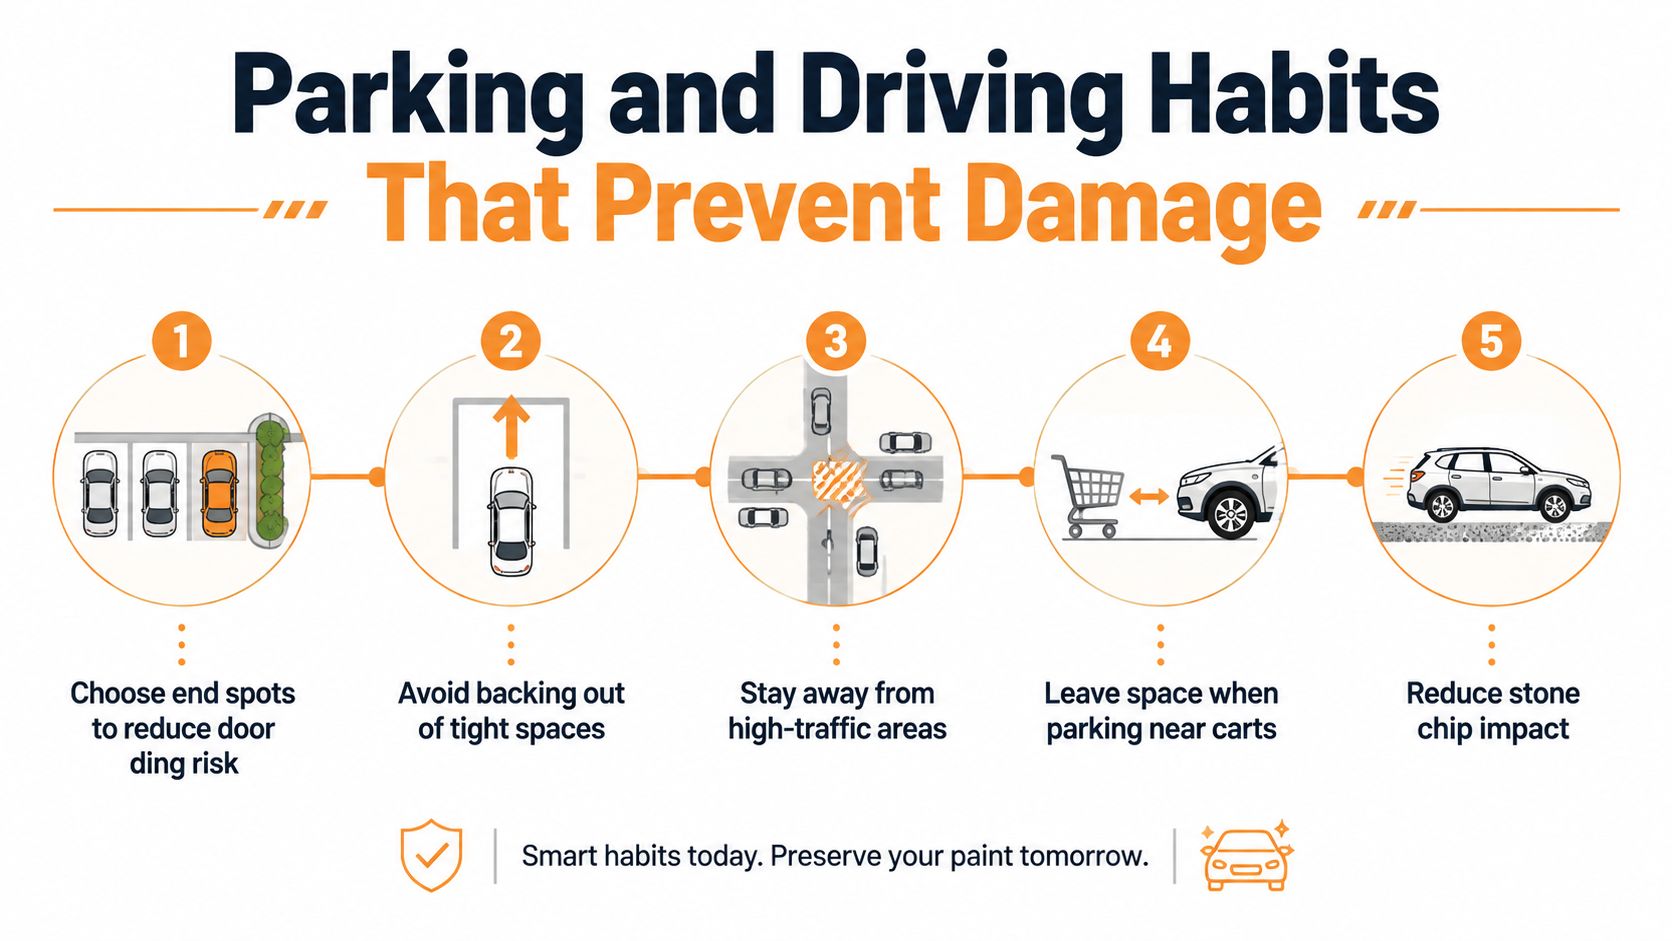
Choose an end spot when practical, and use pull-through spaces when they let you avoid tight backing maneuvers. Stay away from corners near cart returns, busy pedestrian paths, and spaces where neighboring vehicles have little room for their doors. A mostly empty part of the lot is usually worth more than the closest space.
Before loading the trunk or cargo area, lay down a blanket or moving pad. Coolers, tools, bikes, hardware, and camping equipment can slide into the bumper or scrape the painted lip as you load them. Lift heavy objects instead of dragging them, and check straps or loose items before driving.
Read the environment before shutting off the engine:
- Cart clusters: Park away from abandoned carts and return lanes.
- Sprinklers: Avoid wet zones that can leave mineral deposits on warm paint.
- Trees: Sap, berries, and falling twigs create both contamination and contact risks.
- Construction: Leave extra following distance behind gravel trucks and avoid lane changes beside active work zones.
- Chip-sealed roads: Don't tailgate, because loose aggregate can strike the front of your car.
A car cover only helps when it stays clean and stable. If wind repeatedly moves a dirty cover across the paint, leaving the vehicle uncovered can be safer.
Take a short risk scan at every stop. That small habit prevents damage before a product, polish, or repair has to address it.
Quick Fixes for Fresh Scratches at Home
Don't polish a scratch while the panel is dirty. Wash the area with mild car shampoo, rinse it well, and dry it with a clean microfiber towel so dust and residue don't distort your assessment.
Judge depth before choosing a product
Run a clean fingernail lightly across the mark. If your nail barely catches and the line looks like a change in gloss rather than color, the damage may be limited to the clear coat. If the mark has a clear color change, feels deeper, or shows primer, touch-up or professional repair becomes more appropriate.
For a light clear-coat mark, apply a finishing polish or purpose-made scratch remover to a foam applicator. Work a small test spot with controlled back-and-forth passes, using light pressure, then remove residue with a clean towel. Test before committing to the whole panel, because aggressive correction removes clear coat and can create a larger problem.
A touch-up paint pen is useful when color or primer is visible and the goal is to seal a small breach. Apply less paint than you think you need. Heavy blobs often sit proud of the panel and leave a repair that requires leveling and polishing.
Stop when the repair becomes less controlled than the damage.
Avoid household polish, magic erasers, and untested compounds. These products can be too abrasive or too unpredictable for automotive clear coat. If primer or metal shows, the scratch crosses multiple panels, or a crease has distorted the bodywork, book a detailer or body shop instead of sanding at home. Prompt attention matters because deeper damage can expose underlying material to moisture and lead to peeling or corrosion. (Scratch depth and repair guidance)
Your Simple Scratch-Prevention Checklist
A useful checklist has to fit the way you use the car. An elaborate routine that gets skipped won't protect anything, while a modest process repeated consistently can prevent the low-level abrasion that creates most visible wash marring.

Weekly
- Foam first: Pre-rinse with a hose or foam gun to loosen loose dirt before contact.
- Separate the water: Use a two-bucket wash with grit guards, a clean microfiber mitt, and a dedicated wheel tool.
- Dry softly: Use clean microfiber towels or air, then pat or blot rather than dragging fabric across the paint.
Monthly
Inspect the car under strong, indirect light. Look at the hood, roof, trunk, door handles, bumper corners, and lower panels. A quick detailer can help with light dust on appropriate surfaces, but don't use it as permission to wipe heavy grit from dry paint.
Refresh spray wax or sealant on high-wear horizontal surfaces when the existing layer no longer sheds water or feels slick. Keep clean towels for paint, wash microfiber separately, and retire any towel that falls on the ground.
Seasonally
Decontaminate bonded particles with an appropriate iron remover and clay process, using plenty of lubrication. Refresh wax or a compatible ceramic topper, then inspect PPF edges for lifting, trapped contamination, or damage. A professional detail can identify defects that are difficult to see during a quick driveway wash.
Your driver type changes the workload:
- City commuter: Prioritize parking awareness, frequent gentle rinses, and protection on door handles and front-facing panels.
- Weekend road-tripper: Focus on front-end protection, following distance, and cleaning bugs or road film before they harden.
- Garage-kept enthusiast: Maintain the full wash and inspection routine, but don't add correction steps unless lighting confirms a real defect.
Choose the lowest-friction version you can repeat without thinking. Prevention works when clean tools, low pressure, and smart parking become automatic habits.
If you want to reduce wash-contact risk at home, visit SwiftJet to explore its hose-connected foam gun, which applies clinging foam before a microfiber contact wash. Pair that pre-soak with a separate rinse bucket, clean mitt, and gentle drying routine to give your paint a safer maintenance process.
