
Thinking about building your own car wash foam gun? It's a lot easier than it sounds. With just a few common parts you can probably find at any hardware store, you can put together a tool that completely changes how you wash your car. Building it yourself means getting those professional-level results without paying for a pricey commercial unit.
Why Bother Building Your Own Foam Gun?
Before you start hunting for parts, let's talk about why a DIY foam gun is such a great project. This isn't just about saving a few bucks. It's about getting that thick, shaving-cream-like foam the pros use to protect a car's paint job. A good foam pre-wash is the single best thing you can do to prevent swirl marks and tiny scratches.
A little bit of time invested here will go a long way in preserving your car’s finish and making your detailing routine feel more effective.
The Real Perks of a Homemade Foam Gun
For most people, the biggest draw is the cost savings. There are some fantastic foam guns out there, but building your own can be significantly cheaper. For a baseline, it's worth checking out the features on something like a commercial soap foam gun to see what you're aiming for.
But it’s not just about the money. There’s a real sense of satisfaction that comes from making a tool that’s perfectly dialed in for your setup. You get to choose the parts, making sure it connects to your garden hose or pressure washer without any fuss. Building it yourself also demystifies the process, so you know exactly how it works.
It's no surprise that more people are getting serious about home car care. The market for car wash foam guns is expected to grow from $1.21 billion in 2024 to $1.85 billion by 2031. This isn't just a niche hobby anymore; people everywhere are realizing how much better the results are with a foam gun.
Key Takeaway: A DIY foam gun is more than a budget-friendly project. It’s a smart upgrade for your car care routine that helps eliminate the number one cause of paint damage: bad washing habits.
Keeping Your Paint Safe From Scratches
The real genius of a foam gun is the thick, clingy foam it produces. This foam doesn't just look cool; it lubricates the entire surface of your car.
As it sits there, the foam works its way into all the dirt and grime, lifting those abrasive particles up and away from the paint.
When you rinse it all off, most of that nasty stuff goes with it—before you ever lay a wash mitt on the paint. This pre-soak is the most important step. It drastically reduces the amount of grit you might otherwise drag across your clear coat during the main wash.
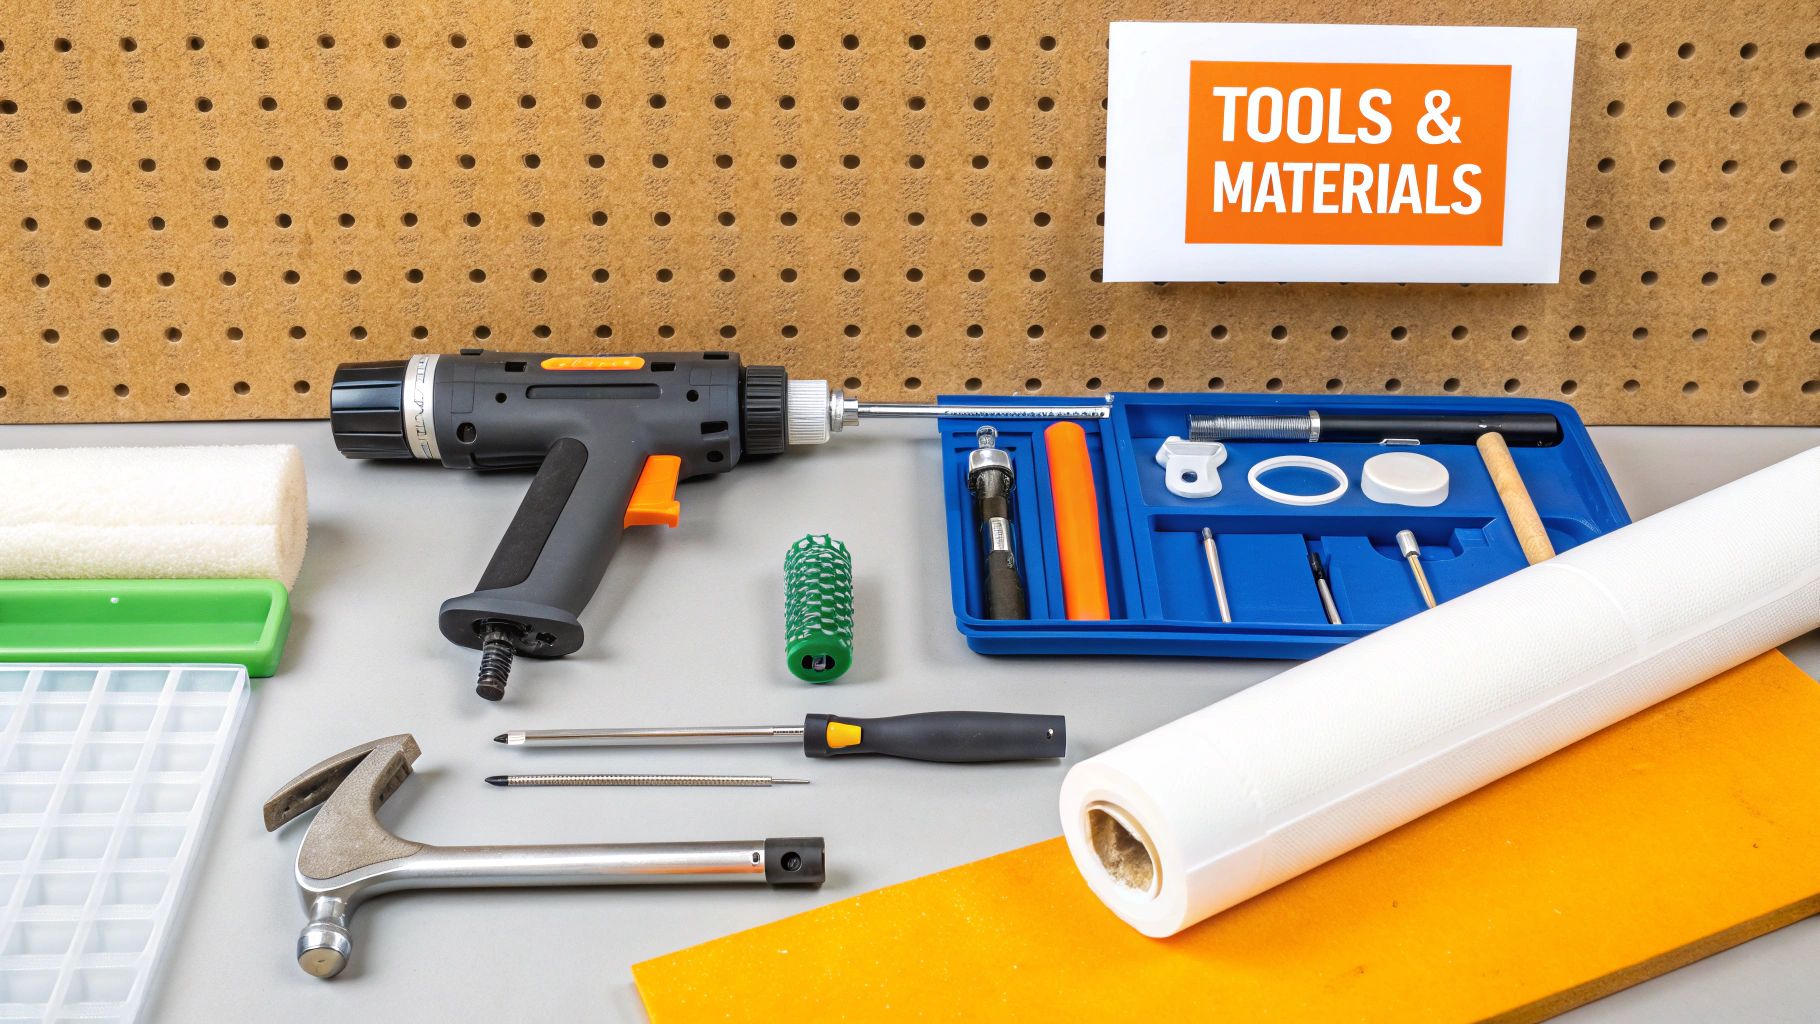
Gathering Your DIY Foam Gun Toolkit
Alright, before we get our hands dirty, we need to round up the right parts. Honestly, knowing what to grab is half the battle when figuring out how to make a car wash foam gun at home that actually works well. Your shopping list will look a bit different depending on whether you're aiming for a simple garden hose setup or a more powerful foam cannon for your pressure washer.
The good news? You won’t need to hunt down anything too exotic. Most of these components are sitting on the shelves of your local hardware store or are just a click away online. The real trick is picking parts that can handle the water pressure you'll be throwing at them, creating a solid, leak-free system.
Core Components for Your Build
If you’re starting with a low-pressure garden hose model, the heart of your foam gun will be a basic hose sprayer, ideally one with a quick-connect fitting. You'll also need a decent plastic or HDPE bottle to hold your soap solution. The real magic, though, comes from a few small brass fittings and some vinyl tubing that will act as the siphon, pulling the soap into the water stream.
A high-pressure build for a pressure washer is a different animal. This version requires a dedicated foam cannon body, usually made of brass, built to handle some serious force. You’ll need a specific adapter to match your pressure washer's wand, a heavy-duty soap reservoir, and the secret ingredient: a 1.1mm orifice nozzle. Don't skip this part—this tiny piece is what whips up that super-thick, satisfying foam.
I've seen this happen a dozen times: people use an oversized orifice nozzle and wonder why their foam is watery. A 1.1mm nozzle is the sweet spot for most consumer-grade electric pressure washers (under 2000 PSI). It creates the perfect amount of backpressure to generate that rich, clinging foam we're all after.
As you start pulling all these pieces together, remember that a clean workspace saves a lot of headaches. It's worth looking into some smart garage storage solutions to keep your tools and parts from getting lost in the shuffle.
Sourcing Your Parts Strategically
You really don't have to break the bank to get quality components. Let's look at the must-haves for each type of build.
To make things easier, I've put together a quick checklist comparing the essential parts for both a low-pressure and high-pressure setup.
DIY Foam Gun Component Checklist
| Component | Low-Pressure (Garden Hose) Version | High-Pressure (Pressure Washer) Version | Pro Tip |
|---|---|---|---|
| Main Body | Standard garden hose sprayer with a trigger | Brass foam cannon body | Brass is your best friend for durability, especially with high pressure. |
| Soap Reservoir | Wide-mouth plastic bottle (recycled is fine!) | Heavy-duty HDPE bottle (often included with body) | A wider mouth makes filling and cleaning way less of a chore. |
| Connectors | Quick-connect garden hose fittings | Pressure-washer-specific quick-connect adapter | Double-check the adapter type (e.g., Kärcher, M22) to match your washer's wand. |
| Siphon System | Brass hose barbs and clear vinyl tubing | Integrated into the foam cannon body | For a DIY hose version, ensure the tubing is a snug fit on the barbs. |
| Key Foaming Part | The sprayer nozzle itself (creates some suds) | 1.1mm Orifice Nozzle | This is non-negotiable for thick foam. Don't settle for the stock 1.25mm! |
| Sealant | Teflon tape for all threaded connections | Teflon tape (or pre-installed O-rings) | A few wraps of Teflon tape prevents annoying drips and pressure loss. |
This table should give you a clear picture of what you need to hunt for.
For anyone just dipping their toes into foam washing, the garden hose build is a fantastic starting point. If you want a deeper dive into that specific setup, our guide on selecting a https://www.swiftjetusa.com/blogs/news/car-wash-foam-gun-for-garden-hose has some extra tips that will help you pick the best base parts for your project.
Once you have your toolkit ready, it's time for the fun part: putting it all together.
Putting Your Garden Hose Foam Gun Together
Don't have a pressure washer? No problem. A garden hose foam gun is your best friend for getting a better car wash at home. It's a straightforward, budget-friendly approach that honestly works wonders. Let's walk through how to assemble this thing, paying close attention to getting those connections secure and leak-proof so you can make the most of your home’s water pressure.
The magic behind this simple setup is a cool bit of science called the venturi effect. Basically, as water blasts through the hose nozzle, it shoots past a tiny opening connected to your soap bottle. This fast-moving water creates a pocket of low pressure, which then sucks the soap concentrate up into the stream, mixing it on the fly to create that thick foam we're after.
This simple breakdown shows how the key pieces of a typical DIY foam gun come together.
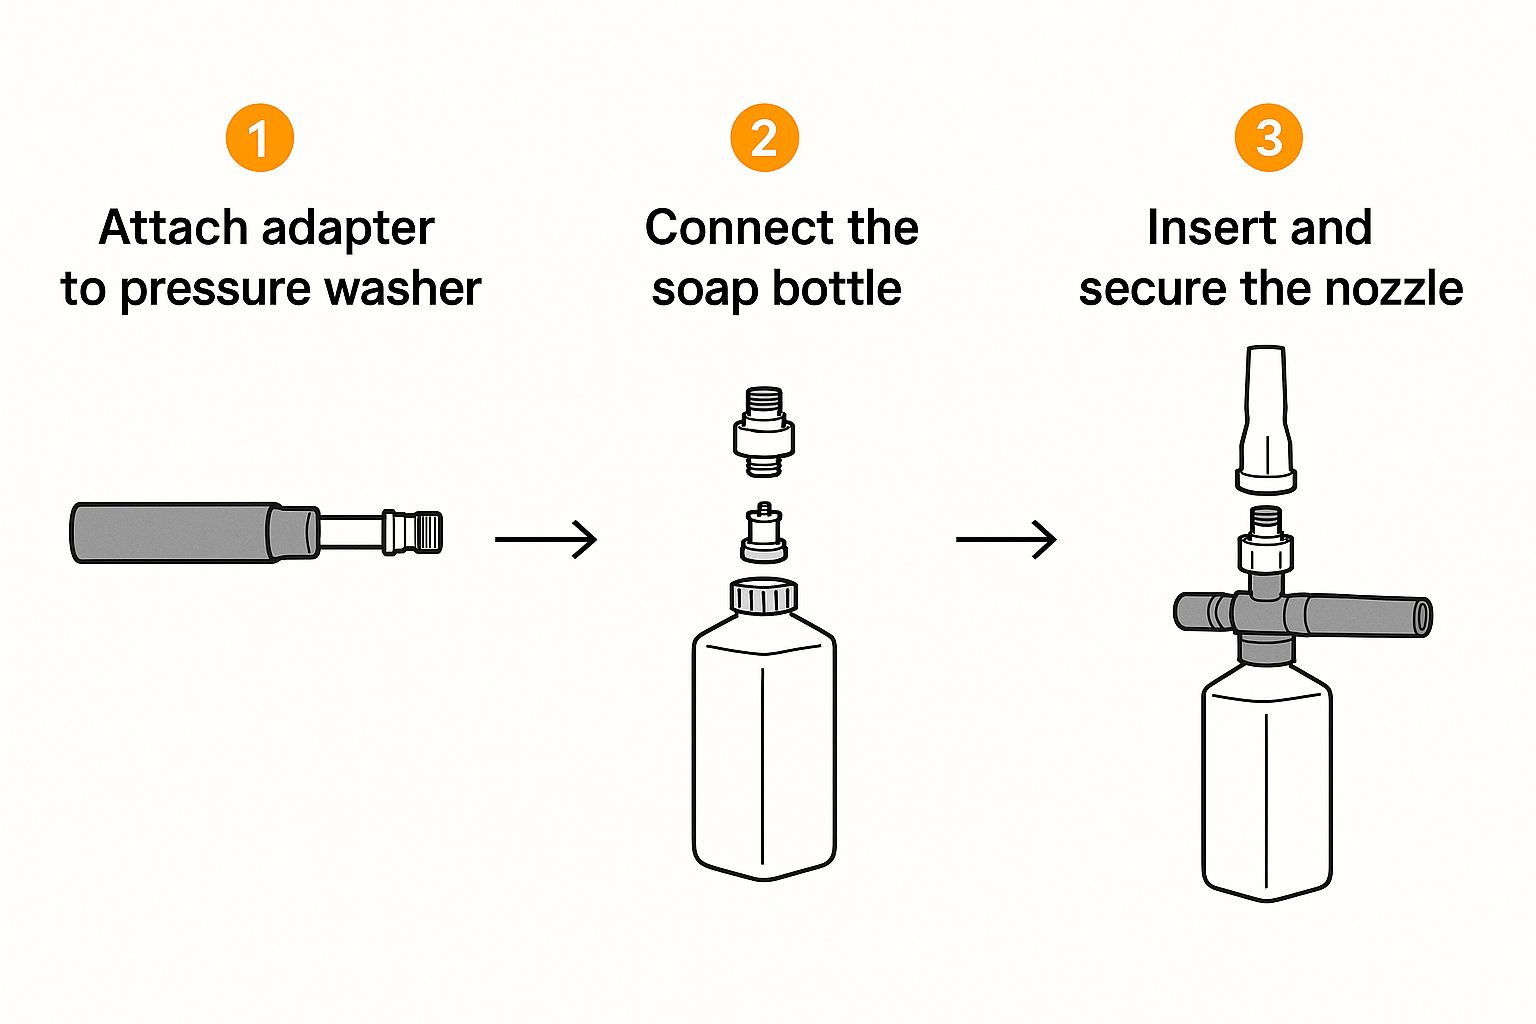
As you can see, it's all about how a few parts—the adapter, the soap bottle, and the nozzle—work together to create one functional unit.
Getting the Soap Bottle Ready
First things first, let's prep the soap reservoir. Grab your wide-mouth plastic bottle and its cap. You'll need to drill two precise holes in that cap: one for the air intake and another for the soap siphon tube. Getting an airtight seal here is absolutely critical for the venturi effect to do its job.
Go ahead and drill the two holes. A word of caution: pick a drill bit that’s just a hair smaller than the outside diameter of your brass hose barb and whatever you're using for an air intake valve.
- Siphon Tube Hole: This is where the brass fitting for the vinyl tubing will go.
- Air Intake Hole: This lets air into the bottle as soap gets siphoned out, which stops a vacuum from forming and killing the foam.
Once the holes are drilled, carefully thread the brass hose barb into its hole. You want a really snug fit. If it feels even a little loose, go ahead and dab a bit of waterproof epoxy or silicone sealant around the base. This will guarantee it's completely airtight.
Building the Siphon and Sprayer Assembly
Now for the siphon itself. Cut a piece of vinyl tubing that's long enough to reach the very bottom of your soap bottle from the cap. Shove one end of this tube firmly onto the hose barb you just installed. That's it—your siphon is ready.
Next, grab your garden hose sprayer. You'll need to attach a matching brass fitting to it, which is where the other end of your new siphon tube will connect. The placement here is everything—it has to be positioned right behind the nozzle, exactly where the water flow is at its fastest.
Pro Tip: I can't stress this enough: wrap every single threaded connection with Teflon tape before you tighten it down. This tiny step is the single best thing you can do to prevent those annoying leaks and pressure loss that will absolutely ruin your foam.
With all the fittings tightened up, you can now snap the main hose sprayer onto your garden hose using the quick-connect adapter. Fill the bottle with your favorite car wash soap and water mix, screw on the cap you modified, and congratulations—you've just learned how to make a car wash foam gun at home.
The fact that these low-pressure DIY foamers are so popular really speaks to how well they work. The market for these tools is already a big deal in the DIY car care scene, estimated at around $2 billion USD and expected to climb to $3 billion USD by 2028. It’s easier than ever for enthusiasts to get quality parts and build their own effective tools. If you're curious about the trend, you can find more detailed market information about low pressure foam guns.
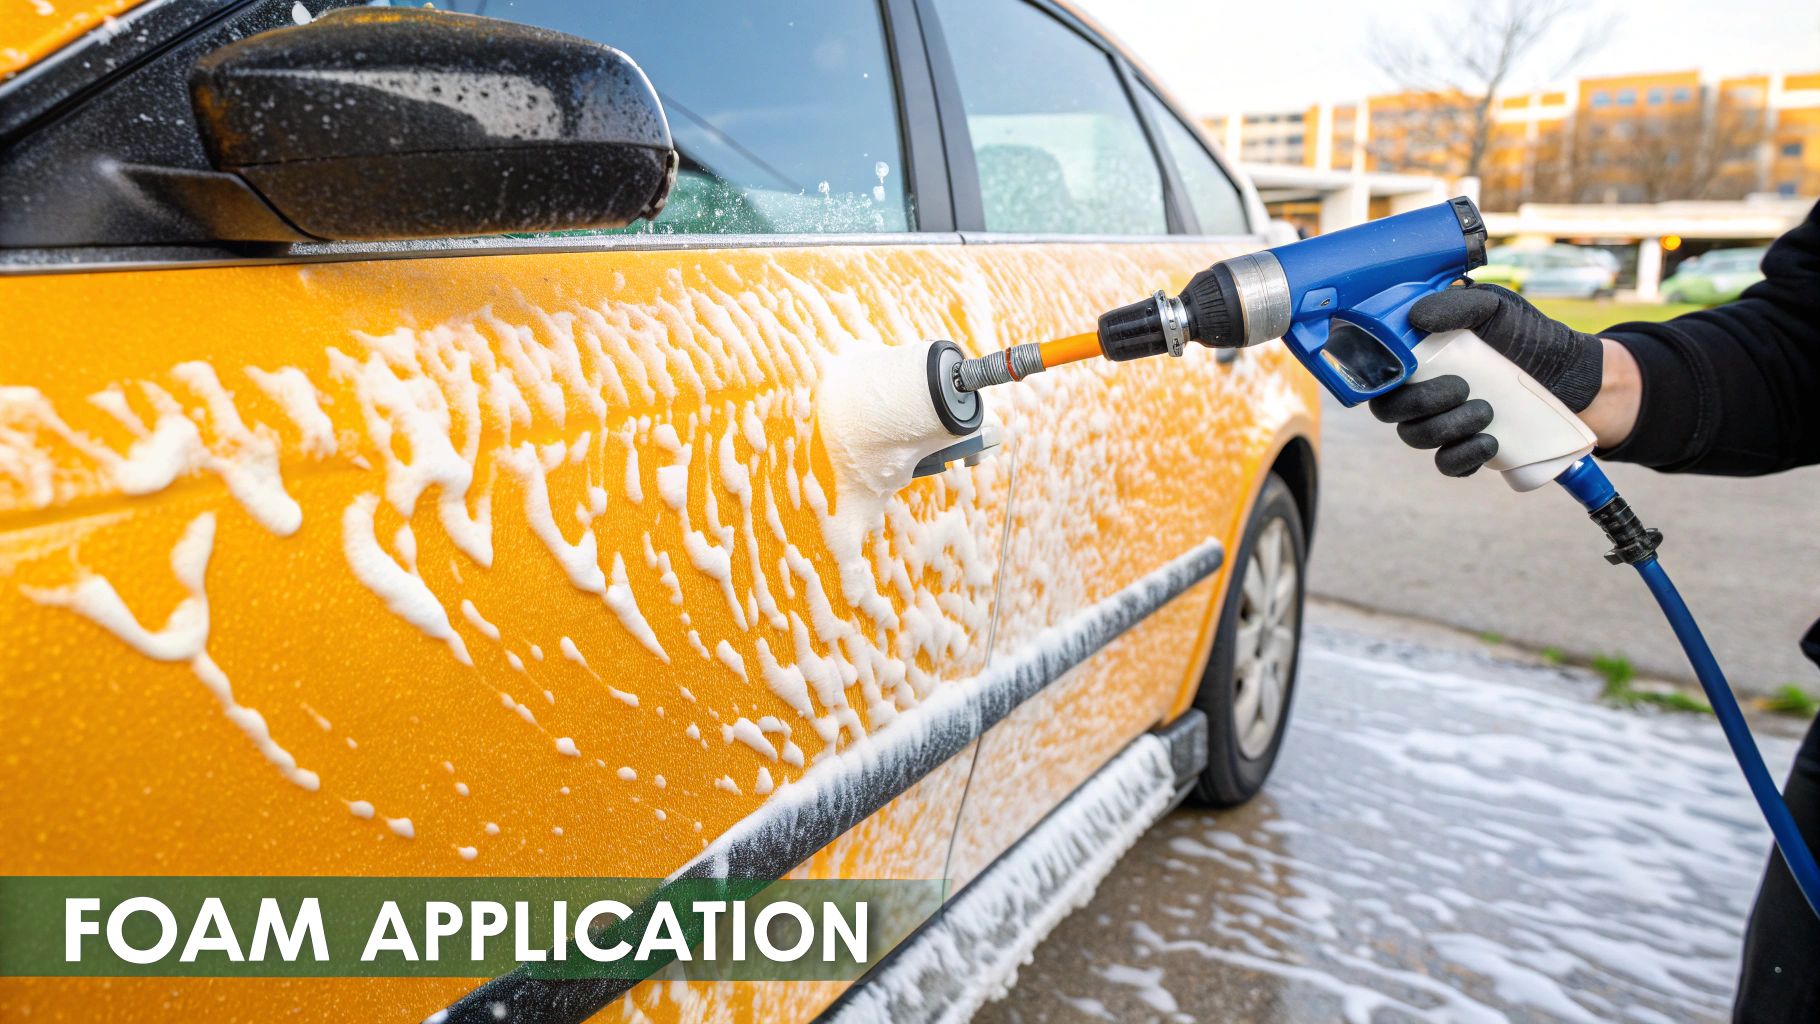
Putting Together Your High-Pressure Foam Cannon
Alright, if you're serious about getting that super-thick, shaving-cream foam that just sticks to your car, then building a high-pressure cannon is your next project. This whole setup is about taking the power from your pressure washer and turning it into a professional-level foam bath for your vehicle. We're going to connect the pieces and get everything dialed in for a perfect, satisfying blanket of suds.
This isn't like the garden hose version we talked about earlier. This build has to handle some serious force, so every single connection needs to be bulletproof. This is where spending a little extra on quality parts, especially the brass body and fittings, really makes a difference. Our goal is a perfectly sealed system that won't leak and will give us maximum foaming power.
It's no surprise this DIY approach is catching on with car enthusiasts. High-pressure foam guns are the top-tier of foam washing, and the market is growing fast—it's expected to be worth around $150 million globally by 2025. More and more people are realizing they can build their own pro-level setups with easily available parts, saving a ton of money. If you're curious about the trend, you can dig into some of the insights on the high-pressure foam gun market.
The Orifice Nozzle: The Real MVP
Let's talk about the most important part of this whole build: the tiny orifice nozzle. This little brass piece does all the heavy lifting. It's single-handedly responsible for creating the backpressure that forces your soap and water mixture into a thick, dense foam. Honestly, it's the secret sauce that turns a regular sprayer into a foam-blasting cannon.
Most off-the-shelf foam cannons ship with a standard 1.25mm orifice nozzle. This size is really meant for beefier, gas-powered pressure washers. If you’re like most of us and have a typical electric pressure washer (usually putting out less than 2.0 GPM), that nozzle is just too big. The result? Runny, sad-looking foam that slides right off your car.
I learned this the hard way. My first attempt with a stock nozzle gave me watery suds, and I was so frustrated. It wasn't until I swapped it out for a 1.1mm version that I got the "aha!" moment. The change was instant—I went from weak bubbles to that thick, clinging foam you see online.
For pretty much any DIY build using a standard electric washer, getting a 1.1mm orifice nozzle is a must. It's not optional if you want great results. It creates just the right amount of restriction, shooting the water and soap through a smaller hole at high speed, which is exactly how you generate that rich, thick foam.
Connecting the Main Parts
Putting it all together is pretty simple, but you need to be precise to avoid high-pressure leaks. Here's how it all fits together.
- Get the Adapter On: First, grab the quick-connect adapter that fits your pressure washer wand. Whether it's a Kärcher K-Series, an M22, or a standard 1/4" plug, make sure it's the right one. Wrap the male threads of the adapter with a good layer of Teflon tape before screwing it tightly into the main brass cannon body.
- Pop on the Siphon Tube: Now, take the clear plastic siphon tube. You'll see a small brass barb on the cannon body—just push the tube firmly onto it. This is what will pull the soap mix up from the bottle.
- Attach the Soap Reservoir: The last step is to screw the heavy-duty soap bottle onto the bottom of the brass body. Check that the threads are clean and get it nice and snug to prevent any annoying drips.
Once it's all assembled, do one last check and make sure every connection is tight. Even a tiny leak can kill your cannon's performance, giving you weak foam and just wasting soap. With everything locked down, you're ready to start calibrating.
Getting the Most Out of Your Homemade Foam Gun
You’ve built it, and now it’s time for the fun part. The real satisfaction comes when you pull the trigger and lay down a thick, satisfying blanket of suds on your car. But just like any quality tool, there's a bit of a learning curve to get that perfect pre-wash. A little practice is all it takes to turn your DIY project into a go-to piece of your detailing kit.
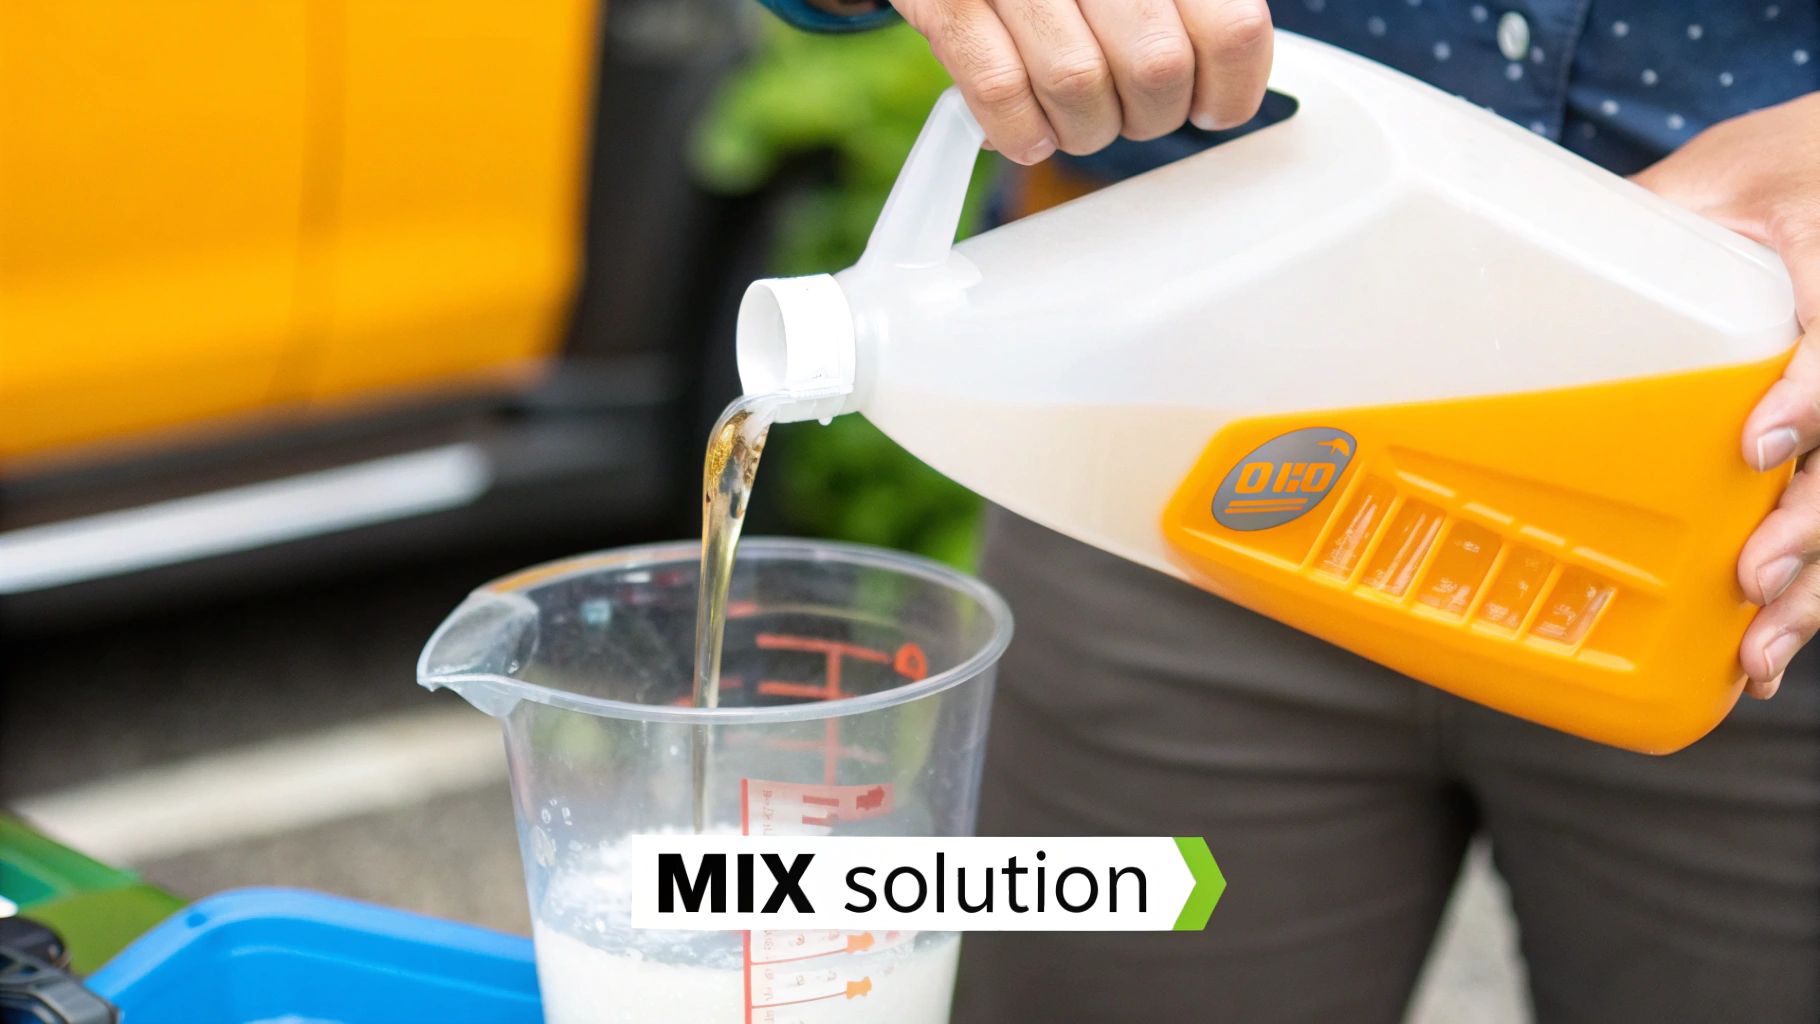
The first hurdle is always getting the foam consistency just right. This is all about nailing the soap-to-water ratio.
Dialing in the Perfect Suds
What works for one person might not work for you. The ideal ratio really depends on two main things: the car shampoo you’ve chosen and how hard your local water is. If you live in an area with hard water (meaning it has a high mineral content), you’ll likely need a bit more soap to get the same rich foam you’d see with soft water.
For most shampoos designed specifically for foam guns, a 1:10 ratio is a solid starting point. That’s one part soap to ten parts warm water. Using warm water is a small trick that makes a big difference, as it helps the soap dissolve more effectively and gives you a better mix.
If the foam looks a little thin or runny, don't sweat it. Just add another ounce of soap to the reservoir, give it a swirl, and test it again. It’s a simple game of trial and error.
Pro Tip: Whatever you do, stay away from dish soap. It makes tons of bubbles, sure, but it’s a degreaser. It will strip every last bit of wax or sealant off your paint, leaving your car's finish totally exposed. Always stick with a pH-neutral car shampoo made for foaming.
Once the mix is dialed in, your application technique is key. Start spraying from the bottom of the car and work your way to the top. This simple trick prevents the soap from just sliding down a dry panel. It gives the foam maximum "dwell time" to cling to the surface and do its job of loosening up all that dirt and grime. For a deeper dive, our guide on how to use a foam gun has even more advanced tips.
Troubleshooting Common Issues
Even a perfectly built DIY foam gun can have an off day. If you run into trouble, it’s usually one of these common culprits with a quick fix.
-
Runny or Watery Foam: This is almost always a soap problem. The first step is to add more soap to your bottle. If that doesn't work, make sure you're using a high-quality shampoo designed for foaming. For those using a pressure washer cannon, the issue might be your orifice. A 1.1mm orifice nozzle is essential for thick foam; a bigger one just won't build enough pressure.
-
Leaky Connections: A tiny drip can kill your pressure and make a mess. If you spot a leak, disconnect that fitting. Wrap the male threads with a fresh layer of Teflon tape, making sure to wrap it in the same direction you'll be tightening it, then reconnect it securely.
-
Uneven Spray Pattern: Is the foam coming out in a weird, lopsided fan? You probably have a partial clog in the nozzle. Just disconnect the gun from your hose or pressure washer and give the nozzle a good flush with clean water to clear out any soap gunk or debris.
Got Questions About Your DIY Foam Gun? Let's Get Them Answered
Even the best-laid plans can hit a snag. When you're figuring out how to make a car wash foam gun at home, a few questions are bound to come up. Getting these sorted out is what separates a frustrating project from a fantastic first wash.
Let's dive into some of the most common hurdles people face.
What Kind of Soap Should I Be Using?
This is usually the first question people ask, and it's a critical one. The soap you choose is just as important as the gun you build.
For that super thick, shaving-cream-like foam, you absolutely need a shampoo made specifically for foam guns or cannons. These are engineered with the right viscosity and surfactants to create dense, clinging foam. Whatever you do, don't use regular dish soap. It’s far too harsh and will strip off your car's wax and protective sealants, leaving the paint exposed.
Look for a pH-neutral car shampoo. This guarantees it’s safe for all your vehicle's surfaces, including paint, plastic trim, and chrome. A good starting point is a 1:10 ratio of soap to warm water, but don't be afraid to experiment. You might need to adjust it a bit depending on your local water hardness and the specific soap you're using.
The biggest mistake I see beginners make is grabbing the wrong soap. A proper foaming car shampoo is a non-negotiable part of the equation. It's formulated to lubricate the surface and safely lift dirt, which is the entire point of a pre-wash.
Help! Why Is My Foam So Runny?
Watery, weak foam is probably the most common complaint, but it's usually an easy fix. Before you start taking your gun apart, look at your soap mixture. Chances are, you just need a little more soap concentrate.
If you've built a high-pressure cannon, the issue is almost always the orifice nozzle. Most electric pressure washers come with a stock 1.25mm nozzle, which is simply too large to produce good foam. Swapping it for a 1.1mm orifice nozzle will create the backpressure needed for those thick suds.
For a garden hose setup, the culprit is usually an air leak. Go back and check every single connection, making sure they're sealed up tight with Teflon tape.
Is a Homemade Foam Gun Actually Safe for My Car's Paint?
Yes, one hundred percent. When built and used the right way, a DIY foam gun is one of the safest washing tools you can use.
The thick layer of foam acts as a pre-soak, breaking down and encapsulating all the abrasive dirt and grit sitting on your paint. This lets you rinse away the vast majority of the grime before you ever touch the surface with a wash mitt.
This simple step drastically lowers the risk of creating swirl marks and fine scratches, which is a major difference between a quick bucket wash and a proper detail. If you want to dive deeper into how these tools work, our guide on the differences between a foam gun vs foam cannon has some great insights.
Ready to skip the build and get straight to washing? The SwiftJet Car Wash Foam Gun connects to any garden hose and delivers incredible foam right out of the box. Every order includes a free microfiber wash mitt to complete your kit. Visit https://swiftjetusa.com to get yours today