
Washing your car at home is one of those things that feels like a chore, but it’s actually a vital piece of maintenance. Get it right, and you’re not just cleaning your car—you’re preserving its finish and protecting its resale value. The truth is, most automated car washes, with their harsh chemicals and gritty, spinning brushes, are a fast track to creating the very micro-scratches and swirl marks that make your paint look dull and tired.
Why a Proper Home Car Wash Is Your Best Investment
Sure, washing your car yourself can save you a few bucks, but the real payoff is in preserving your paint. Think about what happens at a typical commercial car wash: they often use recycled water and aggressive brushes that have already scrubbed dirt off hundreds of other cars. You’re essentially paying someone to lightly sandpaper your clear coat, which over time, leads to that dull, hazy finish we all dread.
When you take control of the process—choosing the right products, using the right tools, and following a proven technique—you shift the focus from a quick, superficial rinse to a thoughtful, detailed clean. This is how you ensure every panel on your vehicle is treated with care, protecting your investment for years to come.
Debunking Common Car Wash Myths
I’ve heard some wild theories over the years, but a few myths just refuse to die. Let's set the record straight on the most common ones.
- "Dish soap is fine, right?" Wrong. Dish soap is a powerful degreaser designed to strip caked-on food from your plates. On your car, it does the exact same thing to your protective wax and sealant, leaving the paint totally exposed to UV rays, bird droppings, and acid rain.
- "One bucket is all I need." Not if you care about your paint. Dunking a dirty wash mitt back into your only bucket of soapy water means you're just picking up all that grit you just removed and rubbing it right back onto the car. This is probably the number one cause of swirl marks.
- "Wax on, wax off... in circles." That circular motion might have worked for Mr. Miyagi, but it’s a terrible way to wash a car. Those circular patterns create very noticeable swirl marks when the sun hits the paint just right. Always wash in straight, overlapping lines that follow the car's body panels.
Honestly, the biggest mistake I see DIY detailers make is underestimating how much damage a bad wash can do. A few extra minutes and the right method will save you hundreds, maybe even thousands, in paint correction services down the road.
At the end of the day, a dedicated home wash car routine is about so much more than just looking good. It’s preventative maintenance for your vehicle’s most visible and vulnerable asset—its paint.
Getting Your Car Wash Kit in Order
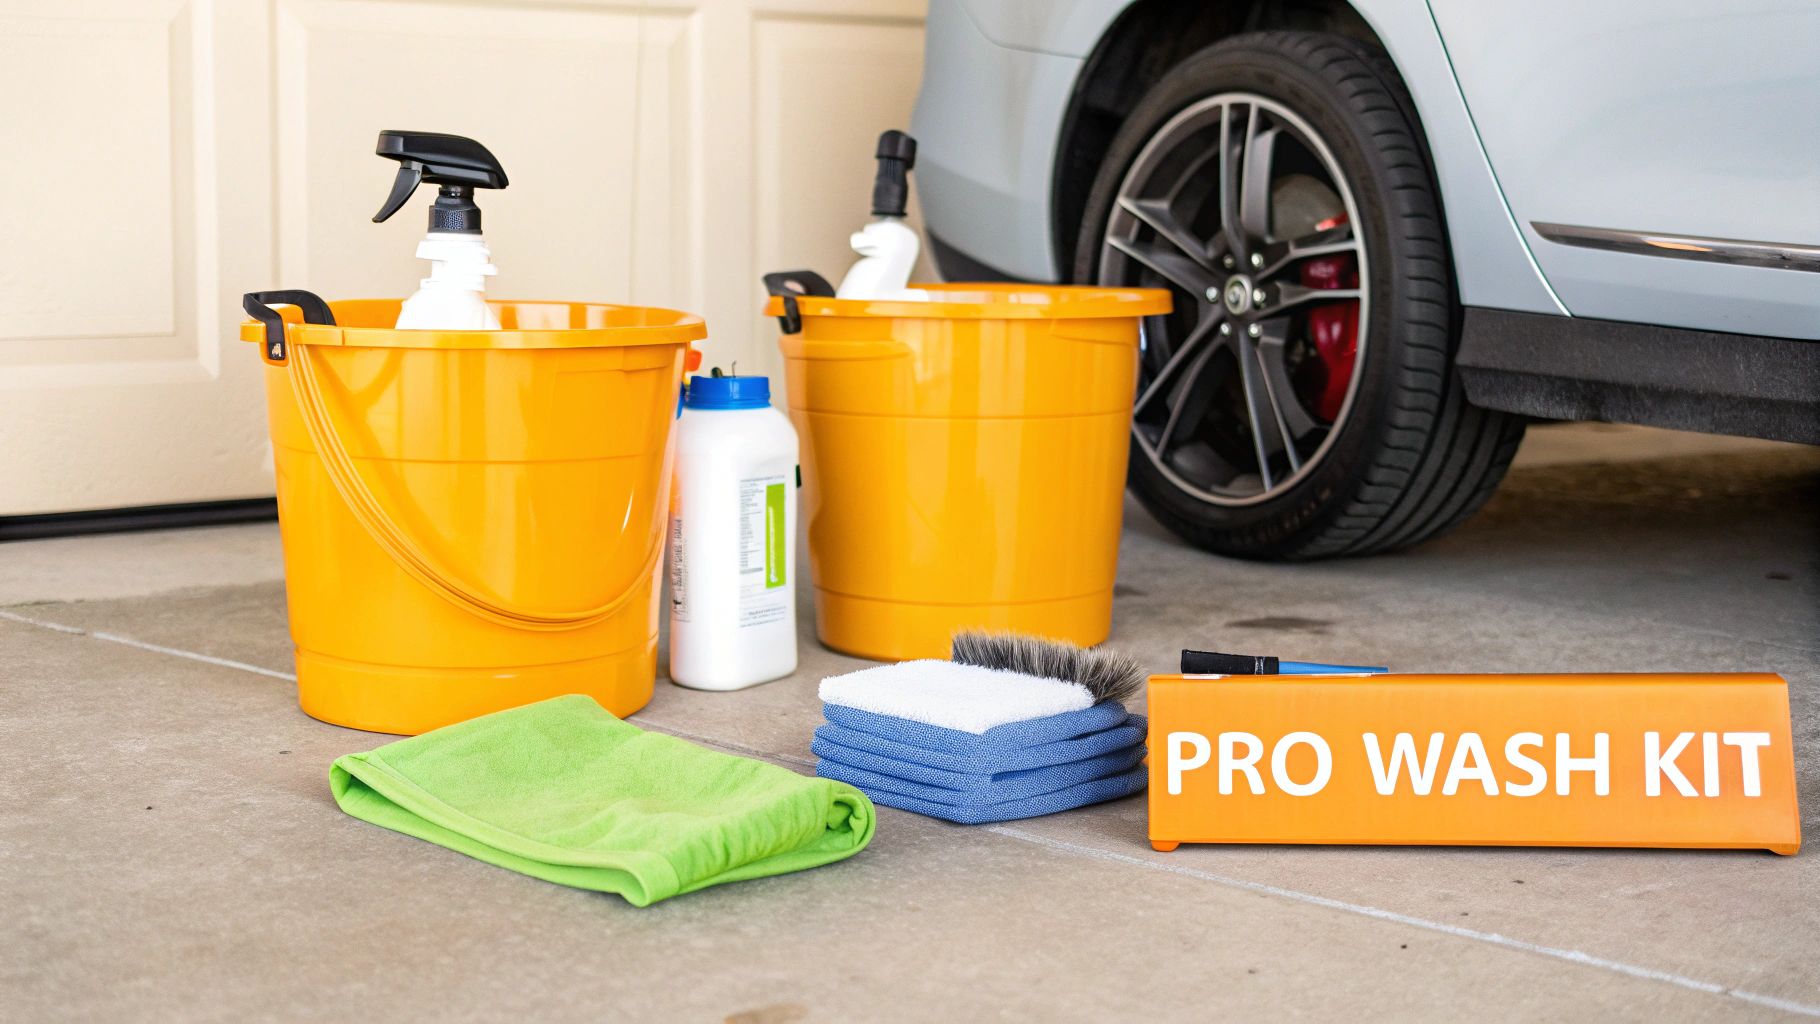
Before you even think about turning on the hose, let’s talk gear. Having the right tools on hand is the secret to getting that professional shine at home. This isn't about being a pro detailer; it's about working smarter, not harder, and—most importantly—keeping your car's paint safe from accidental damage.
So, it’s time to retire that old bucket and the ratty sponge from the back of the garage. Sponges are notorious for trapping tiny bits of grit and dragging them across your paint, leaving behind a fine web of scratches called swirl marks. Your journey to a better wash starts by swapping out these paint-damaging relics for safer, more effective alternatives.
The Non-Negotiable Washing Gear
These are the core items that will actually touch your car's paint. For a scratch-free wash, consider these absolute must-haves.
- Two Buckets with Grit Guards: This is the cornerstone of the two-bucket wash method. One bucket is for your soapy water, the other is for clean rinse water. The grit guards sit at the bottom, creating a barrier that traps dirt and stops your wash mitt from dragging it back onto the paint.
- pH-Neutral Car Shampoo: Never use dish soap! It's designed to strip grease and will do the same to your car's protective wax or sealant. A quality, pH-neutral shampoo gently lifts grime without compromising the protective layers on your paint.
- A Plush Microfiber Wash Mitt: A high-pile microfiber mitt is your best friend here. Its long, soft fibers pull dirt particles up and away from the surface, trapping them deep inside the mitt instead of grinding them against your clear coat.
Tools That Make the Job Easier and Safer
Once you have the basics covered, a few extra tools can take your car wash from good to great. They not only speed things up but also drastically reduce the risk of scratching your paint.
A foam gun or foam cannon, for instance, is a game-changer. It covers your car in a thick blanket of suds that starts breaking down and loosening heavy dirt before you even touch the surface. Rinsing this foam off removes the worst of the grit, which means less risk when you finally start washing with your mitt. In the same way, dedicated wheel brushes are shaped to get into the nooks and crannies of your wheels, safely scrubbing away stubborn brake dust without damaging the finish.
Getting a professional result at home is more popular than ever. The global car wash service market is valued at over USD 34 billion, which just goes to show how much people care about keeping their vehicles clean. When you do it yourself, you get total control over the products and techniques used on your paint.
To help you get started, here’s a quick checklist to make sure you have everything you need.
Your Home Car Wash Toolkit Checklist
This table breaks down the essentials from the nice-to-haves, helping you build your kit and prioritize what to get first.
| Tool/Product | Essential or Optional | Primary Purpose |
|---|---|---|
| Two 5-Gallon Buckets | Essential | Separates clean soap water from dirty rinse water. |
| Grit Guards (x2) | Essential | Traps dirt at the bottom of the buckets, preventing scratches. |
| pH-Neutral Car Shampoo | Essential | Cleans effectively without stripping wax or sealant. |
| Microfiber Wash Mitt | Essential | Safely lifts and traps dirt away from the paint surface. |
| Microfiber Drying Towel | Essential | Absorbs water quickly and safely without leaving streaks. |
| Wheel Cleaner | Essential | Specially formulated to break down brake dust and road grime. |
| Wheel Brush & Tire Brush | Essential | Agitates dirt on wheels and tires for a deep clean. |
| Foam Gun/Cannon | Optional | Applies a thick pre-wash foam to loosen heavy dirt. |
| Iron Decontaminant | Optional | Chemically removes embedded iron particles from paint. |
| Clay Bar or Clay Mitt | Optional | Removes bonded surface contaminants for a smooth finish. |
| Car Wax or Paint Sealant | Optional | Adds a layer of protection and enhances gloss. |
This list gives you a solid foundation. You can always add the optional items later as you get more comfortable with the process.
For a deep dive into every tool a serious car enthusiast might want, check out our complete car detailing supplies list.
Finally, don't overlook the drying process. A high-quality, super-absorbent microfiber drying towel is non-negotiable. A single large "waffle-weave" or twisted-loop towel can often dry an entire car without leaving behind lint or water spots, giving you that perfect, streak-free finish.
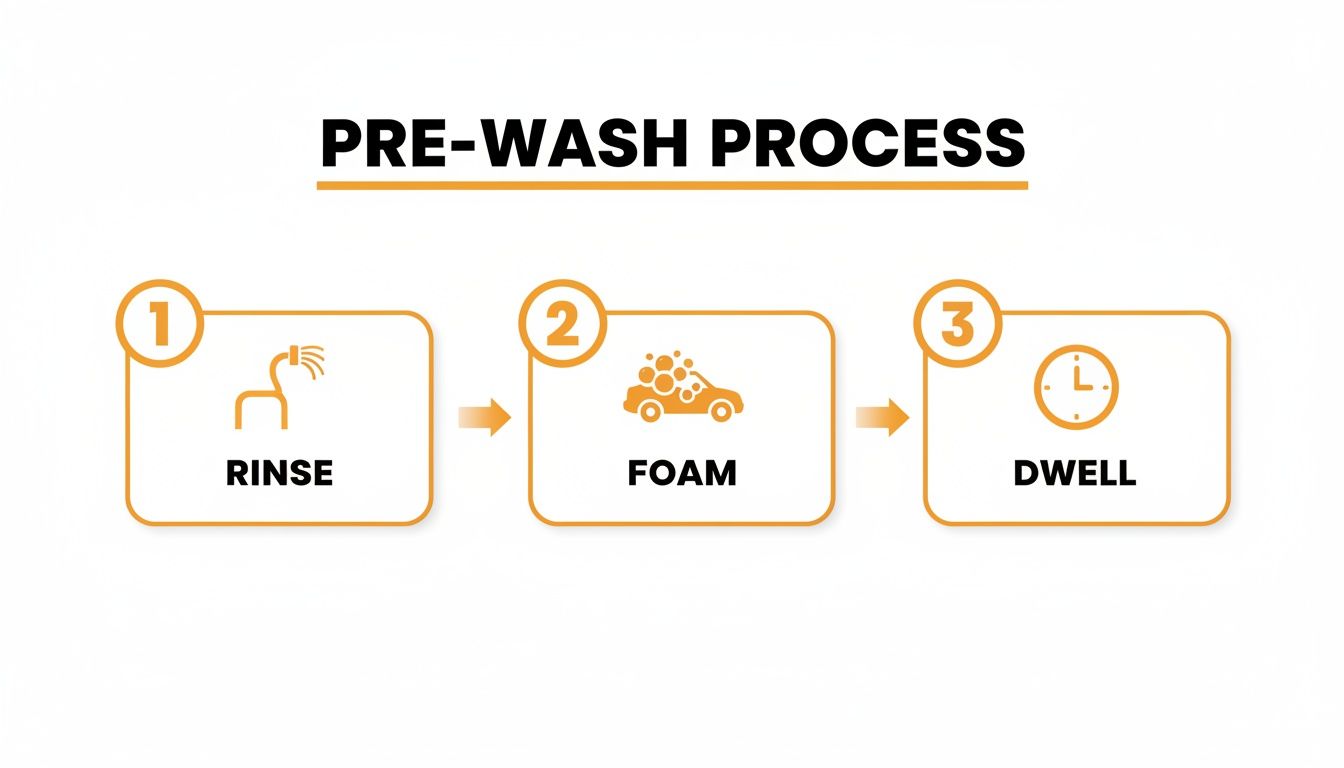
The Pre-Wash Foam Bath That Prevents Scratches
Imagine dragging fine-grit sandpaper across your car's paint. Sounds awful, right? Well, that's pretty much what you’re doing when you take a wash mitt directly to a dirty, dusty car. All that grit gets ground right into the clear coat, and that’s the a-ha moment for how swirl marks and fine scratches are born. It's easily the biggest mistake people make when washing their car at home.
The secret that pros use to sidestep this disaster is the pre-wash. Before a mitt or sponge ever touches the paint, your goal is to get as much of that heavy, abrasive grime off as gently as possible. A quick blast with the hose helps, but the real game-changer is laying down a thick blanket of foam.
Why a Good Foam Bath Is a Non-Negotiable Step
Giving your car a foam bath isn't just for show—it's a critical safety measure. When you smother the vehicle in a rich layer of suds, almost like shaving cream, the cleaning agents (called surfactants) in the soap immediately get to work. Their job is to surround each particle of dirt, breaking its grip on the paint and lifting it up and away from the surface.
This process does the heavy lifting for you so you don't have to. The foam is designed to cling, even on vertical panels, giving the soap plenty of time to dissolve the grime. Let it sit for a few minutes, then just rinse it all off. You’ll watch the most damaging dirt and contaminants slide right off with the foam.
By the time you're ready for the actual hand wash, you’re no longer scrubbing a gritty surface. You’re working on a pre-cleaned car, which can slash the risk of creating new scratches by up to 90%.
Nailing the Perfect Suds
The consistency of the foam is everything. You're not after runny, watery bubbles. You want a thick, rich foam that sticks around. This is where a good foam gun—the kind that hooks right up to a standard garden hose—becomes an essential piece of kit for anyone serious about washing their car at home. It’s designed to mix the perfect amount of soap, water, and air to create that ideal, clingy foam.
Getting it right is pretty simple if you follow a few pointers:
- Pick the Right Soap: Always grab a high-quality, pH-neutral car shampoo made specifically for foam guns. These soaps are engineered to produce the thickest suds.
- Let it Dwell, But Don't Let it Dry: Give the foam about 5-10 minutes to sit on the car and do its thing. This dwell time is crucial for loosening dirt. But—and this is a big one—never let the foam dry on the paint, especially in the sun. That’s a fast track to stubborn water spots.
- Stay in the Shade: If you can, always wash your car out of direct sunlight. A cool surface keeps the foam and water from evaporating too quickly, letting the soap work properly.
Getting the hang of this is easy, and a quality foam gun makes it almost foolproof. If you want a deep dive into getting the most out of your setup, check out our guide on how to use a foam gun. It has all the details you’ll need.
Ultimately, adding this one step completely changes your car wash. It turns a potentially damaging chore into a safe, effective process that protects and preserves your car's finish. Once that foam is rinsed away, you’re left with a much cleaner canvas, perfectly prepped for a safe two-bucket wash.
Mastering the Two-Bucket Contact Wash
Now that the heavy, abrasive grime is gone, it’s time for the main event: the contact wash. This is the moment your wash mitt finally meets the paint, and doing it right is what separates a decent car wash from a truly professional one. The gold standard for a safe, scratch-free wash is the two-bucket method. It sounds simple, and it is, but it's brilliantly effective.
The whole idea is to keep the dirt you remove away from your car's paint. You’ll have one bucket with your pH-neutral car shampoo and another with just plain water. The first is your "suds" bucket, the second is your "rinse" bucket. This simple separation is the secret to a perfect finish.
It's this kind of meticulous technique that people are increasingly looking for. The global mobile car washing market, valued at around USD 7 billion, is expected to nearly double by 2030, which tells you people are serious about taking better care of their cars. You can read more about this trend over at GlobeNewswire.
The Two-Bucket System in Action
So, how does it work in practice?
You’ll start by dipping your clean microfiber wash mitt into the suds bucket. Gently wash one panel of your car—say, the roof. Now, here’s the crucial part: before you even think about going back for more soap, you dunk and swish that dirty mitt around in your rinse bucket.
This is where the magic happens. All the grit and grime you just pulled off the paint gets released into the rinse water. For this to be truly effective, both buckets should have a Grit Guard at the bottom. It’s a simple plastic insert that lets dirt fall to the bottom but keeps it trapped there, so you can't accidentally pick it back up with your mitt.
This is why the pre-wash steps we just covered are so important.
By rinsing, foaming, and letting the soap dwell, you’ve already done most of the heavy lifting, dramatically reducing the amount of dirt your wash mitt ever has to deal with.
Your Washing Workflow
A methodical approach is your best friend here. It prevents cross-contamination and guarantees a better, safer result. Always work this way:
- Start at the Top: Begin with the roof and work your way down, panel by panel. This keeps dirty suds from running over areas you’ve just cleaned. Simple gravity, right?
- Wash in Straight Lines: Whatever you do, don't wash in circles. That’s how you get those awful swirl marks that show up in the sun. Instead, use gentle, overlapping back-and-forth motions that follow the car's body lines.
- One Panel, One Rinse: As soon as you finish a panel (a door, a fender, etc.), head straight back to the rinse bucket. Clean the mitt thoroughly before grabbing fresh suds. This discipline is non-negotiable.
- Save the Dirtiest Parts for Last: Your car’s lower sections—rocker panels, bumpers, and the areas behind the wheels—are always the filthiest. Wash them last. This stops you from dragging road tar and heavy grit all over your hood and roof. And remember, your wheels should be cleaned with completely separate tools.
The core principle is simple: never introduce dirt back into your clean soap bucket. Rinsing your mitt after every single panel ensures only a clean, well-lubricated mitt is touching your paint. It’s a small habit that makes a world of difference in preventing scratches.
Drying and Protecting for a Lasting Shine
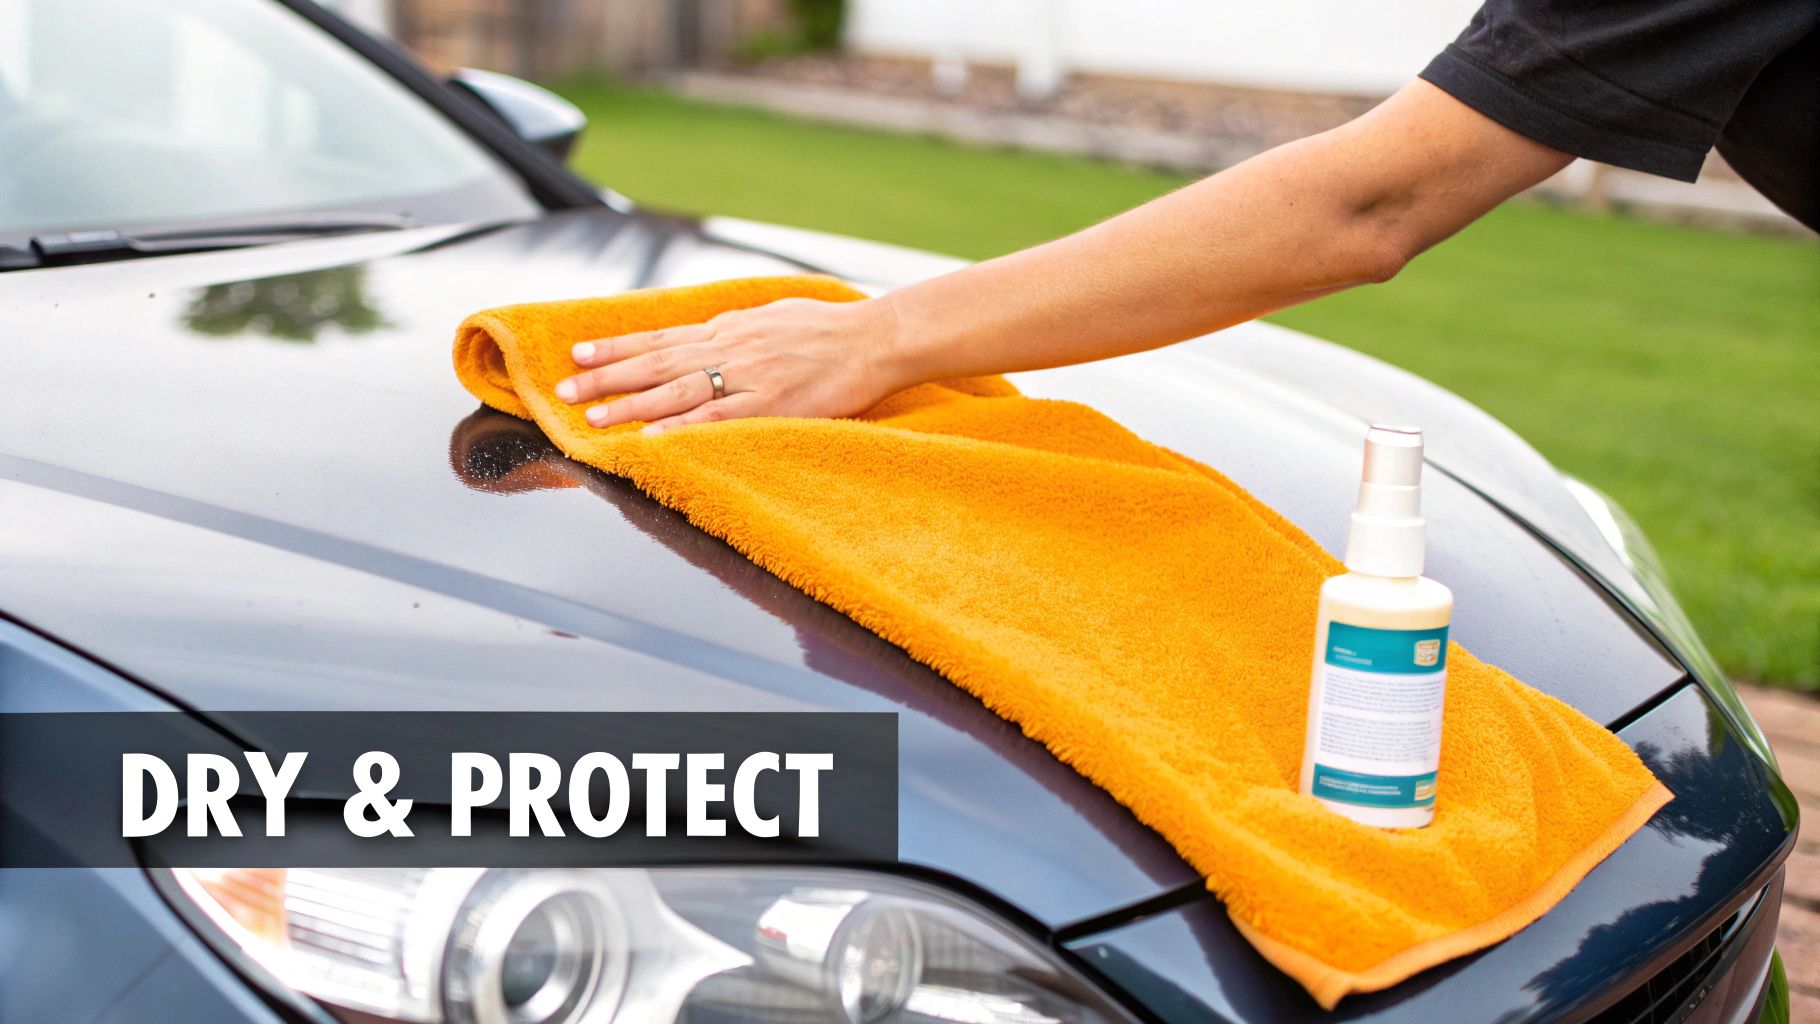 You’ve done the hard work, the final rinse is done, and your car is sparkling clean… but it's also soaking wet. This is a critical moment. Drying your car the wrong way can instantly undo all your careful washing, leaving behind the exact swirl marks and water spots you were trying to avoid.
Tempted to grab an old bath towel or a squeegee? Don't do it. Those tools are notorious for trapping and dragging tiny bits of grit across your finish, creating fine scratches. The only tool for this job is a high-quality, plush microfiber drying towel made specifically for cars.
The Best Techniques for a Spotless Finish
Your mission is to get every last drop of water off the paint without causing any harm. A big, thirsty microfiber towel is your best friend here. A couple of simple techniques will get you a flawless, streak-free result every time.
- The Blotting Method: On big, flat surfaces like the hood, roof, and trunk, this is the safest way to go. Just lay the towel flat, pat it down to absorb the water, and then lift and move to the next spot. It's a zero-friction approach.
- The Dragging Method: For the sides of your car—the doors and fenders—hold the towel by two corners and let its own weight drag it down the panel. You don't need to apply any pressure. The microfiber will do all the work, minimizing contact and risk.
Here’s a pro tip: for tricky spots like grilles, mirror housings, and wheels, grab a leaf blower. It's fantastic for blasting water out of crevices that towels can't reach, which stops those frustrating drips that always seem to show up minutes after you think you're done.
Taking Your Shine to the Next Level
Honestly, you could stop right here and have a beautifully clean car. But if you’re after that head-turning, deep gloss and want to keep it that way, a couple of extra steps make all the difference. This commitment to a pristine finish is a big reason why the U.S. car wash and auto detailing industry is worth around $14 to $15 billion annually.
First, let's talk about paint decontamination. Even after the best wash, your paint can still feel a bit rough from tiny, bonded contaminants. This is where a clay bar or a clay mitt comes in. Glide it over the surface with a lubricant, and you'll feel it pull those impurities right out, leaving the paint as smooth as glass.
A great trick is to use a drying aid. Just a light mist on each wet panel before you wipe provides lubrication, helping your towel glide effortlessly while adding a quick layer of gloss and protection.
Finally, you have to protect that perfectly clean, smooth surface. This is where you apply a layer of high-quality car wax or a modern synthetic paint sealant. This step is non-negotiable. It creates a barrier that shields your paint from UV rays, acid rain, bird droppings, and everything else the road throws at it. Plus, it's what gives the paint that incredible depth and glossy, wet look.
For a deeper dive into this final, crucial stage, check out our complete guide on car wash drying and protection to really lock in that showroom shine.
Your Home Car Wash Questions Answered
Even with the best plan, questions always come up when you're trying to nail down your car wash routine. Getting these little details right is what separates a decent wash from a professional-looking one, and it's how you build real confidence in your process.
Think of this section as your go-to reference for those common head-scratchers. We'll tackle the frequent "what-ifs" and "should-Is" that can make all the difference, helping you refine your technique for a flawless finish every time.
How Often Should I Wash My Car?
There's no single magic number here—it really comes down to where you live and how you use your car. A great starting point for most people is a wash every two weeks. This is frequent enough to keep everyday dirt and grime from bonding to your paint and dulling its shine.
That said, you have to adapt to your surroundings. If you're dealing with salted roads in the winter, or your car is a constant target for bird droppings and tree sap, you need to step it up to a weekly wash. Those contaminants are incredibly corrosive, and the longer they sit, the more likely they are to permanently etch into your clear coat. Time is your enemy here.
Is It Okay to Wash My Car in The Sun?
This is probably one of the biggest and most common mistakes I see people make. You should absolutely avoid washing your car in direct sunlight or when the body panels are hot. It might seem like a good idea to let the sun help you dry, but it creates a nightmare scenario for your paint.
The heat turbo-charges evaporation, drying the soap and water on the surface almost instantly. This is what causes those stubborn water spots and caked-on soap residue. You're then forced to scrub them off, which completely defeats the purpose of a careful, scratch-free wash.
Always work in the shade. If a garage or carport isn't an option, plan your wash for early in the morning or later in the evening when the sun is low and the panels are cool to the touch. This simple change will make a massive difference.
What Is The Difference Between Wax and Sealant?
Both are your paint's last line of defense, adding shine and protection, but they go about it in completely different ways. The right choice for you really depends on the look you're after and how much time you want to put into maintenance.
- Natural Wax (Carnauba): Waxes are known for giving paint a deep, warm, wet-looking gloss that many enthusiasts absolutely swear by. The trade-off is durability; you'll typically only get 1 to 3 months of protection before needing to reapply.
- Synthetic Paint Sealant: These are lab-engineered polymers that create a chemical bond with your paint. They deliver a slick, sharp, almost glass-like shine and offer much longer-lasting protection, often 4 to 6 months or even more.
Is a Pressure Washer Really Necessary?
Necessary? No. A game-changer? Absolutely. While you can definitely get your car clean without one, a pressure washer makes the job faster, easier, and ultimately more thorough.
Its biggest strength is in the pre-rinse, where it has the power to blast away loose grit and heavy contamination that a garden hose would just leave behind. It's also the key to creating that thick, shaving-cream-like foam with a foam cannon, which is crucial for a safe pre-wash. A good nozzle on a garden hose will work, but it just can't match the cleaning power or produce the same quality of foam.
Ready to elevate your home car wash from a chore to a professional-grade detailing session? The SwiftJet Car Wash Foam Gun turns any garden hose into a high-powered foaming machine, laying down the thick suds you need for a safer, scratch-free clean. Get yours today at https://swiftjetusa.com and see the difference for yourself.