
So, you've got a foam soap sprayer. What does it actually do? It’s a simple but clever tool that hooks up to your garden hose, mixing car wash soap with the water stream to create a super-thick lather that clings to your car and starts breaking down dirt before you even touch it.
The SwiftJet foam soap sprayer is all about giving you that professional-level wash at home, minus the cost and complexity of a pressure washer. It's built to be ready to go, delivering impressive results right out of the box.
From Box to Perfect Foam in Minutes

You bought the SwiftJet for one reason: that thick, satisfying foam you see at pro detail shops. The good news is, you can skip the dense manuals. Let’s get you from unboxing to blanketing your ride in grime-dissolving suds in just a few minutes.
What's Inside the Box
When you pop open the SwiftJet package, you’ll see everything you need to get washing immediately. No confusing assembly, no hunting for extra tools.
Here’s a quick look at what you'll be working with:
- The Main Sprayer Body: This is the heart of the unit, with the handle, trigger, and hose connection all in one solid piece.
- Soap Reservoir Bottle: A sturdy plastic bottle where the magic happens. It has clear measurement lines on the side to make mixing soap and water a no-brainer.
- Adjustable Foam Nozzle: This screws onto the front and lets you tweak the foam pattern from a wide, gentle fan to a more focused stream.
- Bonus Microfiber Mitt: We threw in a quality microfiber wash mitt. It's perfect for safely agitating the foam and lifting away stubborn dirt without scratching your paint.
Assembling Your SwiftJet Sprayer
Putting it all together is a breeze—it seriously takes less than 60 seconds. Start by screwing the soap reservoir bottle onto the bottom of the main sprayer body. You want it snug, but there's no need to crank it down with all your might.
Next up, attach the adjustable foam nozzle to the front of the sprayer. It just clicks or twists right into place, making a secure connection. This simple, two-part assembly is a core feature of the SwiftJet car wash foam gun sprayer. The whole point is to spend more time cleaning and less time messing with parts.
Connecting to Your Garden Hose
All that's left is hooking the SwiftJet up to your garden hose. The sprayer comes with a standard quick-connect fitting that should pop right onto most hoses without any issues.
Pro Tip: Before you connect everything, take a second to check that the little rubber washer (the O-ring) is sitting flat inside the sprayer’s hose connector. A missing or crooked washer is the #1 reason for annoying drips and leaks.
Once you’ve confirmed the washer is happy, just screw the hose on until it's hand-tight. That's all it takes to create a leak-proof seal, so all your water pressure goes into making great foam. You're now fully assembled and ready to mix your soap solution.
Creating the Perfect Soap Mixture for Any Job
The real magic of the SwiftJet isn’t just in the sprayer itself—it’s in what you put inside. Nailing the soap-to-water ratio is the difference between a pro-level clean and just spraying sudsy water all over your car. It might seem like a bit of an art at first, but with a few pointers, you’ll be whipping up the perfect foam for any situation.
Think of it like mixing a drink. You wouldn’t use the same recipe for every occasion, and the same goes for washing your car. The whole idea is to match the strength of your solution to how dirty the vehicle is. This not only gives you better results but also saves you a ton of soap in the long run.
Understanding Dilution Ratios
Those little markings on the side of your SwiftJet reservoir? They’re your best friend. They take all the guesswork out of measuring. A "ratio" is just a simple way to compare the amount of soap to the amount of water. For instance, a 1:10 ratio means you’re using one part soap for every ten parts water.
Let's say you're washing a sedan that's just covered in light dust. A lean mixture, like 1:10, is all you need. It creates a nice, wet foam that lifts surface grit and rinses off clean without a fuss.
But what about that work truck caked in mud after a week at the job site? That calls for a much stronger mix. For something that grimy, you’ll want to go with a ratio closer to 1:6. This gives you that thick, dense foam that clings to the paint, giving the soap more time to break down all that heavy-duty dirt.
Pro Tip: The thickness of your foam is directly tied to your soap concentration. More soap equals thicker, stickier foam. That extra cling time is exactly what you need to dissolve stubborn grime before you ever have to touch it.
Here’s a small but important tip: pour your soap into the reservoir first, then add the water. Adding the water second mixes everything up perfectly without turning the inside of the bottle into a bubble bath before you’ve even started spraying.
Adjusting for Your Specific Needs
While these ratios are fantastic starting points, a couple of other things can affect your foam quality. One big one that people often forget about is water hardness. If your tap water is "hard," it’s full of minerals that can prevent soap from sudsing up properly.
If you live in a hard water area and your foam seems a little weak, don't be afraid to add an extra splash of soap. Seriously, a small adjustment can make a huge difference and bring that rich lather right back. The foam soap sprayer is designed to be flexible.
The soap you choose matters, too. Most car wash soaps will work, but the ones made specifically for foam cannons are packed with surfactants that are designed to create that super thick, stable foam we all love. If you want to go deeper on this, check out our guide on the best types of foam car soap.
SwiftJet Recommended Soap Dilution Ratios
Use these as starting points to mix your car wash soap for different cleaning needs.
| Cleaning Level | Suggested Soap-to-Water Ratio | Best For |
|---|---|---|
| Light Clean | 1:10 | Removing light dust, pollen, or recent rainwater spots from a daily driver. |
| Normal Clean | 1:8 | A standard weekly wash for a moderately dirty family SUV or minivan. |
| Heavy Clean | 1:6 | Tackling thick mud, road salt, or heavy grime on off-road vehicles or work trucks. |
After a few washes, you'll get a feel for what works best with your water and soap, and you can start tweaking these ratios to your heart's content.
From Wet Foam to Shaving Cream Lather
Believe it or not, the thickest foam possible isn't always the goal. Different jobs call for different consistencies.
-
Wet, Runny Foam (Lean Mix): This is perfect for a quick pre-rinse or a maintenance wash on a car that isn't too dirty. It encapsulates light contaminants and lets you rinse them away safely.
-
Thick, Clinging Foam (Rich Mix): This is your deep-cleaning powerhouse. The "shaving cream" foam sticks to the vehicle, giving the soap maximum time to do its job and break down grime before you even touch the paint with your microfiber mitt.
At the end of the day, a little experimentation is your best tool. Start with our recommendations, and don’t hesitate to adjust. Before you know it, you’ll be able to eyeball the perfect mix for any car, any time.
Pro Techniques for Applying Foam Evenly
Alright, now for the fun part—blanketing your car in a thick layer of suds. There's definitely an art to laying down the perfect coat of foam, and getting it right is what separates a quick rinse from a professional-level detail. Mastering this process means you’ll get the most cleaning power out of your foam soap sprayer without wasting a drop of soap.
But before you even think about foaming, give your vehicle a quick pre-rinse with plain water. This is a crucial first step that a lot of people skip. It knocks off all the loose stuff—dust, leaves, light mud—so you're not just grinding it into the paint when you start washing. You're clearing the way for the foam to attack the really tough, bonded-on grime.
The Bottom-Up Application Method
When you're ready to foam, your first instinct might be to start at the roof and let gravity do the work. Don't. The real pro technique is to start at the bottom of the vehicle and work your way up.
It sounds a little backward, I know, but there’s a smart reason behind it. The lowest parts of your car, like the rocker panels and bumpers, are always the filthiest. When you hit these areas first, you’re giving the soap the most time to dwell right where it’s needed most. As you move up, any foam that runs down is just reinforcing the work it’s already doing on the heavy grime below.
Key Takeaway: Always apply foam from the bottom up. This simple trick maximizes how long the soap works on the dirtiest parts of your car, leading to a much more effective and even clean.
This method also prevents "clean streaks" where the suds run down clean upper panels too quickly. By starting low, you ensure the entire car gets a uniform coat of foam that can work on all the dirt at once.
Mastering Your Spray Pattern and Distance
The adjustable nozzle on the SwiftJet is your best friend here. It lets you switch between a wide fan and a focused jet, and knowing which to use makes all the difference.
- Wide Fan Setting: This should be your default for big, flat surfaces like doors, the hood, and the roof. It lays down a thick, even blanket of foam quickly.
- Focused Jet Setting: Flip to this more direct stream to blast grime out of wheel wells, grills, and those other tight spots where mud loves to hide.
Your distance from the car is just as important. For that perfect, clingy foam, hold the foam soap sprayer about 3 to 4 feet away from the panel. This gives the foam room to expand before it hits the surface. Get too close, and it will just splatter; stand too far back, and the wind will carry it away.
This infographic gives you a great visual for dialing in your soap-to-water ratio based on how dirty your car is.
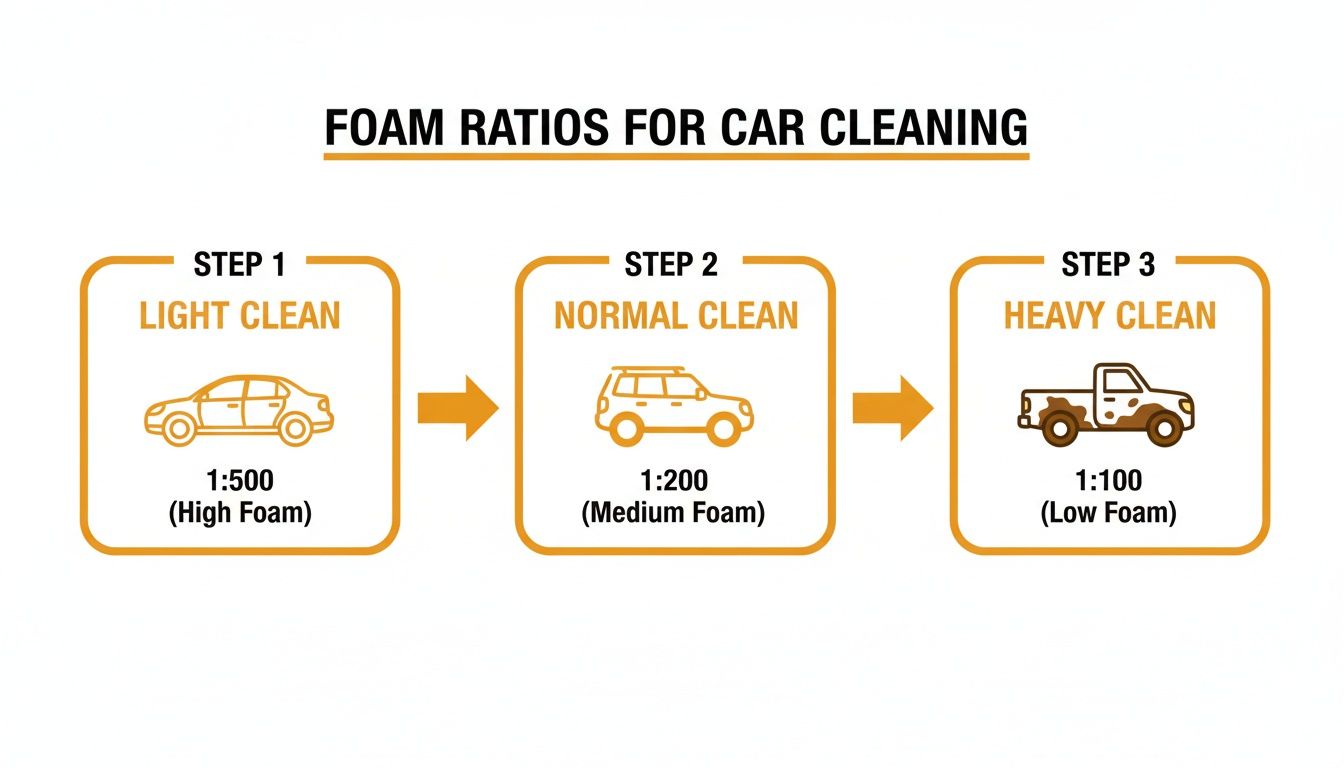
As you can see, a quick wash on a sedan that's just a little dusty requires a much leaner mix than what you'd need for a truck caked in mud.
Pacing and Overlap for Flawless Coverage
The last piece of the puzzle is your motion. Think like you're spray painting. Use slow, steady, sweeping movements, not quick, jerky ones. As you move across a panel, make sure you overlap each pass by about 50%.
This overlapping technique is your guarantee against missed spots and thin patches. It ensures every single inch of your car is coated in a consistent layer of foam, which is exactly what you need for a uniform clean. Take your time. A methodical pace will save you from wasting soap and having to go back over areas you missed.
For a deeper dive into the nuances of foam application, check out our complete guide on how to use a foam gun for incredible results.
Once your car looks like a giant marshmallow, just let it sit. This "dwell time" is critical. The soap is actively breaking down dirt and lifting it off the paint. Give it a good 5 to 10 minutes, depending on how dirty it is and the weather. The one rule is to never let the foam dry on the car, so try to avoid washing in direct, hot sunlight if you can.
Keeping Your SwiftJet Foaming Like New
A tool is only as good as how well it works when you need it. The great news is that keeping your SwiftJet foam soap sprayer in peak condition is incredibly simple. A few minutes of basic care after each wash will guarantee you get that thick, satisfying foam every single time. It's not about complicated tear-downs; it's about building a quick, easy habit.
Honestly, almost every problem I’ve ever seen with a foam soap sprayer comes down to one thing: old soap residue. When soap dries inside the small internal parts, it crystallizes and gums up the works. That's what leads to weak foam or, even worse, no foam at all. Luckily, stopping this from happening is a breeze.
The 30-Second Post-Wash Flush
This is the golden rule of foam sprayer ownership. If you do nothing else, do this. The post-wash flush is a non-negotiable routine that takes less than a minute and is 99% effective at preventing clogs.
Once you’re done washing your car, just unscrew the soap reservoir. Dump out whatever soap solution is left and give the bottle a quick swirl with clean water.
Then, fill the reservoir with plain water, screw it back on, and connect it to your hose. Now, just pull the trigger and spray clear water through the unit for about 30 seconds. This simple action forces clean water through the siphon tube, mixing valve, and nozzle, clearing out any soap film before it can harden.
My Two Cents: I think of it like rinsing out a coffee pot. You wouldn't leave old grounds in there to mess up your next brew. It’s the same logic—a quick flush keeps the tool clean and ready to go for next time.
Quick Component Checks
Besides the all-important flush, giving the physical parts a quick once-over will go a long way in extending your sprayer's life. You can easily do these checks while the unit is air-drying.
A few key spots to keep an eye on:
- The Reservoir: After flushing, I like to give the inside of the bottle one last rinse and let it air dry completely before putting it away. This stops any musty smells and makes sure your next soap mix is pure.
- The O-Rings: Your SwiftJet has little rubber gaskets (O-rings) where the hose connects and where the bottle screws on. Check these every so often for cracks or wear. A bad O-ring is the number one cause of annoying leaks.
- The Nozzle Filter: Inside the nozzle is a small mesh screen that helps create the foam. If your performance ever dips even with regular flushing, just unscrew the nozzle and rinse this little filter under warm water to clear out any stubborn gunk.
Storing Your Sprayer The Right Way
Where you keep your foam soap sprayer between washes matters just as much as how you clean it. Tossing it in the wrong spot can lead to premature damage.
Once everything is clean and totally dry, find a spot for it that’s out of extreme temperatures and direct sun. A cabinet in the garage, a shelf in the shed, or even a utility closet are all perfect.
| Where You Store It | The Problem It Causes | The Simple Fix |
|---|---|---|
| In Direct Sunlight | UV rays can make the plastic brittle over time. | Keep it in a shaded or enclosed spot like a garage or shed. |
| In Freezing Temps | Any trapped water can freeze, expand, and crack plastic parts. | Make sure the unit is bone-dry before storing it in the winter. |
| In High Humidity | Can cause mildew to grow inside a damp bottle. | Always let the reservoir air dry completely before reassembling. |
Sticking to these simple habits will take you less than five minutes after you wash your car. It’s a tiny investment of time that pays off big, ensuring your SwiftJet performs like a champ and gives you that pro-level foam, wash after wash.
Dealing with Common Foaming Problems
Even with a great tool like the SwiftJet foam soap sprayer, some days the foam just doesn't cooperate. You're expecting that thick, satisfying shaving-cream consistency, but all you get is sad, soapy water. It's frustrating, I know.
The good news is that most of these issues are super simple to fix. It usually boils down to just a few common culprits. Before you get discouraged, let's run through the most frequent hiccups and how to get back to blanketing your car in perfect foam in no time.
Why Is My Foam So Thin and Watery?
This is the one I hear about most often. If your foam is runny and just slides right off the paint, work your way through this quick mental checklist. It's almost always one of these three things.
- Your Soap-to-Water Ratio is Off: A lightly dusty car might be fine with a leaner 1:10 mix, but if you want that thick, clingy foam, you need more soap. Try a richer batch, something closer to 1:8 or even 1:6, and see how much that improves things. More soap concentrate almost always means thicker foam.
- Your Water Pressure is Too Low: Your SwiftJet relies on your home’s water pressure to work its magic. First, make sure the spigot is cranked open all the way. Then, take a quick walk down the length of your hose and straighten out any kinks—even a small bend can kill your pressure at the nozzle.
- The Sprayer Dial Isn't Set for Max Foam: That little dial on top of your sprayer controls how much soap solution gets pulled from the reservoir. To get the thickest suds, you need to turn that dial to the highest setting, which is usually marked with a '+' or a bigger icon. This lets the most soap into the water stream.
Why Am I Getting No Foam at All?
If you're just getting a stream of plain water, that’s a clear sign that the soap mix isn't getting pulled through the system. Don't worry, this is almost always a simple blockage or a disconnected part.
The very first thing to check is the small plastic siphon tube inside the reservoir. It can sometimes pop off the sprayer body. Just push it back on firmly, and you should be back in business.
Still no foam? You’ve likely got a small clog. Dried soap loves to block the tiny filter screen or the siphon tube. A quick rinse with warm water, like we talked about in the maintenance section, will usually dissolve it right away.
Quick Tip for Stubborn Clogs: If a rinse doesn't work, you can gently use a paperclip or a small piece of wire to poke out any gunk from the tip of the siphon tube or the nozzle's tiny opening. Just be gentle so you don't scratch any of the plastic parts.
How Do I Stop Leaks?
A dripping sprayer is just plain annoying and a waste of good soap. Leaks almost always happen at one of two spots, and the fix is usually pretty easy.
- Leaking from the Hose Connection: This is the most common drip point. Nine times out of ten, the problem is the little rubber washer (the O-ring) inside the sprayer’s connector. Make sure it's sitting flat and check that it isn't cracked or missing.
- Leaking from the Reservoir Cap: Seeing drips from where the bottle screws on? You probably cross-threaded it by accident. Just unscrew the bottle completely and carefully re-thread it. You want it snug, but there's no need to overtighten it.
Frequently Asked Questions
Got questions about your new SwiftJet? You're in the right place. We've compiled the most common questions we get from new owners and laid out all the expert answers right here. This is your go-to guide for getting the most out of your foam soap sprayer.
Can I Use Any Car Wash Soap with the SwiftJet?
That's a great question. While you can use most car wash soaps and get some suds, you'll see the best results with a shampoo made specifically for a foam soap sprayer or foam cannon. These are engineered with high-lubricity surfactants that are designed to whip up into that thick, clinging foam we all love.
If you use a regular car wash soap, don't worry—it'll work. You'll just likely have to use a much richer soap-to-water ratio to get the same effect, which means you'll burn through your soap supply a lot faster.
One Soap to Absolutely Avoid: Whatever you do, never use dish soap. It’s full of aggressive degreasers that will strip off any wax or sealant protecting your paint, leaving it exposed to the elements. Over time, it can even damage the plastic and rubber seals inside your sprayer. Always stick with a proper car wash soap to protect your investment.
Will This Foam Soap Sprayer Work with Low Water Pressure?
The SwiftJet was designed to work great with typical household water pressure, which usually sits between 40 and 60 PSI. You definitely don't need a pressure washer to get fantastic foam.
That said, water pressure does have a direct impact on foam quality. If you know your home's pressure is on the low side, you might find the foam comes out a little thinner or wetter than you see in videos.
If that happens, here are a couple of tricks you can try:
- Make a Richer Mix: Just bump up your soap-to-water ratio. For example, if a 1:10 mix isn't quite cutting it, try a 1:8 mix. A little more soap concentrate can make a big difference when water force is lower.
- Check Your Hose: Make sure your garden hose is completely uncoiled and the spigot is turned on all the way. A simple kink or a partially opened valve can kill your water pressure before it even reaches the sprayer.
For most people, though, the SwiftJet will produce amazing, thick foam right out of the box with no fuss.
What Is the Difference Between a Foam Sprayer and a Foam Cannon?
This comes up all the time, and it's a key distinction. The real difference boils down to the power source and, as a result, the intensity of the foam.
- A foam soap sprayer, like your SwiftJet, connects directly to a standard garden hose. It cleverly uses your home's water pressure to pull soap from the canister and mix it into a foamy solution.
- A foam cannon is a different beast entirely. It has to be attached to a high-pressure washer. It uses the powerful blast from the pressure washer to create that incredibly dense, almost shaving-cream-like foam.
Basically, think of it like this: a foam cannon gives you that professional-detailer level of foam, but it comes with the cost and hassle of buying and setting up a pressure washer. The foam soap sprayer is the perfect middle ground—it gives you a fantastic, effective foam wash at home without any of that extra equipment. You get about 80-90% of a foam cannon's performance with none of the complexity.
Ready to see what a real foam wash can do for your car? The SwiftJet is built for simplicity, power, and a seriously satisfying wash. Experience the SwiftJet difference for yourself at swiftjetusa.com.