
If you've ever spent a Saturday washing your car, only to step back and see a spiderweb of fine scratches under the sun, you know the frustration. That’s often the result of the old-school bucket-and-sponge method, where you're essentially dragging tiny bits of grit across your paintwork.
This is exactly why foam gun car detailing has become so popular among enthusiasts and pros alike. It's a completely different approach that uses a simple garden hose attachment to blanket your vehicle in a thick layer of cleaning foam, lifting the dirt away before you ever have to touch the surface.
Why Foam Guns Are a Game Changer for Car Washing
The idea behind using a foam gun is simple but incredibly effective. Instead of immediately scrubbing at a dirty car, you first cover it in a rich, clinging layer of suds. This foam doesn't just sit there; it goes to work.
This "dwell time" is where the magic happens. The active agents in the soap start to break down, loosen, and encapsulate all the road grime, dust, and dirt particles. The foam essentially lifts them up and away from the delicate clear coat.
The Science of a Safer Wash
Imagine millions of tiny, lubricated bubbles getting between the harmful grit and your car's paint. When you rinse the foam off, most of those damaging particles are washed away before a wash mitt ever makes contact. This pre-wash step is what dramatically reduces the risk of creating swirl marks.
Compared to a traditional bucket wash, this method has some serious perks:
- Superior Lubrication: The foam creates a super-slick surface, so your wash mitt glides effortlessly instead of grinding dirt into the finish.
- Enhanced Efficiency: You can foam an entire car in less than 60 seconds. This gets you even soap coverage everywhere, without constantly dunking a mitt back into a potentially gritty bucket.
- Deeper Cleaning: Suds from a bucket run off vertical surfaces almost immediately. A good foam clings, giving the soap more time to dissolve stubborn road film and bug splatters.
The real benefit here is turning your wash from a chore that could damage your paint into a safe, effective, and honestly, pretty satisfying routine. You're not just getting your car clean; you're actively preserving its finish for the long haul.
This technique really sets the stage for a pro-level detail right in your driveway. A foam gun is designed to work with a standard garden hose, making it super accessible. Its cousin, the foam cannon, achieves a similar result but requires a pressure washer. If you're curious about the specifics, you can check out the key differences between a foam gun vs. a foam cannon in our detailed breakdown.
Either way, the goal is the same: a brilliantly clean, shiny, and scratch-free car.
Building Your Essential Detailing Arsenal
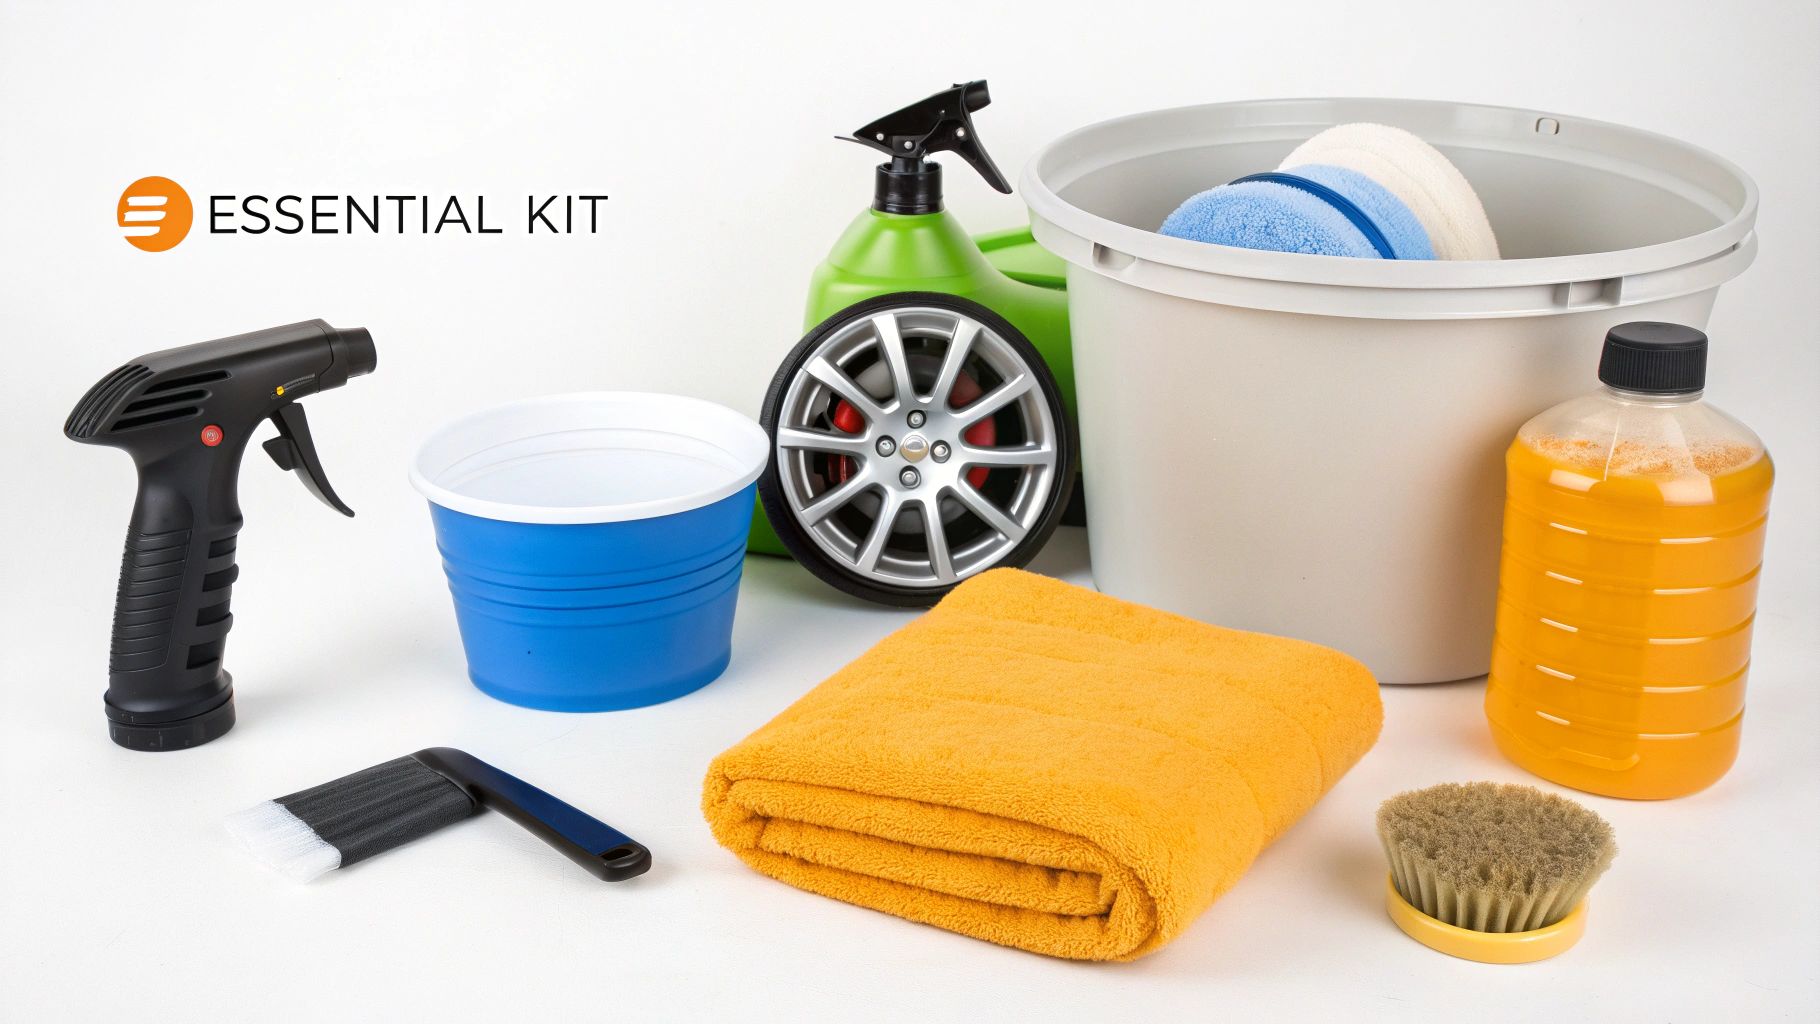
While your foam gun is the headliner, a truly professional finish comes from the supporting cast. Think of it less as just "washing your car" and more as a complete detailing system where every tool has a purpose. Having the right gear on hand is what elevates a quick rinse into a restorative treatment for your vehicle's paint.
The most critical teammate for your foam gun is, without a doubt, the soap. A rookie mistake I see all the time is reaching for dish soap. That stuff is designed to strip grease, and it will do the exact same thing to your car's wax and sealant, leaving the paint totally exposed. Always, always use a dedicated, pH-neutral car wash soap—it's formulated to generate thick, clinging foam that lifts dirt without compromising your protective layers.
The All-Important Contact Wash and Drying Stage
Even after a perfect foam pre-soak, there's usually a stubborn, near-invisible layer of road film left behind. This is where a gentle contact wash becomes necessary to get that perfectly clean surface.
Your two main players here are a quality wash mitt and a pair of buckets.
- Microfiber Wash Mitt: Forget old sponges. A plush, deep-pile microfiber mitt is what you want. Its long, soft fibers are designed to trap dirt particles and pull them safely away from the paint, dramatically reducing the risk of swirl marks.
- The Two-Bucket Method: This is a non-negotiable technique for safe washing. You'll have one bucket for your soapy water and another filled with plain water for rinsing. After washing a panel, dunk and agitate your dirty mitt in the rinse bucket before going back to the soap. This one simple habit keeps the grit and grime out of your clean wash water.
Just as a bad wash technique can cause swirls, so can improper drying. Air drying leaves water spots, and using an old bath towel is a recipe for scratches. This is why investing in proper drying towels is just as important as your wash mitt.
My rule of thumb? Look for dedicated car drying towels with a high GSM (grams per square meter) rating. Anything 700 GSM or higher is going to be incredibly plush and absorbent. This lets you gently blot or pat the surface dry, rather than dragging a towel across the paint and creating micro-scratches.
Finishing Your Foam Gun Car Detailing Kit
To really cover all your bases, you'll need a few specialized tools for the dirtiest parts of your vehicle. Your wheels and tires take a beating from road grime and corrosive brake dust, so they need their own set of equipment.
- Dedicated Wheel Brushes: Grab a few soft-bristled brushes in different shapes. You'll need them to gently clean wheel faces, get deep into the barrels, and navigate the tight spots around lug nuts and brake calipers without causing damage.
- Tire Brush: Tires need a separate, more aggressive brush. A stiff-bristled one is perfect for scrubbing embedded dirt and old, brown-looking tire dressing off the sidewalls, giving you a fresh surface for a new application.
To make sure you have everything you need before you start, I’ve put together a quick checklist of the essentials.
Foam Gun Detailing Checklist
| Item | Critical Role | Insider Tip |
|---|---|---|
| Foam Gun | Pre-soaking & loosening dirt | Look for one with adjustable spray patterns for better control. |
| pH-Neutral Car Soap | Safely cleans without stripping wax | Use a soap designed for foam guns for the thickest suds. |
| Two 5-Gallon Buckets | Separates clean and dirty water | Add Grit Guards to the bottom of each bucket to trap dirt. |
| Microfiber Wash Mitt | Gentle contact washing | Have a separate, lower-quality mitt for wheels and lower body panels. |
| High-GSM Drying Towels | Safely absorbs water | A large "waffle-weave" towel is great for the bulk of the car. |
| Wheel & Tire Brushes | Cleans heavy grime and brake dust | Never use your wheel brushes on the car's paint, and vice-versa. |
This table covers the core of what you'll need for a fantastic foam gun car detailing session every time.
Putting together your toolkit doesn't have to be overwhelming. For a more exhaustive breakdown, check out our complete car detailing supplies list to see what the pros use. And as you explore, you'll find other specialized tools like the Hydrosuds Sprayer that show just how versatile foaming technology can be. By assembling these key pieces of gear, you're not just washing your car—you're protecting your investment and guaranteeing a showroom shine.
Dialing In Your Foam Gun for the Perfect Suds
This is where the real magic happens. Getting that thick, satisfying foam that clings to your car isn't just for show—it's about giving the soap enough time to break down dirt and grime safely. Mastering your setup turns a basic car wash into a professional detailing pre-soak.
First, let's get the physical connection sorted. Hooking up a foam gun like the SwiftJet to a standard garden hose is a breeze. Most use a quick-connect fitting that just snaps right on. Once it’s secure, pick the right spray nozzle. You’ll probably have a few options, but the fan spray nozzle is your best friend for covering large areas like the roof, hood, and doors quickly and evenly.
The real game-changer, though, is what happens inside the foam gun's reservoir. That's where you'll mix your soap and water.
Cracking the Code on Soap Dilution Ratios
You've probably seen dilution ratios on car soap bottles, like 1:10 or 1:20. Don't let it intimidate you; it's just a simple recipe. A 1:10 ratio means you're using one part soap for every ten parts of water.
So, for a standard 32-ounce (about 950ml) foam gun canister, a 1:10 ratio breaks down like this:
- Soap: Roughly 3 ounces (or about 90ml)
- Water: The remaining 29 ounces (or about 860ml)
This is a great starting point, but it's rarely the final answer. The "perfect" mix really depends on a few things unique to your garage.
What Affects Your Foam Quality?
Not all car soaps or water sources are created equal. The concentration of your soap is a huge factor; some ultra-concentrated formulas need way less product to whip up a thick lather.
Another thing people often forget is water hardness. If you live somewhere with "hard" water (meaning it's full of minerals), you might notice your soap doesn't foam up as well. If that's the case, you'll probably need to add a bit more soap to the canister to get that thick, clingy foam you see in videos. On the flip side, soft water usually needs less soap to get the job done.
My go-to pro tip is to always start lean. Begin with a weaker mix than you think you need—try just 1 to 2 ounces of soap in a full canister of water. Give it a test spray on a small panel. If the foam is thin and runs right off, add another half-ounce of soap, give the canister a gentle swirl, and try again. This way, you don't waste expensive soap and you can dial in the perfect consistency for your specific setup.
This methodical approach puts you in control. Instead of just guessing and pouring, you’re finding the sweet spot for luxurious foam without overusing your product. In fact, data from detailing forums shows that over 70% of detailers favor this method because the improved dwell time lets the soap work its magic far more effectively. This means fewer swirl marks and a much better finish. You can find more insights on the growing car detailing market on einpresswire.com.
Adjusting the Foam Gun for a Perfect Application
Once your soap solution is mixed, the final piece of the puzzle is the adjustment dial on the foam gun itself. Most have a knob on top that controls how much soap solution gets mixed with the water flowing from your hose.
- Richer Foam (Thicker): Turn the dial towards the “+” or “max” setting. This draws more soap into the stream, creating a dense, shaving cream-like foam that’s perfect for heavily soiled areas like bumpers and lower side panels.
- Leaner Foam (Wetter): Turn the dial towards the “-” or “min” setting. This uses less soap, producing a wetter foam that’s great for a light maintenance wash or if you're working in the sun and need to rinse off quickly.
For most washes, you’ll want to lean towards the richer side to maximize that cling and dwell time. It’s the combination of the right soap dilution in the canister and the proper dial setting that gives you that professional, thick blanket of suds. Of course, knowing how to select the best foam car soap is the foundation of this whole process, since not all formulas are designed for heavy suds. A little experimentation with these settings is part of the fun and will quickly make you an expert at creating the perfect pre-wash foam every single time.
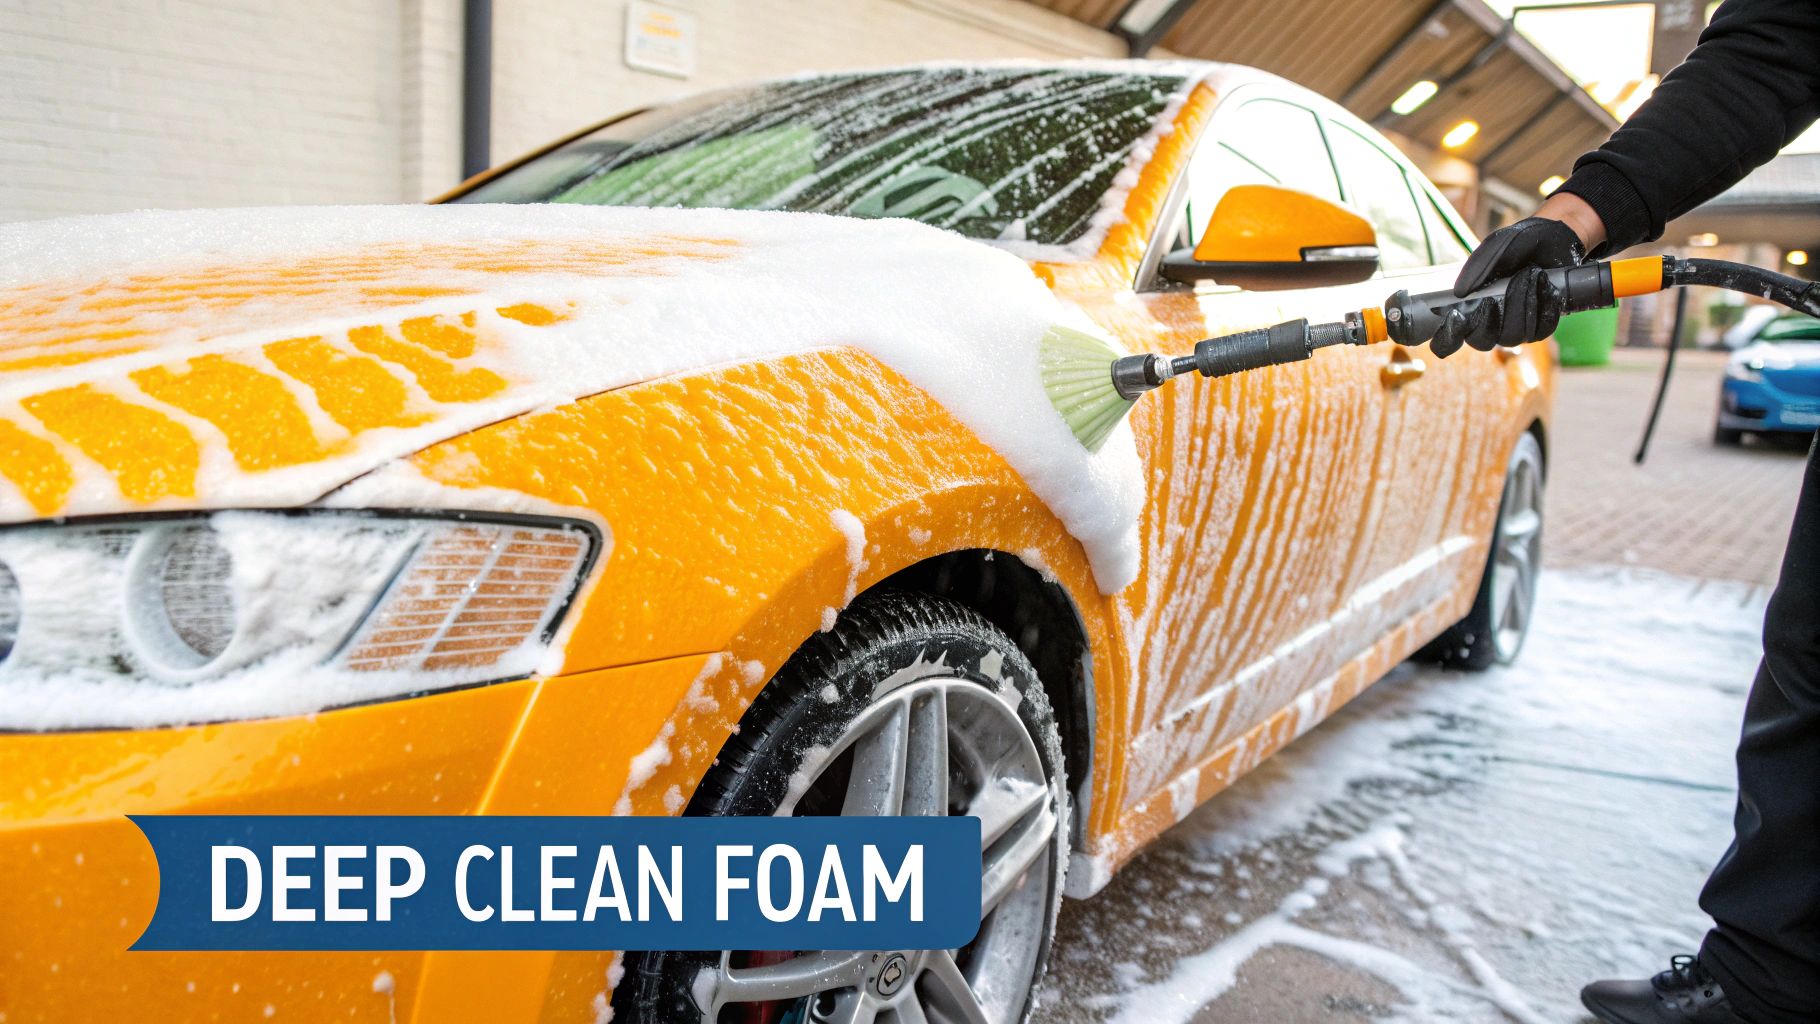
Time to Foam: Mastering the Pre-Wash Application
You've got your foam gun ready and the soap is mixed just right. Now for the fun part—covering your car in a thick, satisfying blanket of cleaning foam. But this isn't just for looks. This step is a critical pre-wash designed to lift the worst of the grit and grime off your paint before you ever lay a hand on it.
First, a Proper Pre-Rinse
Before you even think about foaming, grab your garden hose and give the entire vehicle a thorough rinse. Start from the top and work your way down. The goal here is simple: knock off all the loose, heavy stuff. We're talking mud, sand, leaves, and that top layer of dust.
Think of it as clearing the way. This quick rinse lets the foam concentrate its power on the more stubborn, bonded-on road film instead of getting bogged down by surface debris. It's a two-minute step that makes a world of difference in your final results.
Setting up the foam gun itself is a breeze. You're just connecting the hose, adding your soap mix, and picking a setting on the dial.
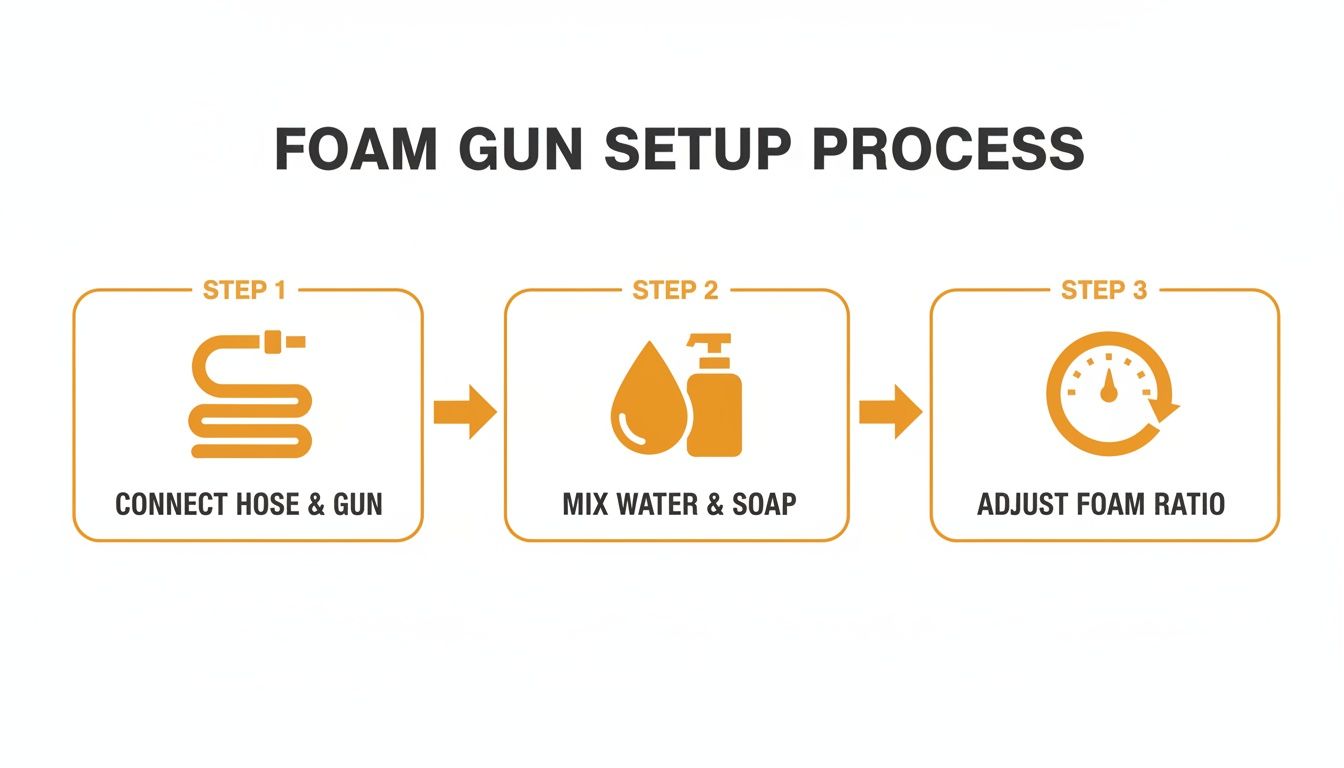
As you can see, getting started is incredibly straightforward. Connect, mix, and adjust—that's all it takes.
The Art of Applying the Foam
Once the pre-rinse is done, it's go time. Here’s a pro tip that might feel a bit backward at first but trust me, it works: start foaming at the bottom of the car and work your way up.
Why? When you foam the lower panels first (like the side skirts and bottoms of the doors), you're giving the dirtiest parts of the car the longest contact time with the soap. As you work your way up, the foam from the roof and windows will run down, reinforcing the foam already clinging to the lower sections. This prevents the suds from sliding off dirty areas too quickly.
This bottom-up method ensures every inch of your car gets maximum coverage and an effective pre-soak.
Adjust Your Spray Pattern on the Fly
One of the best features of a good foam gun is the adjustable nozzle. Don't just set it and forget it—use it to your advantage. Different parts of your car need different kinds of attention.
- Wide Fan Spray: Use this for the big, flat panels like the roof, hood, and doors. A wide, horizontal fan lets you cover these large areas quickly and evenly.
- Concentrated Jet Spray: When you get to the really grimy spots, tighten up that nozzle. A focused stream is perfect for blasting bugs off the front bumper, hitting the caked-on mud on the rocker panels, and getting deep inside the wheel wells.
Switching between these patterns as you move around the vehicle is key to applying the right cleaning power exactly where it's needed most.
Key Takeaway: Don't just spray and pray. The goal is strategic application. Use a wide fan for the big panels and a concentrated jet to attack the stubborn, grimy areas for a much deeper clean.
The Waiting Game: Understanding Dwell Time
Your car is now completely covered in a rich layer of foam. Don't touch it! This is the dwell time, and it’s where the magic happens. The active agents in your car soap are hard at work, breaking down, surrounding, and lifting all that road film away from your clear coat.
A solid dwell time is usually 3 to 5 minutes. You need to give the foam enough time to work, but the golden rule is to never let it dry on the surface. Dried-on soap is a recipe for stubborn spots and streaks that can be a real pain to remove.
The perfect dwell time isn't a fixed number; it all depends on the weather.
- In Direct Sunlight: If washing in the sun is your only option, you have to move fast. Your dwell time might shrink to just 1-2 minutes. The heat will evaporate the water in the foam incredibly quickly, so you may need to work in sections—foaming, washing, and rinsing one part of the car at a time.
- In the Shade or on a Cool Day: This is the dream scenario. With no sun beating down, you can safely let the foam dwell for the full 5 minutes, or maybe even a little longer. This gives you maximum cleaning power without any risk of it drying.
This pre-wash is the cornerstone of modern foam gun car detailing. It transforms a potentially scratch-filled chore into a safe and highly effective cleaning process. It’s no surprise that the auto detailing world is the biggest market for these tools, making up over 60% of all sales. Detailers and enthusiasts love them because they can slash water usage by up to 50% compared to a free-flowing hose, all while delivering the thick foam needed to do the job right.
If you're interested in the data, you can read more about these foam cannon market trends on archivemarketresearch.com. By truly mastering these simple techniques, you’re not just washing your car—you’re actively preserving its finish for years to come.
The Final Rinse, Drying, and Finishing Touches
You can do everything right—the pre-rinse, laying down that perfect blanket of foam, the careful contact wash—and still mess it up in these last few steps. A flawless wash is only half the battle. The real magic, that perfect, streak-free finish, comes down to how you rinse and dry the car. This is where you lock in all your hard work.
Once the foam has done its job and you’ve finished your contact wash, it’s time to rinse it all away. Your technique here matters just as much as it did in the beginning. You always want to rinse from the top of the vehicle and work your way down.
Let gravity do the heavy lifting for you. Starting at the roof ensures all the soap and leftover grime gets flushed down and away from the panels you've already rinsed. This simple, systematic approach is your best defense against dirty water running over clean sections, which is exactly what causes those annoying streaks and water spots. Give a little extra attention to panel gaps, behind the mirrors, and in the grille—all the places suds love to hide.
Achieving a Scratch-Free Dry
With the surface perfectly clean, the mission is to get it dry without putting any new scratches or swirl marks into the paint. Here's the golden rule: never, ever drag a dry or cheap towel across your paint. That’s probably the number one cause of wash-induced swirls. Instead, let's look at the safer, smarter ways to do it.
The best method for drying with a towel is what I call the "blot and lift" technique. Grab a high-quality, super-plush microfiber drying towel—look for one with a high GSM (grams per square meter) rating. Lay it flat on a panel, gently pat it down to let it soak up the water, and then lift it straight off.
This completely avoids the friction that creates micro-scratches. Sure, it might take a few extra minutes compared to a quick wipe-down, but trust me, your paint will thank you for it in the long run.
An even better option? Touchless drying. If you have a leaf blower (the battery-powered ones are great for this) or a dedicated car dryer, you can simply blow the water right off the surface. This is hands-down the safest possible way to dry your car because literally nothing but air touches the paint. It's also a champ at blasting water out of those tricky spots like emblems, lug nut holes, and side mirrors, which stops those frustrating drips that show up later.
A great wash is defined by the finish. Using a high-quality drying towel with the blotting method or opting for touchless drying with a blower are the two best ways to ensure your foam gun car detailing efforts result in a truly flawless, swirl-free shine.
Elevating Your Finish with Pro Tips
The car is clean and dry, but a few final touches can take the results from just "great" to "professional." These small steps make a massive visual impact and add a bit of extra protection.
- Use a Drying Aid: This is a fantastic trick straight from the pro playbook. As you're drying, lightly mist a spray sealant or a quick detailer onto a panel while it's still a little damp. When you blot the area dry, the product acts as a lubricant to reduce friction even further, all while leaving behind a slick layer of gloss and protection.
- Clean Glass Last: No matter how careful you are, you’ll get some overspray on the windows. Always save the glass for the very end. Use a good, ammonia-free glass cleaner and a fresh microfiber towel to wipe away any residue for a perfectly clear, streak-free view.
- Dress Your Tires: Nothing frames a clean car like deep, black tires. Applying a quality tire dressing doesn't just look amazing; it also helps protect the rubber from UV rays and cracking. It’s that final detail that makes the whole job pop.
Troubleshooting Your Foam Gun
Even the best tools have off days. If your foam gun starts acting up, don't worry—most "problems" are actually simple fixes that take just a minute to diagnose. It almost always comes down to a simple issue with your soap, water pressure, or a tiny blockage.
Before we dive into the fixes, let's talk prevention. The single best thing you can do for your foam gun is to give it a quick flush after every wash. Just fill the canister with plain water and spray it through for about 30 seconds. This tiny step prevents soap scum from building up and causing clogs, which is honestly the source of most headaches.
Weak or Watery Foam? Let’s Fix It.
Is your foam looking more like sad, runny bubbles than the thick, shaving-cream-like suds you want? This is by far the most common issue, and thankfully, it's the easiest to solve.
Work your way through this checklist:
- Is Your Soap Mix Too Thin? This is the culprit 90% of the time. You've likely added too much water for the amount of soap. Just pop the top off and add another half-ounce of your concentrated car soap, give it a gentle swirl, and see the difference.
- Check the Top Dial: That little dial on top of the foam gun controls your soap-to-water mixture. Make sure it's twisted all the way toward the "+" symbol for the richest, thickest foam.
- What's Your Water Pressure Like? Walk back to the spigot and make sure it's turned on all the way. Also, quickly scan your garden hose for any kinks that might be choking off the water flow. Low pressure kills foam.
Sputtering, Clogging, or No Spray at All?
If the spray is erratic, sputtering, or just won't come out, you're probably dealing with a small blockage. It sounds more dramatic than it is, and you won't need any special tools to clear it.
Your first stop should be the small mesh filter right where the pickup tube goes into the gun's body. Unscrew the canister and take a look. If you see any gunk or undissolved soap bits, a quick rinse under the tap will usually clear it right out.
If that filter looks clean, check the nozzle tip. Sometimes a tiny piece of debris can get stuck in the opening and mess up the spray pattern. You can gently poke it clear with a paperclip or a small pin. That simple trick usually gets you right back to a perfect, even spray.
Got Questions About Foam Gun Detailing?
Even seasoned pros had questions when they first started. Let's tackle some of the most common ones we hear, so you can foam up your car with confidence.
Can I Use Dish Soap in My Foam Gun?
That’s a hard no. It’s tempting, I get it, but dish soap is designed to obliterate grease—and it will do the exact same thing to your car's wax, sealant, or ceramic coating. It strips away that vital layer of protection, leaving your paint vulnerable.
Your best bet is to always use a dedicated, pH-neutral car wash soap. These soaps are engineered to lift dirt and grime without damaging the protective layers you've worked so hard to apply.
Does a Foam Gun Actually Replace Hand Washing?
Think of a foam gun as the perfect opening act, not the main event. It’s a phenomenal pre-wash tool that safely dissolves and lifts the heavy grit and grime—the stuff that causes swirl marks and scratches during a contact wash.
After you rinse the foam, you'll still have a thin layer of bonded road film. For a truly deep clean, you’ll want to follow up with a two-bucket wash using a quality microfiber mitt.
The foam gun does about 80% of the heavy lifting. It makes the contact wash safer, faster, and way more effective. It's not a replacement, but an essential partner.
What if My House Has Low Water Pressure?
Most foam guns are happiest with standard household water pressure, which usually sits between 40-60 PSI. If you know your pressure is on the low side, you might notice the foam comes out a bit thinner than you see online.
Don't worry, you can usually work around it. Just tweak your soap-to-water ratio by adding a little more soap to the canister. You can also turn the mixture dial to the richest setting to help thicken things up.
Foam Gun vs. Foam Cannon: What's the Real Difference?
It all comes down to the power source. A foam gun is built for convenience, connecting directly to any standard garden hose. It’s the perfect tool for most car enthusiasts.
A foam cannon, on the other hand, needs the muscle of a pressure washer to work. That extra power is what creates that super-thick, shaving-cream-style foam. While impressive, a foam gun gives you fantastic results without the need for extra equipment.
Ready to see the difference for yourself? The SwiftJet Foam Gun is designed to give you a thick, satisfying foam bath with just a garden hose. It even comes with a free microfiber mitt to perfect your wash. Shop the SwiftJet Foam Gun now and make swirl marks a thing of the past.