

You can buy the same soap your neighbor uses, fill the same sprayer, and still end up with two very different washes. One car gets an even, glossy film that loosens grime without drama, the other gets runoff, missed spots, and a mitt that drags because the foam wasn't laid down well in the first place. That gap usually isn't the shampoo, it's how the foam gets onto the surface, how long it stays there, and whether the method matches the vehicle's shape and your setup.
Why Your Foam Method Matters More Than Your Soap
I see this all the time in driveways. One person blasts a huge white coat across the hood, lets it slide off the sides, then wonders why the lower panels still feel gritty. Another person uses less foam, but places it where it matters, keeps the panel wet, and finishes with fewer passes of the mitt and less pressure on the paint.
The delivery method changes the wash, not just the prep
Foam application methods decide whether the product stays on the surface long enough to do useful work. Foam is supposed to lubricate, surround dirt, and make contact safer, so the difference between a clinging blanket and a watery rinse matters more than people think. That's why the same shampoo can feel great through one setup and mediocre through another.
A lot of beginner advice focuses on soap brands. That's the wrong first question. The better question is whether your vehicle, your water pressure, and your patience level call for a foam cannon, foam gun, pump sprayer, or simple hand wash.
Practical rule: choose the method that keeps dirt floating away from the paint, not the method that just looks dramatic for the first ten seconds.
The reason this matters goes beyond car care. Foam delivery has been formalized for a long time in other fields too, where gentle application and surface coverage are treated as separate problems from the foam chemistry itself. That same logic applies to a car in a driveway, because a good result comes from the right blanket, the right angle, and the right sequence.
A decision framework beats a single favorite tool
Some vehicles want thick, clinging foam. Others need a lighter application that doesn't flood trim, badges, or mirrors. Some washes are about maximum lubrication before mitt work, while others are just about softening dust so you can rinse quickly and safely.
A better mental model is simple. Match the method to the job, then match the dwell pattern to the surface. The rest of this guide breaks that down into four practical categories, pressurized foam cannons, pump sprayers, hand application, and brushless rinseless methods.
How Foam Actually Works on a Surface
Foam is not magic. It's a delivery system that carries surfactants and lubricants onto dirt, then gives them time to break the bond between contamination and paint. If you've ever wiped a dusty panel dry, you already know the risk, because dry particles behave like sandpaper. Wet, lubricated contact changes that equation.
Three things happen at once
First, the chemistry loosens grime. Second, the bubbles help lift and suspend that grime instead of letting it sit flat on the clear coat. Third, gravity starts pulling the liquid down the panel, which is why foam that clings longer usually gives you a better window for agitation and rinsing.
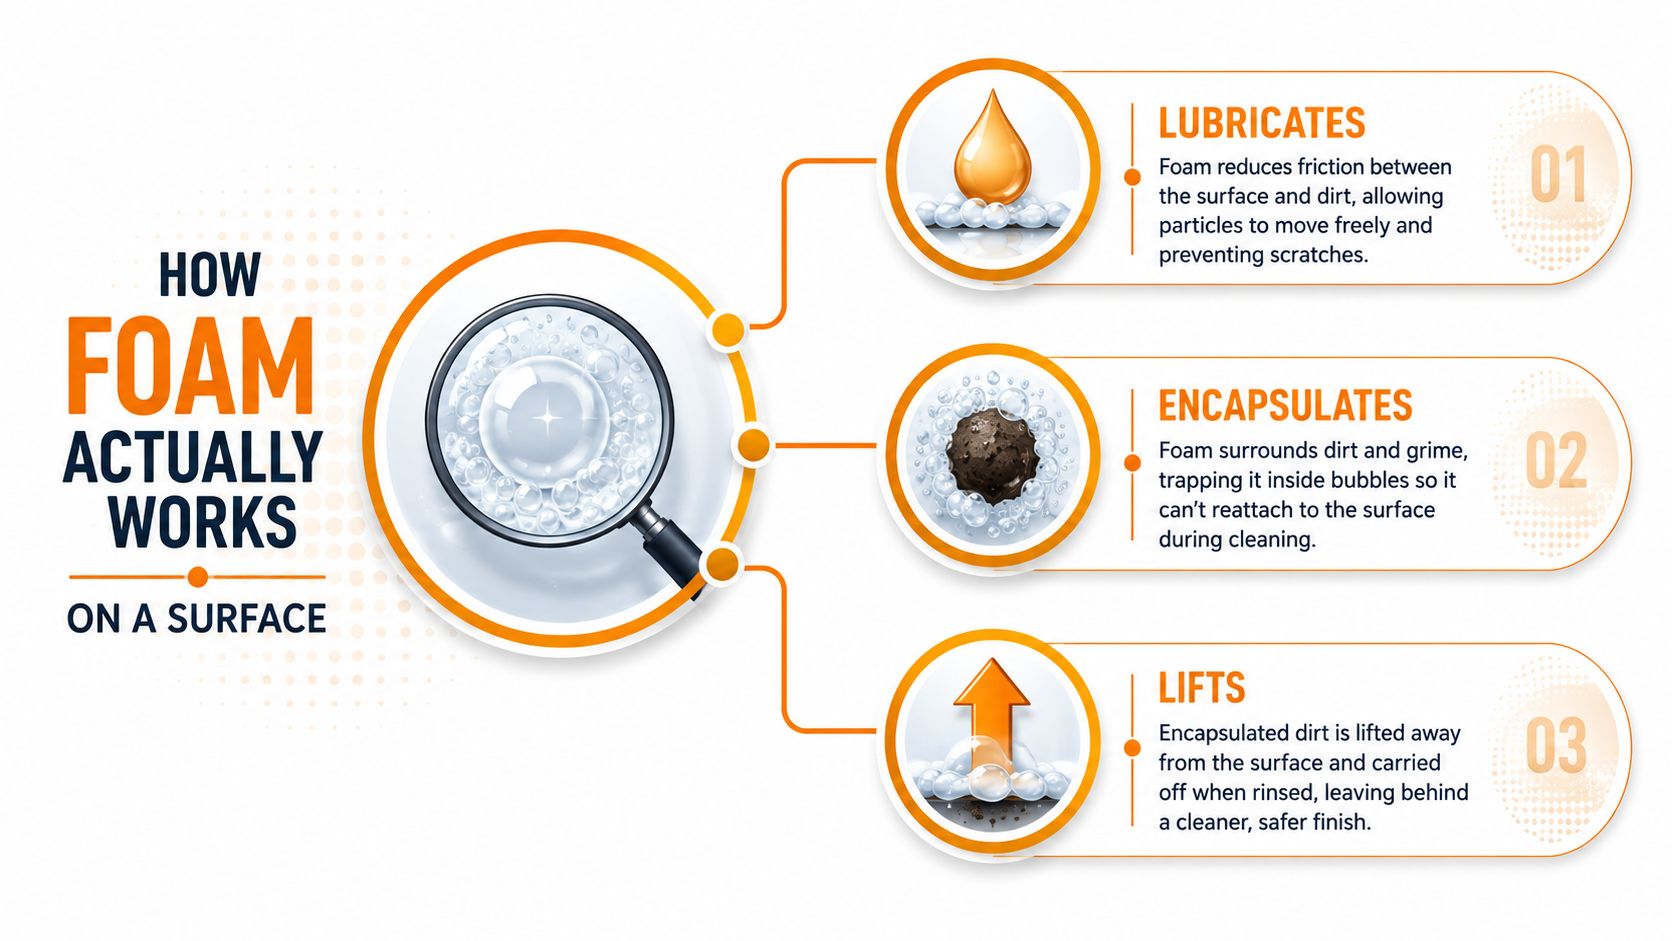
That's the big difference between thick foam and thin foam. Two products can be equally strong on paper, but if one drains fast, it stops helping before you've finished a panel. The better foam is the one that stays wet, covers evenly, and gives your mitt or rinse enough time to move grime without grinding it back into the finish.
A useful comparison comes from window cleaning, where controlled coverage matters more than flashy output. Clean Space SA's window washing approach is a good reminder that clear, even application often beats excess product when the goal is a clean, streak-free surface, not a showy one. The same idea carries over to paint, glass, trim, and wheels.
Read foam behavior before you buy anything
If you understand how foam behaves, you can predict the result from a product description. Dense, clinging foam usually means longer dwell and better vertical coverage. Looser foam usually means faster drainage, less hanging power, and more reliance on your rinsing or mitt technique.
That also explains why vehicle geometry matters so much. A flat hood tolerates a lot. A vertical tailgate, a mirror cap, or a recessed grille does not. Foam has to stay where you put it, and the surface shape either helps or fights that goal.
Comparing the Main Foam Delivery Tools
The tool choice is simpler once you stop asking which one is “best” and start asking what each one is built to do. A foam cannon or foam gun gives you hose-connected convenience with a decent blanket. A foam lance mounts to a pressure washer and pushes denser foam with more force. A pump sprayer is portable and inexpensive, but it usually makes a thinner layer. Hand application is the baseline, especially when you're working with a bucket, mitt, and a careful rinse.
Foam Delivery Tools at a Glance
| Tool | Setup | Foam Thickness | Best For |
|---|---|---|---|
| Foam cannon or foam gun | Hose-connected, simple setup | Medium to thick | Driveway washing, portable convenience |
| Foam lance | Pressure washer-mounted | Thick, dense, clinging | Heavier contamination, larger panels |
| Pump sprayer | Manual pump, no pressure washer | Thin to medium | Light dust, quick maintenance cleaning |
| Hand application | Bucket, mitt, and soap solution | No foam blanket, direct wash | Traditional contact wash, controlled cleaning |
The hose-fed option is popular because it gives you a real foam layer without needing a full pressure washer setup. If you want a more detailed breakdown of that setup style, the internal guide on the Auto Foam Cannon fits neatly here.
What each tool does well and where it falls short
A foam cannon makes sense when you want a portable middle ground. It's easy to deploy, easier to store, and usually enough for routine washes where you're not fighting baked-on mud. A foam lance is the stronger choice when you already own a pressure washer and want thicker cling across wide panels or stubborn lower sections.
A pump sprayer works when convenience matters more than foam drama. It's the option I'd reach for on light dust or maintenance work where I just need controlled lubrication without hauling out more equipment. Hand application still matters because it keeps you honest about panel-by-panel cleaning and mitt discipline, especially when the surface already needs careful contact work.
Practical rule: if you want portability, choose the hose-fed foam gun. If you want the densest foam and already own a pressure washer, use a lance. If you want the simplest low-tech option, use a pump sprayer or a bucket wash.
For high-output cleaning jobs, a pressure-based setup can make more sense than a lightweight hose tool. Arelli Cleaning's high-pressure washing services are a reminder that stronger equipment is useful when surfaces need more force, but that doesn't make it the right choice for every car, trim piece, or delicate finish.
Low-Pressure Versus High-Pressure Foam Delivery
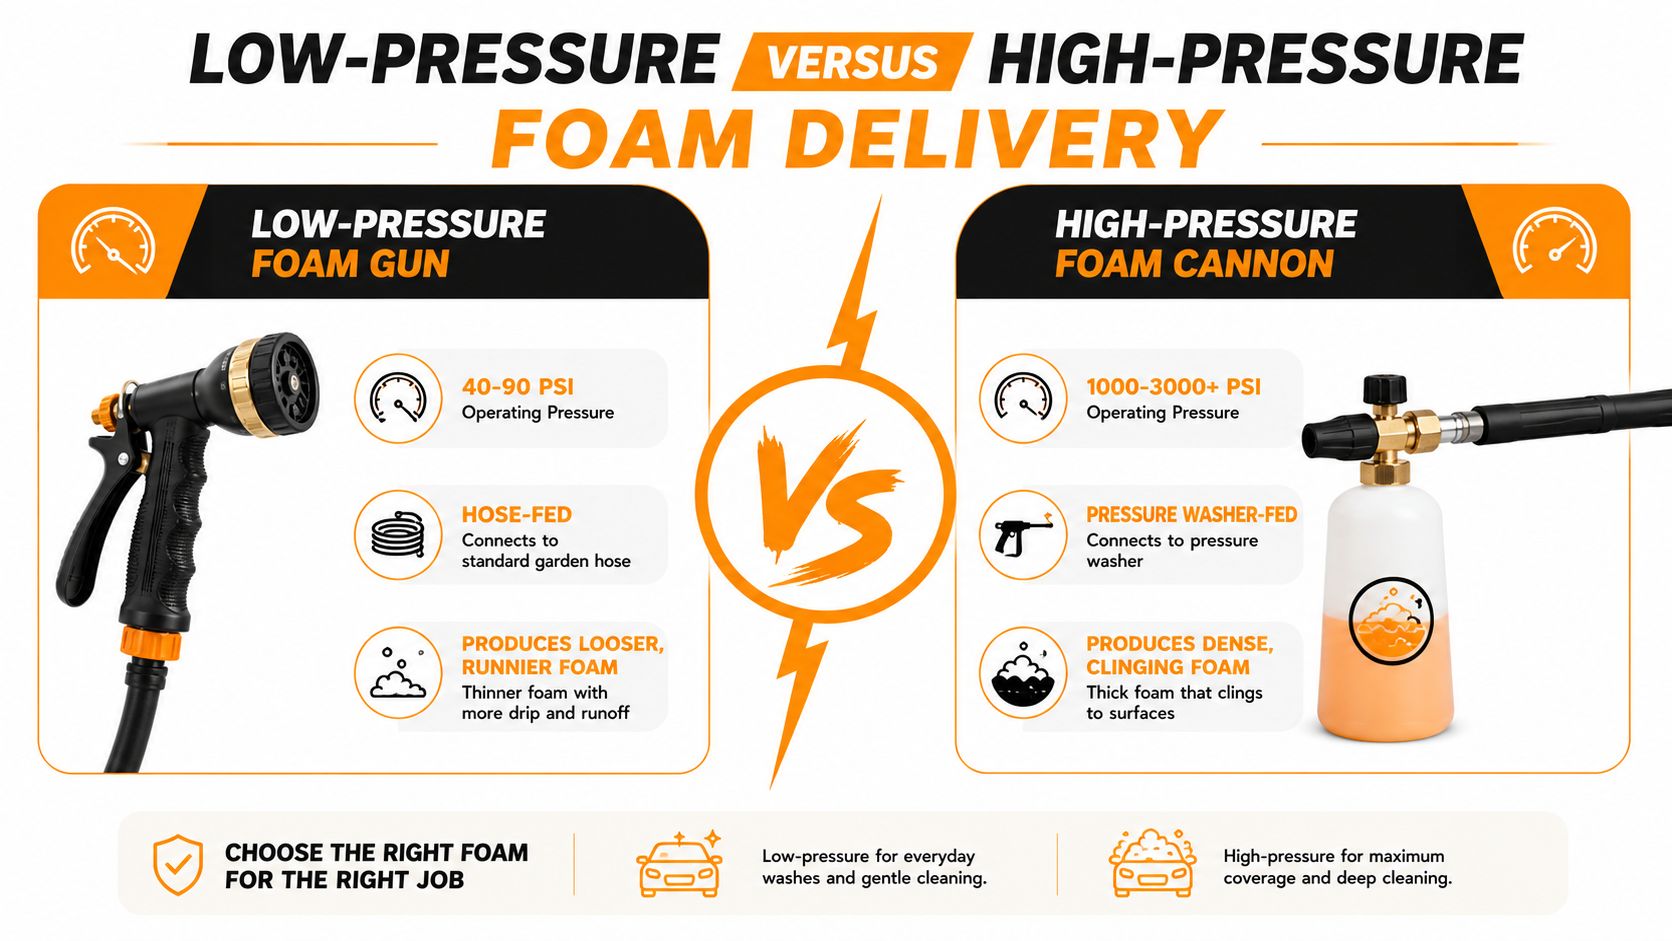
Pressure changes everything. Low-pressure hose-fed foam guns usually give you a wetter, looser layer that drains faster but feels safer on delicate finishes and overspray-sensitive areas. High-pressure foam lances can atomize the solution into much finer bubbles, which often cling better and rinse cleaner, but they demand more control over distance and angle.
Think of it like a paint sprayer versus an airbrush
A low-pressure setup behaves more like a broad paint sprayer. It covers easily and gently, but the pattern can be softer and less dense. A high-pressure lance behaves more like an airbrush, it creates finer foam structure and tighter coverage, but it also needs a steadier hand so you don't blast contamination across the panel.
The pressure gap matters most when the surface is already dirty. A black daily driver parked under trees benefits from a gentler, wetter application because you want the foam to sit, soften pollen or sap, and reduce friction before contact. A dusty work truck can handle a stronger pass and then a careful mitt wash because the larger, flatter surfaces tolerate more aggressive prep.
The point isn't that high pressure is “better.” It's that pressure range should match contamination level and surface sensitivity. A thick foam layer on a delicate surface can still be the wrong answer if it's being forced on too hard or stripped off too quickly.
Where pressure helps and where it gets in the way
Low pressure helps when you're washing around badges, trim, soft-touch plastics, or anything that doesn't need force. It's also the easier choice if you're just trying to get a safe layer down quickly before a rinse. High pressure helps when you need stronger coverage across bigger panels and want the foam structure to hold longer before rinse-off.
Fillaree's refill foam soap dispenser guide is a useful reminder that people often underestimate how much setup affects the final result. The same soap in a better-filled, better-adjusted dispenser can behave very differently from a sloppy fill and poor pattern control.
If you want a deeper look at the lower-force side of the debate, the internal guide on Low Pressure Washing is a good companion. Pressure is just one variable, but it's the one that changes the feel of the whole wash fastest.
Setting Up a Foam Wash Step by Step
Good foam work starts before the trigger gets pulled. Loose grit has to come off first, because foam is meant to support the clean, not grind contamination into the finish. After that, the mix, distance, and order matter more than brand hype.
A clean routine keeps the results repeatable
Start with a pre-rinse. You're trying to knock off the loose stuff so the foam doesn't have to fight every particle by itself. Then mix your solution according to the product label, because foam soaps can vary a lot, and a common working range is 1:10 to 1:100 depending on strength and purpose.
Fill the bottle with water first, then concentrate. That reduces unnecessary foaming inside the bottle and helps the mix stay more consistent. Spray at a distance of roughly six to twelve inches from the panel, then move in overlapping passes instead of dumping all the product into one spot.
Practical rule: thin, even coverage usually beats a heavy burst, because the goal is uniform lubrication, not a white wall of soap.
The sequence matters too. Lower panels collect the worst grime, so start there and work upward in controlled passes. That lets you spend more attention where the dirt is heaviest without dragging runoff across clean upper sections.
Keep the layers light and the timing sane
The industrial foam world treats layer control seriously. In polyurethane work, excessive layer thickness causes problems, so passes stay controlled rather than piled on all at once. The same logic works on paint, because a thin, even coat is easier to manage than a dripping blanket that slides off before it can help.
After the contact wash, a second light pass can restore lubrication while you move the mitt across the panel. That's especially useful on larger cars or when the first rinse left the surface looking uneven. The point is to keep friction low, not to make the car disappear under foam.
For a visual walkthrough, this foam wash setup guide matches the sequence most DIY detailers can follow without overthinking it.
A straightforward video reference can help too, especially if you're still dialing in bottle fill, trigger control, and spray pattern.
Matching Foam Methods to Real-World Wash Jobs
A tool becomes easier to choose when you stop thinking in product names and start thinking in shapes. A commuter sedan in a dusty suburb, a tall RV wall, and a quick maintenance wash all ask for different foam behavior, even if the soap bottle is the same.
Five common situations and the method that fits
- Dusty daily commuter sedan: A foam gun or light foam cannon usually makes sense here. Use a moderate dwell period, then rinse or mitt-wash before the dirt fully dries. The common mistake is overloading the roof and hood while ignoring the lower doors and rocker panels.
- Black or dark-colored car: Pick the method that leaves the most forgiving lubrication blanket, which is usually a foam cannon with controlled distance or a gentle hose-fed foam gun. Dark paint shows wash-induced marring fast, so a rushed pass is the problem, not the product. The usual mistake is scrubbing too soon because the foam looks like it's already “doing enough.”
- Full-size truck with wide flat panels: A foam lance or a strong foam gun works well because broad panels reward even coverage. Work in sections so runoff doesn't dry while you move around the truck. The common mistake is treating the whole side as one panel and letting the lower half sit too long.
- RV or camper with tall vertical surfaces: Choose the method that clings longest and doesn't slide off right away. Vertical walls favor denser foam and more controlled application, because gravity works against you the whole time. The common mistake is using a thin spray that disappears before you've finished the first side.
- Quick rinse-less maintenance wash: A pump sprayer or very light foam application can be enough when the dust is light and the goal is lubrication, not deep cleaning. In this case, a full pre-rinse may not be necessary. The common mistake is over-prepping a surface that only needed a fast maintenance pass.
Practical rule: the right foam method is the one that matches panel shape, dirt level, and how long the product can stay useful before you touch the paint.
The big pattern is simple. Flat, heavily contaminated surfaces can tolerate stronger delivery and longer passes. Vertical, delicate, or overspray-sensitive surfaces need a method that clings without sliding away or creating extra cleanup.
When Technique Beats Foam Volume
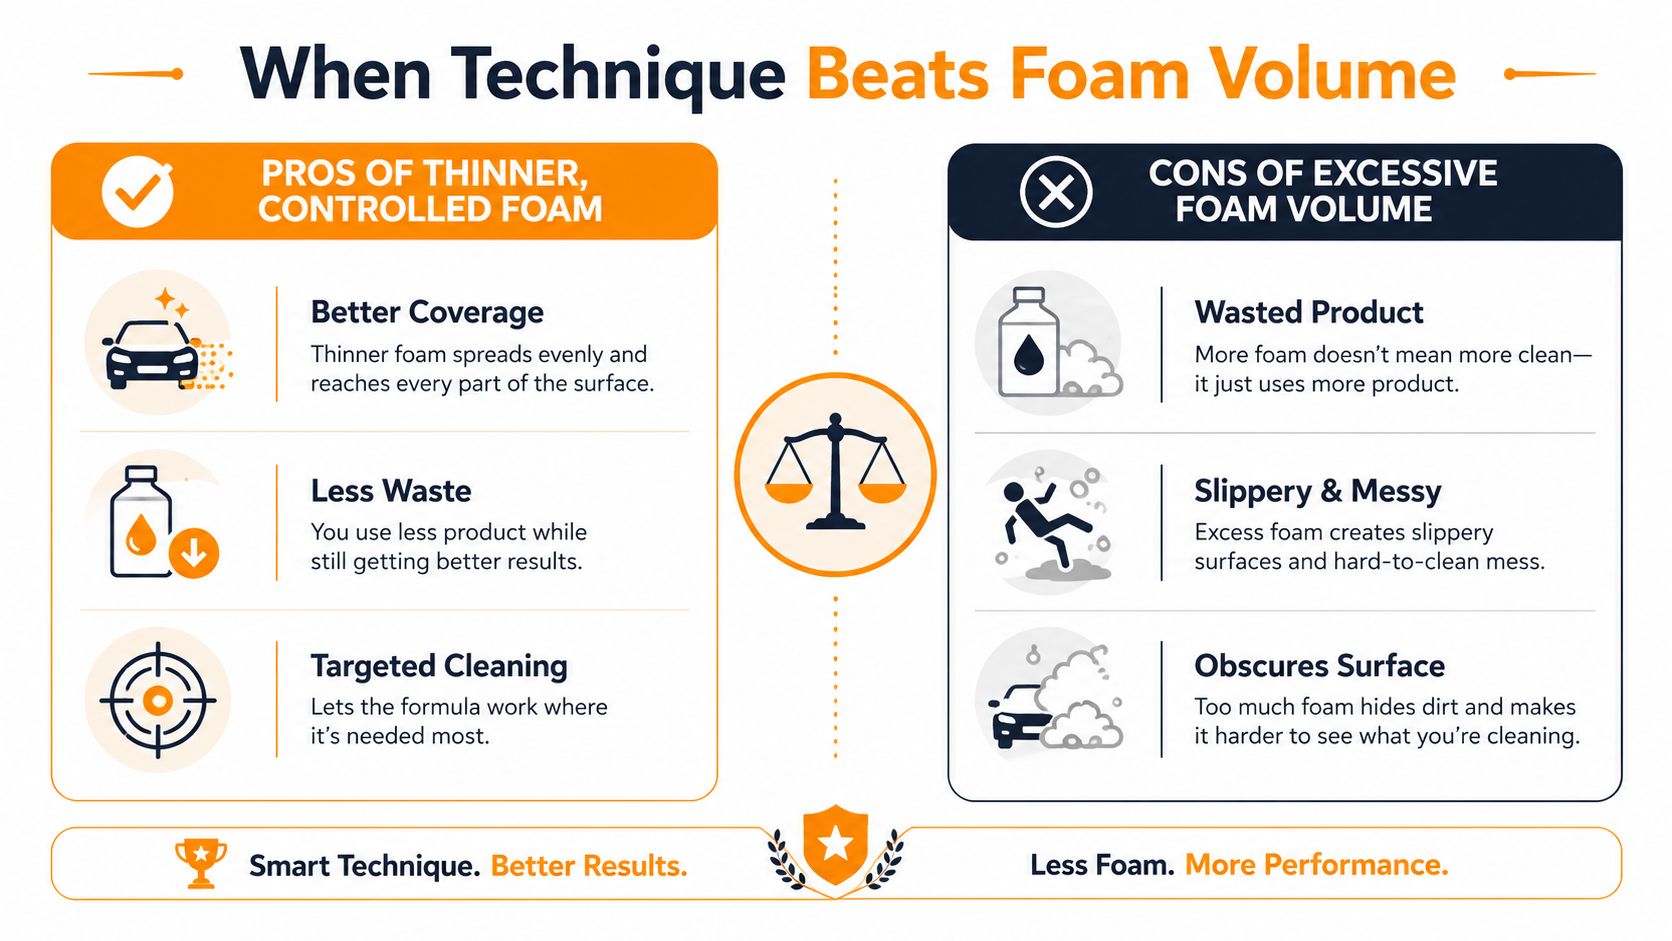
More foam looks impressive, but it doesn't automatically clean better. Gentle placement usually protects the structure of the blanket longer than a hard blast that tears it apart before it can sit on the panel. That's the same reason fire and industrial foam practices favor controlled placement over brute-force dumping.
The soft skills that actually change the finish
Angle matters. If you spray too steeply, foam bounces, breaks, and runs. If you overlap your passes and keep a steady distance, the panel gets a more even coat and the mitt glides more predictably during contact work.
Order matters too. Roof first, then upper glass and panels, then lower sections. That sequence keeps runoff from dirty panels from recontaminating areas you already covered. It also helps you avoid the common habit of spending all your attention on the hood while the sides stay under-foamed.
The biggest trap is the foam arms race. People chase denser output, thicker caps, and more dramatic cling, then wonder why their wash still feels messy. A controlled layer, paired with patient dwell time and careful mitt discipline, usually produces a cleaner result than a thick overspray that collapses into runoff.
Where technique outruns product hype
A better wash comes from using foam as a precision tool. That means panel-by-panel coverage, patient rinsing, and mitt work that stays light instead of chasing the illusion that more white suds equal more safety. The finish tells you the truth pretty quickly.
If the foam sits evenly, doesn't run off too fast, and leaves the panel slick, the method is probably right. If it slides off in sheets, collects in trim gaps, or forces extra wiping, the setup needs adjustment before the soap needs replacing.
Troubleshooting, Maintenance, and a Portable Foam Option
If the cannon won't draw soap, check the pickup tube first. Weak foam usually points to a bad mix, a worn orifice, a loose bottle seal, or a nozzle that's partially clogged. After every wash, rinse the bottle, flush the pickup tube, store the trigger assembly dry, and replace the orifice if foam quality falls off sharply.
SwiftJet's Car Wash Foam Gun fits the portable-foam niche because it connects to a standard garden hose, includes on/off trigger control, and comes with a microfiber wash mitt. It's offered in orange, blue, or black, ships free on orders over $49, and comes with a 100% satisfaction guarantee plus a VIP program for ongoing discounts and tips. For casual DIYers and gift buyers, that combination is often enough to cover the most common driveway needs without stepping into a full pressure-washer setup.
If you want a hose-fed foam option that keeps the setup simple while still giving you clinging soap and control at the trigger, take a look at SwiftJet. It's a practical fit for the portable end of foam application methods, especially if you want one tool for cars, trucks, and weekend washes without adding more equipment to the garage.
