
Getting your car detailed isn't just about a quick wash. It’s a full-on process of cleaning, restoring, and protecting your vehicle's paint to get that showroom look. The real magic happens in stages: a pre-wash foam bath, the classic two-bucket wash, paint decontamination, polishing, and locking it all in with a protective layer like wax or a sealant.
Building Your Detailing Toolkit
Before you even think about turning on the hose, a professional-level finish starts with having the right gear. It's time to move past the old bucket-and-sponge routine and assemble a real detailing arsenal. Think of this less as a shopping list and more as your game plan for getting a flawless, swirl-free result every single time.
The obsession with pristine car care is growing for a reason. The global car detailing market is booming, expected to jump from $1.52 billion in 2024 to $1.67 billion in 2025. People are taking more pride in their vehicles, and it shows.
Core Washing and Drying Equipment
The bedrock of any great detail is a wash process that's safe for your paint. This means using specific tools designed to keep scratches at bay.
- Two 5-Gallon Buckets: One for your soapy water, one for clean rinse water. This simple setup is your number one defense against dragging grit and grime back across your paint.
- Grit Guards: Drop one of these into the bottom of each bucket. They act like a filter, trapping dirt at the bottom so your wash mitt can’t pick it back up and create swirl marks.
- SwiftJet Foam Gun: This is a non-negotiable for the pre-wash stage. It hooks right up to a standard garden hose and blankets your car in thick foam, which starts breaking down heavy dirt before you ever have to touch the paint.
- Plush Microfiber Towels: You can never have too many. Get a dedicated wash mitt, a few large, high-GSM towels for drying, and a separate stash for glass, wheels, and interior jobs.
Before we dive into chemicals, let's get a clear picture of the essential hardware. This table breaks down the core tools you'll need to get started.
Your Essential Detailing Gear Breakdown
| Tool | Primary Purpose | Why It's Critical |
|---|---|---|
| Two 5-Gallon Buckets | Separating soapy water from rinse water. | Prevents cross-contamination and dragging dirt back onto the car's surface. |
| Grit Guards | Trapping dirt at the bottom of buckets. | Keeps your wash mitt clean, drastically reducing the risk of swirl marks. |
| SwiftJet Foam Gun | Pre-wash foaming to loosen heavy dirt. | Lifts and encapsulates grime without physical contact, making the wash safer. |
| Microfiber Towels | Washing, drying, and buffing surfaces. | Highly absorbent and soft, they're the safest material for touching your paint. |
Having these four foundational items sets you up for a much safer and more effective wash, laying the groundwork for a truly professional finish.
Chemicals and Cleaning Solutions
The chemicals you choose are just as crucial as the tools you wield.
One of the most common mistakes I see is people grabbing dish soap for their car. It's way too harsh and will strip off any wax or sealant you have, leaving your paint totally exposed. Stick with products made specifically for cars.
For the interior, a powerful portable car vacuum is your first line of attack to get rid of all the crumbs and debris before you start with any cleaners.
You'll also want a quality pH-neutral car shampoo, a dedicated wheel cleaner that can dissolve stubborn brake dust, and an ammonia-free glass cleaner for a streak-free view. If you want a complete shopping list to make sure you haven't missed anything, check out our guide on the must-have auto detailing equipment list.
The Pre-Wash Foam Bath Technique
Now that you've got your gear sorted, we can get into the single most important part of a safe wash. The pre-wash foam bath is where the real magic happens, and it’s what separates a professional, scratch-free job from a quick driveway scrub. This step does the heavy lifting for you by getting the nastiest, most abrasive dirt off the car before you ever touch it with a mitt.
Just picture it: your car is coated in a fine layer of sand, road grit, and other sharp little particles. If you jump straight in with a sponge or wash mitt, you’re basically grinding that grit right into your clear coat. That’s how you get those dreaded swirl marks that kill your car's shine. The foam bath is a touchless way to avoid all that damage.
Why a Foam Cannon Is Your Paint's Best Friend
This is where a quality foam gun, like the SwiftJet, becomes a detailer's secret weapon. It hooks up to your pressure washer or garden hose and covers the entire vehicle in a thick, clinging blanket of snow foam. And trust me, this isn't just for a cool Instagram shot; that foam is hard at work.
The active agents in a good car shampoo immediately start to break down and encapsulate all the dirt. As the foam slowly slides down the car, it pulls that grime away from the paint. This process can safely remove a huge percentage of the dirt before you even think about making contact. That's the whole point.
This visual breaks down how the foam pre-wash fits into the beginning of your detailing process.
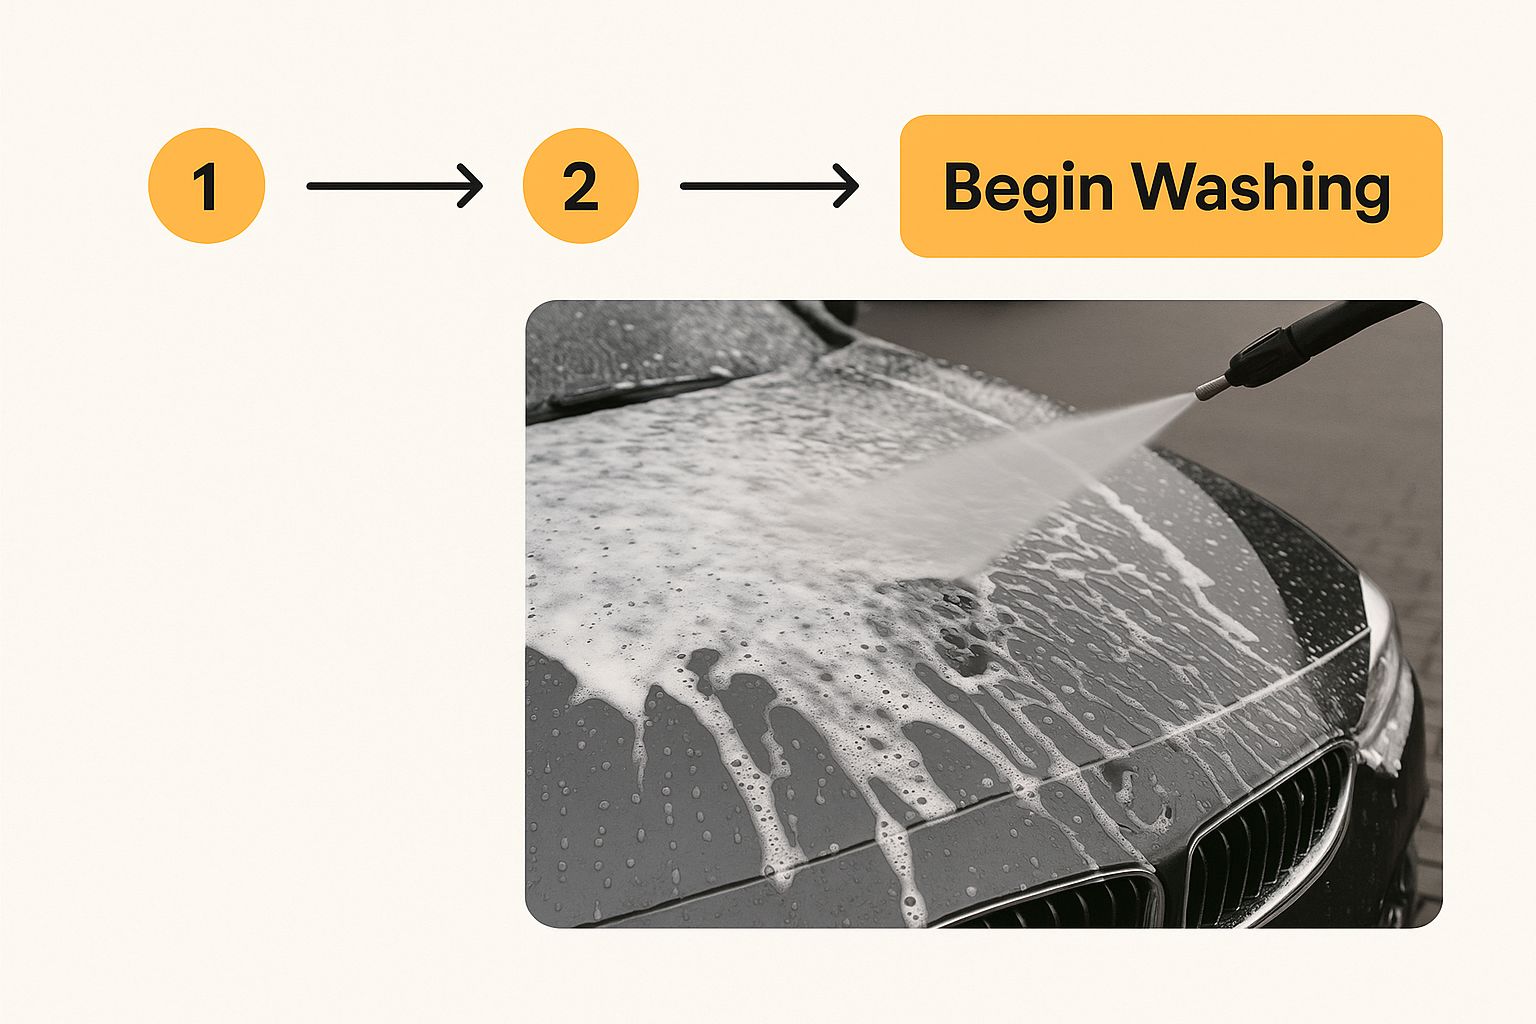
As you can see, after a quick rinse, blanketing the car in foam is the very first cleaning step. It preps the surface so the main contact wash is dramatically safer.
Nailing the Perfect Foam Consistency and Dwell Time
Getting that perfect, shaving-cream-like foam isn’t just for show—it's about effectiveness. If your foam is too thin and watery, it’ll just run off before the soap has a chance to do its job. On the other hand, if it’s way too thick, it might just sit on top and not actually penetrate down to the paint.
The SwiftJet foam gun has an adjustable nozzle that lets you dial this in perfectly. Here’s how I get it right every time:
- Follow the soap's ratio: First, check your car shampoo bottle. It will have a recommended dilution for foam cannons, usually something like 1-2 ounces of soap for every 10-12 ounces of warm water in the reservoir.
- Use the top dial: This dial controls how much soap mix gets pulled into the water stream. Turn it toward the "+" for thicker foam or the "-" for a thinner, wetter mix.
- Adjust the spray pattern: The nozzle at the front twists to change the spray from a tight stream to a wide fan. I use a wide fan to cover big areas like doors and the hood quickly.
Once the car is completely covered, you have to let the foam "dwell," which just means letting it sit and work.
The sweet spot for dwell time is usually 5 to 10 minutes. You need to give the soap enough time to dissolve all that grime, but you absolutely cannot let it dry on the paint. If it dries, especially in the sun, you'll be left with stubborn water spots that are a pain to remove.
When time’s up, just rinse all the foam and loosened dirt away, starting from the top and working down. You’ll be shocked at how much cleaner the car is already. For a deeper dive, you can learn more about how to use a foam gun in our complete guide. Getting this initial step right is a cornerstone of doing a proper, step-by-step detail.
Executing a Flawless Two-Bucket Wash
Now that the pre-wash foam has lifted away the worst of the grit, it's time for the main event: the contact wash. This is where you'll physically touch the paint, and frankly, it's where most swirl marks are born. To do it right, detailers swear by the two-bucket method. It’s a simple system, but it's incredibly effective at keeping your paint safe.
This isn't just washing your car; it's a core part of the detailing process. The entire goal is to separate your clean, soapy water from the dirty rinse water. Why? So you aren't just dragging the same dirt you just removed all over your car's finish.
Setting Up Your Two Buckets for Success
The setup is easy but absolutely critical for a scratch-free wash. Grab two 5-gallon buckets. If you can, label one "WASH" and the other "RINSE" to avoid any confusion once you get into a rhythm.
The secret weapon here is a Grit Guard. It's a simple plastic insert that sits at the bottom of each bucket, and it makes all the difference. As you rinse your wash mitt, dirt falls through the grate and gets trapped underneath, keeping it far away from your mitt and your paint.
- Rinse Bucket: This one gets filled with nothing but plain, clean water. It’s your cleaning station for the wash mitt.
- Wash Bucket: Fill this one with water too, but add your favorite pH-neutral car shampoo. Using a pH-neutral soap is key—it cleans thoroughly without stripping off any wax or sealant you've previously applied.
This separation is everything. Most of the micro-scratches you see on cars come from a dirty wash mitt. The two-bucket method is designed to solve that exact problem.
Mastering the Top-Down Washing Technique
With your buckets ready, it’s time to get started. The golden rule is simple: work from the top down. Gravity is on your side here. As you clean the roof, dirty water runs down over the lower, grittier parts of the car, giving them a bit of an extra pre-soak.
This approach keeps you from pulling the heavy gunk from your rocker panels and bumpers up onto the cleaner areas like the hood and doors.
Here’s the process for every single panel of the car:
- First, dip your clean wash mitt into the WASH bucket and load it up with plenty of suds.
- Gently wash a small section—think half the roof or a single door panel. Always use straight-line motions, never circles. Swirling motions create swirl marks.
- Now, before you even think about getting more soap, plunge that dirty mitt into the RINSE bucket. Rub it against the Grit Guard to dislodge all the dirt it just picked up.
- Wring out the mitt, then go back to the WASH bucket for fresh, clean suds. Now you're ready for the next section.
By repeating this rinse-and-reload process for every panel, you're stopping cross-contamination in its tracks. You trap the dirt from one panel in the rinse bucket, guaranteeing only clean, lubricated suds touch the next.
This is arguably the most important part of the entire detail for maintaining your paint's health long-term. It might feel a bit tedious, but this discipline is what separates a quick wash from a true detail. The difference in paint clarity after a year of using this method versus a single bucket is night and day.
Achieving a Glass-Smooth Paint Surface
After a solid wash, your car looks clean, but is it really? Here's a little trick: slip a plastic sandwich bag over your hand and gently glide it across the hood. If you feel a gritty, rough texture, that's bonded contamination. It's the stuff that a normal wash just can't touch.
Think of your car’s clear coat like your skin—over time, its pores get clogged. We're talking about industrial fallout, brake dust, and tree sap that embed themselves into the finish. This grit not only dulls the shine but also stops any wax or sealant from properly bonding to the paint. If you leave it, it can cause some serious, permanent damage.
Getting a Truly Clean Slate
To tackle this, we start with chemical decontamination. This step is all about targeting the nasty stuff, especially those tiny iron particles from brake dust and industrial pollution. They're sharp, they rust, and they show up as tiny orange specks that are impossible to wash off.
An iron remover spray is your best friend here. Just spray it onto the cool, dry paint and give it a few minutes to work its magic. You'll see the clear liquid turn a dramatic purple as it reacts with and dissolves the iron. Honestly, it's one of the most satisfying parts of detailing—that "bleeding" effect shows you just how much gunk was hiding on your paint. Once it's done reacting, just give the panel a thorough rinse.
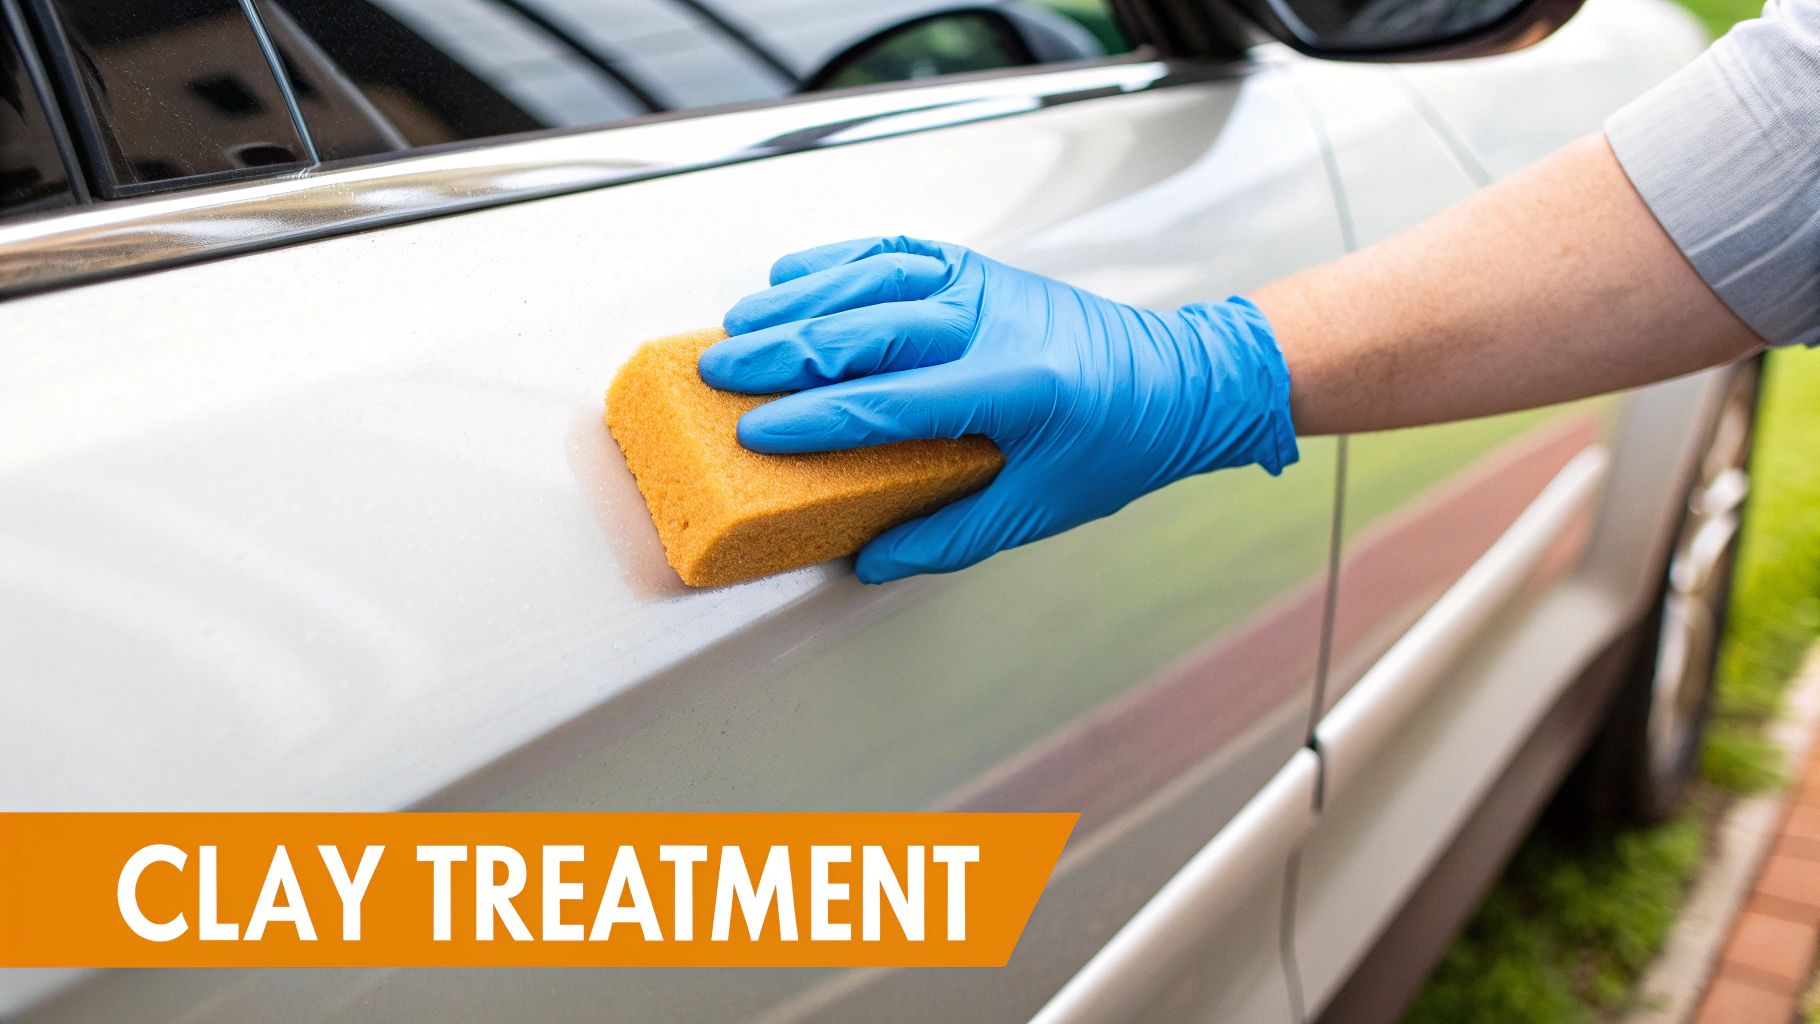
The Classic Clay Bar Treatment
Next up, we go old-school with a clay bar. This is a physical decontamination step. The special, putty-like clay gently grabs and lifts any leftover surface contaminants that the iron remover might have missed, leaving the paint feeling incredibly smooth.
Here’s how to do it right:
- Work in small sections. Don't try to tackle the whole hood at once. A 2x2 foot area is perfect.
- Lube it up. Spray the section with a dedicated clay lubricant or even a quick detailer. You can't use too much—the goal is to have the clay glide, not drag.
- Glide, don't scrub. Flatten the clay into a small pancake and slide it back and forth over the lubricated area with very light pressure. You'll literally feel and hear it picking up the grime.
- Keep going until it's silent. Once the clay glides smoothly and quietly, you're done with that spot. Wipe the area dry with a clean microfiber and feel the difference. It's night and day.
- Fold and knead. Check your clay often. When it gets dirty, just fold it in on itself to expose a fresh surface. And if you drop it on the ground? Toss it. It's not worth scratching your paint.
A huge rookie mistake is mashing the clay bar into the paint. You have to let the clay and the lubricant do the work. Pressing too hard will just create fine scratches (marring) that you'll have to polish out later.
Restoring That Deep, Wet Shine
With a perfectly smooth, decontaminated surface, you're ready for the most transformative part of the job: paint correction. This is where you actually fix imperfections like swirl marks, fine scratches, and oxidation to bring back that incredible gloss. There's a reason the global car detailing services market is projected to grow from USD 48.6 billion in 2025 to a massive USD 97.2 billion by 2035—this step makes all the difference. You can learn more about this trend in the latest car detailing services market report.
Paint correction involves using abrasives—either a compound or a polish—to gently level the clear coat. While they sound similar, they have very different jobs. A compound has more "cut" to remove deeper defects, while a polish uses finer abrasives to refine the finish and crank up the gloss.
So, how do you know which one to reach for?
Polish vs Compound Choosing the Right Abrasive
It really comes down to the condition of your paint. A more aggressive compound is great for neglected finishes, but a gentle polish is often all you need to restore that showroom shine.
| Characteristic | Compound | Polish |
|---|---|---|
| Abrasiveness Level | High | Low to Medium |
| Primary Use | Removing moderate to heavy scratches, swirl marks, and oxidation. | Removing very fine swirls, holograms, and enhancing gloss. |
| Typical Finish | Can leave a slight haze (marring) that requires a follow-up polish. | Leaves a high-gloss, reflective, and ready-to-protect finish. |
| When to Use It | On neglected paint with visible defects that a polish can't remove. | As a final step after compounding or on paint that's in good condition. |
For most weekend detailers working on a daily driver with light swirls, a good one-step polish is usually more than enough to make a huge difference. You can apply it by hand with a foam applicator, but if you want truly professional-looking results, a dual-action (DA) polisher is the way to go. It makes the job faster, easier, and gives you a much more consistent, flawless finish.
If you’re ready to take the leap into machine polishing, be sure to read our complete guide on how to polish car paint like a pro. Once you wipe away the final residue, you'll be left with a surface that's not just smooth, but incredibly glossy and reflective—the perfect canvas for that final layer of protection.
Locking In That Shine with Lasting Protection
Alright, you've done all the heavy lifting. The pre-wash, the two-bucket method, the deep cleaning, and the polishing have brought your car's paint to a place it probably hasn't been since it left the factory. But don't pop the kettle on just yet. This last step is what makes all that work last.
Without a tough barrier between your perfect paint and the world, that incredible gloss you just created will fade fast. A good protective layer is your shield against UV rays, bird droppings, acid rain, and all the gunk the road throws at you. This is the difference between your car looking amazing for a few days versus a few months.
It’s no surprise that the demand for these products is through the roof. The car detailing market was valued at around USD 37.41 billion in 2024 and is expected to climb to USD 56.59 billion by 2032. Car owners are wising up to how vital paint protection really is. You can dig into the numbers in the latest car detailing market analysis.
Choosing Your Shield: Wax, Sealant, or Coating?
When it comes to protection, you’ve basically got three main choices. Each one strikes a different balance between looks, durability, and how much effort you have to put in. Knowing the pros and cons is key.
- Carnauba Wax: This is the old-school favorite, loved by purists for the deep, warm glow it gives the paint. It's usually the easiest to apply, but it's also the least durable—you'll be lucky to get six to eight weeks out of it.
- Synthetic Sealant: Think of a sealant as a modern, lab-designed shield. It’s a polymer-based formula that actually bonds to your paint, creating a slick, reflective shine that lasts way longer than wax—typically four to six months.
- Ceramic Coating: This is the top dog of paint protection. A ceramic coating is a liquid polymer that cures into a hard, glass-like shell over your clear coat. The result is incredible resistance to chemicals and dirt, and it can last for two to five years with the right care.
A lot of people get spooked by ceramic coatings, but the newer formulas are much more DIY-friendly. Still, for most of us, a synthetic sealant is the perfect middle ground. It gives you 80% of a coating’s benefits with an application process that’s as easy as waxing.
For the weekend detailer, a quality synthetic sealant hits that sweet spot of stunning gloss and real-world durability, all without the nerve-wracking application of a pro-level coating.
The Art of a Streak-Free Application
It doesn’t matter which product you pick; your technique is what makes or breaks the final result. If you rush this part, you'll be left with ugly streaks and high spots. A little patience here goes a very long way.
First things first: make sure the car is cool to the touch, bone dry, and out of direct sunlight. Applying anything to a hot panel will cause it to flash-dry, making it a nightmare to apply evenly and buff off.
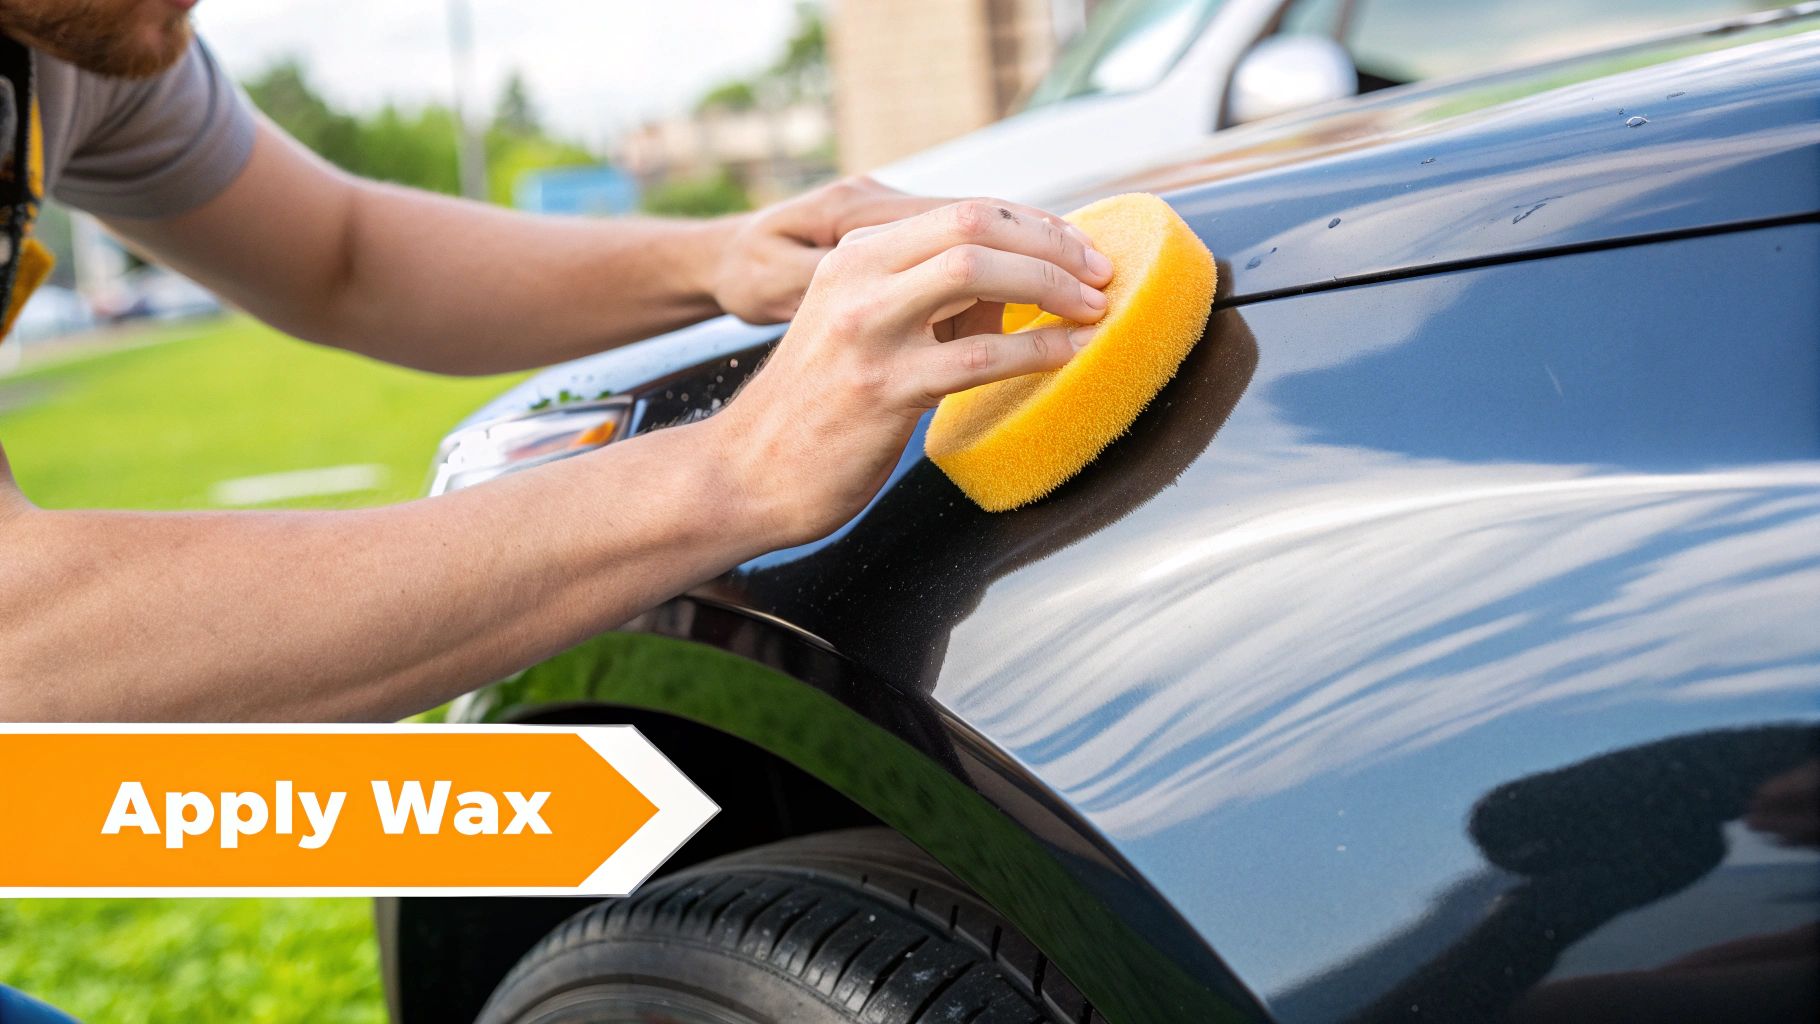
Here’s my go-to process for applying a sealant or wax:
- Get a good applicator. Put a few small dots of product on a clean foam applicator pad. Remember, less is more. A thin, even coat is what you're after.
- Work in small, manageable sections. I usually break a panel down into 2x2 foot squares. This keeps you in control and ensures the product doesn't dry before you can get to it.
- Apply with overlapping passes. Gently spread the product using light pressure. I prefer straight-line motions, back and forth, then up and down, to ensure full coverage.
- Wait for it to haze. Check the bottle for the recommended cure time. Most products need to "haze over," which can take anywhere from 5 to 20 minutes. The old "swipe test" never fails: gently swipe a clean finger across the surface. If it comes away clean, you’re ready to buff.
- Buff off for a brilliant shine. Grab a plush, clean microfiber towel and gently buff away the residue. Keep flipping the towel to a fresh side so you're not just smearing the residue around.
And that's it. Step back and take it all in. That deep, wet-looking gloss is now locked in and protected. Your car is officially shielded from the elements, ready to turn heads for months to come.
Your Top Car Detailing Questions, Answered
Even with the best guide in hand, you’re bound to have questions once you get started. We get it. Getting the right answers to these little "what-ifs" can mean the difference between a frustrating Saturday and a showroom-quality shine. Let's tackle some of the most common things people ask, from total beginners to seasoned weekend warriors.
A little insider knowledge here goes a long way.
How Often Should I Really Do a Full Detail?
This is the big one, and the answer really hinges on what you mean by a "full detail." If we're talking about the whole nine yards—clay bar, compound, polish, the works—that’s a major project you don’t need to do very often.
For a car you drive every day, a complete detail like that is best done once or twice a year. That’s the sweet spot for correcting the swirl marks and grime that accumulate over the seasons without wearing down your clear coat unnecessarily.
The real secret, though, is what you do in between. A good maintenance wash using your SwiftJet foam gun and a safe two-bucket method should happen every one to two weeks. This keeps the heavy gunk from building up and maintains your wax or sealant, which makes that big annual detail a whole lot easier.
Is Detailing My Car in the Sun a Bad Idea?
Yes, it's one of the biggest rookie mistakes you can make. Professionals will tell you to avoid direct sunlight at all costs, and for good reason.
When your car’s panels are hot, water and detailing chemicals evaporate in seconds. This leaves behind nasty water spots and chemical residue that can be a real pain to buff out. In a worst-case scenario, they can actually etch into your clear coat, causing permanent damage.
Pro Tip: Always try to work in a garage, under a carport, or at least on a cool, overcast day. A cool surface is your best friend—it gives you the working time you need to apply products correctly and wipe them off completely for a perfect, streak-free finish.
What’s the Difference Between Just Washing and Actually Detailing?
It’s a night-and-day difference. Think of a car wash as a quick surface clean. Its only job is to get the loose dirt and dust off your car so it looks better from ten feet away.
Detailing, on the other hand, is a top-to-bottom restoration. It’s a deep, meticulous process that involves things a simple wash never touches:
- Decontaminating the paint to pull out embedded grit and industrial fallout.
- Correcting paint defects like swirl marks and fine scratches.
- Protecting the finish with a durable layer of wax, sealant, or ceramic coating.
The goal isn't just to make the car clean—it's to bring it back to a like-new (or often, better-than-new) condition.
Do I Actually Need a Foam Gun to Wash My Car?
While you can wash a car with just a bucket and a mitt, using a foam gun like the SwiftJet is a game-changer for doing the job safely and effectively. I wouldn't wash a car I care about without one.
The thick layer of foam acts as a pre-soak. It clings to the car, loosening and lifting away the abrasive grit before you ever touch the paint with your wash mitt. This one step dramatically cuts down on the risk of inflicting swirl marks and scratches, which is the key to keeping your paint looking incredible for years.
Ready to stop just washing your car and start truly caring for it? The SwiftJet foam gun is the perfect first step toward getting that professional, scratch-free finish right at home. Explore the SwiftJet foam gun and start detailing like a pro today.