
So you want to detail your car like a pro? Forget what you’ve seen at the local drive-thru car wash. True detailing is a craft, a methodical process that brings your vehicle’s finish back to life and protects it from the elements. It’s about more than just making it shiny; it's about restoration.
This guide is your roadmap. We're going to break down the entire process into manageable stages, showing you exactly what to do and why. Think of it as your blueprint for achieving that deep, glossy, "wet look" finish right in your own driveway.
The 5-Phase Detailing Workflow
Getting a flawless finish isn't about one magic product; it’s about a sequence of steps where each one perfectly sets up the next. You can't just jump to waxing and expect great results. You have to prep the canvas first.
The whole process boils down to five key phases:
- Prep & Pre-Wash: This is all about loosening the really tough grime and road film before you ever touch the paint with a mitt. It’s the secret to a scratch-free wash.
- The Main Wash: Once the heavy lifting is done, you’ll perform a proper two-bucket wash to safely remove the remaining surface dirt.
- Decontamination: Here’s where we get serious. We’ll remove all the embedded gunk—the stuff a normal wash leaves behind—like industrial fallout, tar, and tree sap.
- Polishing (Paint Correction): This is the game-changer. You'll gently level the clear coat to erase swirl marks, fine scratches, and oxidation, which is what truly restores that deep gloss and clarity.
- Protection: Finally, you'll lock in all your hard work with a durable layer of wax, sealant, or a ceramic coating to shield the paint and keep it looking incredible for months.
To help you visualize how these stages flow together, here’s a quick overview.
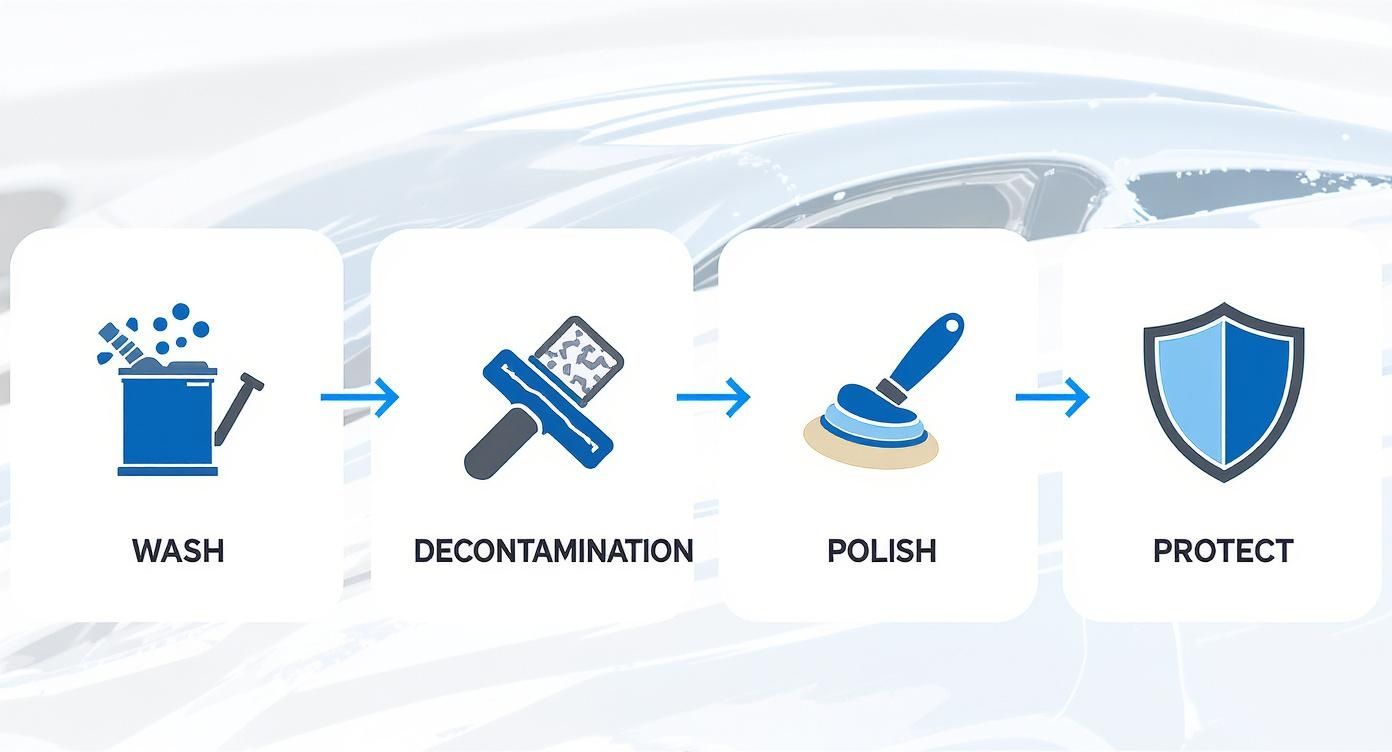
As you can see, it's a logical progression. Skipping a step or doing them out of order just means you'll be fighting against yourself and won't get the results you're after.
To make it even clearer, let's break down the goals and tools for each stage.
The 5 Phases of Car Detailing at a Glance
This table sums up the entire workflow, giving you a high-level look at what each phase accomplishes and what you'll need to get it done.
| Phase | Primary Goal | Key Tools & Products |
|---|---|---|
| 1. Prep & Pre-Wash | To safely lift and remove heavy dirt and grime without scratching the paint. | Foam Gun (like the SwiftJet), Pre-Wash Snow Foam, Pressure Washer or Garden Hose |
| 2. The Main Wash | To gently clean the surface using a contact method that prevents swirl marks. | Two Buckets with Grit Guards, pH-Neutral Car Shampoo, Microfiber Wash Mitt |
| 3. Decontamination | To remove bonded and embedded contaminants that washing can't touch. | Clay Bar or Clay Mitt, Iron Fallout Remover, Tar Remover, Isopropyl Alcohol (IPA) |
| 4. Polishing | To remove paint defects like swirls and fine scratches to restore gloss and clarity. | Dual Action (DA) Polisher, Polishing Compounds & Pads, Masking Tape |
| 5. Protection | To seal the corrected paint, protecting it from the elements and locking in the shine. | Wax, Paint Sealant, or Ceramic Coating; Microfiber Applicators & Towels |
Seeing it laid out like this makes the whole process feel much more approachable, right? It’s just a matter of tackling one phase at a time.
Following this structured approach ensures you’re not just cleaning your vehicle, but methodically restoring and preserving its finish for maximum visual impact and durability.
And it’s not just a niche hobby anymore. The passion for proper car care is booming. The global car detailing market was valued at around $37.41 billion and is expected to climb to $56.59 billion by 2032. That’s a whole lot of people who have discovered the satisfaction of a perfectly detailed car. If you're interested, you can dive deeper into the full market analysis of these car detailing trends.
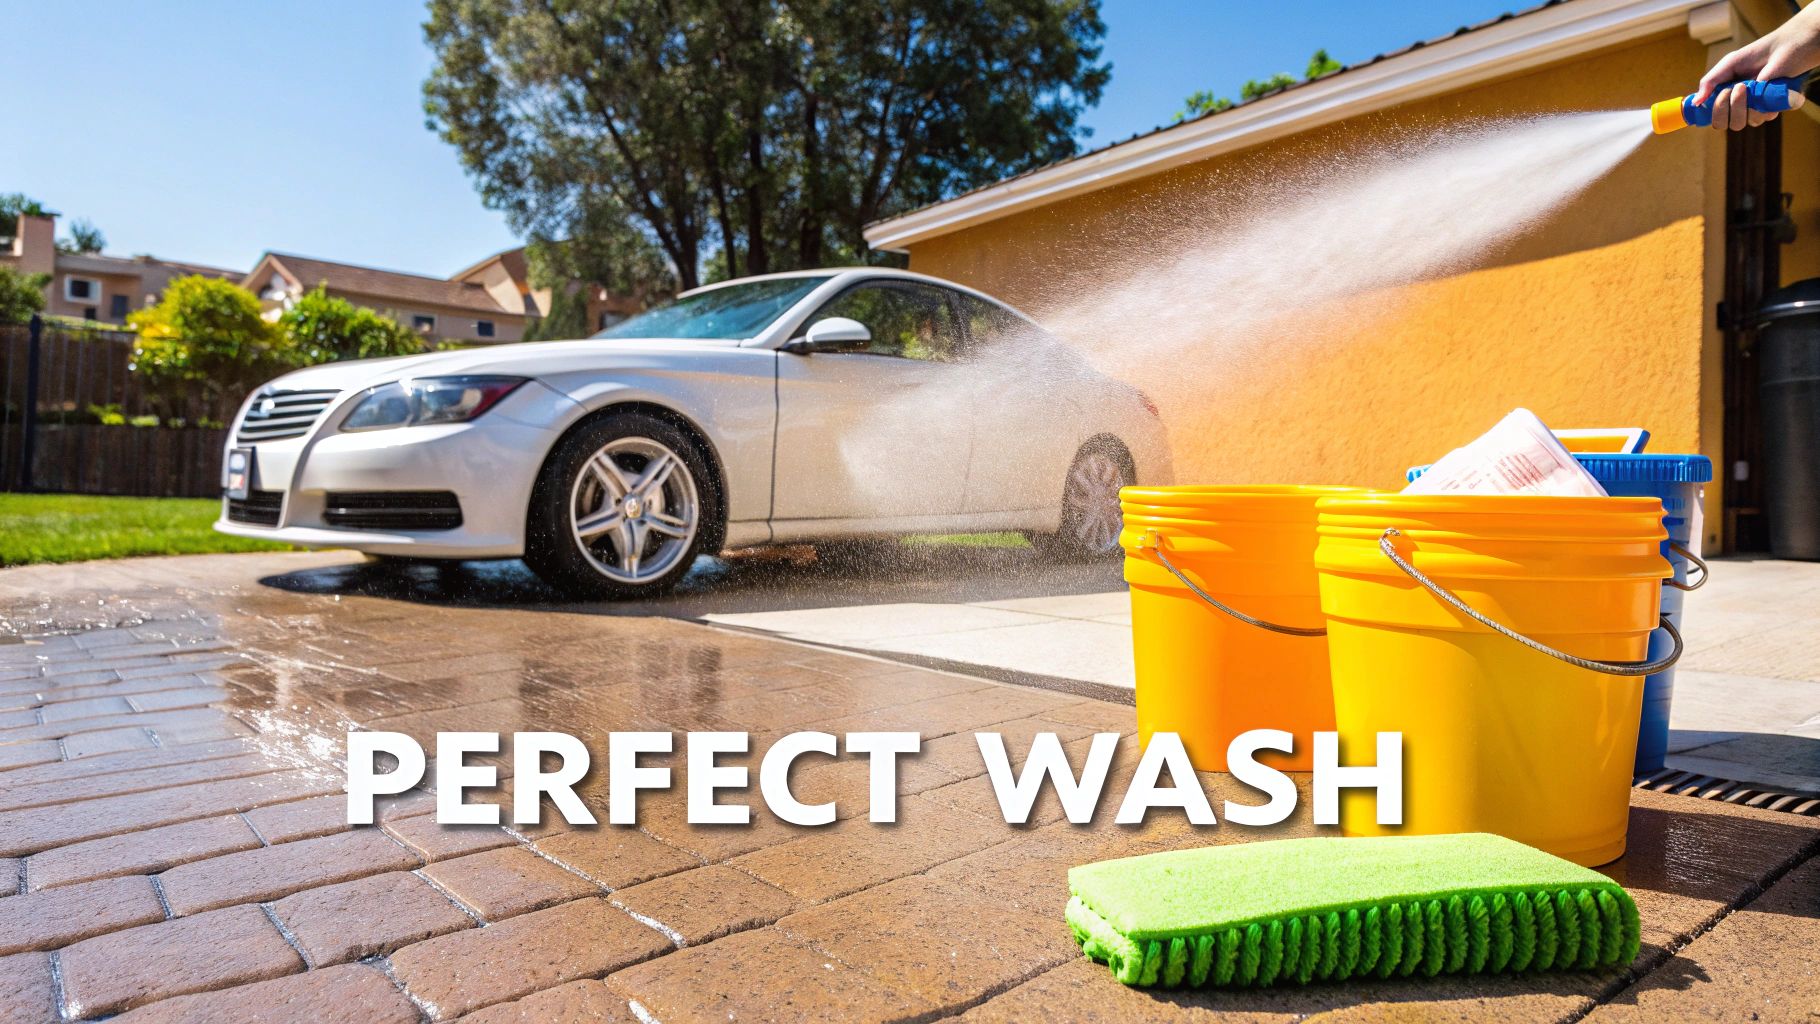
Laying the Foundation: The Perfect Wash
Every truly jaw-dropping detail job is built on one thing: a flawless wash. This isn't just about getting the car clean. It’s a deliberate, methodical process to lift away dirt without inflicting damage, setting a perfect canvas for polishing and protection. If you rush this part, you'll spend hours later trying to polish out the very swirls and scratches you just created.
First, let's talk about where you're washing. You have to get out of the direct sun. A hot panel will cause soap and water to evaporate in seconds, leaving behind stubborn water spots that can actually etch into your clear coat. Always work in the shade or on a cool, overcast day.
Your Arsenal for a Damage-Free Wash
Before a single drop of water hits the paint, get your gear ready. The absolute cornerstone of a safe wash is the two-bucket wash method. If you take away only one thing from this guide, let it be this. It's the single best habit you can form to prevent swirl marks.
So, what is it? Simple. One bucket is for your sudsy car shampoo, the other is just plain rinse water. You’ll load your wash mitt with soap, clean a small section of the car, and then—this is the crucial part—you rinse the now-dirty mitt in the plain water bucket before ever putting it back into your soap. This keeps all the grit you just pulled off the paint from contaminating your clean wash water.
To dive deeper into the technique, check out our full guide on the two-bucket wash method and see why it’s a non-negotiable for anyone serious about their car's finish.
Here’s your essential checklist:
- Two Buckets: Get ones with Grit Guards at the bottom. They’re cheap insurance against scratches.
- A pH-Neutral Car Shampoo: Never, ever use dish soap. It’s designed to strip grease, and it will strip every bit of wax, sealant, and essential oils from your paint, leaving it dull and unprotected.
- A High-Quality Microfiber Wash Mitt: A good mitt traps dirt particles deep in its fibers, pulling them away from the paint surface.
- The SwiftJet Foam Gun: This is your secret weapon for the first—and most important—step.
The Critical Pre-Wash Phase
Think about the type of dirt that's on your car. It’s not just dust; it’s sand, silt, and abrasive road grit. If you just jump in with a wash mitt, you're basically grinding that grit into your clear coat. You have to get the heavy stuff off without touching the paint.
This is where your SwiftJet foam gun comes in. Hook it up to a regular garden hose, and you can cover the entire car in a thick blanket of snow foam. This isn't just for show. The foam goes to work, encapsulating those large, gritty particles and loosening up caked-on grime. As it dwells, gravity pulls the foam—and the dirt—safely down and off the vehicle.
Let the foam sit and do its thing for 5-10 minutes, just be careful not to let it dry on the surface. You’ll literally see the dirt melting off the car. Once it’s worked its magic, give the car a thorough rinse from top to bottom. This one step can remove up to 80% of the damaging grit before you ever lay a hand on the paint, making your hand wash infinitely safer.
The Hand Wash: A Top-Down Strategy
With the most dangerous grit gone, it’s time for the contact wash. Pros have a specific order of operations to prevent dragging dirt from the filthiest areas onto the cleaner ones.
Wheels & Tires First
Your wheels are caked in corrosive brake dust and nasty road grime. Always tackle them first with their own dedicated brushes, mitts, and wheel cleaner. If you use the same tools on your wheels and then move to your paint, you’re just smearing metallic brake dust all over your car’s finish. Keep your wheel tools separate. Always.
Work From the Top Down
When it's time for the paint, start at the roof and work your way down. Go from the roof to the glass, then the hood, trunk, and the upper parts of the doors. Gravity is your friend here, as it pulls the dirty suds down over areas you haven't washed yet.
Save the dirtiest parts for dead last. The lower rocker panels, bumpers, and behind the wheels are constantly blasted with road grime. By washing them at the end, you avoid dragging that heavy contamination across the more pristine upper panels.
Pro Tip: Ditch the circles. That classic "wax on, wax off" circular motion is the number one cause of ugly swirl marks. Instead, wash in straight, overlapping lines—either horizontally or vertically. If you do happen to cause any light marring, straight-line scratches are far less noticeable to the human eye than circular swirls.
Rinse each panel as you finish it to keep the soap from drying. After the whole car is washed, give it one final, thorough rinse from top to bottom. This careful, structured approach is what separates a DIY wash from a professional detail. It leaves the paint perfectly clean and prepped for decontamination without adding any new damage you'll have to fix later.
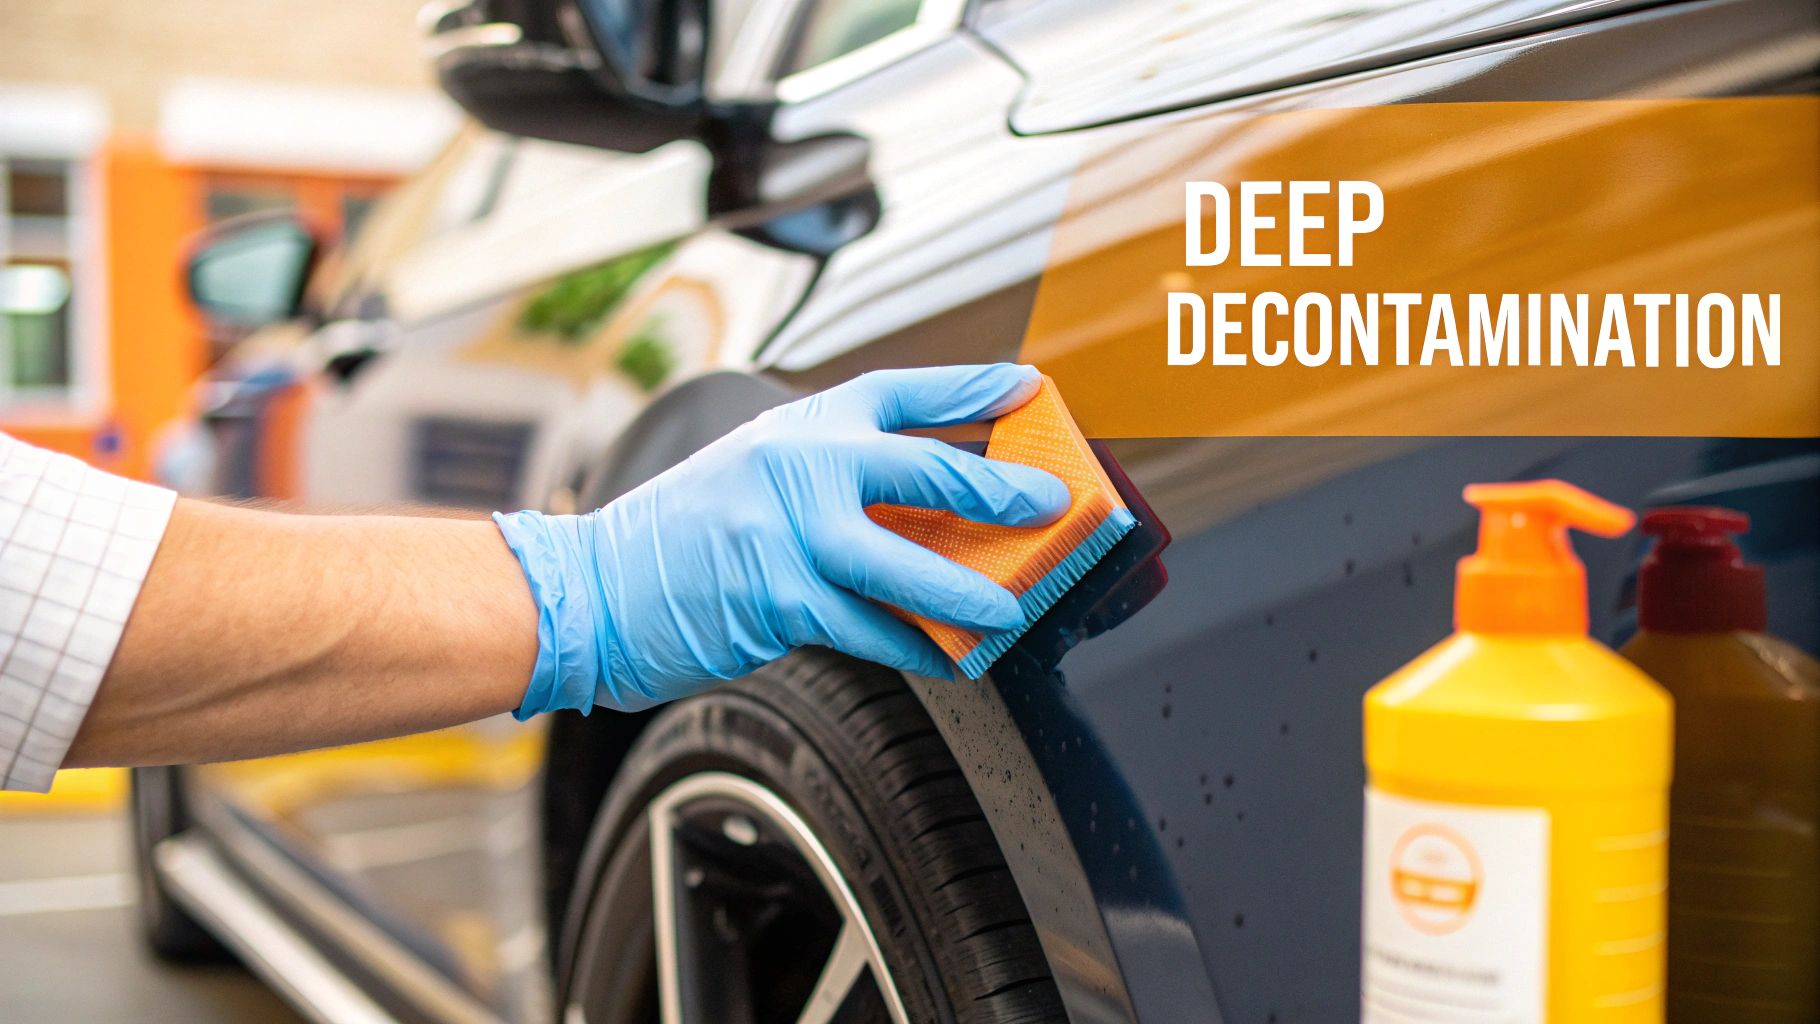
Removing What the Eye Cannot See
Even after a meticulous wash, your car’s paint isn't truly clean. Go ahead, run your hand over the surface. For a more telling test, slide your hand into a thin plastic sandwich bag first and then feel the paint. Feel that gritty, rough texture? Those are bonded contaminants that soap and a wash mitt just can't touch.
This is where decontamination comes in, and it's a non-negotiable step in any real detail. We're going to deep-clean the clear coat by removing all that embedded gunk. It's a two-phase attack: first, a chemical spray to dissolve nasty metal particles, then a physical pass to lift away everything else. If you skip this, you're just grinding those contaminants deeper into the paint when you polish, or worse, trapping them under your wax or sealant.
The Chemical Cleanse: Iron Removers
Our first move is a chemical one. Your car is constantly getting showered with tiny, airborne iron particles from things like brake dust (yours and everyone else's) and industrial fallout. These sharp little bits dig into your clear coat, oxidize, and create tiny rust spots that can cause permanent damage down the road.
An iron remover is the right tool for this job. It’s a pH-balanced chemical made specifically to dissolve these ferrous metals without messing with your paint.
- How it works: The active ingredients trigger a chemical reaction with any iron particles, breaking them down into a solution you can just rinse away.
- The "Bleeding" Effect: This is the cool part. As the spray works its magic, it changes color to a deep purple or red, making it look like your car is "bleeding." This is your visual proof that the product is actively dissolving the iron.
Using it is simple. Just spray it liberally onto a cool, dry panel. Let it sit for a few minutes (check the bottle for exact times), but never let it dry. Once you see the purple streaks form, give the panel a thorough rinse with a strong stream of water.
The Mechanical Polish: Clay Bar Treatment
With the metals gone, it's time to handle everything else. I'm talking about the stubborn stuff an iron remover won't get: tree sap, road tar, paint overspray, and all that other gritty residue. For this, the detailing clay bar is your best friend.
A clay bar is basically an engineered resin compound that gently shears off and pulls out anything sticking up from the paint's surface. Think of it like a lint roller for your car; it grabs the junk without hurting the paint underneath.
Using a clay bar is the secret to getting that truly pristine, glass-smooth surface. It’s what creates the perfect foundation for polish and wax to bond to, giving you a much better and longer-lasting result.
To get started, you just need three things: a clay bar, a good clay lubricant, and a clean microfiber towel. The lubrication is absolutely essential. Using a clay bar on a dry surface will mar your paint, no question. A dedicated clay lube is best, but a quality quick detailer spray will also work in a pinch.
Mastering the Clay Bar Technique
The process itself is pretty straightforward, but it’s all about a gentle touch.
- Prep the Clay: Tear off a small piece of the clay bar, maybe a third of the whole thing. Knead it in your hands and flatten it into a small pancake that fits in your palm. I always recommend breaking it up—if you drop a piece on the ground, you can just toss that small section instead of the entire bar.
- Lube the Surface: Work in small, 2x2 foot sections. Spray the clay lubricant generously over the area. You really can't use too much here; more is better.
- Glide, Don't Scrub: Gently glide the clay over the lubricated paint in straight, overlapping lines. Don't apply pressure; let the clay itself do the work. At first, you'll feel and maybe even hear it grabbing the contaminants. As the surface gets clean, it will glide smoothly and silently.
- Inspect and Fold: After each section, look at the surface of the clay. It'll be covered in tiny specks it just pulled from your paint. Fold the dirty clay in on itself to expose a fresh side, and move on.
- Wipe and Check: Once a section feels perfectly smooth, use a clean microfiber towel to wipe away the leftover lubricant. Now, do the plastic bag test again. The difference will be night and day.
By knocking out this two-part decontamination, you’ve prepared the perfect canvas for the next steps. For an even deeper dive, our complete guide explains exactly how to clay bar your car to get that flawless, glass-like finish. Now your paint is truly clean and ready for polishing.
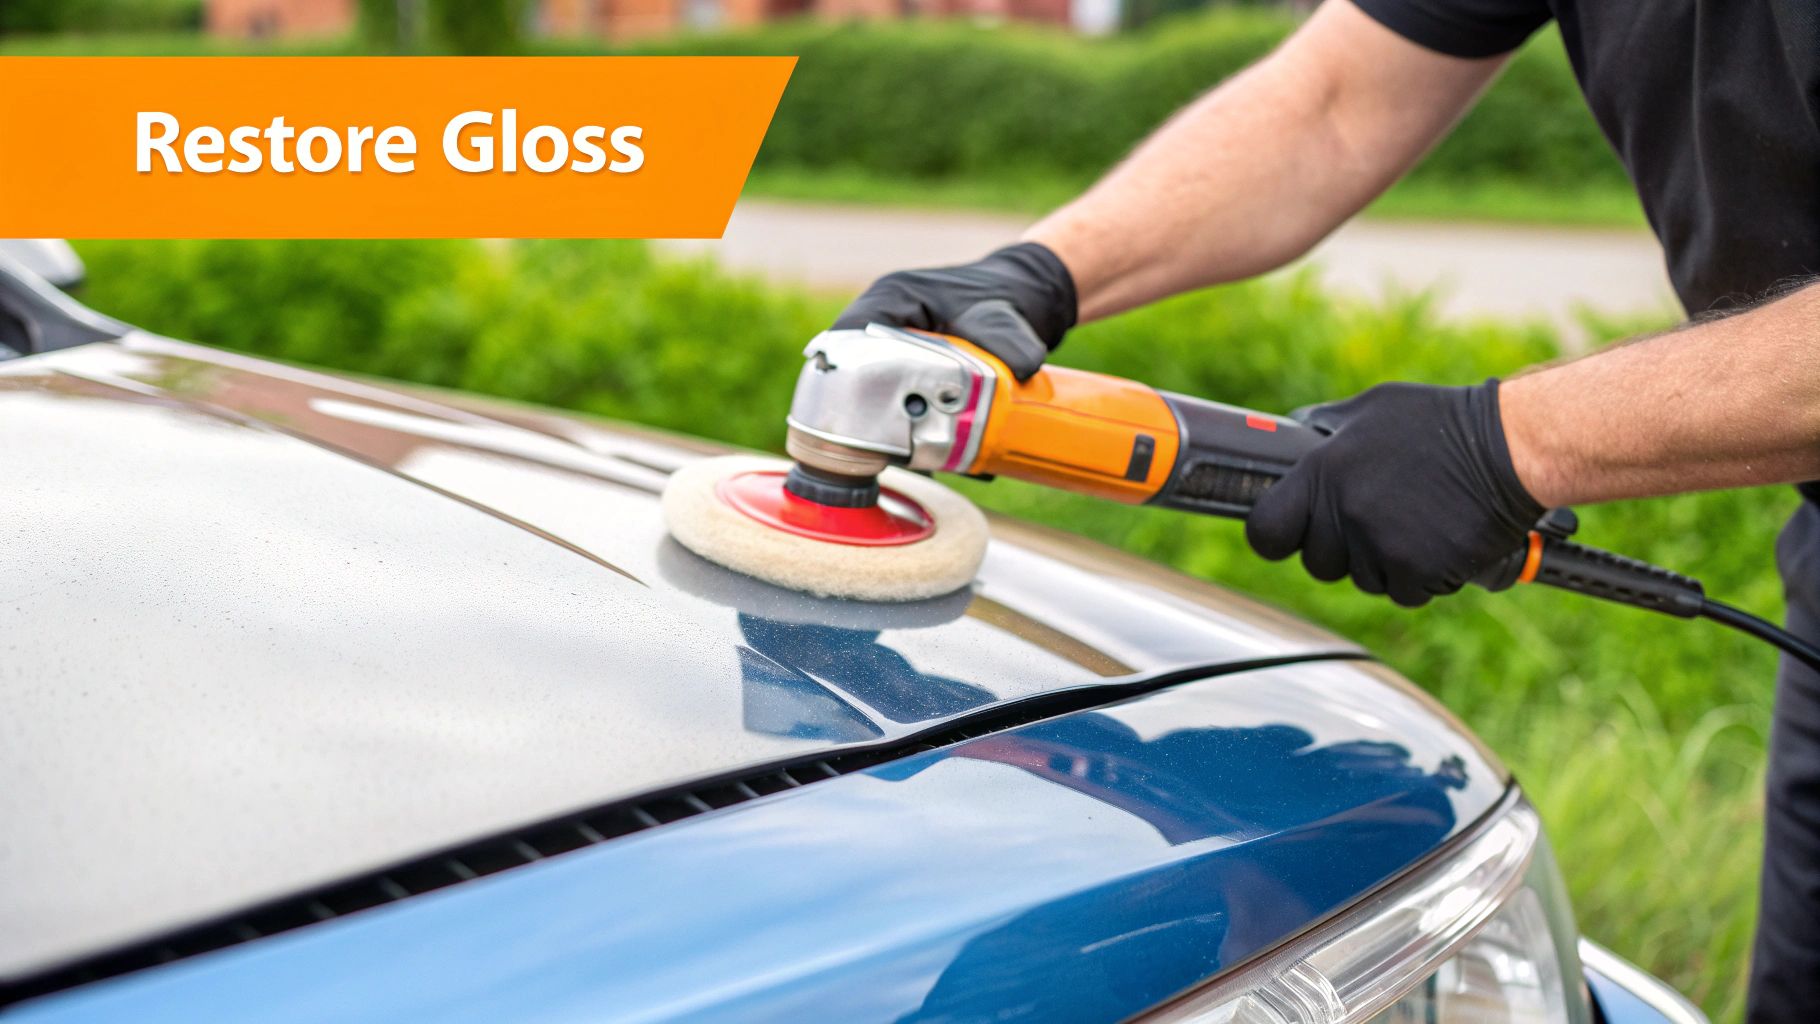
Restoring Clarity and Gloss with Polishing
Now that your car’s paint is perfectly clean, we get to the fun part—the step that truly makes the biggest visual impact: polishing. This is where we physically erase the imperfections that make a car look tired and dull. We're talking about those frustrating swirl marks, light scratches, and water spots that have built up over time. Polishing gets rid of all that, revealing the deep, rich color hiding underneath.
Think of your clear coat as a smooth piece of glass. Daily driving covers it in millions of microscopic scratches. On their own, they're tiny, but together they scatter light in every direction instead of reflecting it back cleanly. Polishing smooths that surface back out, restoring that sharp, mirror-like shine you’re after.
Hand Polishing vs. Machine Polishing
Your first big decision is how to tackle the job. Can you polish by hand? Absolutely. It’s great for adding a bit of gloss and clearing up very light hazing. But if you want to get rid of visible swirl marks and actual scratches, a machine is really the only way to go.
A modern dual-action (DA) polisher is a surprisingly safe and effective tool, even if you’ve never used one before. It oscillates in a random pattern, which keeps you from building up too much heat and burning the paint—a common fear with old-school rotary buffers. For anyone serious about detailing, a quality DA polisher is a total game-changer.
Understanding Compounds and Polishes
Polishing products are essentially liquid sandpaper. They use tiny abrasives to gently level the clear coat. They range from aggressive compounds that remove deep defects to fine polishes that just add gloss.
- Cutting Compounds: These have larger, sharper abrasives. They’re designed to knock down heavy swirl marks, deeper scratches, and oxidation. They work fast but can leave their own light haze behind, often called micro-marring.
- Finishing Polishes: These use much finer, gentler abrasives. Their job is to clean up any haze left by a compound and refine the finish to a jaw-dropping, high-gloss shine.
If your car just has moderate swirls, a good "one-step" polish that balances cutting power and finishing ability is often the perfect solution. For a seriously neglected car, you’ll likely need a two-step process: compound first, then follow up with a polish.
The golden rule of paint correction is simple: use the least aggressive method necessary. Your clear coat is finite, and the goal is to preserve as much of it as possible. This is why the next step is so critical.
The All-Important Test Spot
Before you even think about polishing the whole car, you have to do a test spot. Pick a small, 2x2 foot area on a flat panel like the hood or trunk. This is your lab, where you’ll figure out the right combination of polish and pad to get the results you want.
Imagine starting with a heavy cutting compound on paint that only has light swirls—you’d be removing way more clear coat than needed. A test spot prevents this. It allows you to start with a light polish and only increase the aggressiveness if the defects aren’t coming out.
Mastering the Polishing Technique
Once you've dialed in a combo that works on your test spot, you're ready to replicate that process across the rest of the car.
- Tape It Off: Use detailing masking tape to protect sensitive areas like black plastic trim, rubber seals, and emblems. Polish can stain trim, and paint is thinnest on panel edges, making them easy to burn through.
- Prime the Pad: Squeeze 3-4 pea-sized drops of polish onto your pad. Don't go crazy here; too much product just makes a mess and actually hinders performance.
- Spread the Love: With the machine off, gently dab the pad across your working section. This spreads the polish out and prevents it from slinging everywhere the second you turn the polisher on.
- Use a Cross-Hatch Pattern: Start the machine on a low speed (like 1 or 2) to spread the polish a bit more. Then, crank it up to your working speed (usually 4-5 on a DA) and get to work. Move the polisher slowly in overlapping horizontal passes, then follow with overlapping vertical passes. This is the classic cross-hatch pattern that ensures even correction.
- Let the Polish Work: Apply just enough downward pressure to keep the pad spinning. As you work the area, the polish’s abrasives break down, and you’ll see the product go from a thick haze to a thin, almost clear film. That’s your signal it’s done its job.
- Wipe and Inspect: Turn the machine off before lifting it off the paint. Grab a clean microfiber towel and wipe away the residue. Use a bright light to check your work and make sure the defects are gone.
Just repeat this process, panel by panel, until the whole vehicle is done. It’s meticulous work, but the visual payoff is enormous. For a deeper dive into the tools and methods, our complete guide on how to polish car paint has even more pro tips. This is how you get that flawless, mirror-finish, ready for its final layer of protection.
Locking In Your Hard Work with Protection
You've done the heavy lifting. The hours of washing, claying, and polishing have paid off, and your car's paint is practically glowing with a depth it hasn't had in years. This is the moment where the real magic happens, but it's also when your paint is most vulnerable. Now, it's time to lock in that flawless finish with a tough protective layer.
Think of this final step as a shield. It's the only thing standing between your pristine paint and the onslaught of UV rays, bird droppings, road grime, and acid rain. Without it, all that hard work could be undone in just a few weeks. The product you choose here will define not just how your car looks, but how long it stays looking that good.
Choosing Your Shield: Waxes vs. Sealants vs. Coatings
Your main choices for protection fall into three camps, and each has its own personality. Figuring out their differences is the key to picking the right one for your car, your budget, and how much time you're willing to commit.
Traditional Carnauba Waxes
These are the old-school romantics of the detailing world. Made from the Brazilian Carnauba palm, these waxes give you a deep, warm, wet-looking glow that’s tough to beat. They’re a joy to apply and bead water like crazy. The trade-off? Their beauty is temporary; you'll get 1-3 months of protection, at best.
Synthetic Paint Sealants
Sealants are the modern workhorses. These are man-made polymers that chemically bond to your paint, creating a slick and durable shell. They offer a sharper, more reflective shine than wax and last significantly longer—typically 4-6 months, sometimes even more.
Ceramic Coatings
These are the undisputed champions of paint protection. A ceramic coating is a liquid polymer that cures into a hard, glass-like layer over your clear coat. It provides incredible resistance to chemicals, UV damage, and even light scratches. The shine is crisp, and the water-repelling (hydrophobic) effect is extreme. While they take more effort to apply correctly, a single application can last for 2 years or more.
The Bottom Line: For pure, show-car beauty on a short-term basis, pick a wax. For an excellent balance of shine and longevity, a sealant is your go-to. For the absolute best in long-term, rugged protection, a ceramic coating is the clear winner.
Applying Your Protection for a Flawless Finish
No matter which product you land on, the core principle is the same: thin is in. Piling on a thick coat won't add more protection; it just makes the product a nightmare to remove and wastes your money. Always work on a clean, cool panel out of direct sunlight.
Here's the general game plan:
- Use a Foam Applicator Pad: Squeeze a small amount of product onto a soft foam or microfiber applicator.
- Work in Small Sections: Focus on a 2x2 foot area at a time, using gentle, overlapping motions to get even coverage.
- Apply a Thin, Even Coat: You should barely be able to see the product on the surface. If you can easily write your name in it, you've used way too much.
- Follow Curing Instructions: This is non-negotiable. Every product has a specific "hazing" or curing time before you can wipe it off. Follow the manufacturer's directions to the letter. Wiping it off too soon or too late can leave you with a streaky, blotchy mess.
- The Final Buff: Grab a plush, clean microfiber towel and gently buff away the residue. You'll reveal a slick, protected surface underneath. Remember to flip your towel to a clean side often to avoid re-introducing residue.
This level of meticulous care isn't just for enthusiasts anymore. The convenience of professional work has led to huge growth in the mobile detailing sector, which is projected to expand at a CAGR of 8-9% in major markets through 2035. As our lives get busier, more people are turning to experts to maintain their vehicles.
Don't Forget the Finishing Touches
A truly pro-level detail goes beyond the paint. These final steps are what separate a good job from a great one.
Tires and Trim
Your freshly polished paint will make faded plastic trim and dull, brown tires stick out like a sore thumb.
- Trim Restoration: Use a dedicated plastic trim restorer to bring back that deep, rich black on your bumpers, mirror housings, and window trim.
- Tire Dressing: Apply a quality tire dressing for a clean, satin-black finish. This not only looks fantastic but also helps protect the rubber from drying and cracking. Stay away from the overly glossy, sling-prone gels that make a mess of your paint.
Glass Cleaning
Streaky, hazy windows can ruin an otherwise perfect detail. Use an ammonia-free automotive glass cleaner and the two-towel method: one towel to apply and clean, and a second, dry towel for a final, streak-free buff.
By taking the time to apply these protective measures, you're doing more than just preserving a shine. You're investing in how to make your car last longer and maintain its value for years to come.
Answering Your Top Car Detailing Questions
When you're diving into the world of proper car detailing, a few questions always seem to pop up. Getting the right answers can be the difference between a stunning finish and a lot of wasted effort. Let's clear up some of the most common ones I hear.
How Often Should I Really Detail My Car?
This is probably the biggest question out there. While it's tempting to think more is always better, going all-out with a full correction every few months is overkill and can actually thin out your clear coat over time.
Think of a complete, multi-stage detail—the whole nine yards with decontamination, polishing, and sealing—as a major reset for your car. This is something you should only need to do once or twice a year.
The real secret is what you do in between. A safe, two-bucket wash every one to two weeks is your best defense against the grime that wants to permanently bond to your paint. Of course, life isn't that simple, and your schedule might need to change based on:
- Your Climate: If you're dealing with road salt in the winter or baking sun in the summer, you'll need to wash more often.
- Where You Park: A car that lives in a garage is protected. One that sits under a tree or on the street is constantly under attack.
- How You Drive: A daily highway commute will cake on far more dirt than a gentle weekend cruise.
A good sealant or a ceramic coating is your best friend here. It acts as a tough barrier, stretching the time between those big detailing sessions and making your regular washes much easier.
Can I Just Use Dish Soap to Wash My Car?
Let me be crystal clear: absolutely not. This is one of the most common and damaging mistakes you can make. It might seem like a cheap and easy solution, but you'll pay for it later.
Dish soaps are incredible degreasers. They're designed to obliterate every last bit of oil and grease from your dinner plates. When you put that on your car, it does the exact same thing—it strips away all the wax or sealant you worked so hard to apply.
Once that protective layer is gone, your clear coat is left naked and exposed to the elements. This massively speeds up oxidation and fading. Always, always use a dedicated, pH-neutral car wash soap.
What's the Real Difference Between Wax and a Sealant?
The main distinction here boils down to what they're made of and how long they last.
- Waxes: These are usually made from natural stuff, like carnauba wax. They give your paint a gorgeous, deep, warm glow that many purists love. The trade-off is durability; you'll typically only get 1-3 months of protection.
- Sealants: These are synthetic polymers, engineered in a lab to create a chemical bond with your paint. This creates a slick, hard shell that offers a sharp, glassy shine and lasts much longer—think 4-6 months or even more.
And if you want to take it a step further, ceramic coatings offer a semi-permanent layer of protection that can last for years.
Here's a simple way to remember it: Wax sits on top of the paint. A sealant chemically bonds with the paint. That bond is why sealants offer superior protection and longevity.
Do I Actually Need to Use a Clay Bar?
If you're serious about getting a perfectly smooth finish and making your wax or sealant last, then yes, you absolutely do. Washing alone, no matter how thorough, can't pull out the embedded contaminants stuck in your clear coat.
Think about it—trying to polish a gritty surface just grinds those tiny particles deeper into the paint. Trying to apply a sealant over them means it can't bond properly and will fail much sooner.
The clay bar step is what creates a truly clean slate. It ensures every step that follows—polishing, sealing, waxing—can do its job to the best of its ability.
Ready to elevate your wash game? The SwiftJet foam gun is the easiest way to give your car a safer, more effective clean right from your garden hose, laying the perfect foundation for every detail.