
Washing your car seems simple, but achieving that flawless, scratch-free shine you see at professional detail shops requires more than just soap and water. It's about using the right techniques and tools to protect your vehicle's paint while efficiently removing dirt and grime. Many common mistakes, like washing in direct sunlight or using the wrong towel, can lead to swirl marks, water spots, and a dull finish. This guide provides 8 professional car washing tips that go beyond the basics. We'll break down proven methods used by experts, from the initial pre-rinse to the final spot-free dry.
A key part of this professional approach is using a thick, lubricating foam to lift dirt away safely, a task made effortless with a tool like the SwiftJet Car Wash Foam Gun. By following these steps, you can elevate your routine, protect your investment, and achieve a durable, showroom-quality clean every time you wash your car in your own driveway. Forget lackluster results. You will learn specific, actionable strategies that prevent damage and maximize shine, transforming your standard wash into a meticulous detailing session. This list will equip you with the knowledge to maintain your vehicle's appearance and value with confidence.
1. Master the Two-Bucket Method to Prevent Scratches
If you’re still washing your car with a single bucket of soapy water, you’re unintentionally grinding dirt and grit back into your paint. The two-bucket method is a foundational technique used by professional detailers to prevent the swirl marks and fine scratches that dull your car’s finish over time. This approach isolates clean, soapy water from contaminated rinse water, ensuring your wash mitt is always clean before it touches your vehicle’s surface.
This simple yet effective separation is one of the most crucial car washing tips for maintaining showroom-quality paint. The process involves one bucket for your car wash shampoo solution and a second bucket filled with plain water for rinsing. After cleaning a single panel, you dunk and agitate the dirty wash mitt in the rinse bucket, dislodging harmful abrasive particles before reloading it with fresh suds from the wash bucket.
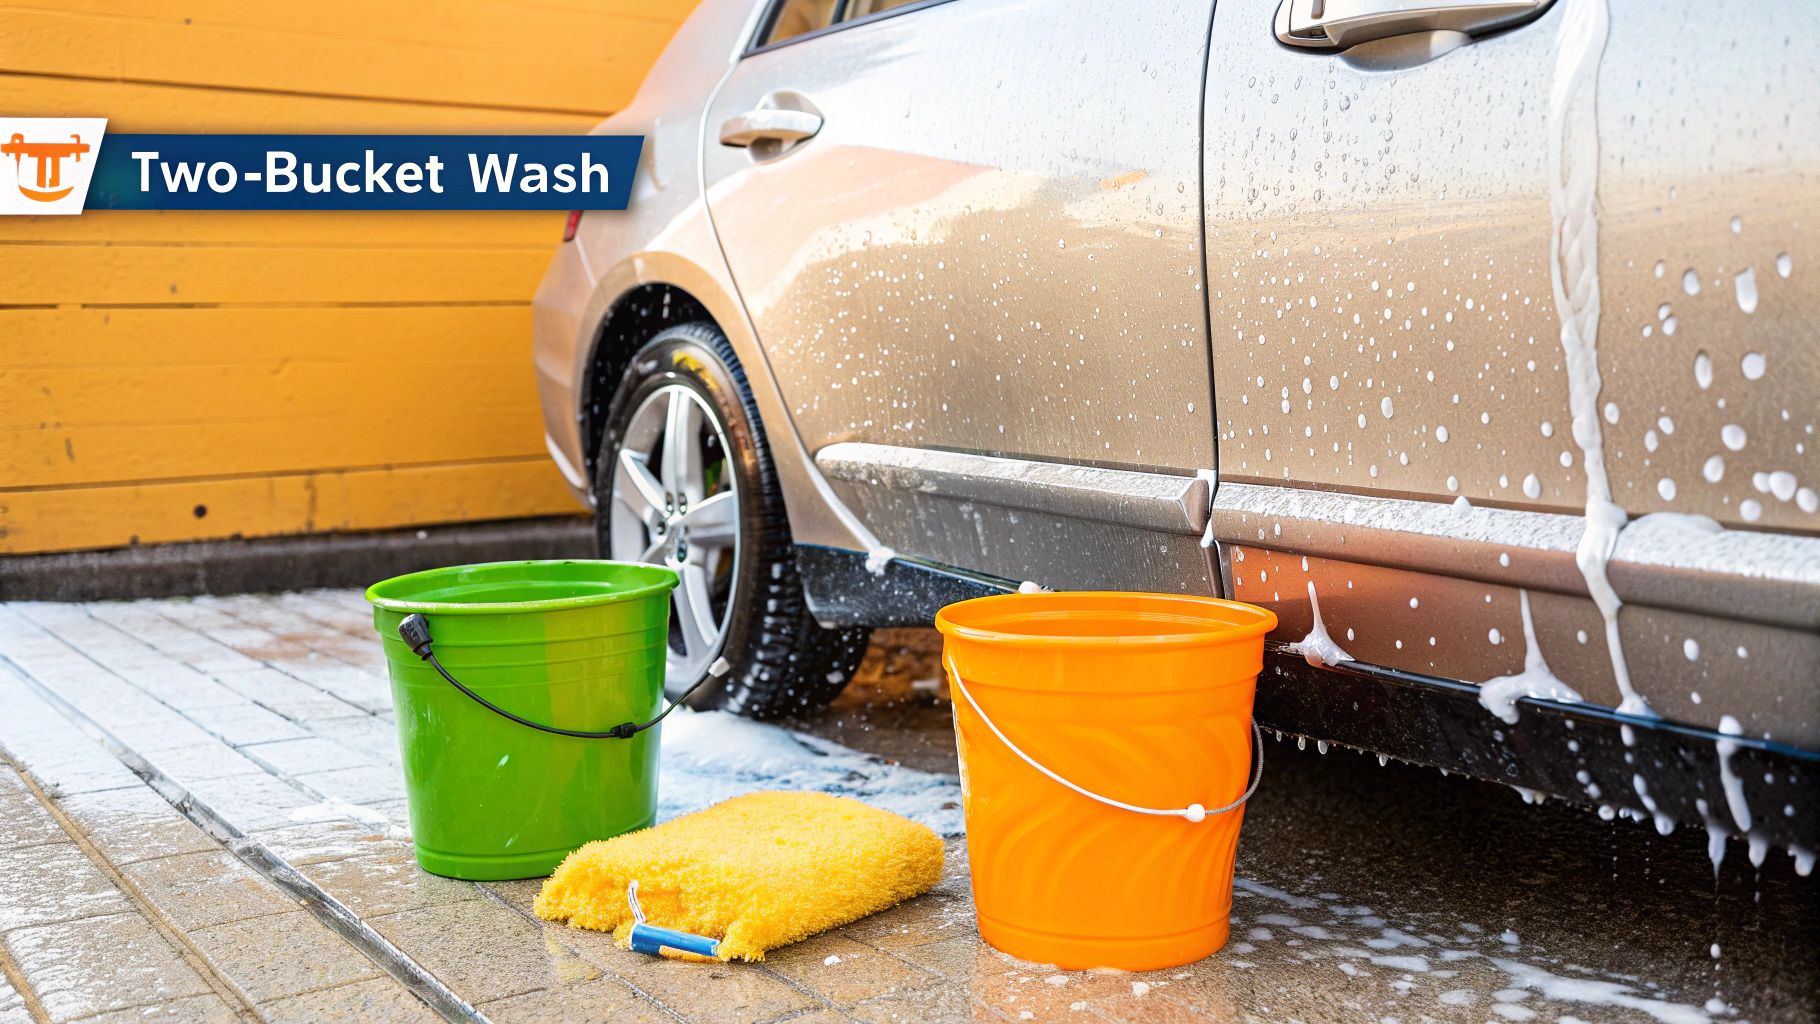
How to Implement the Two-Bucket Method
To elevate your washing routine, follow these actionable steps for a flawless, scratch-free finish:
- Pre-Rinse is Key: Before your mitt ever touches the paint, use a foam cannon like the SwiftJet Foam Gun to apply a thick layer of pre-wash foam. This initial step lifts and encapsulates heavy dirt, allowing you to rinse it away and drastically reduce the amount of grit your wash mitt will encounter.
- Use Grit Guards: Place a grit guard at the bottom of both your wash and rinse buckets. These simple inserts create a barrier that traps dirt particles at the bottom, preventing them from being stirred up and reintroduced to your clean mitt.
- Work Top-Down: Always wash your car from the top to the bottom. Gravity pulls dirt downward, so cleaning the roof, windows, and hood first ensures you aren't dragging grime from lower, dirtier panels (like rocker panels and bumpers) onto cleaner upper surfaces.
2. Work in Shade and Cool Conditions
Washing your car under the blazing sun is a recipe for a frustrating finish. Direct sunlight and high surface temperatures cause water and soap to evaporate almost instantly, leaving behind stubborn water spots and unsightly soap residue before you even have a chance to rinse. Working in the shade or during cooler parts of the day is a fundamental car washing tip that ensures a smooth, streak-free result and protects your vehicle’s finish.
This simple adjustment in your routine allows cleaning solutions to work as intended, giving you ample time to wash, rinse, and dry each section properly. By avoiding heat-related complications, you prevent mineral deposits from etching into your clear coat and soap scum from bonding to the paint. This approach guarantees that your efforts result in a brilliantly clean car, not a surface covered in spots and streaks.
How to Implement Washing in Ideal Conditions
To avoid the pitfalls of a hot wash, incorporate these actionable steps into your process for a flawless finish:
- Time Your Wash Strategically: The easiest way to avoid direct sun is to wash your car in the early morning or late evening when the sun is less intense. Professional mobile detailers often schedule their appointments during these cooler windows to ensure the best results.
- Create Your Own Shade: If you don't have access to a garage or a naturally shaded spot, consider a temporary solution like a pop-up canopy. Even parking in the shadow of your house can make a significant difference in the surface temperature of your vehicle.
- Cool the Surface First: Before applying any products, feel the car's surface with your hand. If it’s hot to the touch, give it a thorough rinse with cool water. Using a foam cannon like the SwiftJet Foam Gun to apply a layer of pH-neutral foam can also help cool the panels while starting the cleaning process, ensuring your soap doesn't dry prematurely.
- Work in Smaller Sections: When washing in warmer conditions is unavoidable, divide the car into smaller, more manageable sections. Wash, rinse, and dry one small area completely (e.g., half the roof or one door) before moving to the next. This prevents any section from air-drying before you can attend to it.
3. Pre-Rinse and Pre-Treatment Are Non-Negotiable
Diving straight in with a soapy mitt is a recipe for paint damage. Before you even think about the main wash, a thorough pre-rinse and pre-treatment stage is essential for lifting heavy, abrasive contaminants safely. This critical first step involves rinsing the entire vehicle to dislodge loose dirt, sand, and mud, followed by applying targeted treatments that break down stubborn grime like bugs, tar, and road film. By doing the heavy lifting chemically, you minimize the physical scrubbing required later, drastically reducing the risk of scratches.
This preparatory phase is one of the most impactful car washing tips for achieving professional results. It ensures that by the time your wash mitt makes contact, the most dangerous particles have already been removed. Specialized products like snow foam, citrus-based degreasers, and iron fallout removers work on a molecular level to dissolve bonded contaminants, making the subsequent hand wash safer and more effective. For example, a thick layer of snow foam encapsulates dirt, allowing it to be rinsed away without any harsh scrubbing.
How to Implement Pre-Rinse and Pre-Treatment
To properly prepare your vehicle’s surface and ensure a safe wash, follow these actionable steps:
- Foam First for a Touchless Pre-Wash: The most effective pre-treatment is applying a thick blanket of snow foam. Using a foam cannon like the SwiftJet Foam Gun creates a dense, clinging foam that has extended "dwell time," allowing its cleaning agents to break down traffic film and grime effectively. Let it sit for several minutes before rinsing to lift the majority of dirt off without a single touch.
- Target Stubborn Contaminants: After the initial foam and rinse, inspect the vehicle for remaining trouble spots. Apply a dedicated bug and tar remover to the front bumper and mirrors, or an iron fallout remover to wheels and lower body panels to dissolve embedded metallic particles. Always follow the product-specific instructions for dwell time.
- Rinse Thoroughly from Top to Bottom: Use a pressure washer or strong hose nozzle to rinse away the pre-treatment products and loosened debris. Always work from the top of the vehicle down. This uses gravity to your advantage, ensuring that dirt flows down and off the car, preventing recontamination of already rinsed upper panels. Pay extra attention to wheel wells, rocker panels, and behind the license plate, where dirt loves to hide.
4. Top-to-Bottom Washing Sequence
Washing your car out of order is like mopping a floor before you dust the shelves; you’re just creating more work and compromising your results. The top-to-bottom washing sequence is a fundamental principle that leverages gravity to your advantage. By starting at the roof and working your way down, you ensure that dirt and grime are systematically washed away from clean areas, rather than being redeposited onto them.
This systematic approach prevents the cross-contamination of grit from the dirtiest parts of your car, like the wheels and lower body panels, onto the more sensitive upper surfaces. Professional detailers and even automated car washes are designed around this logical flow, as it’s the most efficient way to achieve a thoroughly clean vehicle without introducing new scratches. Adhering to this order is one of the easiest yet most impactful car washing tips you can adopt.
This infographic illustrates the proper sequence for washing your vehicle to maximize efficiency and prevent re-soiling.

Following this simple three-stage process ensures that contaminants are consistently moved downward and away from the vehicle.
How to Implement the Top-to-Bottom Sequence
Integrate this professional workflow into your routine with these actionable steps for a smarter, more effective wash:
- Pre-Wash the Entire Vehicle: Before you begin washing by hand, use a foam cannon like the SwiftJet Foam Gun to cover the entire car in a thick layer of suds. This pre-soak loosens dirt everywhere, making the subsequent top-down wash much safer and more effective as grime will rinse off more easily.
- Divide and Conquer: Mentally divide your vehicle into sections: roof, windows, hood/trunk, upper side panels, and finally, the lower panels and bumpers. Wash and rinse one section at a time before moving down to the next to prevent soap from drying on the surface.
- Save Wheels and Tires for Last: The wheels and tires are almost always the dirtiest part of your vehicle. By washing them last with a separate set of brushes and mitts, you avoid transferring abrasive brake dust and road tar to your vehicle’s delicate paintwork.
5. Use Proper Washing Tools and Techniques
The most advanced cleaning chemicals are only as effective as the tools used to apply them. Using worn-out sponges, old bath towels, or aggressive brushes on your paintwork is a surefire way to inflict scratches and swirl marks, undoing all your hard work. Selecting and using the right washing tools is a fundamental car washing tip that separates an amateur wash from a professional detail, ensuring you clean effectively without causing damage.
Employing purpose-built tools, like soft microfiber wash mitts and dedicated wheel brushes, is crucial for protecting your vehicle’s delicate finish. Each tool is designed for a specific task, from gently lifting dirt off paint to safely agitating grime on durable surfaces like tires. By using the correct tool with the right technique, you let the tool and the soap do the heavy lifting, minimizing physical force and reducing the risk of abrading the clear coat.
How to Select and Use the Right Tools
To integrate professional-grade tools and techniques into your wash routine, follow these actionable steps:
- Choose the Right Mitt: Opt for a deep-pile microfiber wash mitt for painted surfaces. Its long, soft fibers pull dirt particles away from the surface, trapping them deep within the mitt instead of dragging them across the paint. This is far safer than a flat sponge, which can trap grit against the surface and cause scratches.
- Wash with Straight-Line Motions: Avoid the classic "wax-on, wax-off" circular motions. Instead, wash one small section at a time using gentle, straight-line motions, either front-to-back or top-to-bottom. This method is less likely to create noticeable swirl marks if a stray piece of grit gets caught in your mitt.
- Use Dedicated Tools for Dirty Areas: Your wheels and tires are the dirtiest parts of your car. Never use the same wash mitt on your wheels and paint. Designate a separate set of tools, like tough boar’s hair brushes and durable microfiber towels, exclusively for wheels, tires, and exhaust tips to prevent cross-contamination of brake dust and heavy road grime.
- Let the Foam Do the Work: The thick, clinging suds produced by a foam cannon like the SwiftJet Foam Gun provide essential lubrication. This slick barrier allows your wash mitt to glide effortlessly across the surface with minimal pressure, significantly reducing friction and the potential for scratches.
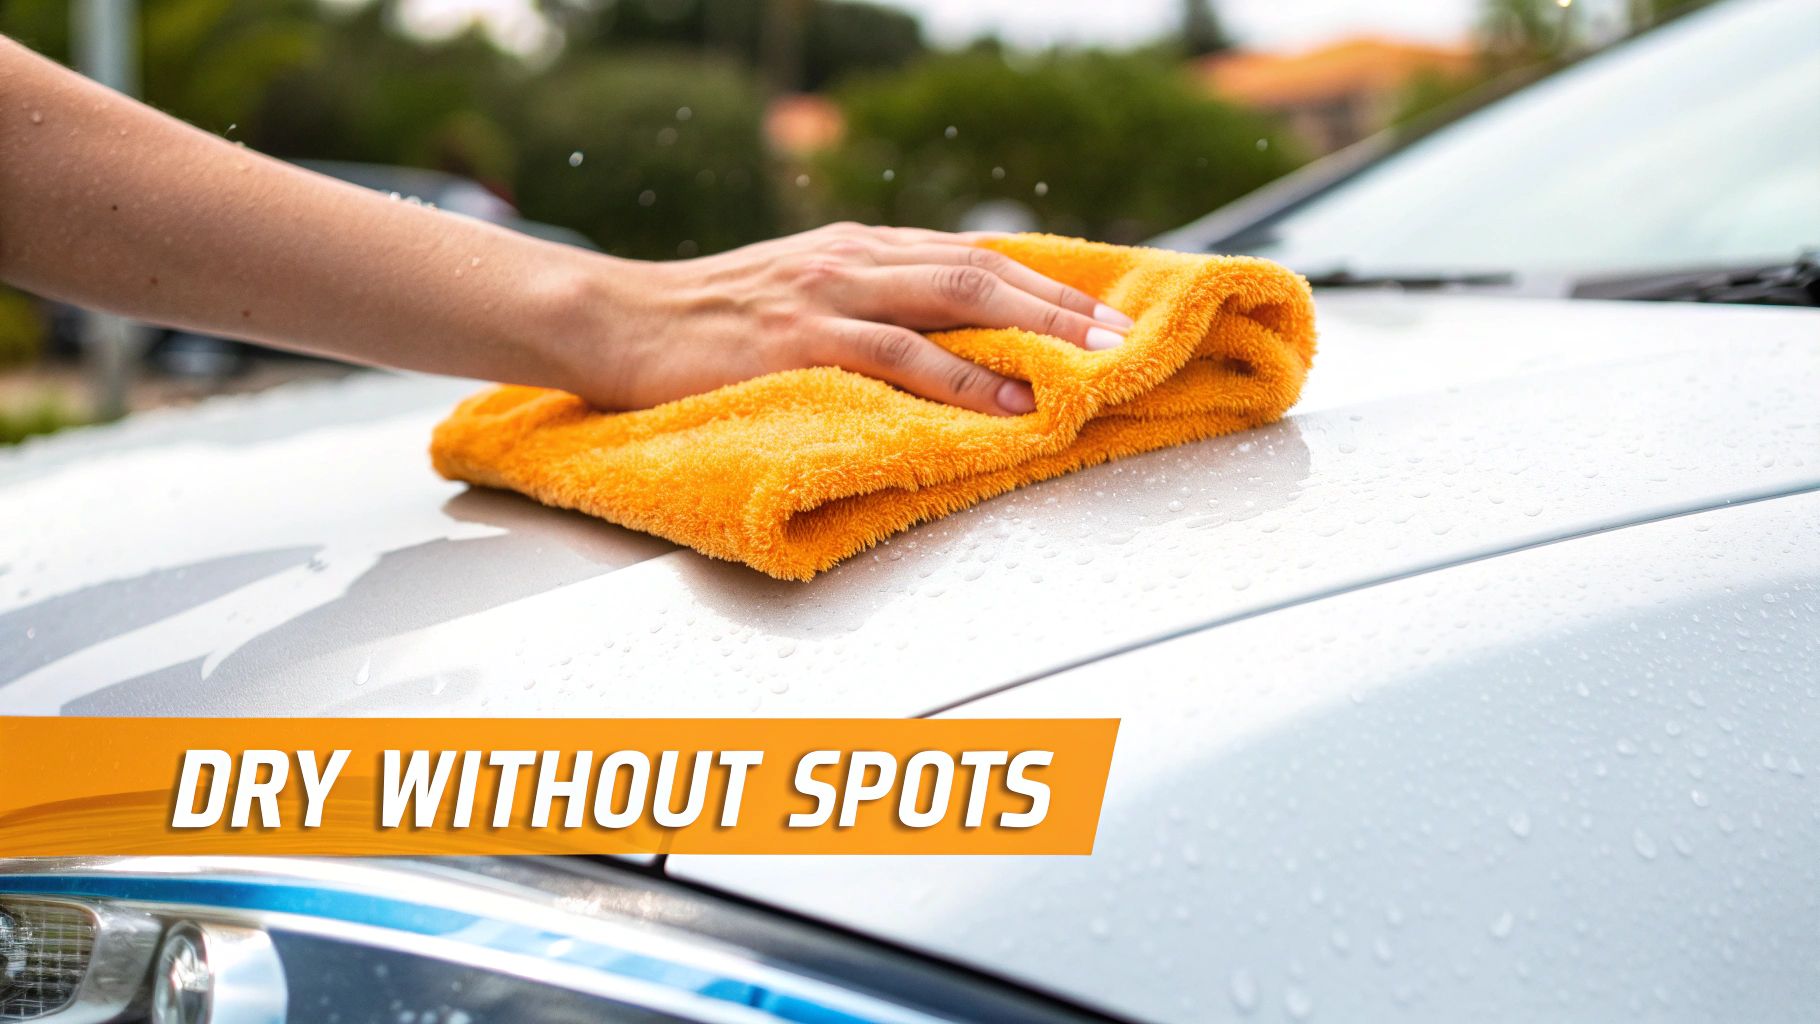
6. Implement Proper Drying Techniques to Avoid Water Spots
Your car wash isn't finished until the vehicle is completely dry. Allowing your car to air-dry might seem harmless, but it’s a direct invitation for unsightly water spots and mineral deposits to etch into your clear coat. Proper drying is one of the most crucial car washing tips for achieving a flawless, streak-free shine, as it removes lingering moisture before it can mar your freshly cleaned paint.
This final step ensures all your hard work pays off, leaving behind nothing but a brilliant, reflective surface. The goal is to remove water quickly and safely, using tools and methods that minimize contact and prevent the reintroduction of any fine particles. Whether you use ultra-absorbent towels or forced air, the right technique preserves your vehicle’s finish and enhances its final appearance. For a deeper dive into this critical step, you can explore the best way to dry a car after washing on swiftjetusa.com.
How to Dry Your Car Like a Pro
To achieve a spotless finish and protect your paint, incorporate these professional drying methods into your routine:
- Use High-Quality Microfiber Towels: Ditch the old bath towels and chamois. A large, high-GSM (grams per square meter) waffle-weave microfiber towel is the best tool for the job. These towels are designed to absorb massive amounts of water safely. Instead of dragging the towel, use a blotting motion or lay it flat on a panel and gently pull it toward you.
- Employ a Drying Aid: For an extra layer of protection and shine, lightly mist a drying aid or spray wax onto each wet panel before you wipe it down. This lubricates the surface, reducing friction and the risk of scratching, while also adding a temporary layer of hydrophobic protection.
- Leverage Forced Air for Tricky Areas: Water loves to hide in tight spaces like mirror casings, grilles, and emblems, leading to frustrating drips later. A dedicated car dryer or even a leaf blower can be used to blast water out of these crevices, ensuring every part of your vehicle is completely dry.
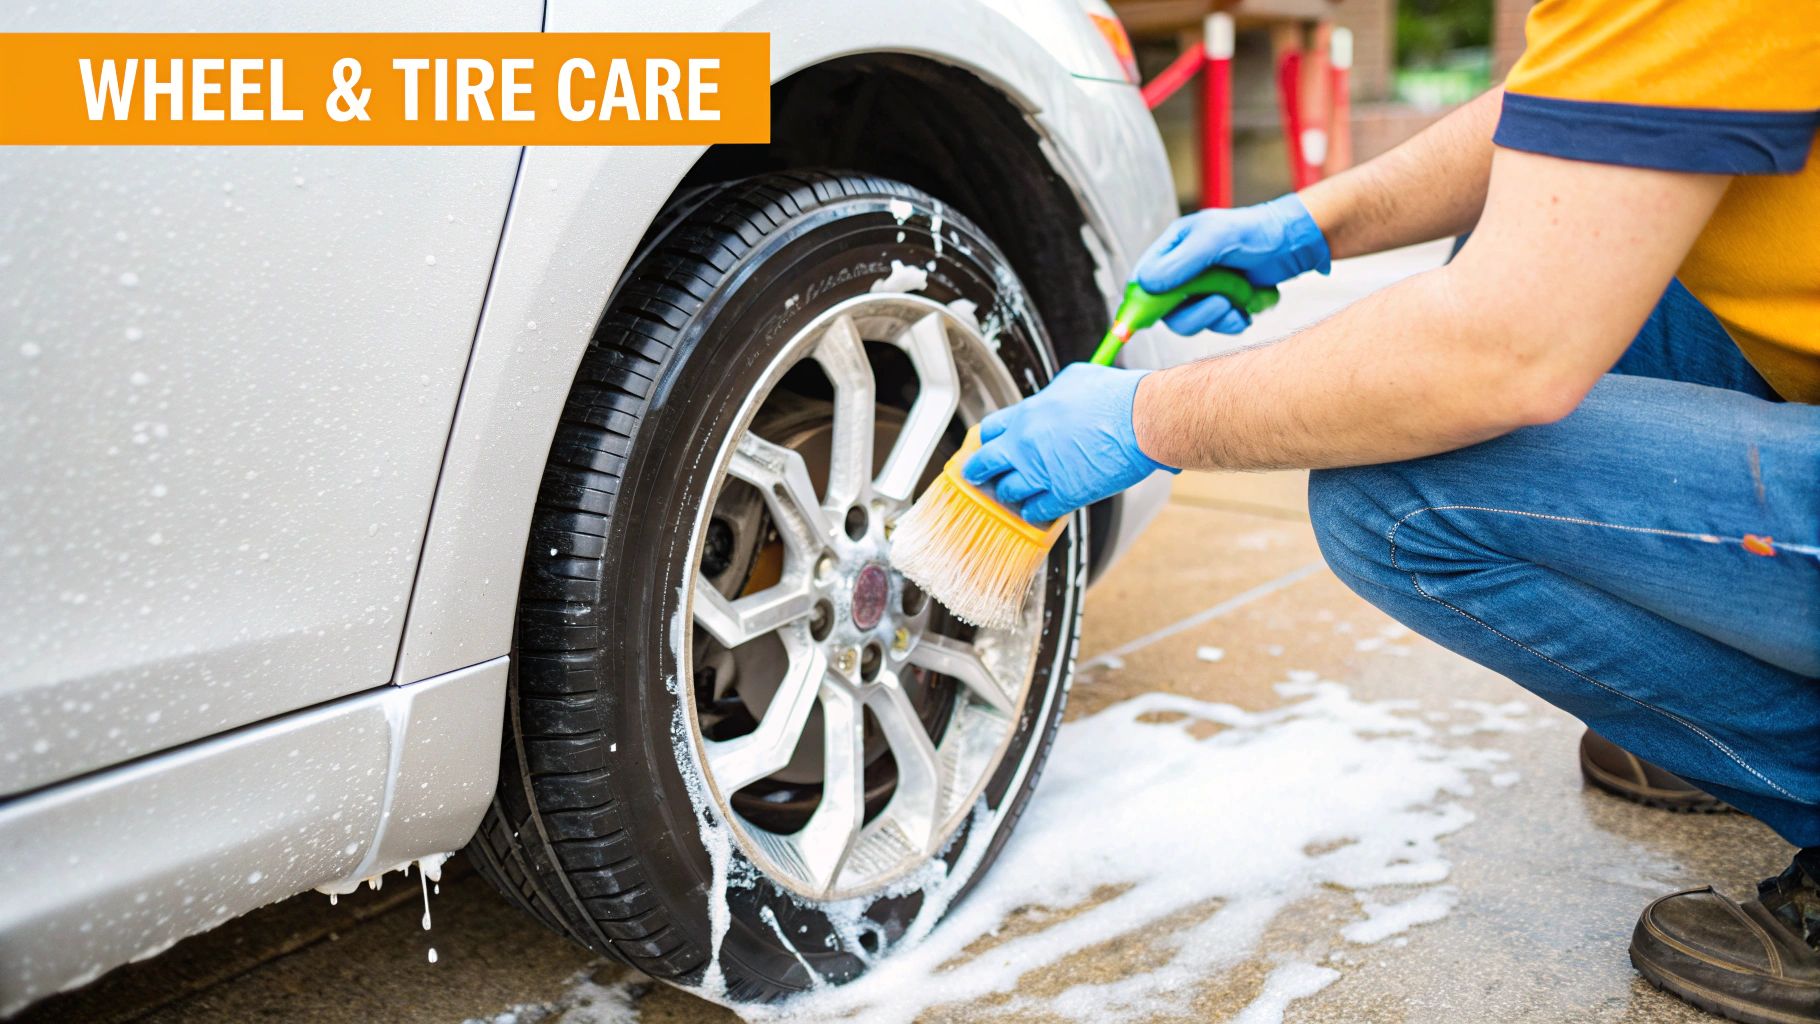
7. Give Your Wheels and Tires Specialized Attention
Your car’s wheels and tires are constantly bombarded with the harshest contaminants on the road, including corrosive brake dust, asphalt, and sticky road grime. Standard car wash soap often isn't strong enough to break down these stubborn materials. Giving your wheels and tires specialized care with dedicated cleaners and tools is a crucial car washing tip that not only enhances your vehicle's appearance but also protects these expensive components from long-term damage.
This focused approach involves using specific products formulated for wheels and tires, which differ greatly from the needs of your vehicle's paint. For a truly thorough cleaning, especially on parts like wheels and tires that accumulate heavy grease and grime, you might want to consult an ultimate guide to degreasing and vehicle maintenance. Using the right chemicals and techniques prevents damage to sensitive wheel finishes and ensures a deep clean that makes the whole car look better.
How to Properly Clean Your Wheels and Tires
To restore the look of your wheels and tires and protect them from future harm, integrate these steps into your washing process:
- Cool Down and Pre-Rinse: Always ensure your wheels are cool to the touch before applying any cleaners. Hot surfaces can cause chemicals to evaporate too quickly, leading to stains or damage. Start by rinsing the wheel and tire thoroughly to remove loose dirt and brake dust.
- Apply a Dedicated Wheel Cleaner: Your foam cannon is not just for paint. Fill your SwiftJet Foam Gun with a pH-neutral, acid-free wheel cleaner and apply a thick, even coat. This method ensures complete coverage, allowing the product to dwell and break down contaminants in hard-to-reach areas like lug nut holes and brake calipers.
- Agitate and Rinse: Use a set of dedicated wheel brushes, separate from your paint wash mitts, to agitate the cleaner. Use a large, soft-bristled brush for the wheel faces and a smaller, more detailed brush for the spokes and inner barrel. Thoroughly rinse the wheel, tire, and wheel well before moving on to the next. Learn more about the best way to clean car rims for a perfect shine.
- Finish with Tire Dressing: Once the wheels are clean and dry, apply a quality tire dressing to protect the rubber from UV damage and give it a rich, dark finish. Apply sparingly with a foam applicator for a clean, non-greasy look.
8. Establish a Regular Maintenance Schedule
Washing your car isn't just about making it look good; it's about preventative maintenance. Establishing a consistent car washing schedule is one of the most effective car washing tips for protecting your vehicle's paint and finish. A regular routine prevents the buildup of corrosive contaminants like bird droppings, bug guts, road salt, and industrial fallout, which can etch into the clear coat and cause permanent damage if left for too long.
A proactive schedule makes each wash faster and more effective because you’re dealing with light, fresh dirt rather than caked-on grime. Your ideal frequency will depend on your driving habits, local climate, and where you park your vehicle. Whether you're a daily commuter exposed to city pollution or a weekend driver on clean suburban roads, a set schedule ensures your car receives the care it needs before minor issues become major, costly problems.
How to Create Your Ideal Washing Schedule
Tailor your car care routine to your specific needs for optimal protection and appearance. Here’s how to determine the right frequency and stick to it:
- Assess Your Driving Conditions: If you’re a daily commuter, especially in an urban area or region with harsh weather, aim for a weekly wash. For those who drive less frequently or in milder conditions, a bi-weekly wash is often sufficient to keep contaminants at bay. You can learn more about how often you should wash your car by reading our complete care guide.
- Adjust for the Season: Winter is especially tough on vehicles due to road salt and de-icing chemicals, which are highly corrosive. Increase your washing frequency during these months, focusing on the undercarriage and lower body panels to neutralize these damaging agents.
- Use a Foam Cannon for Quick Washes: A fast and easy wash is one you're more likely to do regularly. Using the SwiftJet Foam Gun for a touchless pre-wash or a quick maintenance wash allows you to efficiently remove surface-level dirt in minutes, making it simple to maintain your schedule even when you're short on time.
- Keep Quick Detailing Supplies on Hand: For immediate issues like bird droppings or tree sap, use a quick detailer spray and a microfiber towel for spot cleaning. Addressing these contaminants instantly prevents them from baking into the paint and causing lasting damage between full washes.
8 Essential Car Washing Tips Comparison
| Method | Implementation Complexity 🔄 | Resource Requirements ⚡ | Expected Outcomes 📊 | Ideal Use Cases 💡 | Key Advantages ⭐ |
|---|---|---|---|---|---|
| Two-Bucket Wash Method | Medium - requires setup of two buckets, grit guards, and rinse process | Moderate - two buckets, grit guards, wash mitts | High - reduces scratches, swirl marks, professional finish | Enthusiasts, professionals, heavily soiled vehicles | Reduces paint damage; cleaner wash water; cost-effective |
| Work in Shade and Cool Conditions | Low - requires timing and location choice | Low - shaded area or garage, cool water | Moderate - prevents water spots, streaking, better product effectiveness | Hot climates, outdoor washing, summer months | Avoids water spots; extends working time; protects paint |
| Pre-Rinse and Pre-Treatment | Medium - involves additional steps and specialized products | Medium to High - pressure washer, foam cannon, pre-wash solutions | High - removes grime, reduces scratch risk, enhances wash effectiveness | Heavily contaminated vehicles, professional detailing | Loosens dirt; protects paint; improves cleaning quality |
| Top-to-Bottom Washing Sequence | Low to Medium - requires disciplined washing order | Low - no extra tools required | Moderate - prevents recontamination, efficient wash process | All vehicle types, professional protocols | Efficient cleaning; reduces cross-contamination |
| Use Proper Washing Tools and Techniques | Medium - requires learning and tool investment | Medium - quality mitts, brushes, towels | High - minimizes swirl marks, extends tool life, professional finish | Detailers, enthusiasts focused on paint protection | Protects finish; better cleaning; tool longevity |
| Proper Drying Techniques | Medium - careful technique and timing needed | Medium - quality towels, chamois, blowers | High - prevents water spots, streaks; maintains finish | All washes especially in sunny/warm environments | Spot-free finish; protects paint; prepares for wax/sealant |
| Wheel and Tire Care | Medium - specialized products and attention required | Medium to High - wheel cleaners, brushes | High - removes brake dust, protects wheels, enhances appearance | All vehicles, especially high-value or performance wheels | Protects wheels; removes tough grime; enhances look |
| Regular Maintenance Schedule | Low to Medium - requires commitment and planning | Low - regular supplies, time investment | High - prevents damage, maintains value, easier washes | All vehicle owners aiming for long-term protection | Prevents damage; reduces costs; keeps vehicle looking new |
Transform Your Car Wash from a Chore to a Craft
Mastering the art of the perfect car wash is not about simply removing dirt; it's about adopting a methodical approach that protects your investment and delivers a stunning, professional-grade finish. Throughout this guide, we've deconstructed the process, transforming it from a weekend chore into a refined craft. By implementing these expert car washing tips, you're equipped to achieve results that rival a professional detailer, all from your own driveway.
Let's quickly revisit the core principles that form the foundation of a flawless wash:
- Safety First: The two-bucket method, working on a cool surface in the shade, and a thorough pre-rinse are non-negotiable steps. These techniques are your primary defense against introducing swirl marks and scratches into your vehicle's delicate clear coat.
- Efficiency and Effectiveness: Washing from top to bottom ensures you aren't re-contaminating clean panels with runoff from dirty areas. This logical sequence saves time and effort, leading to a uniformly clean vehicle.
- The Right Tools for the Job: Your choice of wash mitts, drying towels, and dedicated wheel brushes is just as important as your technique. High-quality microfiber is essential for trapping dirt safely and drying without leaving lint or streaks.
From Good to Great: The SwiftJet Advantage
The single most impactful upgrade you can make to this process is integrating a pre-wash foam bath. Using a high-quality foam gun, like the SwiftJet, elevates your routine by encapsulating and lifting abrasive grit before you ever touch the paint with a mitt. This critical pre-treatment step drastically reduces the risk of micro-scratches, making it one of the most vital car washing tips for anyone serious about paint preservation. It turns the pre-rinse from a simple spray-down into a powerful, active cleaning stage.
Key Takeaway: The ultimate goal is to minimize physical contact with your car's paint whenever possible. A thick layer of foam does the initial heavy lifting, so your wash mitt only has to deal with the remaining, less abrasive contaminants.
Your Path to a Pristine Finish
The journey to a perfect shine doesn't end when the water is turned off. Proper drying techniques are crucial for preventing water spots, and consistent wheel and tire care completes the look for that showroom-ready appearance. Finally, establishing a regular maintenance schedule solidifies these practices into a sustainable habit.
You now have the blueprint for turning every wash into a detailing session that enhances and protects your vehicle. Move beyond the quick, damaging tunnel wash and embrace a method that showcases your car in its best light. By applying these principles, you're not just cleaning your car; you are actively preserving its value, extending the life of its paint, and taking immense pride in a job done right.
Ready to elevate your car care routine with the single most effective tool for a scratch-free wash? The SwiftJet Car Wash Foam Gun is engineered to make these professional car washing tips easy and accessible for everyone. Visit SwiftJet to see how you can achieve a safer, deeper, and more satisfying clean today.