

You probably noticed the scrape when you got out of the car, looked down at the wheel, and saw a fresh silver streak or a rough gouge where the curb got too close. That moment sends a lot of people straight to the shelf, where every bottle promises to be the car rim scratch remover that fixes everything. It usually doesn't work that way. The right product depends on whether you're dealing with paint transfer, a light scuff, or a deeper cut into the wheel finish.
What Most People Get Wrong About Rim Scratch Removers
The usual mistake starts at the curb. A driver sees a mark on the rim, assumes it's one kind of damage, and buys a remover based on the label instead of the scratch itself. That's why some repairs look fine in the driveway and then fall apart after the first wash, the first brake-dust cleanup, or the first hot day.
The product is not the diagnosis
A scratch remover can be useful, but only after you know what the wheel needs. Independent repair guidance separates rim damage by depth, because shallow scuffs and clear-coat transfer respond to sanding and polishing, while gouges that expose bare metal usually need filler, repainting, or a patch system instead of a polish-only approach. That distinction matters because the market is full of products marketed like universal fixes, even though the repair path changes with the damage class. The practical question is not just which bottle to buy, it's whether you need a bottle at all.
Practical rule: if the scratch is still rough after light staged sanding, you're past the point where a simple remover will solve it cleanly.
Finish matters just as much as damage depth
Two wheels can show the same scrape and need different repairs. A painted alloy rim can usually be blended with paint and clear coat, while a polished or chrome-plated wheel can haze, discolor, or need a much more specialized finish strategy. That's why a one-size-fits-all remover wastes money, and sometimes makes the wheel harder to refinish later.
The better way to think about this is simple. Diagnose first, prep second, repair third, protect last. Once you follow that order, the shelf product becomes the final tool, not the first guess.
Identifying Your Rim Scratch Type and Severity
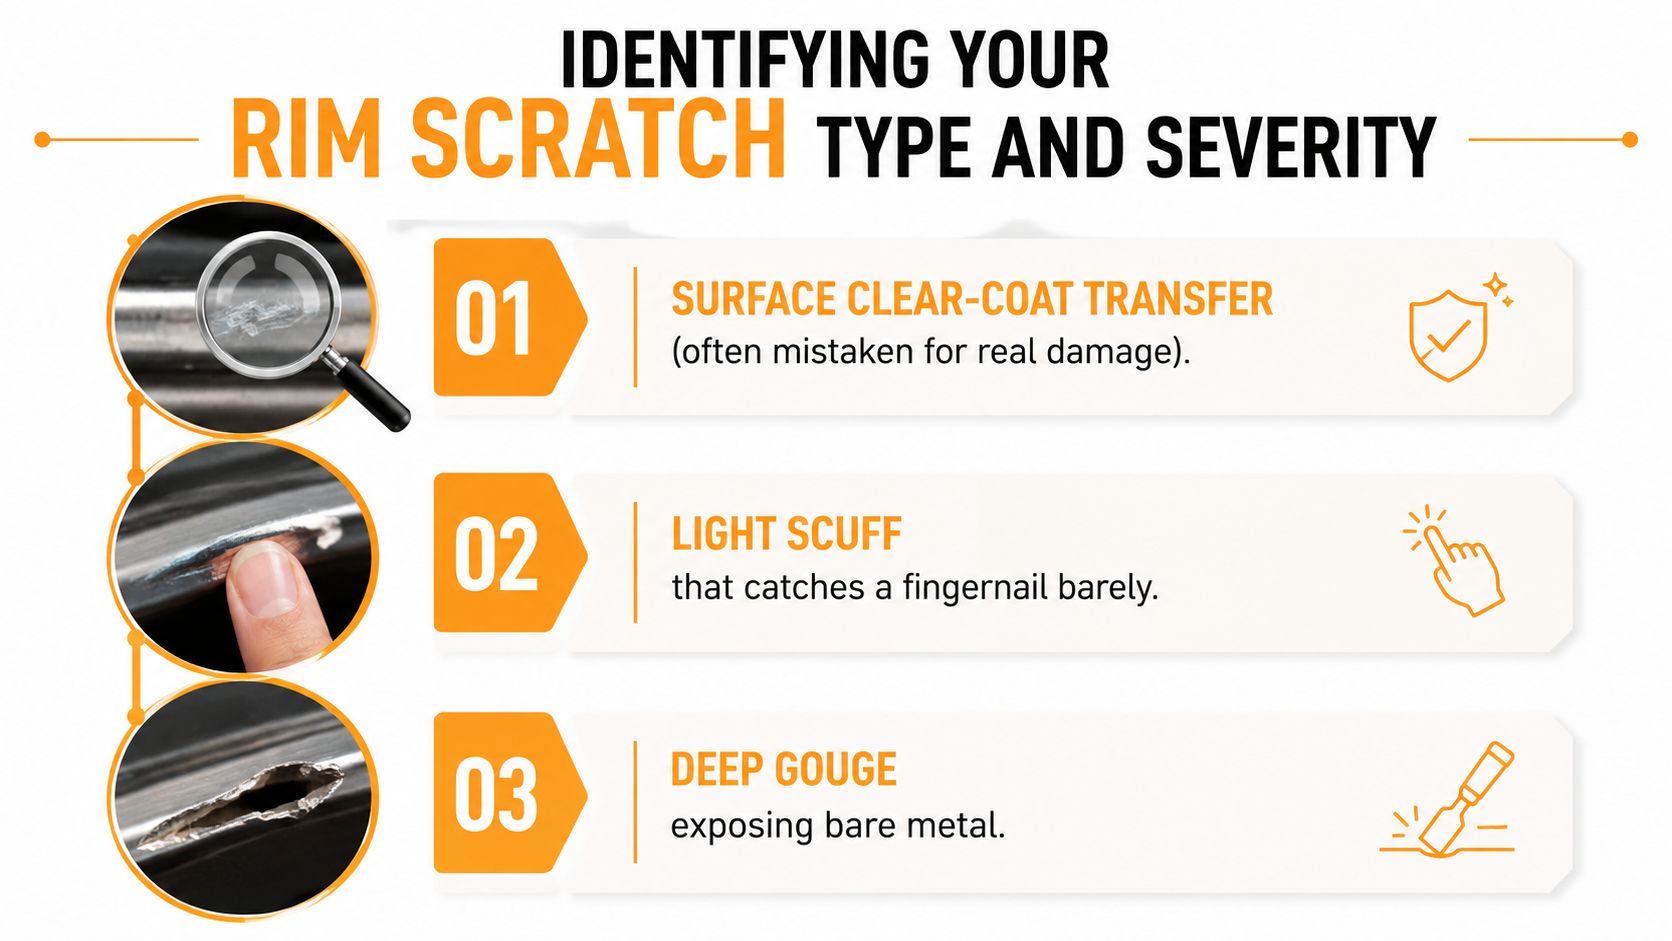
Start with the fingernail test
Run a clean fingernail across the mark. If it barely catches, you're likely looking at a light scuff or clear-coat transfer, the kind of damage that often responds to polishing and careful finishing. If the nail hooks firmly, the damage is deeper, and you're probably dealing with a gouge that needs sanding, filler, or repainting.
That test sounds basic because it is. It's also one of the most useful driveway checks you can do before buying anything. A scratch that feels smooth after staged sanding is usually in DIY territory. A scratch that still feels sharp is not a polishing job.
Use light and angle to read the finish
A flashlight helps you separate transfer from actual material loss. Clear-coat transfer often sits on top of the finish and can look worse in bright light than it really is. A true gouge usually shows a broken edge, a dull trough, or exposed metal where the protective layer is gone.
Finish type changes the reading too. Painted alloy generally gives you the most forgiving repair path. Polished aluminum needs cleaner finishing because haze shows fast. Chrome-plated wheels are the least forgiving in practice, because the surface layer behaves differently and spot repairs rarely disappear completely.
Match the scratch to the wheel, not just the mark
A minor scuff on a painted wheel may be a good candidate for a remover or touch-up product. A deeper curb rash on a chrome-plated wheel is a very different problem. The same mark can demand a different fix depending on whether the rim is painted, polished, clear-coated, or plated.
| Severity tier | What it looks like | What it usually needs |
|---|---|---|
| Surface transfer | Color on the surface, minimal texture | Cleaner, polish, light blending |
| Light scuff | Barely catches a fingernail | Sanding, finishing, possibly touch-up |
| Deep gouge | Clearly catches, sharp edge, exposed metal | Filler, repaint, or pro refinish |
If the scratch is still confusing after those checks, step back and photograph it in daylight. That's often the fastest way to see whether you're dealing with a cosmetic mark or a real material break.
Prep and Clean the Rim the Right Way
Dirty wheels sabotage repairs. Brake dust, road film, and tire dressing all interfere with adhesion, and if you drag grit across the rim while you work, you can turn one scratch into several. A proper prep routine is boring, but it's what keeps the repair from looking good for a week and failing after that.
Work through the surface in layers
Start with a rinse to knock off loose grit, then cover the wheel with a foam layer so the cleaner can cling and soften grime before you touch it. A foam cannon earns its place here because it lets the cleaner dwell instead of sliding off immediately, which gives brake dust time to loosen before a mitt ever touches the finish. After that, do a contact wash with a dedicated wheel-safe cleaner, then decontaminate with iron remover or clay if the surface still feels rough. Finish with an isopropyl alcohol wipe so polishing dust, oils, and dressing residue don't stay under the repair.
For wheel-safe cleaning chemistry, it helps to use a dedicated product designed for the job, like the guidance in SwiftJet's ph-neutral wheel cleaner overview.
Don't skip the safety basics
Use nitrile gloves and avoid harsh acid cleaners on uncoated alloy. Wheel finishes are less forgiving than painted body panels, and a cleaner that looks aggressive on a dirty rim can leave the surface uneven or stained. If the wheel still has brake-dust residue in the damaged area, keep cleaning until the cloth comes away clean.
Prep decides the repair result
A clean, dry, grease-free wheel is the difference between coating that bonds and coating that lifts. If the surface still feels slick, stop and clean again. The repair will only be as strong as the surface beneath it.
Choosing the Right Repair Method for Your Rim
The smartest repair choice depends on the scratch, the finish, and how much time you want to spend. A product that works on a paint-transfer scuff won't save a gouge, and a full refinish is usually overkill for a light mark. Here's the routing decision I use when I'm deciding whether a wheel stays in the garage or goes to a shop.
Compare the four main paths
| Method | Best For | Typical Cost | Time Required | Skill Level |
|---|---|---|---|---|
| Scratch remover polish | Surface transfer and very light scuffs | Qualitative, usually the lowest-cost option | Short, often same-session work | Low |
| Touch-up paint pen | Small painted scuffs that need color restoration | Qualitative, modest cost | Short to moderate, with curing time | Low to moderate |
| Sanding plus filler plus repaint | Moderate curb rash and deeper cosmetic damage | $50 to $150 for steel and aluminum rims, per CarParts as cited in the repair guidance context | Time-sensitive, multi-step work | Moderate |
| Full professional refinish | Deep gouges, chrome work, or cases where home repair won't blend cleanly | $200+ for chrome-plated rim repair, and it can exceed $500 | Recarfix notes a body shop may keep the vehicle 1 day to 1 week | High |
The broad repair guidance also shows how much labor shape matters. Recarfix says a rim patch takes about 15 minutes per rim, a complete wheel repair can take around 10 minutes per wheel including cleaning, and polishing can average about 1 hour per wheel. That spread tells you why a quick product-only fix sometimes isn't realistic. (Recarfix repair guidance)
If the scratch can be made smooth to the touch after staged sanding, DIY cosmetic repair is usually viable. If it still feels sharp, the wheel likely needs filler or professional refinish work.
Use the finish as your final filter
A painted alloy wheel gives you the widest DIY window. Chrome-plated wheels sit on the far end of the cost and complexity range, and polished finishes punish rushed polishing with visible haze. For a practical read on how finish changes repair compatibility, the discussion in NSP Coatings' powder coating guide is useful context for understanding why coating systems behave differently from raw metal or plated surfaces.
The repair method should fit the damage, not the other way around. Once that's clear, the rest of the job becomes a controlled process instead of a guessing game.
Step-by-Step Rim Scratch Repair Process
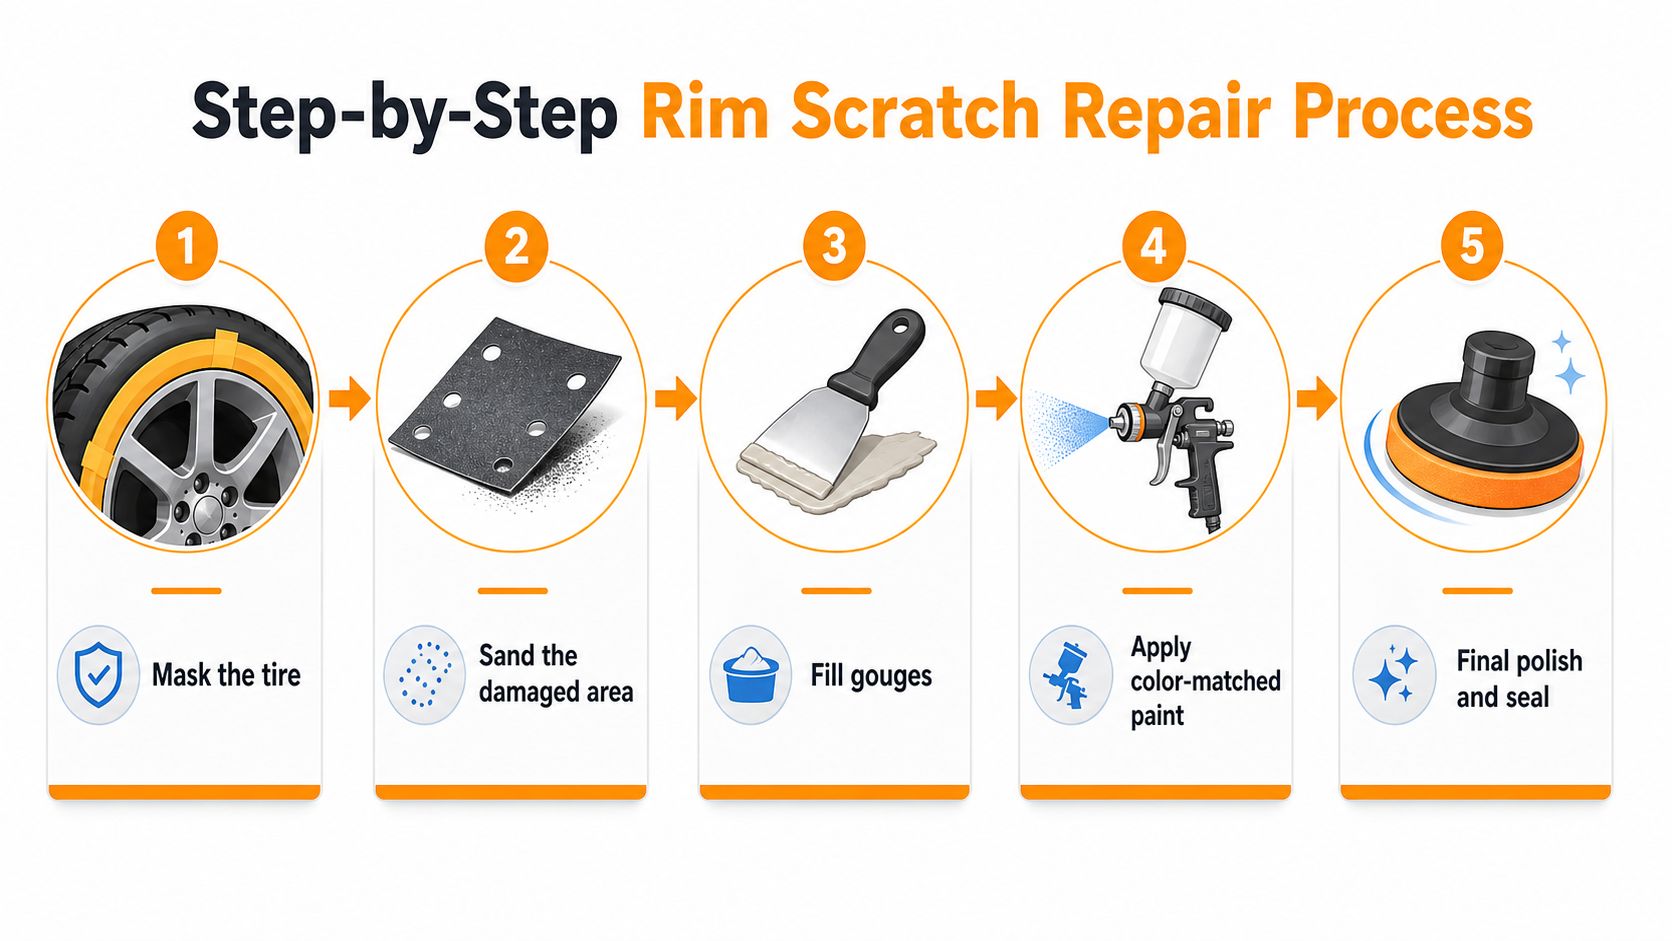
For a moderate curb-rash gouge on a painted alloy wheel, I'd rather move slowly and keep the repair flat than rush it and leave a wavy patch. That means masking, sanding, filling if needed, painting in thin layers, and letting the wheel cure before it sees water or road load again. A rushed repair often looks acceptable in photos and poor in daylight.
Build the surface back in stages
Start by taping the tire and any adjacent trim. Then sand the damaged area with progressive grits until the transition feels even. For filler-based workflows, the technical finishing range often moves up to 800 to 1000 grit, and for final finishing you may need 2000 to 3000 grit before polishing. That step matters because the goal shifts from removing material to blending light, so the repair stops looking like a patch and starts looking like a finish.
If you need a sanding reference that fits the finishing stage, perfect finish with 200 grit is a useful comparison point for understanding how coarse work differs from the finer finishing grades used later.
After sanding, apply spot putty if the gouge still has low spots, then let it set and sand it back flush. A filler-based workflow can take up to 2 hours just for the spot putty stage before re-sanding smooth, so don't expect that part to be instant.
Paint in thin, timed layers
Once the wheel is flat and clean, lay down 2 light base-coat layers with 20 to 30 minutes between coats. Follow with 2 to 3 clear-coat layers. Thin coats bond and level better than one heavy pass, and they're less likely to run on a curved rim face.
Cure rule: after the final clear coat, let the wheel cure for at least 24 hours before pressure washing it or driving in conditions that will hit the fresh finish hard.
A brief polish after curing restores gloss and helps the new finish visually merge with the old one. If the wheel still looks flat, use a gentle polishing approach rather than aggressive compound. A good follow-up reference for wheel finishing technique is SwiftJet's alloy wheel polisher guide.
Watch the final handoff
The last mistake is usually impatience. Fresh paint that gets wet too early can haze, soften, or lose adhesion. Give it the full cure, then protect it properly.
Keep the process moving in the right order
- Mask the tire carefully. Clean lines protect the rest of the wheel.
- Sand the damaged area progressively. Don't jump straight to fine grit.
- Fill only what sanding can't flatten. Overfilling creates ridges.
- Apply color-matched paint in light coats. Heavy coats sag.
- Finish with polish and sealant. That restores gloss and adds protection.
For a clear visual walkthrough of the same flow, the embedded repair video is worth watching once before you start.
Why Your Rim Finish Changes Everything
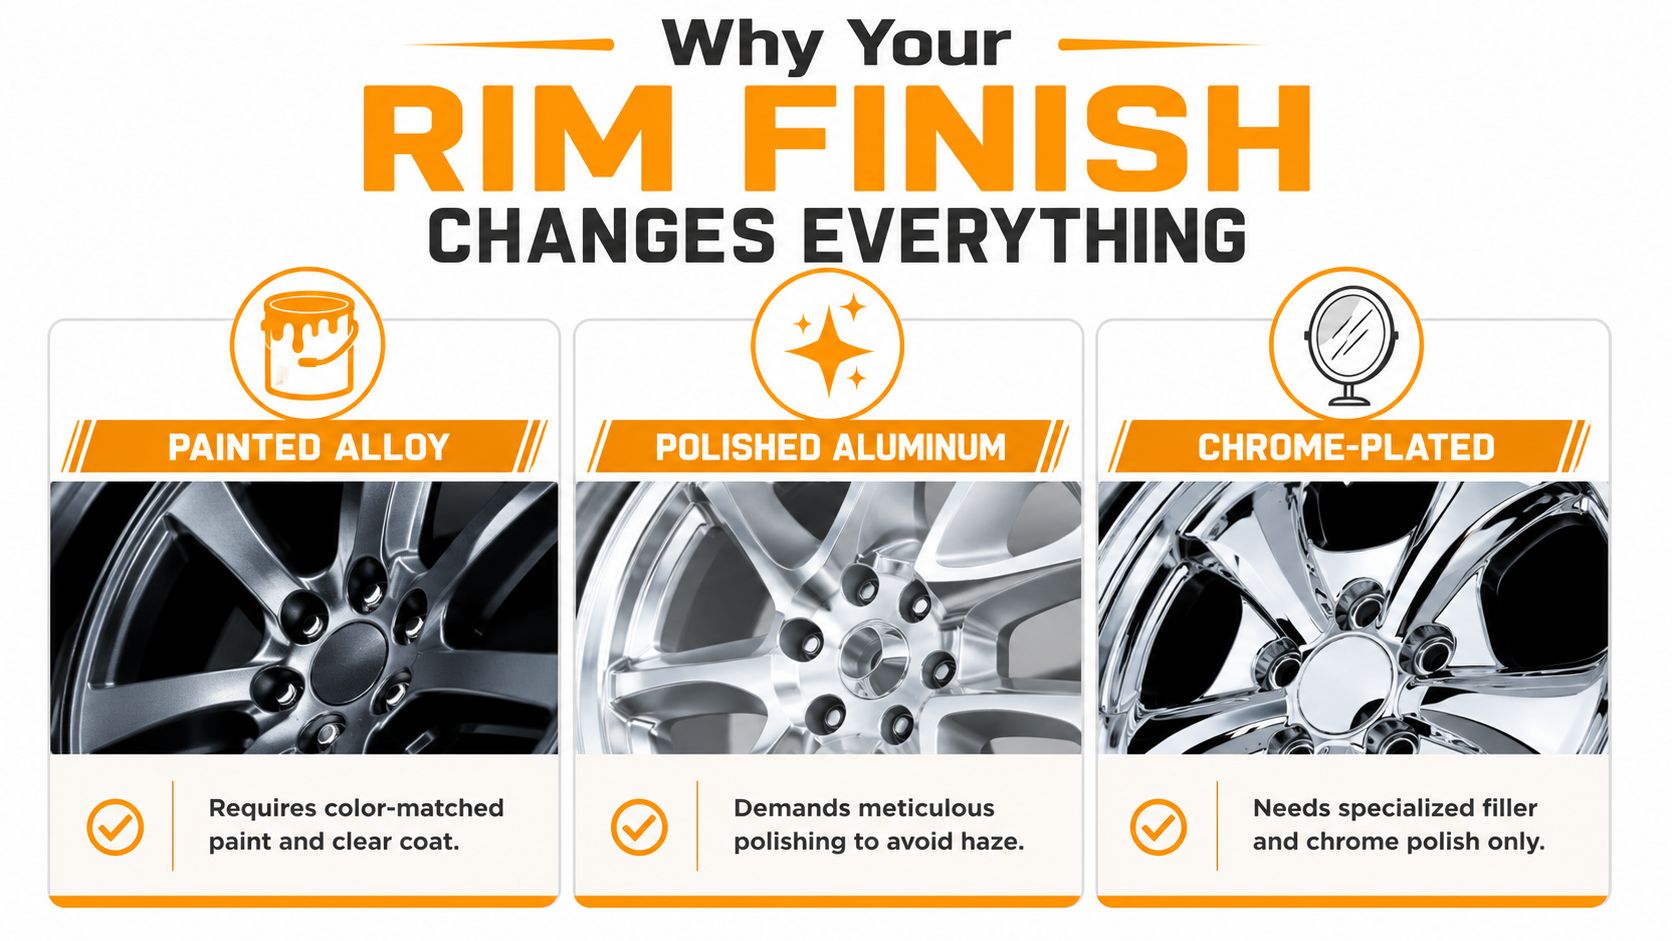
A scratch remover that behaves well on one wheel can ruin another. The reason is simple, the finish is the repair system. Painted alloy, polished aluminum, and chrome-plated rims each react differently to sanding, polishing, and coating, so the bottle matters less than the surface you're putting it on.
Painted alloy gives you the widest margin
Painted alloy is the most straightforward surface for DIY repair because it's designed to accept sanding, primer, color coat, and clear coat as part of the finish stack. It's still easy to mess up with a heavy hand, but the repair logic matches most touch-up products. If the scratch is shallow and the paint system is intact, the repair path is usually predictable.
Polished and chrome demand more restraint
Polished aluminum can haze if you use the wrong abrasive or polish too aggressively. Chrome-plated wheels are more sensitive still, and that's why repair pricing for chrome starts around $200 and can exceed $500, according to the repair pricing guidance cited earlier. The plating layer can't be spot-replicated at home the way a painted finish can.
Environment changes the result
Cold weather, road salt, and brake-dust-heavy commutes all shorten the margin for error. One repair guide notes that lacquer may need warming in colder temperatures so the spray flows and adheres more consistently, which tells you the environment is part of the repair, not just the backdrop. If you're working in a garage that's cold or damp, expect drying and leveling to behave differently than they do in ideal shop conditions.
For more on finish-specific coating behavior, the NSP Coatings powder coating guide is a good supplement if you want to understand why some wheel surfaces respond better to full refinishing than to spot touch-up.
A wheel finish is not just cosmetic. It decides whether a scratch remover blends, dulls, or fails outright.
Protecting Rims and Preventing Future Curb Rash
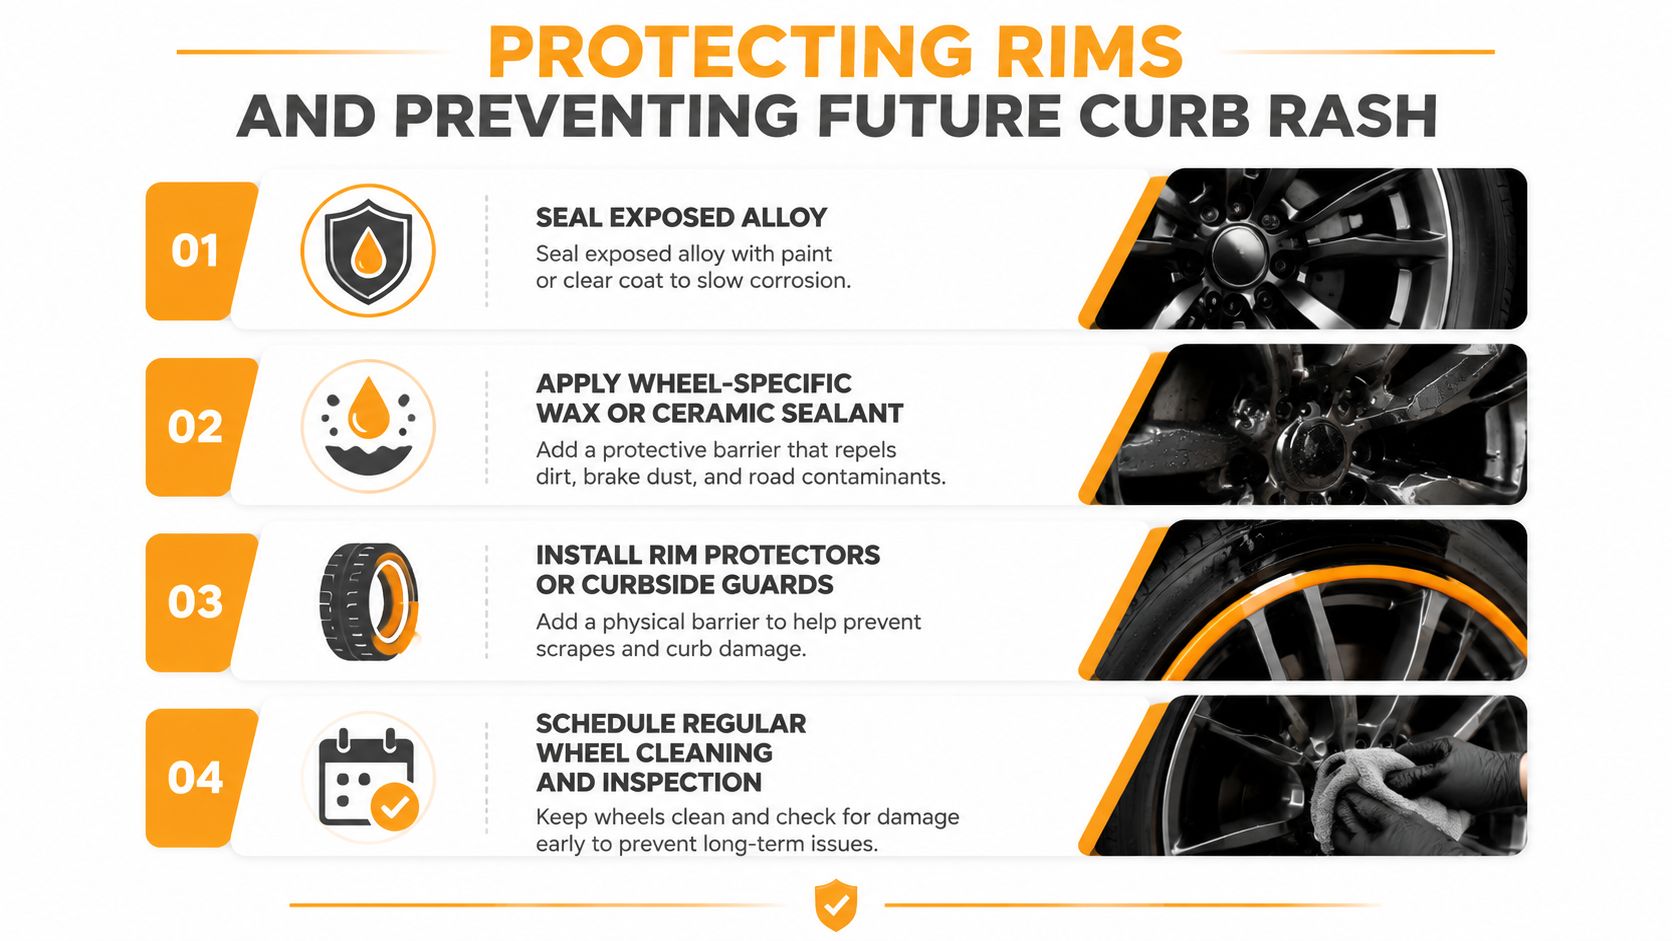
A repaired rim needs protection right away, or the next wash can undo part of your work. Seal exposed alloy or fresh paint with a clear coat or wheel-safe sealant so moisture and corrosion don't start at the scratch line. After that, keep brake dust from building into a gritty layer by using a wheel-specific wax or ceramic sealant and a gentle pre-rinse before contact washing.
Parking habits matter more than most people admit
Stay wider from curbs than feels necessary, especially on low-profile tires and steep driveways. Those setups leave less forgiveness when the car rolls or the suspension compresses. A little extra attention in parking lots saves a lot of touch-up work later.
Add a maintenance loop
If you like to personalize the look of your wheels, even something as simple as browse Forgiato wheel decals can be part of a broader wheel-care routine, but decoration should never replace protection. Cleaning, inspection, and timely sealing are what keep the finish alive. A quick wheel check during routine washes catches new scrapes before they get worse.
The maintenance mindset is the fix. Diagnose, prep, repair, protect. If you keep that sequence, you'll spend less on the wrong remover and more on repairs that last.
If you want a cleaner way to wash and protect the wheels you just repaired, SwiftJet has tools built for careful, at-home detailing. Visit SwiftJet to explore foam cleaning gear and wheel-care accessories that make regular maintenance easier, so the next scratch stays a small problem instead of a full repaint.
