
The key to washing a black car and keeping it swirl-free is surprisingly simple: minimize physical contact. It’s all about using plenty of lubrication to lift dirt away from the paint, not grinding it in. This means starting with a touchless pre-wash using a foam cannon, then moving to a careful, methodical hand wash with the right technique.
Why Black Paint Reveals Every Imperfection
Have you ever noticed how a clean black car looks like a pool of liquid ink, but the second it gets a bit of dust or a minor scratch, it's all you can see? That's not just in your head—it's physics. Black paint absorbs light and reflects its surroundings with incredible depth, creating that stunning mirror finish we all love.
But that same mirror effect is what makes it a brutal billboard for every single flaw.
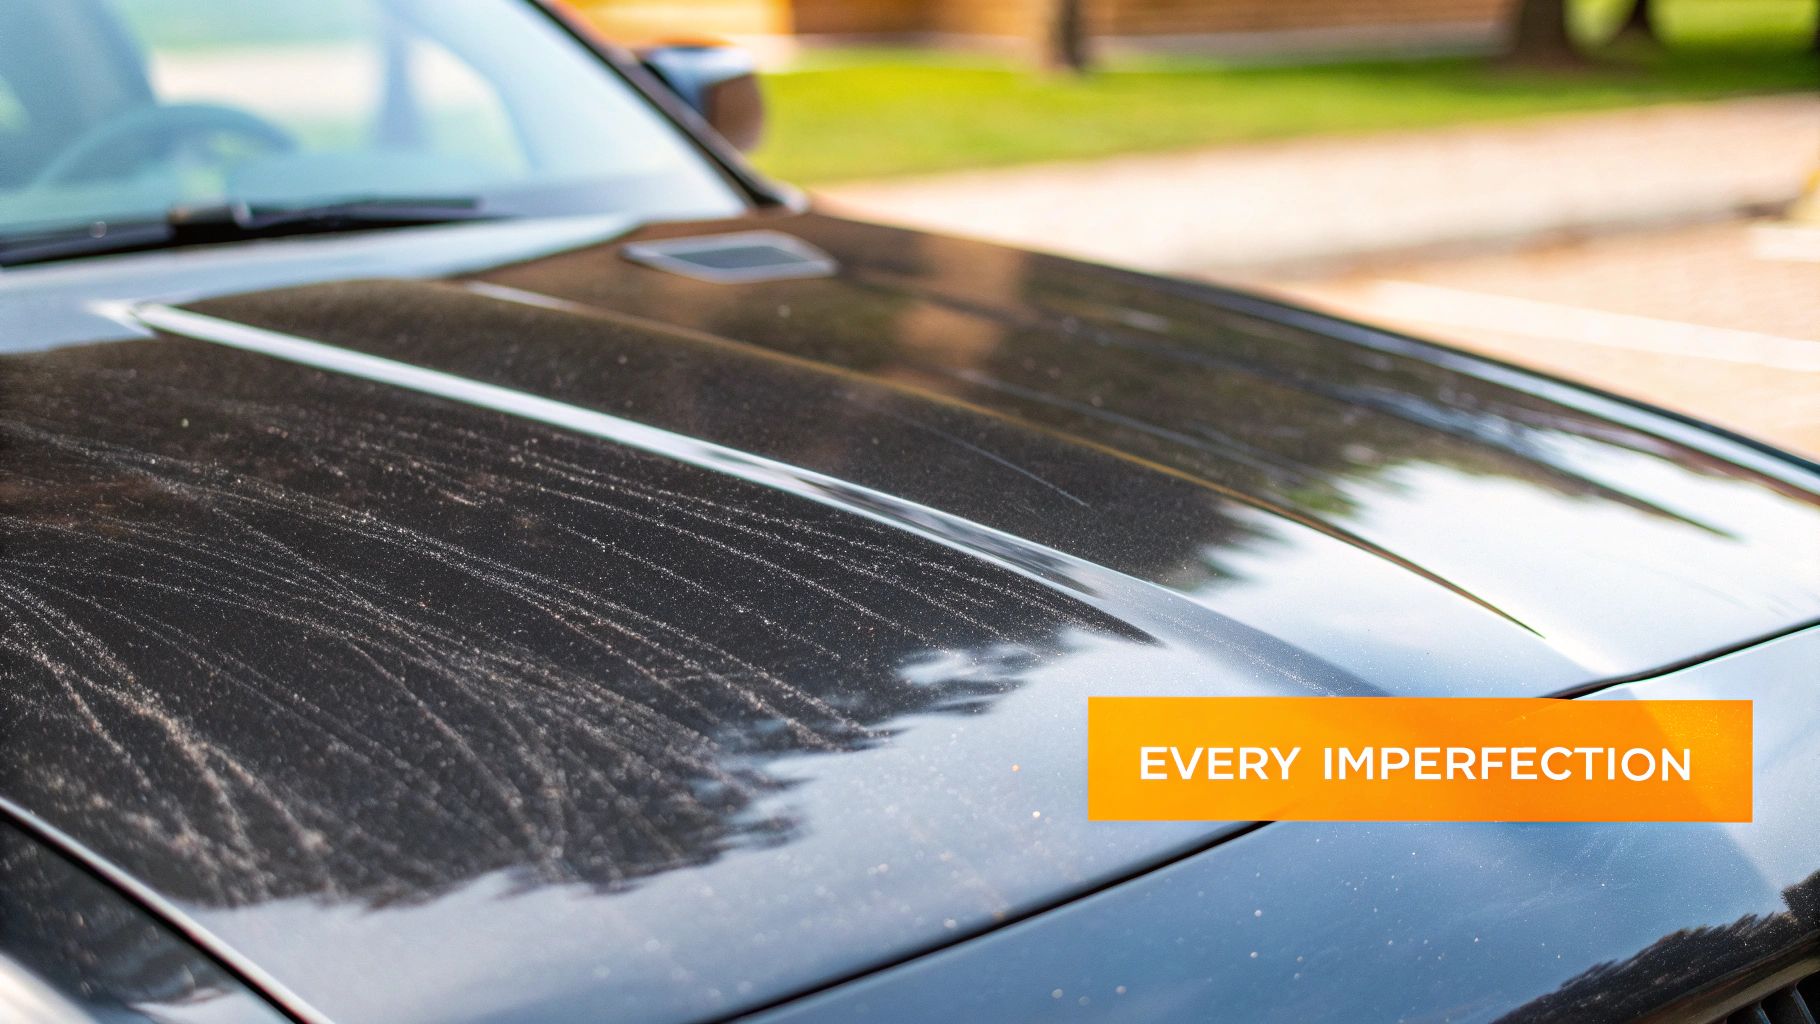
Unlike a white or silver car that can camouflage small imperfections, a black finish provides a high-contrast background. Swirl marks, fine scratches, water spots, and even bird droppings stand out in painful detail. This is exactly why common, shortcut washing methods are so damaging to dark-colored cars.
The Problem with Traditional Washing
Grabbing an old t-shirt, a single bucket of soapy water, and a cheap sponge might seem fine for a quick wash, but on a black car, it's a recipe for disaster. These tools and techniques just drag abrasive grit and dirt across your paint, etching a fine web of micro-scratches called swirl marks. A professional detailer’s entire philosophy is built around avoiding this at all costs.
The secret isn't to scrub harder; it's to work smarter. This guide will walk you through a process that puts paint safety ahead of speed. For that deep, rich shine, a deliberate approach is the only way.
The core principles are straightforward:
- Minimize Contact: The less you physically touch the paint, the less chance you have of scratching it. Simple as that.
- Maximize Lubrication: Thick, rich foam and high-quality, pH-neutral car shampoos create a slippery barrier between your wash mitt and the paint's surface.
- Remove Dirt Safely: A proper pre-wash stage is designed to lift and encapsulate loose dirt, allowing most of it to be rinsed away before you ever touch the car.
The professional approach is simple: clean the car before you wash it. The pre-wash and foam bath do the heavy lifting, ensuring the hand wash is only for removing the last bit of bonded grime.
This careful, meticulous technique is precisely why so many black car owners turn to professionals. The demand for specialized care is huge—the global car wash services market was valued at USD 34.31 billion in 2024. You can learn more about the growth in professional car care from this detailed industry report.
Gathering Your Essential Car Washing Toolkit
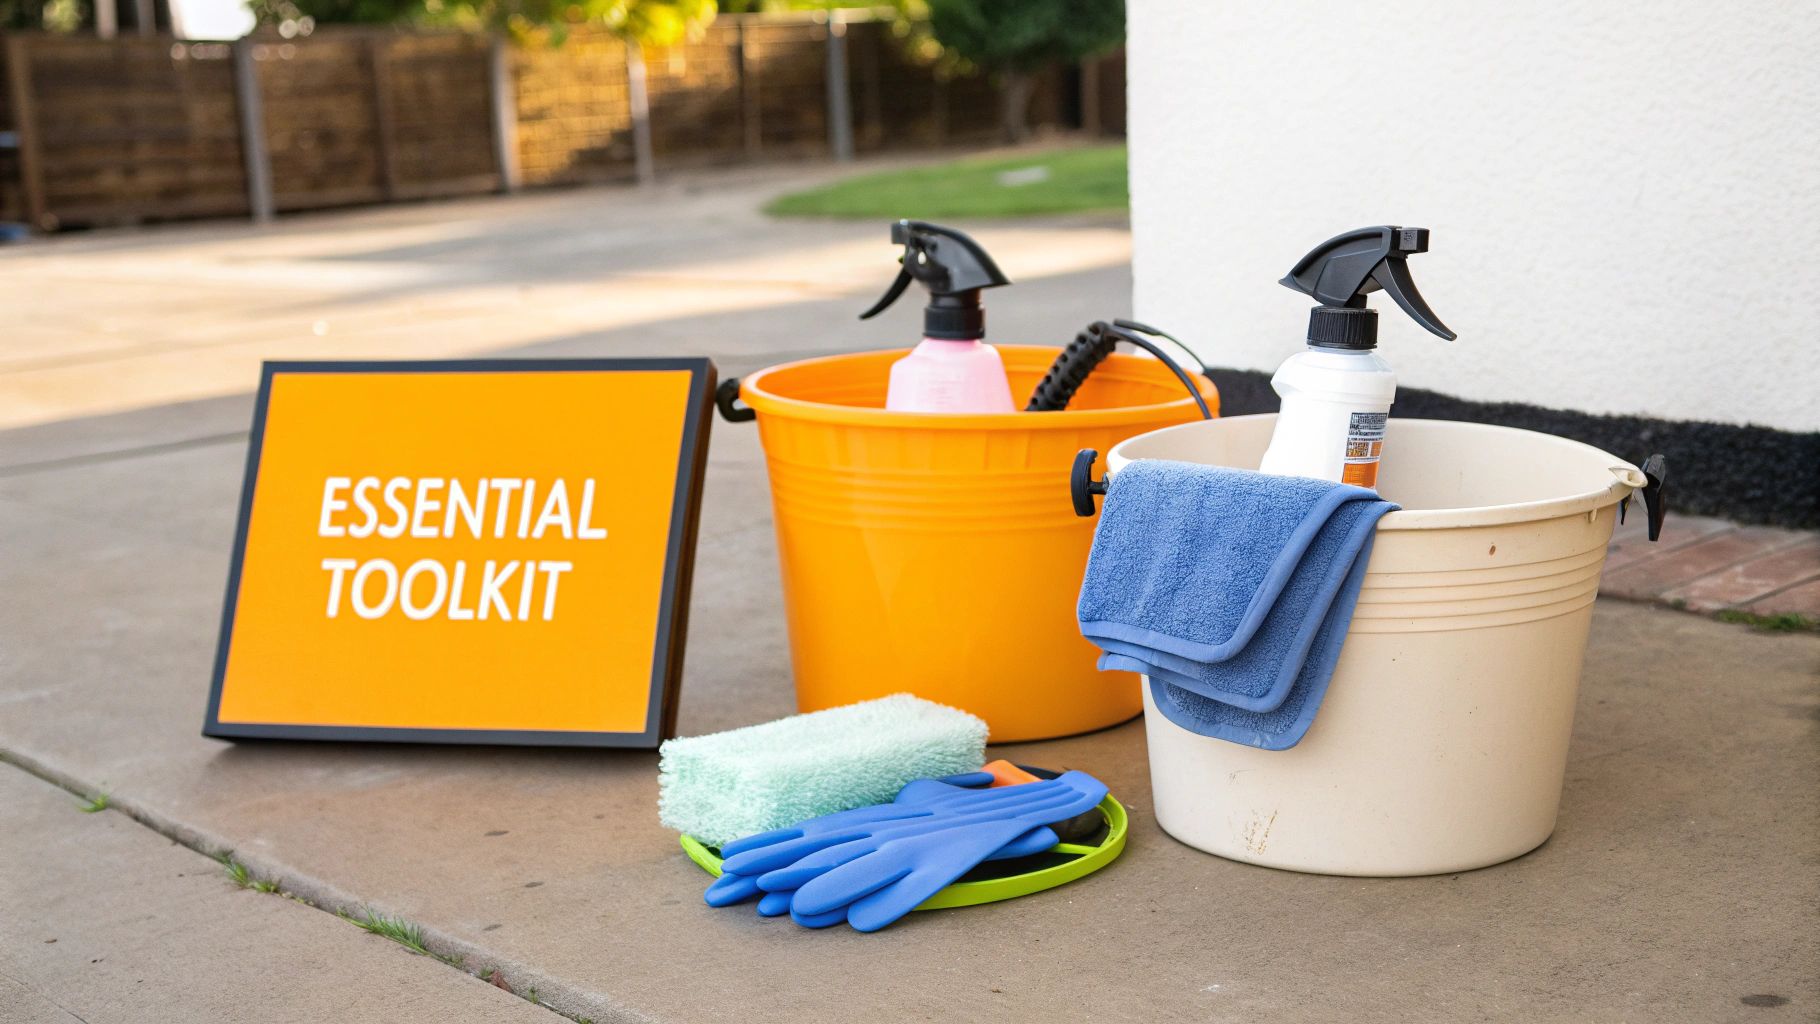
Before a single drop of water hits your paint, having the right gear is non-negotiable. This isn’t about just getting the car clean; it’s about doing it safely. Using the wrong tools is the fastest way I’ve seen to inflict a spiderweb of swirl marks on a black car’s unforgiving finish.
Think of this as building a specialized arsenal. Every single item has a specific, paint-saving job to do.
Your Core Washing Components
The most fundamental—and I mean fundamental—upgrade you can make is switching to a two-bucket system. This simple method is the bedrock of professional detailing for a reason.
- Two 5-Gallon Buckets: One is strictly for your soapy water, and the other is for clean rinse water. Separating them is the key to preventing cross-contamination.
- Grit Guards: These simple plastic inserts sit at the bottom of each bucket. As you rinse your mitt, they trap the dirt and grit, preventing those abrasive particles from ever making their way back to your paint.
- pH-Neutral Car Shampoo: Please, never use dish soap. A quality, pH-neutral car wash soap creates thick, slick suds that lift dirt away while being gentle enough to leave your wax or sealant perfectly intact.
This setup means that after washing a single panel, you dunk your dirty mitt in the clean rinse bucket—scrubbing it against the Grit Guard—before it ever goes back into the soap. It’s a game-changer.
A dedicated car shampoo's main job is to provide lubrication. The slickness it creates is what allows your wash mitt to glide over the surface, dramatically cutting down the risk of the micro-scratches that show up so glaringly on black paint.
Tools for Pre-Wash and Drying
To truly master the art of washing a black car, your toolkit needs to address the stages where most swirls are born: the pre-wash and the drying process. Here, the goal is a nearly touchless approach.
A foam cannon is practically a must-have. It hooks up to your pressure washer and blankets the car in a thick layer of clinging foam. This isn't just for show; the foam encapsulates and loosens heavy dirt, letting gravity do the work before you ever have to touch the paint.
For the actual contact wash, you'll need a few plush microfiber wash mitts. Ditch the old sponges—they just trap grit on their flat surface. A deep-pile mitt, on the other hand, pulls particles deep into its fibers, safely away from your finish. To see what else the pros keep on their carts, check out our guide on the essential auto detailing equipment list.
Finally, for drying, grab a couple of large, high-quality waffle-weave microfiber towels. Their unique texture is incredibly absorbent, allowing you to blot the water dry instead of wiping and potentially dragging any missed grit across the paint.
Your Essential Black Car Wash Toolkit
To make it even clearer, here's a checklist of the absolute must-haves for a swirl-free wash. Investing in these items upfront will save you from countless hours of polishing down the road.
| Tool/Product | Primary Purpose | Why It's Critical for Black Paint |
|---|---|---|
| Two 5-Gallon Buckets | Separating clean and dirty water | Prevents re-introducing grit and grime back onto the paint. |
| Grit Guards (x2) | Trapping dirt at the bottom of the bucket | Physically keeps abrasive particles away from your wash mitt. |
| pH-Neutral Car Shampoo | Lubrication and gentle cleaning | Cleans without stripping wax/sealant; the slickness is your best defense against scratches. |
| Foam Cannon/Gun | Pre-wash foam application | Loosens heavy dirt and grime before you make contact, minimizing scrubbing. |
| Microfiber Wash Mitts | Safe contact washing | Deep pile traps dirt away from the surface, unlike sponges that drag it across. |
| Waffle-Weave Drying Towels | High-absorbency, safe drying | Allows you to blot the car dry instead of wiping, which is a major cause of swirls. |
Having these tools on hand isn't just about following steps; it's about adopting a mindset that puts the safety of your car's finish first. It's the difference between just washing your car and actually caring for it.
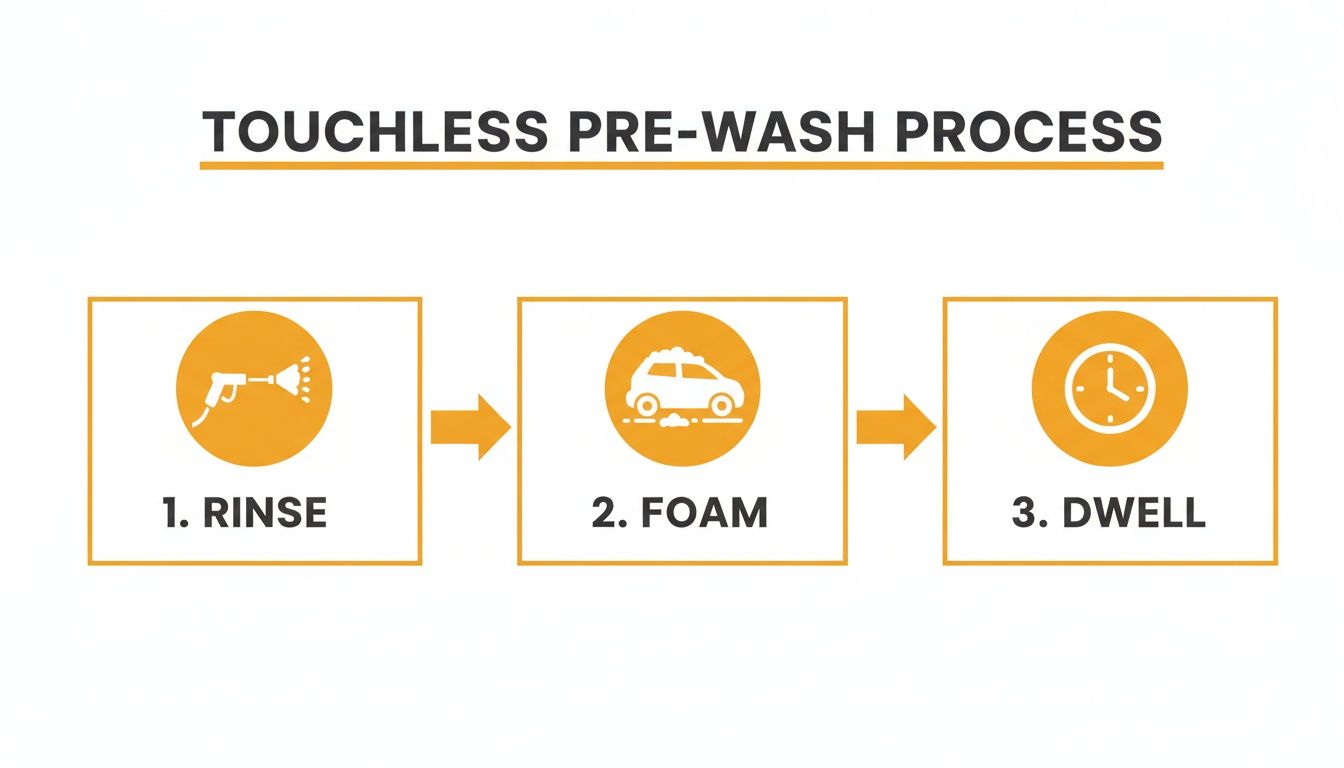
The Touchless Pre-Wash: Your First Line of Defense
This is, without a doubt, the most critical part of keeping a black car swirl-free. The entire point here is to get as much of that gritty, scratchy dirt off the paint before you ever lay a wash mitt on it. This is where a pressure washer and foam cannon truly earn their keep.
Think of it as a two-pronged attack. Start with a simple, methodical rinse. I always recommend a wide-angle tip for your pressure washer—a 40-degree nozzle is perfect for this. Work your way from the roof down, systematically rinsing every panel. This first pass safely blows off all the loose stuff like dust, pollen, and light road film without you ever having to touch the paint.
Unleashing the Power of a Foam Bath
With the loose debris gone, it's time for the real showstopper: the foam bath. And trust me, this is far more than just a cool photo op for social media; it’s a non-negotiable step for properly washing a black car.
Hook up your foam cannon and blanket the entire vehicle in a thick layer of high-quality snow foam. This isn't just soap. The foam is specifically designed to cling to vertical surfaces, giving it time to soften and break down stubborn grime. More importantly, it encapsulates all those tiny dirt particles, lifting them away from the paint's surface so they can be rinsed away safely.
Getting that rich, shaving-cream-like consistency is everything. If you're struggling to get it right, we've got a detailed guide on dialing in the perfect foam cannon soap ratio that will help you achieve that thick, effective foam every time.
Let that foam sit and do its thing for 5-10 minutes. You'll actually see it start to pull the dirt down the side of the car. But here's the golden rule: never, ever let it dry on the paint. If you're washing in the sun, you’ll have to work faster to avoid nasty streaks and water spots.
Rinsing and Evaluating Your Work
Once the foam has dwelled and you can see it’s done its job, it’s time to rinse. Again, always work from the top down. Be thorough and make sure you rinse away every last bit of suds and the dirt it has trapped within it.
You’ll notice that professional car washes are increasingly adopting touchless or hybrid methods. This isn't a coincidence. They know how effective this process is for preserving a vehicle's finish, and there's a clear market trend showing the demand for safer washing techniques, especially for dark vehicles.
After this final rinse, take a step back. The surface should look remarkably clean. It's now prepped and significantly safer for the next phase of the wash.
The Two-Bucket Method: Your Best Defense Against Swirls
Alright, the pre-wash is done. Most of the heavy lifting is out of the way, and your black paint is finally ready for a careful contact wash. This is where we introduce the undisputed champion of safe washing: the two-bucket method.
It’s a simple, almost ritualistic process that seasoned detailers live and die by. Why? Because it directly tackles the #1 cause of wash-induced scratches—dragging dirt from one part of the car all over another.
The setup couldn't be easier. You need two buckets, and I can't stress this enough, each one needs a Grit Guard at the bottom. One bucket gets your pH-neutral car shampoo, creating a nice, sudsy solution. The other is just for clean water. That separation is the entire magic trick.
The Wash-and-Rinse Rhythm
The secret to the two-bucket method isn't just the buckets themselves, but the rhythm you get into while using them. You're creating a system to trap the dirt you pull off the car so it never gets a second chance to touch your paint.
Think of the pre-wash steps as clearing the way for this main event.
Getting all that loose grime off first makes this contact wash infinitely safer.
Here’s how the process flows, panel by panel:
- Load Your Mitt: Start by dunking a clean, plush microfiber wash mitt into your soap bucket. Let it get completely saturated with those slick, lubricating suds.
- Wash One Small Section: Gently glide the mitt over a small area—think half the hood or a single door. Use straight-line motions, never circles. Let the suds do the work, not pressure.
- Dunk and Scrub: Now for the critical part. Before you even think about getting more soap, plunge that dirty mitt into your rinse bucket. Scrub it firmly against the Grit Guard at the bottom. You’ll literally see the dirt and grit fall out of the fibers and get trapped underneath the guard.
- Reload and Go Again: Once your mitt is clean, you can safely dip it back into the soap bucket, load it up with fresh suds, and move on to the next panel. Repeat.
This isn't a race. The deliberate act of rinsing your mitt after every single section is the most important detailing habit you can form. It guarantees that only a clean, sudsy mitt is touching your paint, not one secretly loaded with abrasive grit.
Start from the Top, Finish at the Bottom
Just as important as how you wash is where you start. Always work from the top of the car down. It just makes sense.
Begin with the roof, then the glass, then the hood and trunk. Gravity will pull the dirty suds down, away from the areas you've just cleaned. You’re not fighting to keep clean panels clean.
The lower parts of your car—the rocker panels, bumpers, and the area behind the wheels—are always filthy. They’re magnets for road tar, brake dust, and the worst grime imaginable. Save these for the absolute last. By washing them at the end, you avoid dragging that heavy-duty contamination across your hood or doors.
For an extra layer of safety, I personally use a completely separate wash mitt for just these lower sections. It might sound like overkill, but on a black car, that little bit of extra care pays huge dividends.
Drying Your Black Car Without Leaving Scratches
Alright, the heavy lifting is done. You’ve navigated the pre-wash and the two-bucket wash with care. Your black car is now sparkling clean, but it's also at its most vulnerable. This is the moment where a perfect wash can go south—the drying stage. So many swirl marks and fine scratches are born right here, and they're completely avoidable.
First thing's first: step away from the old bath towels, rubber squeegees, or that ancient chamois you have in the garage. These tools are notorious for trapping tiny bits of grit you might have missed and dragging them across your delicate clear coat. All that meticulous work you just did? Undone in an instant.
To keep that deep, black paint looking flawless, let's look at the two best ways to get it dry.
The Blotting Method with Microfiber
This is probably the most common and accessible technique for a safe dry. The trick is to use a large, premium microfiber drying towel. You’re looking for something with a seriously plush, deep pile—you'll often see them marketed as "waffle-weave" or "twist-loop" towels. Their entire purpose is to soak up a ton of water without you having to apply any real pressure.
The secret is simple: blot, don't wipe.
Lay the towel out completely flat over a panel, like the roof or the hood. Pat it down gently and let the thirsty fibers do the work. Once it's saturated, lift it straight up and move to the next spot. This blotting motion avoids the friction that causes those dreaded micro-scratches, which is absolutely critical for a perfect black finish.
The Touchless Air Drying Method
If you want to take paint safety to the next level, a truly touchless dry is the way to go. An air blower is your best weapon here. While pro detailers have specialized car dryers, a clean electric leaf blower can do a fantastic job. This is the ultimate method for preventing any contact with the paint and is amazing for chasing water out of all the nooks and crannies.
Use the powerful stream of air to blast water from all those annoying spots that always seem to drip later:
- Around the mirror housings
- Inside panel gaps and along trim pieces
- Out of the front grille and emblems
- From the seals around your headlights and taillights
You’ll want to move with a purpose, especially if it’s a warm day, to stop water spots from forming as mineral deposits get left behind on the clear coat. For a deeper dive, check out our complete car wash drying guide.
Proper drying isn't just a niche concern; it's a major part of car ownership. Consumer behavior studies show that about 66% of Americans wash their cars around 13 times a year—roughly once or twice a month. For anyone with a black car, making sure every one of those washes ends with a safe drying process is the only way to protect that incredible, deep shine. You can find more data on car care trends in this consumer habits report.
Protecting Your Paint for a Lasting Shine
You’ve done the hard part—a perfect, swirl-free wash. But the job isn't quite finished. To lock in that deep, liquid shine on your black car, the final step is laying down a solid layer of protection. Think of it as armor for your paint, a sacrificial barrier that takes the daily abuse so your clear coat doesn't have to.
This protective layer does more than just make the car look glossy. It creates a slick, hydrophobic surface that repels water. You'll see water bead up and roll right off, taking dirt and grime along for the ride. This means your car stays cleaner for longer, and the next wash will be worlds easier.
Choosing Your Level of Protection
When it comes to paint protection, you've got a few different paths you can take. Each one offers a unique balance of durability, ease of application, and cost. There's no single "best" choice here—it really boils down to your goals and how much time you're willing to put in.
-
Spray Waxes and Sealants: These are your go-to for speed and simplicity. You can apply them in minutes right after a wash, and they give you a fantastic boost in shine and slickness. They’re a great way to top up an existing layer of protection, typically lasting from a few weeks to a couple of months.
-
Paste Waxes and Sealants: These require a bit more elbow grease, whether you're applying by hand or with a machine, but the payoff is worth it. They offer much better durability, often lasting 3-6 months, and create that deep, warm glow that car enthusiasts absolutely love, especially on black paint.
-
Ceramic Coatings: If you’re looking for the ultimate in long-term defense, this is it. The prep work is intense—the surface has to be flawless—but a professionally applied ceramic coating can last for 2-5 years or even longer. It cures into a hard, chemical-resistant shell, offering unparalleled protection from the elements.
No matter which product you land on, consistency is what truly matters. A well-protected surface is your number one defense against the world. Think of it as a core principle of good vehicle ownership. Folding regular waxing or sealing into your schedule is a crucial part of a smart approach to general car maintenance.
Maintaining the Shine Between Washes
So, your car is protected and gleaming. How do you keep it that way? For the light dust, pollen, or fresh bird droppings that inevitably show up between washes, a quality quick detailer spray and a plush microfiber towel are your best friends.
Just give the dusty spot a light mist and gently wipe with one side of the towel. Then, flip to a clean, dry side to buff away any remaining streaks. This simple trick safely lifts the contaminants before they have a chance to bond to or etch your paint, keeping your car looking perfect until its next proper two-bucket wash.
Frequently Asked Questions About Washing a Black Car
Even with the best technique, keeping a black car looking perfect can bring up a lot of questions. Let's walk through some of the most common issues I hear about, so you can sidestep those simple (but often costly) mistakes.
Is Hand Washing Really Better Than an Automatic Car Wash?
Yes, without a doubt. When you're dealing with delicate black paint, a proper hand wash using the two-bucket method is always the safer bet.
Those big, spinning brushes at most automated car washes are basically swirl-making machines. They're often caked with dirt and grit from hundreds of other cars, and they just grind all that debris right into your clear coat. It's the fastest way to undo all your hard work.
What about the "touchless" washes? They're a little better, but still not ideal. To get the car clean without any physical contact, they have to use incredibly harsh, high-pH chemical detergents. These aggressive cleaners will strip off any wax, sealant, or ceramic coating you've applied, leaving your paint unprotected.
When it comes down to it, the best wash is one where you have total control over every single thing that touches your paint. An automated system just can't give you that level of careful attention.
How Do I Stop Getting Annoying Water Spots?
Water spots are the bane of every black car owner's existence. They're just mineral deposits left behind when water evaporates, but on a dark, mirror-like surface, they stick out like a sore thumb.
Stopping them is all about technique and timing. Here’s what you need to do:
- Never, ever wash in direct sunlight. A hot panel will cause water and soap to evaporate almost instantly, baking those mineral spots right on. Always work in the shade or wait for a cool, overcast day.
- Dry the car immediately. Don't let it air-dry. Grab a high-quality, plush microfiber drying towel or use a leaf blower to get every last drop of water off the surface quickly.
- Use filtered water for the final rinse. If you live in an area with hard water, this is a game-changer. A simple de-ionizing filter for your hose removes the minerals that cause spots in the first place, making drying much more forgiving.
Can I Just Use Dish Soap? It Cleans Great, Right?
Please, step away from the dish soap. I see this all the time, and it makes me cringe.
Yes, it’s great at cutting through grease on your dinner plates. The problem is, it's too good. That same grease-stripping power will also remove every trace of wax, sealant, or any other protective layer on your paint. It leaves your clear coat totally naked and vulnerable to UV damage, bird droppings, and everything else.
Always stick with a pH-neutral car shampoo. These are specifically designed to gently lift dirt and grime without compromising the protective coating you’ve so carefully applied.
Ready to get that perfect, swirl-free wash at home? The SwiftJet Car Wash Foam Gun connects to any garden hose to deliver the thick, dirt-lifting foam you need for a safe and effective pre-wash. Learn more and get yours today at https://swiftjetusa.com.