
Transforming your vehicle from a daily driver into a showpiece requires more than a quick rinse. It demands a systematic, professional-level approach. This definitive auto detailing checklist breaks down the entire process into seven manageable, crucial stages, ensuring no surface is overlooked and every step contributes to a flawless finish. We’ll guide you through everything from the initial pre-wash that prevents scratches to the final layer of protection that seals in a mirror-like shine.
Forget generic car wash advice. This is a comprehensive roadmap designed for enthusiasts and aspiring professionals alike. Each stage is detailed with the specific tools, products, and techniques needed to execute it perfectly. We cover the entire spectrum of detailing, including interior deep cleaning, paint correction, and specialized wheel care. This structured method eliminates guesswork, prevents common mistakes like swirl marks, and guarantees a consistent, high-quality result every time you pick up a microfiber towel.
Whether you're a seasoned detailer refining your process or a weekend warrior aiming for better results, this guide provides the actionable steps and pro-level insights needed to achieve a deep, lasting clean. For those starting with a heavily soiled vehicle, particularly an off-road model, understanding the basics of a thorough wash is paramount. Learning how to properly clean your 4x4 establishes a solid foundation before you dive into the finer points of detailing. Prepare to elevate your car care routine and rediscover your vehicle's true potential.
1. Pre-Wash and Rinse
The pre-wash and rinse phase is arguably the most crucial step in any professional-grade auto detailing checklist. It is the foundational process of removing the top layer of loose dirt, grime, dust, and other abrasive contaminants before any physical contact is made with the vehicle's paint. Skipping this step is like trying to wipe a sandy table with a dry cloth; you inevitably drag damaging particles across the surface, causing microscopic scratches, swirl marks, and marring that dull the finish.
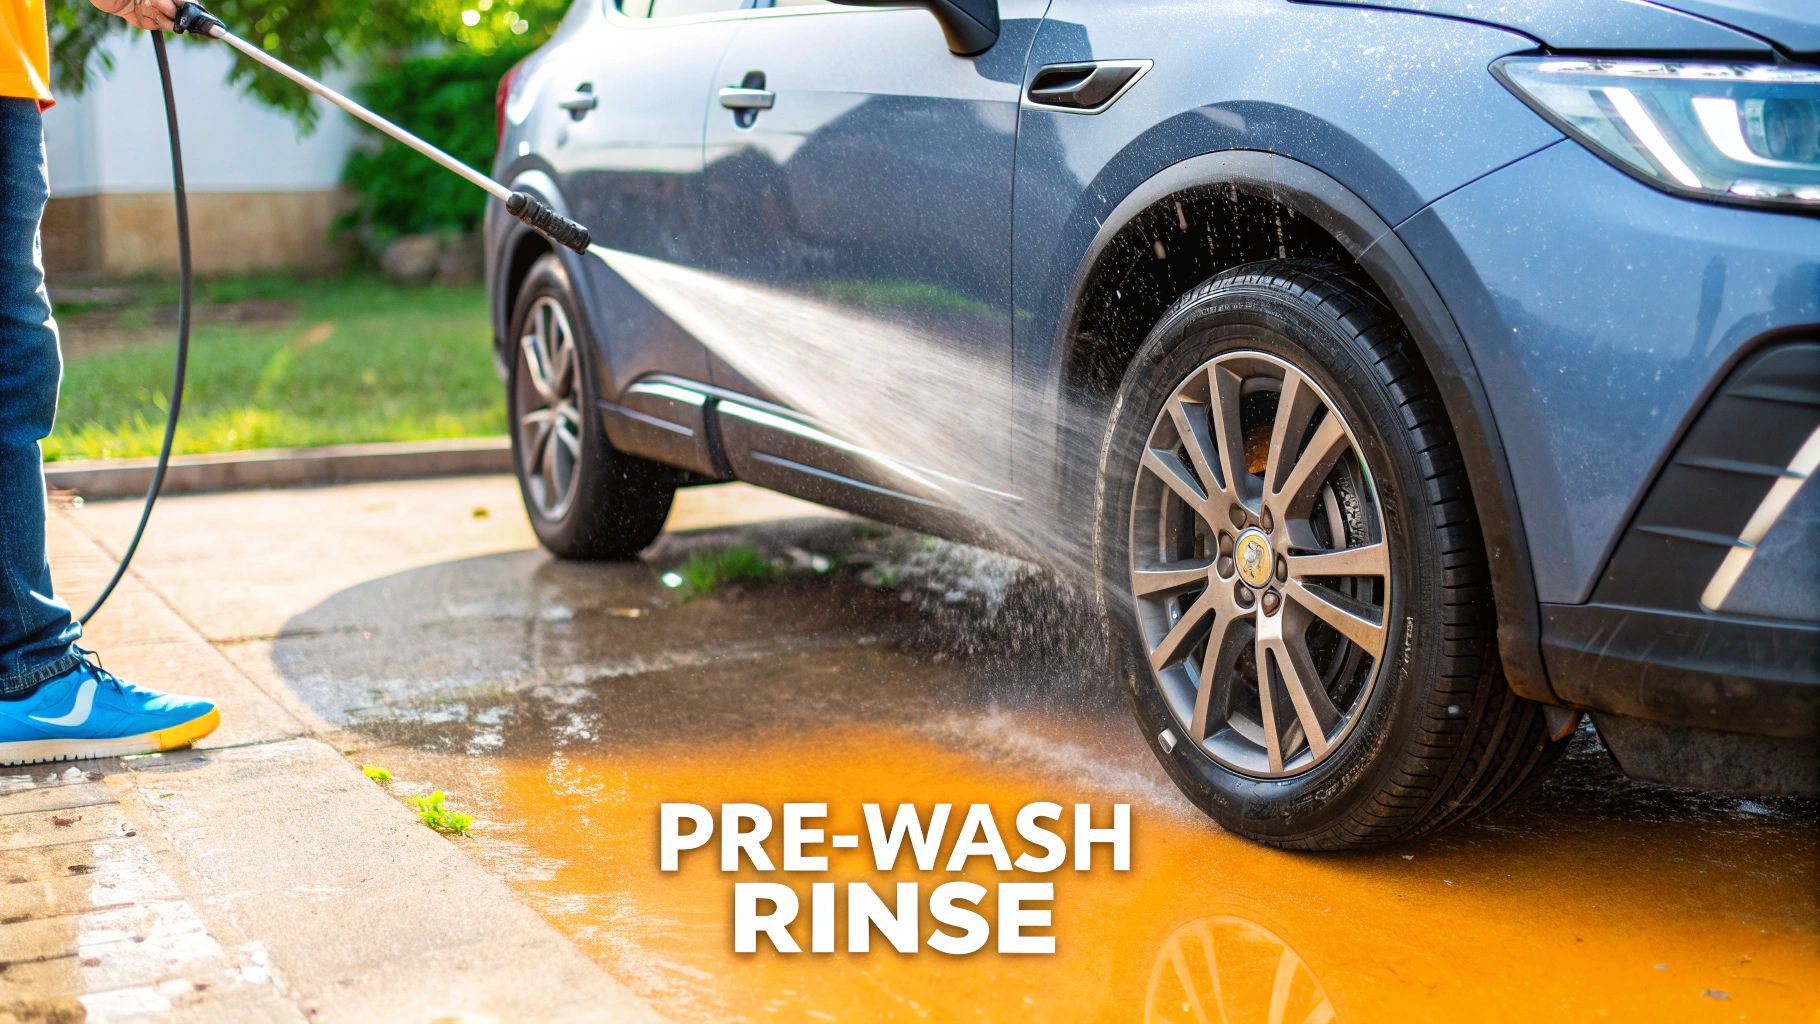
The goal of the pre-wash isn't to clean the car completely but to make the subsequent contact wash as safe as possible. By lifting and rinsing away the majority of the grit, you significantly reduce the risk of inflicting damage during the main wash, preserving the integrity and clarity of your vehicle's clear coat. This is a non-negotiable step for anyone serious about maintaining a flawless finish.
How to Implement a Proper Pre-Wash
A successful pre-wash involves more than a quick spray with a garden hose. It requires the right tools and a systematic approach to ensure maximum effectiveness.
- Initial Rinse: Start with a thorough rinse using a pressure washer or a high-pressure nozzle on a garden hose. Work systematically from the top of the vehicle down, letting gravity help pull the dirt away. Focus on heavily soiled areas like the lower body panels, bumpers, and especially the wheel wells, where caked-on mud and debris accumulate.
- Apply Pre-Wash Foam: The next stage often involves a dedicated pre-wash product, typically a pH-neutral snow foam. Using a foam cannon attached to a pressure washer (or a foam gun for a garden hose), cover the entire vehicle in a thick layer of foam.
- Dwell Time: Let the foam dwell on the surface for 3-5 minutes. Do not let it dry. During this time, the active cleaning agents will encapsulate dirt particles, lifting them from the paint and breaking down stubborn grime without any physical scrubbing. You will visibly see the foam turn brown as it pulls contaminants off the car.
- Final Pre-Rinse: After the dwell time, perform another meticulous top-to-bottom rinse, washing away all the foam and the loosened dirt with it. Your vehicle is now prepped for a safer, more effective contact wash.
Key Insight: The pre-wash is the ultimate application of the "work smarter, not harder" philosophy in detailing. The chemicals in the snow foam do the heavy lifting, so your contact wash mitt only has to deal with a minimal amount of remaining bonded contaminants.
2. Two-Bucket Wash Method
Once the pre-wash is complete, the contact wash begins. This is where the two-bucket wash method becomes an indispensable part of any professional auto detailing checklist. It is a fundamental technique designed to minimize the introduction of scratches and swirl marks by systematically isolating dirt and grit from your clean wash mitt. Using a single bucket means you are repeatedly dipping your mitt into water contaminated with the very abrasive particles you just removed, turning your wash process into a sandpapering session for your car's paint.

The two-bucket method solves this problem by using one bucket for your car shampoo solution and a second, separate bucket filled with plain water for rinsing your mitt. By rinsing the dirty mitt in the dedicated water bucket before reloading it with fresh soap, you ensure that the grit removed from the car never contaminates your clean wash solution. This simple, yet highly effective, procedure is championed by detailing experts like Larry Kosilla of AMMO NYC and is non-negotiable for preserving a flawless, mirror-like finish.
How to Implement the Two-Bucket Wash Method
Proper execution is key to unlocking the full potential of this scratch-prevention technique. It requires discipline and a few specific tools to work effectively.
- Prepare Your Buckets: Label your buckets "Wash" and "Rinse" to avoid mix-ups. Fill the "Wash" bucket with a high-quality, pH-neutral car shampoo, following the product's dilution instructions. Fill the "Rinse" bucket with clean, plain water. For maximum safety, place a grit guard at the bottom of each bucket. These plastic grates allow dirt and debris from your mitt to settle at the bottom, preventing them from being stirred up and reintroduced to your mitt.
- The Wash Process: Begin washing the vehicle from top to bottom, tackling the least dirty panels first (roof, windows, hood). Submerge your clean wash mitt in the "Wash" bucket and gently wash a single panel in straight lines, not circular motions, to further reduce swirl marks.
- Rinse and Repeat: After washing one small section, do not put the mitt directly back into the soap. Instead, dunk it into the "Rinse" bucket and scrub it against the grit guard to dislodge all the collected dirt and contaminants. You will see the rinse water become progressively dirtier.
- Reload and Continue: Once the mitt is clean, you can safely reload it with fresh suds from the "Wash" bucket and move to the next panel. Continue this systematic process until the entire vehicle is clean, replacing the rinse water if it becomes excessively murky.
Key Insight: The two-bucket method is a physical system that forces a safe washing habit. By creating a dedicated step for cleaning your wash media, you eliminate the single greatest cause of wash-induced damage and ensure your contact wash is as safe as it is effective.
3. Clay Bar Treatment
After a thorough wash, your vehicle’s paint may feel clean, but it is likely still harboring embedded contaminants that a regular wash cannot remove. The clay bar treatment is a critical decontamination step in any serious auto detailing checklist, designed to mechanically pull these bonded particles from the clear coat. This process uses a specialized polymer clay compound to safely extract impurities like industrial fallout, brake dust, tree sap, and road tar, leaving the surface perfectly smooth.
Running your hand over a "clean" but un-clayed surface often reveals a gritty, sandpaper-like texture. These are the contaminants that block wax, sealants, or ceramic coatings from properly bonding to the paint. A clay bar treatment removes this barrier, creating an ultra-smooth foundation that is essential for achieving a high-gloss shine and ensuring long-lasting protection. This is the secret step that separates a standard car wash from true, professional-level detailing.
How to Implement a Proper Clay Bar Treatment
Executing a clay bar treatment requires attention to detail and a gentle touch, but it's a straightforward process when done correctly. The key is lubrication and methodical work.
- Prepare the Surface: The vehicle must be completely washed and dried before you begin. Never use a clay bar on a dirty car, as you will just drag large abrasive particles across the paint.
- Work in Small Sections: Divide the car's panels into small, manageable 2x2 foot sections. This ensures your lubricant doesn't dry out and allows you to focus your efforts.
- Lubricate Generously: Spray a generous amount of a dedicated clay lubricant or a quick detailer spray onto your first small section. The surface should be very wet; there is no such thing as too much lubricant here.
- Glide the Clay: Take a small piece of your clay bar and flatten it into a palm-sized patty. Gently glide the clay back and forth over the lubricated section with light pressure. You will feel and hear the clay picking up contaminants. Continue until the clay glides smoothly and quietly, which indicates the area is decontaminated.
- Inspect and Knead: After each section, inspect the clay bar. You will see the contaminants embedded in it. Fold the clay patty in on itself and knead it until a clean surface is exposed. This prevents you from rubbing the collected grit back onto the paint. If you accidentally drop the clay on the ground, discard it immediately, as it will be full of abrasive particles that will severely scratch your paint.
- Final Wipe and Next Step: Wipe the lubricant residue off the completed section with a clean microfiber towel. Proceed to the next section, repeating the process until the entire vehicle is done. The car is now ready for polishing or the direct application of a wax or sealant. For a complete walkthrough, you can learn more about how to use a clay bar from this step-by-step guide.
Key Insight: The clay bar process is not about scrubbing or applying pressure. It’s about letting a lubricated clay bar glide over the surface to "grab" contaminants. Proper lubrication is the most critical element for a safe and effective treatment, preventing marring and ensuring a flawless finish.
4. Paint Correction and Polishing
Paint correction is the transformative process of meticulously removing imperfections from a vehicle's clear coat. This is where the true art of detailing shines, as it addresses issues like swirl marks, light scratches, oxidation, and water spots that dull the paint's appearance. By using a machine polisher with various compounds and polishes, a detailer systematically levels the paint surface, restoring its clarity, depth, and gloss.
This is not a mere cleaning step; it's a restoration process. The goal is to create a perfectly smooth, mirror-like surface that reflects light uniformly, revealing the true color and beauty of the paint. A properly corrected finish is the ultimate foundation for applying high-quality waxes, sealants, or ceramic coatings, ensuring they bond correctly and provide maximum protection and aesthetic appeal.
How to Implement Paint Correction
Executing paint correction requires patience, a keen eye, and the right combination of tools and products. It’s a multi-stage procedure that should never be rushed, as it involves removing a microscopic layer of the clear coat.
The following infographic illustrates the fundamental workflow for a successful paint correction process.
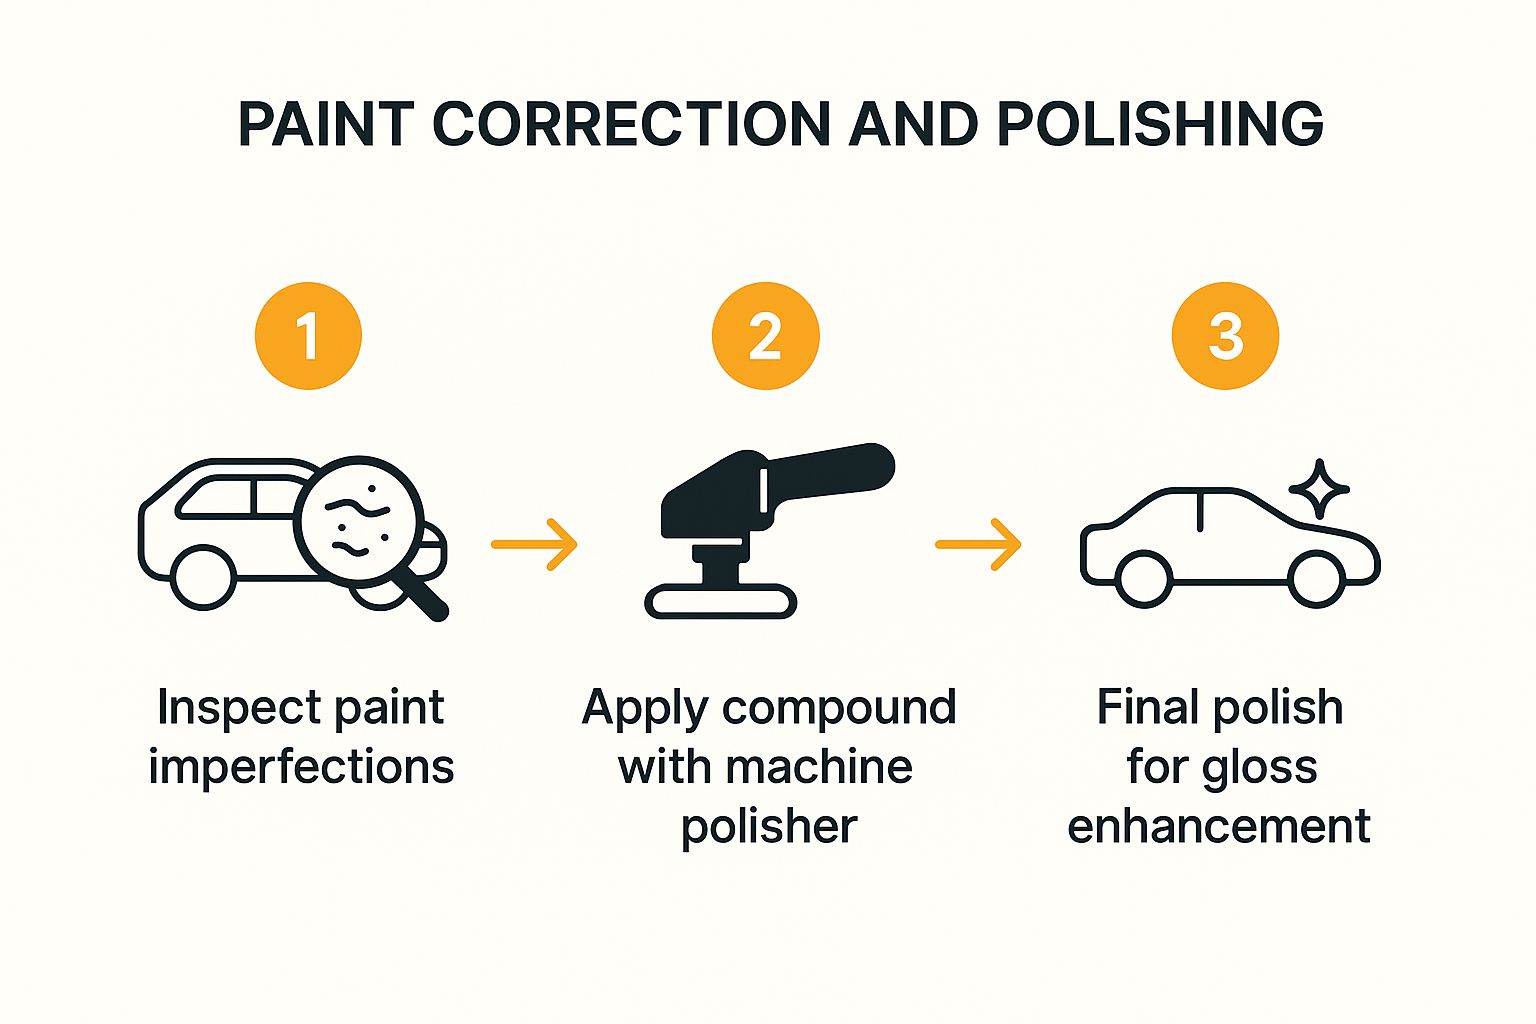
This process flow emphasizes a systematic approach, starting with a thorough assessment before moving from more aggressive correction to fine polishing.
- Inspection and Preparation: After a thorough wash and decontamination, inspect the paint under strong, direct lighting to identify all defects. Mask off sensitive areas like plastic trim, rubber seals, and emblems with painter's tape to prevent accidental damage.
- Test Spot: Always begin with a test spot in an inconspicuous area. Start with your least aggressive combination (a finishing polish and a soft pad) and check the results. If imperfections remain, step up to a more aggressive pad or compound until you achieve the desired level of correction.
- Compounding (The Cutting Step): Using a machine polisher, apply a cutting compound to a small, manageable section (e.g., 2' x 2'). Work the product in a cross-hatch pattern with slow, overlapping passes until the compound becomes clear. This step removes the deeper scratches and swirls.
- Polishing (The Finishing Step): After compounding, the surface may have a slight haze from the aggressive abrasives. Switch to a finer polish and a softer finishing pad. Repeat the process to refine the surface, removing any hazing and dramatically enhancing the gloss and clarity.
- Final Wipe-Down: After polishing each section, wipe the area with a panel prep spray or isopropyl alcohol solution to remove any leftover polishing oils. This reveals the true state of the finish and prepares it for a protective layer.
Key Insight: Paint correction is a game of precision and patience. The "less is more" principle is paramount. Always start with the mildest approach possible to preserve the vehicle's clear coat, only escalating the aggressiveness of your products as needed to remove the specific defects you're targeting.
5. Interior Deep Cleaning
While a pristine exterior turns heads, the interior deep clean is what transforms the driving experience from merely functional to genuinely luxurious and comfortable. This step in the auto detailing checklist goes far beyond a simple wipe-down and vacuum. It involves a systematic and comprehensive cleaning of every surface inside the cabin, from the headliner down to the carpet fibers, using specialized products and techniques to sanitize, restore, and protect. Neglecting the interior is like owning a beautiful house with a messy interior; the full value and enjoyment can never be realized.
The goal of interior deep cleaning is to remove embedded dirt, stubborn stains, allergens, and odors that a surface-level clean leaves behind. This process is essential for maintaining the value of the vehicle, improving air quality, and creating a pleasant environment for both driver and passengers. Whether it's a family vehicle after a long road trip or a ride-share car needing a refresh, a proper interior detail makes the cabin feel new again.
How to Implement a Proper Interior Deep Clean
A successful interior detail requires patience, the right tools, and a methodical approach to ensure no area is overlooked. This process tackles different materials, from leather and fabric to plastic and vinyl.
- De-Clutter and Initial Vacuum: Begin by removing all floor mats and personal items. Then, perform a thorough initial vacuum of the entire interior, including seats, carpets, and crevices. Use crevice tools and detailing brushes to dislodge dirt from seams and tight areas.
- Clean Soft Surfaces: Address fabric seats and carpets using a dedicated fabric or carpet cleaner and a stiff brush to agitate the fibers. For deep stains, a hot water extractor is highly effective. For leather, use a pH-balanced leather cleaner applied with a soft-bristled brush, then wipe clean with a microfiber towel before conditioning.
- Wipe Down Hard Surfaces: Use an all-purpose cleaner (APC) or a dedicated interior cleaner for the dashboard, door panels, center console, and plastic trim. Spray the cleaner onto a microfiber towel, not directly onto the surface, to prevent overspray on electronics. Use detailing brushes to clean air vents, switchgear, and panel gaps.
- Clean Glass and Apply Protectant: Clean the inside of all windows with an ammonia-free glass cleaner for a streak-free finish. Finally, apply a UV protectant, like those from 303 Aerospace Protectant, to all plastic, vinyl, and rubber surfaces to prevent fading and cracking. For those looking for more expert advice, you can learn more about professional car interior cleaning tips on swiftjetusa.com.
Key Insight: The "top-to-bottom" rule is critical for interior detailing. Start with the headliner, then move to the dash and doors, then the seats, and finally the carpets. This ensures that any dislodged dust and debris fall onto uncleaned areas, preventing you from having to re-clean surfaces.
6. Wheel and Tire Detailing
Often cited as the dirtiest part of any vehicle, the wheels and tires demand a specialized approach in any comprehensive auto detailing checklist. This step involves the deep cleaning, decontamination, and protection of wheels, tires, wheel wells, and brake components using dedicated products. These areas face a constant barrage of corrosive brake dust, road tar, iron particles, and grime, which can permanently damage wheel finishes if not properly addressed.
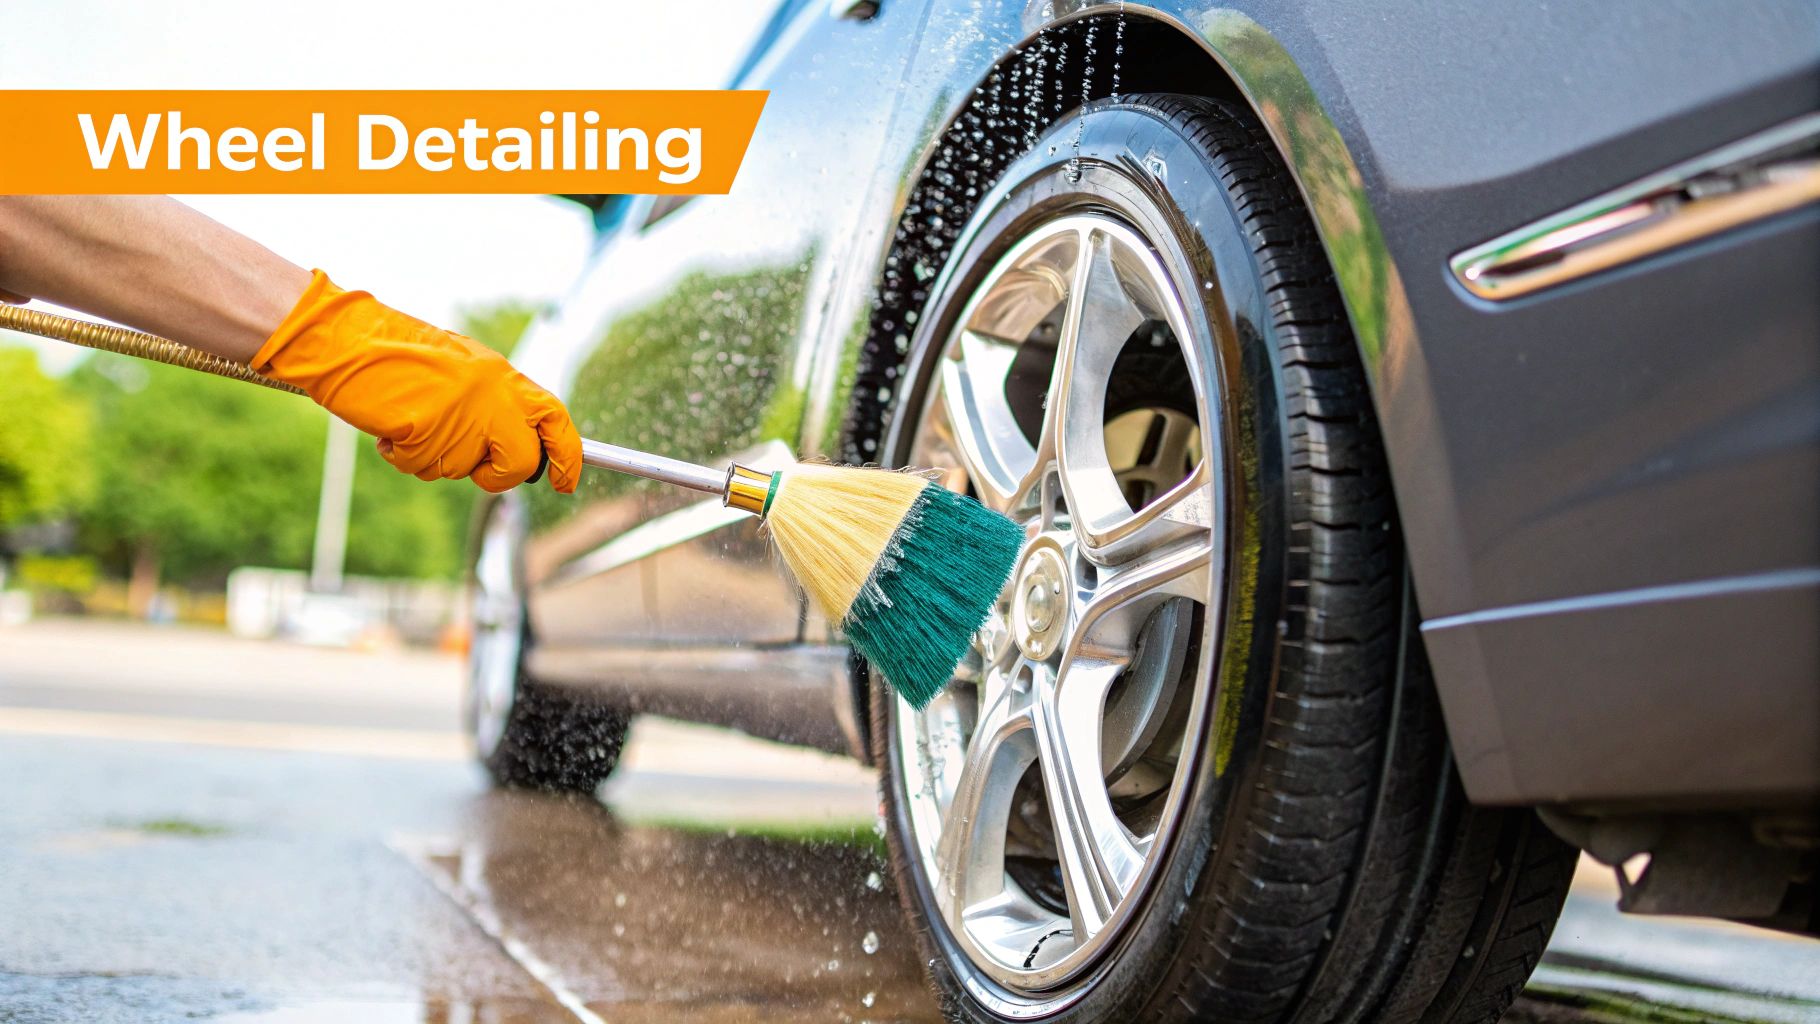
Standard car wash soap is simply not strong enough to break down the uniquely stubborn contaminants found here. The goal of dedicated wheel and tire detailing is to restore these components to a like-new condition and apply protection to make future cleaning easier. This is essential for performance car enthusiasts maintaining expensive custom wheels and luxury vehicle owners looking to protect delicate OEM finishes.
How to Implement Proper Wheel and Tire Detailing
A systematic, multi-step process using the right chemicals and tools is key to achieving professional results without causing damage. It is critical to work on one wheel at a time from start to finish.
- Rinse and Cool: Start by thoroughly rinsing the wheel, tire, and wheel well with a pressure washer or strong jet of water. Crucially, ensure the wheels are cool to the touch before applying any chemicals, as heat can cause cleaners to evaporate too quickly and stain the surface.
- Apply Dedicated Cleaners: Spray a dedicated, non-acidic wheel cleaner onto the wheel face, barrel, and brake calipers. Immediately follow with a tire cleaner on the rubber sidewalls. You may see the wheel cleaner turn purple as it reacts with and dissolves embedded iron particles from brake dust.
- Agitate All Surfaces: Use a variety of dedicated brushes that are separate from your paint-washing tools. A soft-bristled face brush for the spokes, a long barrel brush for behind the spokes, and a stiff-bristled tire brush are essential. Scrub all surfaces, including the tire sidewalls, to remove browning and old dressings.
- Rinse and Dry: Rinse the entire assembly thoroughly, ensuring all chemical residue is washed away. Dry the wheels with a dedicated microfiber towel to prevent water spots.
- Protect and Dress: Apply a layer of wheel sealant or ceramic coating to the clean, dry wheels to protect against future contamination. Finish by applying a thin, even layer of your preferred tire dressing to the tire sidewalls for a rich, dark finish.
Key Insight: The cardinal rule of wheel cleaning is to use a separate set of buckets, mitts, and brushes. Cross-contaminating your paint wash tools with the heavy grit and metallic fallout from wheels is one of the fastest ways to inflict deep scratches on your vehicle's clear coat.
7. Paint Protection Application
After all the intensive cleaning, decontamination, and polishing, the paint protection application is the final, crucial step in any comprehensive auto detailing checklist. This is where you seal in your hard work, creating a durable, hydrophobic, and high-gloss barrier that shields the paint from the harsh environment. Applying a protective layer like a wax, sealant, or ceramic coating preserves the corrected finish and enhances its depth, clarity, and shine.
The primary function of this step is to protect the vehicle's clear coat from UV radiation, acid rain, bird droppings, road salt, and other contaminants that can etch, fade, or stain the surface. Neglecting this stage leaves your perfected paint vulnerable, meaning its pristine condition will quickly degrade. Moreover, these coatings make future washing significantly easier, as their slick surfaces prevent dirt from bonding as strongly.
How to Implement Proper Paint Protection
The method of application varies depending on the product chosen, from traditional carnauba waxes to advanced ceramic coatings. However, the core principles of a meticulous, patient application remain universal for achieving professional results.
- Choose Your Protection: First, select the right product for your needs. Natural carnauba waxes (like those from Mothers Polish) offer incredible depth and warmth, ideal for classic cars. Synthetic paint sealants (popularized by Chemical Guys and Meguiar's) provide longer-lasting durability, perfect for daily drivers. For the ultimate in longevity and chemical resistance, ceramic coatings (from brands like Gtechniq and CarPro) are the top choice.
- Prepare the Surface: Ensure the paint is completely clean, dry, and cool to the touch. It's best to work in a garage or shaded area, as direct sunlight can cause products to cure too quickly, leading to streaking and high spots.
- Apply a Thin, Even Coat: Using a clean foam or microfiber applicator pad, apply the product in a very thin, even layer. Work on one small section at a time, such as half a hood or a single door panel. Over-application is a common mistake that makes removal difficult and wastes product without adding more protection.
- Follow Cure and Buff-Off Times: Adhere strictly to the manufacturer's instructions for dwell time (how long it sits) and cure time. After the specified time, gently buff away the residue with a clean, plush microfiber towel to reveal a brilliant shine. For coatings, this curing process can take 12-24 hours, during which the vehicle should be kept dry. To dive deeper into the nuances of shielding your vehicle's finish, you can learn more about how to protect car paint on swiftjetusa.com.
Key Insight: The mantra for applying any paint protection is "less is more." A thin, uniform coat provides all the necessary protection and shine. Applying a thick layer will not improve performance; it will only make the buffing process more difficult and can result in an uneven, hazy finish.
7-Step Auto Detailing Process Comparison
| Item | Implementation Complexity 🔄 | Resource Requirements ⚡ | Expected Outcomes 📊 | Ideal Use Cases 💡 | Key Advantages ⭐ |
|---|---|---|---|---|---|
| Pre-Wash and Rinse | Low - Basic rinsing, some equipment needed | Moderate - Pressure washer or high-pressure hose | Removes loose dirt, reduces paint scratches | Initial cleaning step before washing; any vehicle prep | Minimizes paint scratches; saves time in main wash |
| Two-Bucket Wash Method | Moderate - Requires disciplined multi-step wash | Moderate - Two buckets, grit guards, mitts | Reduces paint swirl marks; maintains clean wash water | Scratch-free washing for enthusiasts, professionals | Prevents paint damage; professional-grade finish |
| Clay Bar Treatment | Moderate to High - Requires specific technique | Moderate - Clay bar, lubricant | Removes embedded contaminants; smooth paint surface | Surface prep for waxing/polishing; heavy contamination | Removes contaminants washing can't; tactile result |
| Paint Correction and Polishing | High - Multi-step, machine use required | High - Polishers, pads, compounds | Restores paint clarity; removes scratches and swirls | High-end detailing; restoring damaged or aged paint | Dramatic paint improvement; long-lasting gloss |
| Interior Deep Cleaning | Moderate to High - Material-specific, time consuming | Moderate to High - Multiple specialized products | Deep sanitization, stain removal, odor elimination | Interior restoration; hygiene-focused services | Enhances comfort; extends interior lifespan |
| Wheel and Tire Detailing | Moderate - Specialized cleaning and caution | Moderate - pH balanced cleaners, brushes | Protects wheels; removes brake dust and road grime | Maintaining wheels on performance or luxury vehicles | Prevents staining; prolongs wheel life |
| Paint Protection Application | Moderate - Requires prep and careful application | Moderate - Various coatings and tools | Protects paint; enhances gloss and hydrophobic effect | Final protective step; new or freshly detailed vehicles | Long-lasting protection; easier future maintenance |
Bringing It All Together for a Lasting Shine
You've journeyed through the comprehensive world of professional-grade car care, and now you possess the ultimate auto detailing checklist. This isn't just a list of chores; it's a strategic roadmap to transforming your vehicle from a daily driver into a gleaming masterpiece. By following these steps, you're not just cleaning your car, you're actively preserving its value, protecting it from environmental damage, and rekindling that "new car" feeling every single time you grab the keys. The process, while detailed, is a rewarding investment in your vehicle's longevity and your own satisfaction.
The true power of this checklist lies in its systematic approach. Each phase builds upon the last, creating a synergy that produces results far superior to a simple wash. Skipping the pre-wash means grinding dirt into your clear coat. Neglecting the clay bar leaves contaminants embedded in the paint, hindering polish and wax adhesion. Every single step, from the two-bucket wash to the final layer of sealant, is a critical link in the chain of a perfect detail.
From Checklist to Habit: The Path to Mastery
The key to unlocking lasting results is consistency. A single, exhaustive detail is fantastic, but turning this checklist into a regular maintenance routine is where the magic truly happens. You don't need to perform every single step with every wash. Think of it as a tiered system.
- Weekly/Bi-Weekly Maintenance: Focus on the core cleaning tasks. A proper pre-wash, the two-bucket method, and a thorough interior vacuum and wipe-down will keep your car in excellent shape and make deeper cleaning sessions much easier.
- Quarterly Refresh: This is where you bring in the more intensive steps. Perform a clay bar treatment to remove bonded contaminants that have built up over the months. This is also a great time to re-apply a fresh coat of wax or sealant to bolster your vehicle's defenses.
- Annual Restoration: Once or twice a year, depending on your vehicle's condition and exposure, it's time for the full process. This includes paint correction and polishing to remove swirls and restore that deep, wet-look shine before locking it all in with your chosen paint protection.
By adopting this schedule, you transform an overwhelming task into manageable, satisfying work. You'll spend less time correcting major issues and more time enjoying a vehicle that consistently looks its best.
The Real Value of a Meticulous Detail
Following this auto detailing checklist is about more than just aesthetics. It’s an act of preservation. Each layer of wax or ceramic coating you apply is a sacrificial barrier, taking the brunt of UV rays, bird droppings, and acid rain that would otherwise etch into your clear coat. A clean interior prevents the breakdown of leather, vinyl, and plastics, preserving the cabin's integrity and comfort.
Key Takeaway: A detailed car is a protected car. The time you invest now pays dividends by preventing costly paint repairs, reducing long-term wear and tear, and significantly boosting your vehicle's resale value when it's time to sell or trade-in.
Embrace the process. Put on some music, lay out your tools, and take pride in the methodical transformation of your vehicle. The satisfaction of stepping back to admire the mirror-like reflections and flawless finish you achieved with your own hands is a reward in itself. You now have the knowledge and the plan to achieve professional-level results every time.
Ready to elevate your car wash routine and make the pre-wash and wash steps faster and more effective? The SwiftJet Car Wash Foam Gun connects directly to your garden hose to produce the thick, dirt-lifting foam essential for a safe, scratch-free wash. See how the SwiftJet can perfect the most crucial part of your auto detailing checklist and deliver a better, safer clean.